|
|

This chapter tells you how to use the Cisco 6200 Manager to configure a Cisco 6200 DSLAM. This chapter includes the following sections:
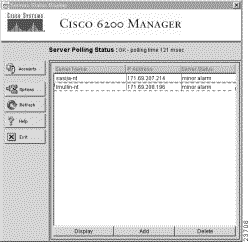
Two Cisco 6200 Manager windows are central to the task of adding, deleting, or accessing a Cisco 6200 element: the Server Polling Status window and the Element Status Display window.
After you log in to the Cisco 6200 Manager, the Server Polling Status window is displayed (Figure 4-1). From this window, you can set server options, add and delete servers, and display the DSLAMs associated with a server process application. You can also monitor server status in this window; for more information, see "Monitoring and Testing."
On the left side of the window are the Application Support buttons.The Options button is described below. For more information about the other buttons, refer to "Managing the Manager."
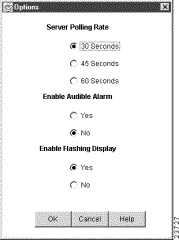
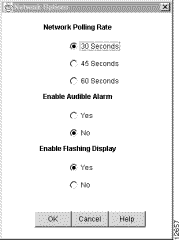
You can set three options from the Server Options window: the server polling rate (how often the server software polls the Cisco 6200 DSLAM), an audible alarm, and a flashing display that indicates the presence of a new alarm in the system. These settings affect how the local server process application displays or updates information received from the Cisco 6200 DSLAM.
The flashing display is enabled by default, the audible alarm is turned off by default. The default for the network polling rate interval is 30 seconds; this option is set globally. Consider increasing the polling rate interval if you need to reduce the amount of network traffic.
To set network options, follow these steps:
The Server Options window is displayed (see Figure 4-2).
Step 2 Change one or more of the items as follows:
Note The audible alarm and flashing display continue to beep and flash until you open the component display. They stop at that point unless there is a new alarm in the system.
Step 3 Click OK to set new options or click Cancel to cancel the operation and return to the Server Polling Status window.
Table 4-1 describes the buttons found at the bottom of the Server Polling Status window (Figure 4-1).
Table 4-1 Server Polling Status Window Buttons
Before you can perform any configuration or monitoring tasks, you must specify the name or IP address of the Cisco 6200 Manager server process to which the Cisco 6200 DSLAMs are connected. To do this, follow these steps:
The Add New Server window is displayed (Figure 4-3).
Step 2 Enter the host name or IP address of the PC that is running the server process.
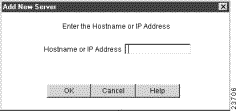
Step 3 Click OK.
The new server process appears in the Server Polling Status window. Click twice on the server name to access the Cisco 6200 DSLAMs associated with that server.
Note To restore a server after it has been deleted from the Server Polling Status window, you must reinstall the default password at the PC where that server process is running. To reinstall the default password, refer to the section "Custom Installation" in "Getting Started."
If an installation of the server process application is no longer in use or you no longer want to access it, you can remove it by following these steps:
Step 2 Click Delete.
A Query window is displayed. You are asked if want to proceed with the removal of the server.
Step 3 Click Yes to remove the server, or click No to cancel the operation.
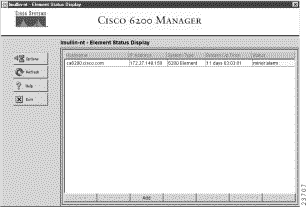
To display the contents of the server, double click on a server name in the Server Polling Status window (Figure 4-1). The Element Status Display window appears (Figure 4-4).
To display the Element Status Display window (Figure 4-4), click twice on a server process in the Server Polling Status window. From the Element Status Display window, you can set network options, monitor DSLAMs (described in "Monitoring and Testing"), add and delete DSLAMs, and access the window for configuring and monitoring Cisco 6200 components.
On the left side of the window are the Application Support buttons. The Options button is described below. For information on the other buttons, refer to "Managing the Manager."
You can set three options from the Server Options window: the server polling rate (how often the client software polls the server software), an audible alarm, and a flashing display that indicates the presence of a new alarm in the system. These settings affect how the local copy of the GUI client displays or updates information received from the server processes.
The audible alarm and flashing display are enabled by default. The default for the network polling rate is 30 seconds; this option is set globally. Consider increasing the polling rate interval if you need to reduce the amount of network traffic.
To set network options, follow these steps:
The Network Options window is displayed (see Figure 4-5).
Step 2 Change one or more of the items as follows:
The audible alarm and flashing display continue to beep and flash until you open the component display. They stop at that point unless there is a new alarm in the system.
Step 3 Click OK to set new options, or click Cancel to cancel the operation and return to the Element Status Display window.
Table 4-2 describes the buttons found at the bottom of the Element Status Display window (Figure 4-4). You can use these buttons to monitor and configure DSLAMs.
Table 4-2 Buttons for Managing Elements in the Element Status Display Window
| This Button... | Is Used to... |
|---|---|
Monitor the selected element, test a subscriber line, and provision subscribers |
|
Change the SNMP community string assigned to the selected element |
|
The Element Status Display window buttons are described in greater detail below.
To monitor an element or provision subscribers, click on the Display button in the Element Status Display window to access the Component Status Display window. The procedure for provisioning subscribers is described below in the section "Provisioning Subscribers." For information on monitoring and testing, refer to "Monitoring and Testing."
To provision cards, click on the Provision button in the Element Status Display window to access the Provisioning window. The procedure for provisioning cards is described below in the section "Provisioning Cards."
Before you can perform any configuration or monitoring tasks, you must add elements by specifying the names and community strings of the Cisco 6200 DSLAMs that you want the Cisco 6200 Manager to access. To do this, follow these steps:
The Add New Element window is displayed.
Step 2 Enter a host name or IP address and a community string.
Note Host name, IP address, and community string are listed in the running configuration of each Cisco 6200 DSLAM. If the Cisco 6200 DSLAM does not have a community string with read and write permission, you will need to assign one through the Cisco 6200 DSLAM CLI. For more information, refer to the Cisco 6200 User Guide.
Step 3 Click OK.
The new element appears in the Element Status Display window. That window lists managed elements and the name, IP address, system type, system up time, and status of each element.
For information about the status of each element, refer to "Monitoring and Testing."
If a Cisco 6200 DSLAM is no longer in use or you no longer want to access it through the Cisco 6200, you can remove it by following these steps:
Step 2 Click Delete.
A Query window is displayed. You are asked if you want to proceed with the removal of the element.
Step 3 Click Yes to remove the element, or click No to cancel the operation.
To change an existing SNMP community string, click on the Change button in the Element Status Display window (Figure 4-4) to display the Change Community String window. You can enter a new community string name in this window.
If the Cisco 6200 DSLAM does not have a read/write community string, you need to add one by using the IOS CLI. For more information, refer to the Cisco 6200 User Guide.
Configuration changes made with the Cisco 6200 Manager are implemented by default in a Cisco 6200 DSLAM's volatile memory. After you make configuration changes in the Element Status Display window, you can save or reject those changes.
In most cases, you will want to save your configuration settings to nonvolatile memory (NVRAM). Typically, when a Cisco 6200 DSLAM is rebooted, it reads its configuration information from NVRAM.
| Caution If you do not save the information to NVRAM, the information is lost when the Cisco 6200 DSLAM is rebooted. |
To save your configuration settings, follow these steps:
Step 2 Click Save Config.
A Query window is displayed. You are asked if want to save the configuration.
Step 3 Click Yes to save the configuration of the element, or click No to cancel the operation.
If you have not saved your configuration, you can restore the configuration values by clicking Reset.
Once you have saved the configuration, you cannot reset it. However, you can use the CLI copy command to write an old configuration file over the current configuration. For more information, refer to the Cisco 6200 User Guide.
| Caution Resetting an element affects all subscribers connected to the chassis. |
To reset the configuration settings of an element, follow these steps:
Step 2 Click Reset.
Step 3 Click Yes to reset the element or No to cancel the operation.
You can use the Cisco 6200 Manager to provision cards. When you provision an NTC or SLC, you reserve resources for it on the management processor card (MPC). The card itself does not have to be present for you to provision it. You should consider provisioning a card if you want to perform configuration tasks—such as setting up line rates and subscriber information—ahead of time.
To provision a new card or change a provisioned card to a different type, follow these steps:
Step 2 Click a slot or specify a slot number by selecting it from the Slot Number list at the bottom of the Provisioning window.
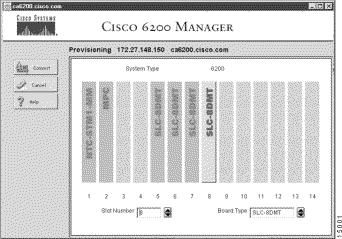
Step 3 Choose a board type from the Board Type list at the bottom of the window. Your options for board type are limited to those board types supported by the slot you selected:
Step 4 Click Commit in the upper left portion of the Provisioning window.
A warning window is displayed. It tells you that your changes will be written to volatile memory only.
Step 5 Click Yes to accept the changes, or click No to cancel the operation and close the warning window.
The changes you make to your configuration settings take effect immediately, but they are not saved permanently until you click the Save Config button.
Subscriber provisioning involves configuring ports on an SLC. The Cisco 6200 Manager allows you to enable ports, assign subscriber names, and set subscriber line rates. You can also delete a subscriber.
The following sections provide the steps for these tasks.
Individual ports are configured from the Subscriber Provisioning window. To access this window, do the following:
The Component Status Display window is displayed.
Step 2 Click the Subscriber Provisioning button on the left side of the window to display the Subscriber Provisioning window (Figure 4-7).
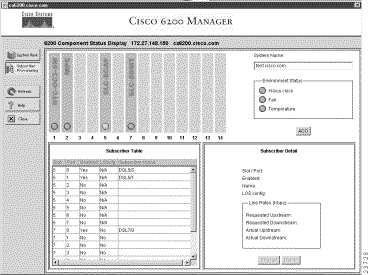
The Subscriber Table pane and the Subscriber Detail pane are displayed at the bottom of the Subscriber Provisioning window. You use these panes to configure individual ports.
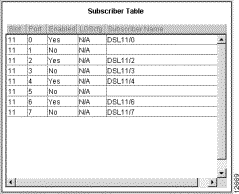
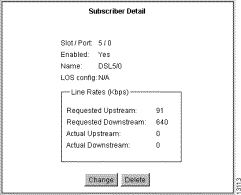
To configure a port, you select a subscriber from the Subscriber Table pane (Figure 4-8). This brings up the Subscriber Detail pane (Figure 4-9), which lists the current configuration for a subscriber and allows you to change that configuration.
When you click the Change button in the Subscriber Detail pane, the Subscriber Detail Entry Form displays (Figure 4-10). In this window, you can set the following:
Note Disabling a port is not the same as deleting a subscriber. When you disable a port, the subscriber name field, the bit rate fields, and all other fields are unchanged. Typically, you disable a port if you want to temporarily disable the service for that port.
When you configure a rate, the rate is used as a "not to exceed" number. If the line quality does not support the requested rate, the actual rate you get may be lower than the requested one.
If the upstream rate is 272, 544, or 816 kbps, the hardware does not accept the top four downstream rates (2688, 4480, 6272, and 7168 kbps).
Use the following procedure to configure a port:
When you select a row in the Subscriber Table pane, the Subscriber Detail pane displays information specific to the row you selected.
Step 2 Click Change in the Subscriber Detail pane.
The Subscriber Detail Entry Form window is displayed (see Figure 4-10).
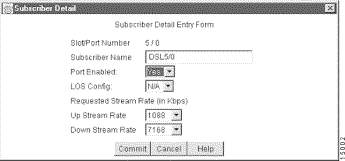
Step 3 In the Subscriber Name field, enter the name or alias assigned to the selected subscriber (length restricted to 24 characters). Press Return.
Step 4 In the LOS Config field, choose Yes to enable LOS Config alarms. This option applies only to DMT cards.
Step 5 In the Port Enabled field, choose Yes to enable a port or No to disable a port.
Step 6 In the Requested Stream Rate field, specify the upstream rate and downstream rate appropriate for the subscriber.
Step 7 Click Commit to save the changes or Cancel to cancel the operation.
When you click Commit, the changes are saved in active memory. To save them permanently in nonvolatile memory, click Save Config.
| Caution If you do not save your changes to nonvolatile memory, your changes will be lost when the system is restarted. |
When you delete a subscriber, the Subscriber Name field in the Subscriber table is cleared, making it easy to identify a port that is not in use. In addition, when you delete a subscriber name, the upstream and downstream bit rate options are returned to their default values.
To delete a subscriber, follow these steps:
When you select a row in the Subscriber Table pane, the Subscriber Detail pane displays information specific to the row you selected.
Step 2 Click the Delete button in the Subscriber Detail pane.
Step 3 A warning message asks you to confirm the deletion. Click Confirm.
A few seconds after you delete the subscriber name, the name is cleared from the Subscriber table.
![]()
![]()
![]()
![]()
![]()
![]()
![]()
![]()
Posted: Thu Feb 6 21:48:37 PST 2003
All contents are Copyright © 1992--2002 Cisco Systems, Inc. All rights reserved.
Important Notices and Privacy Statement.