|
|

This chapter describes the Cisco NI-2 IP Services on all DSLAMs using the second-generation network interface module (NI-2) card. It includes the following sections:
The ATM route-bridged encapsulation feature on a DSLAM is used to route IP over bridged RFC 1483 Ethernet traffic from a stub-bridged LAN.
Bridged IP packets received on an ATM interface configured in route-bridged mode are routed by means of the IP header. Such interfaces take advantage of the characteristics of a stub LAN topology commonly used for digital subscriber line (DSL) access and offer performance and flexibility superior to those offered by integrated routing and bridging (IRB).
ATM route-bridged encapsulation reduces the security risk associated with normal bridging or IRB by reducing the size of the nonsecured network. By using a single virtual circuit (VC) allocated to a subnet (which could be as small as a single IP address), ATM route-bridged encapsulation limits the "trust environment" to a single customer premises that uses IP addresses in the subnet.
ATM route-bridged encapsulation does not support MAC-layer access lists. Only IP access lists are supported.
Perform the following tasks to configure ATM route-bridged encapsulation on your DSLAM:
| Command | Purpose | |
|---|---|---|
Step 1 | DSLAM(config)# interface atm slot/port
| Specify an ATM interface. |
Step 2 | DSLAM(config-if)# pvc VPI/VCI
| Configure a virtual channel to carry the route-bridged traffic. |
Step 3 | DSLAM(config-if)# atm route-bridge ip
| Enable ATM route-bridged encapsulation for IP. |
Step 4 | DSLAM(config-if)# ip address ip-address mask
[secondary]
| Provide an IP address on the same subnetwork as the remote network. |
Step 5 | DSLAM(config-if)# ^Z
| Exit to EXEC mode. |
Only the specified network layer (IP) is routed. Any remaining protocols can be passed on to bridging or other protocols. In this manner, ATM route-bridged encapsulation can be used to route IP while other protocols (such as IPX) are bridged normally.
This section provides the following configuration examples:
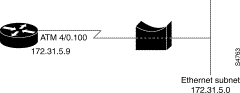
The following example shows a typical ATM route-bridged encapsulation configuration (172.69.5.9 is the address of the ethernet 0/0 interface):
DSLAM(config)# interface atm 1/1

DSLAM(config-if)# ip address 172.69.5.9 255.255.255.0

DSLAM(config-if)# pvc 0/32

DSLAM(config-if)# atm route-bridged ip
The following ATM route-bridged encapsulation example uses a static route to point to an unnumbered interface:
DSLAM(config)# interface atm 1/1

DSLAM(config-if)# ip unnumbered ethernet 0/0

DSLAM(config-if)# pvc 0/32

DSLAM(config-if)# atm route-bridged ip


DSLAM(config-if)# ip route 172.69.5.9 255.255.255.0 interface atm 1/1
The following example shows concurrent use of ATM route-bridged encapsulation with normal bridging. IP datagrams are route-bridged, and other protocols (such as IPX or AppleTalk) are bridged.
DSLAM(config)# radius 1 protocol ieee

DSLAM(config)# interface atm 1/1

DSLAM(config-if)# ip address 172.69.5.9 255.255.255.0

DSLAM(config-if)# pvc 0/32

DSLAM(config-if-atm-vc)# bridge-group 1

DSLAM(config-if-atm-vc)# atm route-bridged ip
Defined by RFC 2661, Layer 2 Tunnel Protocol (L2TP) is an emerging Internet Engineering Task Force (IETF) standard that combines the best features of two existing tunneling protocols: Cisco's Layer 2 Forwarding (L2F) and Microsoft's Point-to-Point Tunneling Protocol (PPTP). For a description of L2TP and a summary of its benefits, restrictions, and configuration information, see the Cisco IOS Release 12.0(1) T Layer 2 Tunnel Protocol feature module and the "Configuring Virtual Private Networks" chapter of the Cisco IOS Dial Services Configuration Guide: Network Services, Release 12.1.
The "Configuring VPDN on the LAC" section discusses configuring L2TP.
The L2TP access concentrator (LAC) is typically (although not always) located at the service provider POP. Initial configuration and ongoing management is done by the service provider. Enter the following commands to enable VPDN on a LAC by using L2TP, beginning in global configuration mode:
The following example configures VPDN on the LAC. The vpdn-group 1 initiates the outgoing L2TP sessions to the LNS. The domain is cisco.com. The IP address of the LNS is 172.16.0.2. The vpdn-group pppoe accepts the incoming PPPoE session on atm 1/1. The PPPoA session is on atm 1/2.
DSLAM(config)# vpdn enable

DSLAM(config)# vpdn-group 1

DSLAM(config-vpdn)# request-dialin

DSLAM(config-vpdn-req-in)# protocol l2tp

DSLAM(config-vpdn-req-in)# domain cisco.com

DSLAM(config-vpdn-req-in)# initiate-to ip 172.16.0.2

DSLAM(config-vpdn-req-in)# local name r1-1

DSLAM(config-vpdn-req-in)# exit

DSLAM(config-vpdn)# exit

!
DSLAM(config)# vpdn-group pppoe

DSLAM(config-vpdn)# accept-dialin

DSLAM(config-vpdn-acc-in)# protocol pppoe

DSLAM(config-vpdn)# virtual-template 1

	!
DSLAM(config-vpdn)# interface virtual-template 1

DSLAM(config-if)# ppp authentication chap

DSLAM(config-if)# no peer default ip address

!

DSLAM(config-if)# interface atm 1/1

DSLAM(config-if)# pvc 1/1

DSLAM(config-if)# encapsulation aal5snap

DSLAM(config-if)# protocol pppoe


DSLAM(config-if)# interface atm1/2 			-> configuration for PPPoA session
DSLAM(config-if)# pvc 1/1

DSLAM(config-if)# encapsulation aal5mux ppp virtual-template 1
To troubleshoot VPDN and L2TP, enter the privileged EXEC command show vpdn tunnel all, which contains information for these L2TP scalability enhancements. These fields are described in Table 7-1.
DSLAM# show vpdn tunnel all


 L2TP Tunnel Information (Total tunnels=1 sessions=500)

 Tunnel id 20 is up, remote id is 12, 500 active sessions
   Tunnel state is established, time since change 00:00:33
   Remote tunnel name is LAC
     Internet Address 10.1.1.1, port 1701
   Local tunnel name is LNS
     Internet Address 10.1.1.2, port 1701
   971 packets sent, 1259 received, 19892 bytes sent, 37787 received
   Control Ns 501, Nr 746
   Local RWS 3000 (default), Remote RWS 3000 (max)
   Retransmission time 4, max 8 seconds
   Unsent queuesize 0, max 0
   Resend queuesize 251, max 261
   Total resends 390, ZLB ACKs 251
   Current nosession queue check 0 of 5
   Retransmit time distribution: 0 0 0 0 1 0 0 0 1
   Sessions disconnected due to lack of resources 0
Table 7-2 describes privileged EXEC commands that help you monitor and maintain VPDNs that use L2TP tunnels.
Troubleshooting components in VPDN is not always straightforward because there are multiple technologies and OSI layers involved. Table 7-3 describes EXEC commands that help you isolate and identify problems on VPDNs that use L2TP tunnels.
The Dynamic Host Control Protocol (DHCP) enables you to automatically assign reusable IP addresses to DHCP clients. The Cisco IOS DHCP Server feature is a full DHCP server implementation that assigns and manages IP addresses from specified address pools within the DSLAM to DHCP clients. If the Cisco IOS DHCP Server cannot satisfy a DHCP request from its own database, it can forward the request to one or more secondary DHCP servers defined by the network administrator.
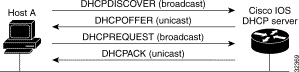
Figure 7-2 shows the basic steps that occur when a DHCP client requests an IP address from a DHCP server. The client, host A, sends a DHCPDISCOVER broadcast message to locate a Cisco IOS DHCP server. A DHCP server offers configuration parameters (such as an IP address, a MAC address, a domain name, and a lease for the IP address) to the client in a DHSCPOFFER unicast message.
 |
Note A DHCP client might receive offers from multiple DHCP servers and can accept any one of the offers; however, the client usually accepts the first offer it receives. Additionally, the offer from the DHCP server is not a guarantee that the IP address will be allocated to the client; however, the server usually reserves the address until the client has had a chance to formally request the address. |
The client returns a formal request for the offered IP address to the DHCP server in a DHCPREQUEST broadcast message. The DHCP server confirms that the IP address has been allocated to the client by returning a DHCPACK unicast message to the client.
The Cisco IOS DHCP Server feature offers the following benefits:
For descriptions of supported MIBs and how to use MIBs, see the Cisco MIB web site on Cisco.com at http://www.cisco.com/public/sw-center/netmgmt/cmtk/mibs.shtml .
Before you configure the Cisco IOS DHCP Server feature, complete the following tasks:
The DHCP server database is organized as a tree. The root of the tree is the address pool for natural networks, branches are subnetwork address pools, and leaves are manual bindings to clients. Subnetworks inherit network parameters and clients inherit subnetwork parameters. Therefore, common parameters, such as the domain name, should be configured at the highest (network or subnetwork) level of the tree.
|
Note Inherited parameters can be overridden. For example, if a parameter is defined in both the natural
network and a subnetwork, the definition of the subnetwork is used. Address leases are not inherited. If a lease is not specified for an IP address, by default, the DHCP server assigns a one-day lease for the address. |
To configure the Cisco IOS DHCP server feature, first configure a database agent or disable conflict logging, and then configure IP addresses that the DHCP server either should not assign (excluded addresses) or should assign (a pool of available IP addresses) to requesting clients. These configuration tasks are explained in the following sections.
A DHCP database agent is any host, for example, an FTP, TFTP, or RCP server that stores the DHCP bindings database. You can configure multiple DHCP database agents and you can configure the interval between database updates and transfers for each agent. To configure a database agent and database agent parameters, use the following command in global configuration mode:
| Command | Purpose |
|---|---|
DSLAM(config)# ip
dhcp database url
[timeout seconds | write-delay
seconds]
| Configures the database agent and the interval between database updates and database transfers. |
If you choose not to configure a DHCP database agent, disable the recording of DHCP address conflicts on the DHCP server. To disable DHCP address conflict logging, use the following command in global configuration mode:
| Command | Purpose |
|---|---|
DSLAM(config)# no ip
dhcp conflict
logging
| Disables DHCP address conflict logging. |
The DHCP server acts as if all IP addresses in a DHCP address pool subnet are available for assigning to DHCP clients. You must specify the IP addresses that the DHCP server should not assign to clients. To do so, use the following command in global configuration mode:
| Command | Purpose |
|---|---|
DSLAM(config)# ip
dhcp
excluded-address low-address
[high-address]
| Specifies the IP addresses that the DHCP server should not assign to DHCP clients. |
You can configure a DHCP address pool with a name that is a symbolic string (such as "engineering") or an integer (such as 0). Configuring a DHCP address pool also places you in DHCP pool configuration mode—identified by the (dhcp-config)# prompt—from which you can configure pool parameters (for example, the IP subnet number and default router list). To configure a DHCP address pool, complete the required tasks in the following sections.
To configure the DHCP address pool name and enter DHCP pool configuration mode, use the following command in global configuration mode:
| Command | Purpose |
|---|---|
DSLAM(config)# ip
dhcp pool
name
| Creates a name for the DHCP server address pool and places you in DHCP pool configuration mode (identified by the dhcp-config# prompt). |
To configure a subnet and mask for the newly created DHCP address pool, which contains the range of available IP addresses that the DHCP server may assign to clients, use the following command in DHCP pool configuration mode:
The domain name of a DHCP client places the client in the general grouping of networks that make up the domain. To configure a domain name string for the client, use the following command in DHCP pool configuration mode:
| Command | Purpose |
|---|---|
DSLAM(dhcp-config)#
domain-name domain
| Specifies the domain name for the client. |
DHCP clients query DNS IP servers when they need to correlate host names to IP addresses. To configure the DNS IP servers that are available to a DHCP client, use the following command in DHCP pool configuration mode:
Windows Internet Naming Service (WINS) is a name resolution service that Microsoft DHCP clients use to correlate host names to IP addresses within a general grouping of networks. To configure the NetBIOS WINS servers that are available to a Microsoft DHCP client, use the following command in DHCP pool configuration mode:
The NetBIOS node type for Microsoft DHCP clients can be one of four settings: broadcast, peer-to-peer, mixed, or hybrid. To configure the NetBIOS node type for a Microsoft DHCP, use the following command in DHCP pool configuration mode:
| Command | Purpose |
|---|---|
DSLAM(dhcp-config)#
netbios-node-type<PN
B> type
| Specifies the NetBIOS node type for a Microsoft DHCP client. |
After a DHCP client has booted, the client begins sending packets to its default DSLAM. The IP address of the default DSLAM should be on the same subnet as the client. To configure a default DSLAM for a DHCP client, use the following command in DHCP pool configuration mode:
By default, each IP address assigned by a DHCP server comes with a one-day lease, which is the amount of time that the address is valid. To change the lease value for an IP address, use the following command in DHCP pool configuration mode:
| Command | Purpose |
|---|---|
DSLAM(dhcp-config)#
lease
{days [hours][minutes] |
infinite}
| Specifies the duration of the lease. The default is a a one-daylease. |
An address binding is a mapping between the IP address and Media Access Control (MAC) address of a client. The IP address of a client can be assigned manually by an administrator or assigned automatically from a pool by a DHCP server.
Manual bindings are IP addresses that have been manually mapped to the MAC addresses of hosts that are found in the DHCP database. Manual bindings are stored in NVRAM on the DHCP server. Manual bindings are just special address pools. There is no limit on the number of manual bindings.
Automatic bindings are IP addresses that have been automatically mapped to the MAC addresses of hosts that are found in the DHCP database. Automatic bindings are stored on a remote host called a database agent. The bindings are saved as text records for easy maintenance.
To configure a manual binding, first create a host pool, then specify the IP address and hardware address of the client or client identifier. The hardware address is the MAC address. The client identifier, which is required for Microsoft clients (instead of hardware addresses), is formed by concatenating the media type and the MAC address of the client. Refer to the "Address Resolution Protocol Parameters" section of RFC 1700, Assigned Numbers, for a list of media type codes.
To configure manual bindings, use the following commands beginning in global configuration mode:
The boot file is used to store the boot image for the client. The boot image is generally the operating system the client uses to load. To specify a boot file for the DHCP client, use the following command in DHCP pool configuration mode:
| Command | Purpose |
|---|---|
DSLAM(dhcp-config)#
bootfile
filename
| Specifies the name of the file that is used as a boot image. |
By default, the DHCP server pings a pool address twice before assigning the address to a requesting client. If the ping is unanswered, the DHCP server assumes (with a high probability) that the address is not in use and assigns the address to the requesting client. To change the number of ping packets the DHCP server should send to the pool address before assigning the address, use the following command in global configuration mode:
By default, the DHCP server waits 500 milliseconds before timing out a ping packet. To change the amount of time the server waits, use the following command in global configuration mode:
| Command | Purpose |
|---|---|
DSLAM(config)# ip dhcp
ping
timeout milliseconds
| Specifies the amount of time the DHCP server must wait before timing out a ping packet. The default is 500 milliseconds. |
By default, the Cisco IOS DHCP Server feature is enabled on your DSLAM. If the feature is disabled, use the following command in global configuration mode to reenable the Cisco IOS DHCP Server feature on your DSLAM:
| Command | Purpose |
|---|---|
DSLAM(config)#
service
dhcp
| Enables the CiscoIOS DHCP Server feature on your DSLAM. Use the no form of this command to disable the CiscoIOS DHCP Server feature. |
To clear DHCP server variables, use the following commands in privileged EXEC mode, as needed:
To enable DHCP server debugging, use the following command in privileged EXEC mode, as needed:
| Command | Purpose |
|---|---|
DSLAM# debug ip dhcp
server {events | packets | linkage}
| Enables debugging on the DHCP server. |
To display DHCP server information, use the following commands in EXEC mode, as needed:
This section provides the following configuration examples:
The following example stores bindings on host 172.16.4.253. The file transfer protocol is FTP. The server should wait 2 minutes (120 seconds) before writing database changes.
DSLAM> ip dhcp database ftp://user:password@172.16.4.253/router-dhcp write-delay 120
In the following example, three DHCP address pools are created: one in network 172.16.0.0, one in subnetwork 172.16.1.0, and one in subnetwork 172.16.2.0. Attributes from network 172.16.0.0, such as the domain name, DNS server, NetBIOS name server, and NetBIOS node type, are inherited in subnetworks 172.16.1.0 and 172.16.2.0. In each pool, clients are granted 30-day leases and all addresses in each subnetwork, except the excluded addresses, are available to the DHCP server for assigning to clients. Table 7-4 lists the IP addresses for the devices in three DHCP address pools.
ip dhcp database ftp://user:password@172.16.4.253/router-dhcp write-delay 120

ip dhcp excluded-address 172.16.1.100 172.16.1.103

ip dhcp excluded-address 172.16.2.100 172.16.2.103

!

ip dhcp pool 0

	network 172.16.0.0 /16

	domain-name cisco.com

	dns-server 172.16.1.102 172.16.2.102

	netbios-name-server 172.16.1.103 172.16.2.103

	netbios-node-type h-node

!

ip dhcp pool 1

	network 172.16.1.0 /24

	default-router 172.16.1.100 172.16.1.101

	lease 30

!

ip dhcp pool 2

	network 172.16.2.0 /24

	default-router 172.16.2.100 172.16.2.101

	lease 30
The following example creates a manual binding for a client named Mars.cisco.com. The MAC address of the client is 02c7.f800.0422 and the IP address of the client is 172.16.2.254.
ip dhcp pool Mars
	host 172.16.2.254
	hardware-address 02c7.f800.0422 ieee802
	client-name Mars
Because attributes are inherited, the previous configuration is equivalent to the following:
ip dhcp pool Mars
	host 172.16.2.254 mask 255.255.255.0
	hardware-address 02c7.f800.0422 ieee802
	client-name Mars
	default-router 172.16.2.100 172.16.2.101
	domain-name cisco.com
	dns-server 172.16.1.102 172.16.2.102
	netbios-name-server 172.16.1.103 172.16.2.103
	netbios-node-type h-node
RFC 2131 outlines how DHCP should work, but does not account for handling interfaces within routing devices that are configured as IP unnumbered. Point-to-point connections can be configured as IP unnumbered. That is, the interface does not have an IP address of its own but shares the IP address of another interface within the same physical device. This allows you to conserve IP addresses, by associating one or more IP unnumbered interfaces with a numbered interface.
Cisco has enhanced the DHCP Relay feature within Cisco IOS software so that, in addition to numbered interfaces, IP unnumbered interfaces can now be supported to send and receive DHCP requests.
The ability to support IP unnumbered interfaces:
DHCP Relay keeps track of DHCP "clients" and is able to add and delete routing information dynamically. Optionally, you can configure DHCP Relay to save client information that is tracked to a local file (for those devices supporting FlashDisk storage) or remotely to a workstation through TFTP. This information is read by DHCP Relay at (re)start time.
DSLAM(config)# int loopback 1
DSLAM(config-if)# ip address 1.1.1.1 255.255.255.255
DSLAM(config-if)# interface atm 1/ ip unnumbered loopback 1
DSLAM(config-if)# atm
route-bridged ip
DSLAM(config-if)# pvc 1/1
DSLAM(config-if)# encapsulation aaal5snap
The DHCP relay agent information option (option 82) enables a Dynamic Host Configuration Protocol (DHCP) relay agent to include information about itself when forwarding client-originated DHCP packets to a DHCP server. The DHCP server can use this information to implement IP address or other parameter-assignment policies.
Service providers are increasingly using ATM route-bridged encapsulation to configure digital subscriber line (DSL) access. The DHCP Option 82 Support for Route-Bridged Encapsulation feature enables those service providers to use DHCP to assign IP addresses and DHCP option 82 to implement security and IP address assignment policies.
DHCP Option 82 Support for Route-Bridged Encapsulation provides support for the DHCP relay agent information option when ATM route-bridged encapsulation (RBE) is used. Figure 7-3 shows a typical network topology in which ATM RBE and DHCP are used. The DSLAM that is using ATM RBE is also serving as the DHCP relay agent.

Option 82 communicates information to the DHCP server using a suboption of the DHCP relay agent information option called agent remote ID. The information sent in the agent remote ID includes an IP address identifying the relay agent and information about the ATM interface and the PVC over which the DHCP request came in. The DHCP server can use this information to make IP address assignments and security policy decisions.
Figure 7-4 shows the format of the agent remote ID suboption.

Table 7-5 describes the agent remote ID suboption fields displayed in Figure 7-4.
| Field | Description |
|---|---|
Port Type | Port type. The value 0x01 indicates RBE. (1 byte) |
Version | Option 82 version. The value 0x01 specifies the RBE version of Option 82. (1 byte) |
Reserved | Reserved. (2 bytes) |
IP address of one of the interfaces on the DHCP relay agent. The rbe nasip command can be used to specify which IP address will be used. (4 bytes) | |
NAS Port | RBE-enabled virtual circuit on which the DHCP request has come in. See Figure 7-5 for the format of this field. (4 bytes) |
Figure 7-5 shows the format of the network access server (NAS) port field in the agent remote ID suboption.

Figure 7-6 shows the format of the interface field. Module 1 indicates an IMA interface; otherwise, Module is 0. Port is offset by one for IMA interfaces: for example, atm0/ima4 is Slot 0, Module 1, Port 3.

DHCP support must be configured before you can use the DHCP Option 82 Support.
DHCP option 82 support must be configured on the DHCP relay agent using the ip dhcp relay information option command before you can use the DHCP Option 82 Support for Route-Bridged Encapsulation feature.
See the following sections for configuration tasks for the DHCP Option 82 Support for Route-Bridged Encapsulation feature.
To configure DHCP option 82 support for RBE, use the following commands in global configuration mode:
| Command | Purpose | |
|---|---|---|
Step 1 | DSLAM(config)# ip dhcp relay information option
| Enables the system to insert the DHCP relay agent information option in forwarded BOOT REQUEST messages to a Cisco IOS DHCP server. |
Step 2 | DSLAM(config)# rbe nasip source_interface
| Specifies the IP address of an interface on the DHCP relay agent that is sent to the DHCP server through the Agent Remote ID suboption. |
To verify that the DHCP Option 82 Support for Route-Bridged Encapsulation feature is configured correctly, use the following command in privileged EXEC mode:
| Command | Purpose |
|---|---|
DSLAM# more system:running-config
| Displays the running configuration. |
In the following example, DHCP option 82 support is enabled on the DHCP relay agent using the ip dhcp relay agent information option command. The rbe nasip command configures the DSLAM to forward the IP address for Loopback0 to the DHCP server.
!
DSLAM(config)# ip dhcp relay information option

DSLAM(config)# ip dhcp-server 10.0.0.202

> !
DSLAM(config)# rbe nasip Loopback1

> !
DSLAM(config)# interface Loopback1

DSLAM(config-if)# ip address 18.52.86.120 255.255.255.255>
!
DSLAM(config-if)# interface Ethernet0/0

DSLAM(config-if)# ip address 10.0.0.40 255.0.0.0

> !
DSLAM(config-if)# interface atm1/1

DSLAM(config-if)# ip address 11.0.0.1 255.0.0.0

DSLAM(config-if)# ip helper-address 10.0.0.202

DSLAM(config-if)# atm route-bridged ip

DSLAM(config-if)# no atm ilmi-keepalive

DSLAM(config-if)# pvc 1/1

DSLAM(config-if)# encapsulation aal5snap

> !
DSLAM(config-if)# interface ATM1/2

DSLAM(config-if)# ip address 12.0.0.1 255.0.0.0

DSLAM(config-if)# ip helper-address 10.0.0.202

DSLAM(config-if)# atm route-bridged ip

DSLAM(config-if)# no atm ilmi-keepalive

DSLAM(config-if)# pvc 1/1

DSLAM(config-if)# encapsulation aal5snap

>  !
For the configuration example above, the value (in hexadecimal) of the agent remote ID suboption is 01010000123456784101001. Table 7-6 shows the value of each field within the agent remote ID suboption.
VPI/VCI authentication is done through the NAS-Port RADIUS attribute. The exact format of this attribute is not specified by the RADIUS RFC, but some formats are common enough to be well-known. The Cisco 6400 system uses format D for VPI/VCI authentication, but this format does not allocate enough bits to uniquely identify the slot and port of a DSLAM.
The NAS-Port attribute is specified, however, not to exceed 32bits in length. To provide the maximum flexibility, the format E setting was created to allow the user to explicitly specify the assignment of each bit in the NAS-Port attribute. For a DSLAM, the assignment should have enough bits to uniquely specify slot and port, even if this limits the range of another field within the attribute (for example, VCI).
The recommended solution is to allocate 6 bits for slot, 1 bit for module (required for IMA), 5 bits for port, 8 bits for VPI, and 12 bits for VCI. If done in this order (MSB to LSB), this format resembles the format D NAS-Port attribute as much as possible, without the ambiguity of the format D solution.
The Cisco Access Registrar performs special processing for devices it is configured to treat as Cisco NASes (for example, 6400) After the device is identified, the User-Name attribute is replaced with the pseudo-User-Name. This new value is the concatenation of 6400 <module>/<slot>/<port> information (treated as if it were sent in format D) and the packet is treated as a regular user authentication from this point on.
The DSLAM can use this mechanism, but because the format is different, the pseudo-User-Name is not as straightforward as it is for the Cisco 6400 system. Instead, the name must be synthesized by calculating the format E NAS-Port value as configured, and then breaking it down into its format D parts.
The format of the new User-Name attribute is the printf of "%s-%d-%d-%d-%d-%d" for the following values (assuming the recommended format E configuration is used):
To configure the VPI/VCI authentication:
DSLAM(config)# aaa new-model

DSLAM(config)# aaa authentication ppp default radius

DSLAM(config)# radius-server host 10.0.0.99 ;ip address of RADIUS server

DSLAM(config)# radius-server attribute nas-port format e SSSSSSAPPPPPIIIIIIIICCCCCCCCCCCC
DSLAM(config)# radius-server key the_secret
|
Note Replace the_secret above with your own key. |
DSLAM(config)# interface atm1/1

DSLAM(config-if)# pvc encapsulation aal5ciscoppp virtual-template2

DSLAM(config-if)# interface virtual-template2

DSLAM(config-if)# ppp authentication pap
The following sections describe the PPP features supported in Cisco IOS Release 12.2:
The following tasks provide the minimum steps needed to configure PPP over ATM on the DSLAM. For more information about PPP over ATM, see "Configuring ATM" in the Wide-Area Networking Configuration Guide of the Cisco IOS 12.1 documentation set.
The DSLAM uses virtual templates to assign PPP features to a PVC. As each PPP session comes online, a virtual access interface is "cloned" from the virtual template. This virtual-access interface inherits all the configuration specified in the virtual template. When the virtual template is changed, the changes are automatically propagated to all virtual-access interfaces cloned from that particular virtual template.
To configure a virtual template, perform these steps starting in global configuration mode:
 |
Caution Do not use a static IP assignment within a virtual template; routing problems can occur. Always enter the ip unnumbered command when configuring a virtual template. |
The following example shows a typical virtual template configuration for the DSLAM:
DSLAM(config)# interface virtual-template 1

DSLAM(config-if)# ip unnumbered ethernet 0/0

DSLAM(config-if)# peer default ip address pool telecommuters

DSLAM(config-if)# ppp authentication chap

DSLAM(config-if)# exit

DSLAM(config)# ip local pool telecommuters 10.36.1.1 10.36.1.254
In this configuration, it is assumed that all PPP over ATM VCs (users) cloned from virtual template 1 use CHAP authentication and are allocated an IP address from the pool named "telecommuters" configured on the router. In addition, the local end of the PPP over ATM connection is running without an IP address (recommended). Instead, the IP address of the Ethernet interface is used for addressability.
To configure a different class of users on the same router, you can provision a separate virtual template interface. The following shows a DHCP server rather than a local pool and PAP authentication over CHAP:
DSLAM(config)# interface Virtual-Template 2

DSLAM(config-if)# ip unnumbered ethernet 0/0

DSLAM(config-if)# peer default ip address dhcp

DSLAM(config-if)# ppp authentication pap chap

DSLAM(config-if)# exit

DSLAM(config)# ip dhcp-server 10.5.20.149
You can configure up to 25 virtual templates.
Large-scale deployment of PPP user services requires the use of a central database, such as RADIUS to ease the configuration burden. RADIUS servers, collectively known as authentication, authorization, and accounting (AAA) servers for PPP over ATM (and other media), contain the per-user configuration database, including password authentication and authorization information. For more information about AAA, see the chapter "Authentication, Authorization, and Accounting (AAA)" in the Cisco IOS Security Configuration Guide.
To configure the DSLAM to use AAA for PPP authentication only, enter the following configuration commands:
The list-name option refers to the name of this particular method list (or default, if it is the default list), and the method option is a list of methods. For example, to configure virtual template 4 to use RADIUS before local authentication, enter the following commands:
DSLAM(config)# aaa new-model

DSLAM(config)# aaa authentication ppp list2 radius local


DSLAM(config)# interface virtual-template 4

DSLAM(config-if)# ip unnumbered ethernet 0/0

DSLAM(config-if)# ppp authentication chap list2

DSLAM(config-if)# ^z
Enter the aaa authentication ppp command with the method keyword local to specify that the Cisco router or access server will use the local username database for authentication. The following example shows how to configure authentication by using the local username database:
DSLAM(config)# aaa new-model

DSLAM(config)# aaa authentication ppp default local
To configure the DSLAM to use a RADIUS server, enter the following commands starting in global configuration mode:
In the following example, a RADIUS server is enabled and identified, and the NAS port field is set to ATM virtual-channel extended format:
DSLAM(config)# aaa new-model
DSLAM(config)# aaa authentication ppp default radius
DSLAM(config)# radius-server host 172.31.5.96 auth-port 1645 acct-port 1646
DSLAM(config)# radius-server key foo
DSLAM(config)# radius-server
attribute nas-port format e
The authentication and accounting port need not be specified, because they default to 1645 and 1646, respectively.
After you have configured a virtual template for PPP over ATM, you must configure the PVCs that carry traffic from the DSLAM to the ATM interfaces. To configure PPP over ATM on a PVC, enter the following commands starting in global configuration mode:
| Command | Purpose | |
|---|---|---|
Step 1 | DSLAM(config)# interface atm 1/1
[.subinterface-number | Specifies the ATM interface and optional subinterface. |
Step 2 | DSLAM(config-if)# atm pvp 1
| Create the PVP subinterface if the interface ismultipoint. |
Step 3 | DSLAM(config-if)# pvc [name] vpi/vci
| Configures a new ATM PVC by assigning a name (optional) and VPI/VCI numbers. |
Step 4 | DSLAM(config-if)# encapsulation aal5mux ppp
virtual-Template number
| Configures the ATM adaptation layer (AAL) and encapsulation type, and configures a PVC to use a virtual-template as the default PPP interfaceconfiguration. |
The following example shows a typical configuration for PPP over ATM, using a RADIUS authentication server:
DSLAM(config)# interface virtual-template 1

DSLAM(config-if)# ip unnumbered ethernet 0/0

DSLAM(config-if)# peer default ip address pool telecommuters

DSLAM(config-if)# ppp authentication chap

DSLAM(config-if)# exit

DSLAM(config)# ip local pool telecommuters 10.36.1.1 10.36.1.254


DSLAM(config)# aaa new-model

DSLAM(config)# aaa authentication ppp default radius

DSLAM(config)# radius-server host 172.31.5.96

DSLAM(config)# radius-server key foo

DSLAM(config)# radius-server attribute nas-port format e


DSLAM(config)# interface atm 1/1

DSLAM(config-if)# atm pvp 1

DSLAM(config-if)# interface atm 1/1.40 multipoint

DSLAM(config-subif)# pvc 0/50

DSLAM(config-if-atm-vc)# encapsulation aal5mux ppp virtual-template 1

DSLAM(config-if-atm-vc)# exit

DSLAM(config-subif)# pvc 0/51

DSLAM(config-if-atm-vc)# encapsulation aal5mux ppp virtual-template 1

DSLAM(config-if-atm-vc)# exit
IPCP subnet mask support allows CPE to connect to the DSLAM and obtain IP addresses and subnet mask ranges that the CPE can use to populate the DHCP server database. The DSLAM brings up PPP sessions with the CPE and authenticates each CPE as a separate user. An extension of the normal IPCP negotiations enables the CPE to obtain an IP subnet mask associated with the returned IP address. The DSLAM adds a static route for the IP address with the subnet mask specified. If the IP and subnet mask is specified by the Framed-IP-Address and Framed-IP-Netmask attribute in the RADIUS user profile, the DSLAM passes the subnet mask and IP address to the CPE during IPCP negotiation. The CPE uses the subnet mask to calculate an IP address pool from which IP addresses are assigned to PCs using the LAN (Ethernet) connection.
Because the CPE can receive both the IP address and subnet mask during PPP setup negotiation, DHCP support is no longer required on the client side. Both the Cisco 67x and Cisco 82x CPEs support the subnet mask delivery.
IPCP subnet mask negotiation is not supported across a MPLS/VPN connection.
DSLAM(config)# aaa new-model

DSLAM(config)# aaa authentication ppp ipcp-method group radius	 <-- This is required
DSLAM(config)# aaa authorization network ipcp-method group radius 	<--
This is required
DSLAM(config)# aaa accounting network default start-stop group radius <- This is optional
!
DSLAM(config)# ip cef


DSLAM(config)# interface Loopback1

DSLAM(config-if)# ip address 1.1.1.1 255.255.255.255

!
DSLAM(config-if)# interface Ethernet0/0

DSLAM(config-if)# ip address 198.1.2.1 255.255.255.0

!
DSLAM(config-if)# interface atm2/1

DSLAM(config-if)# pvc 100/1
DSLAM(config-if)# encapsulation aal5mux ppp Virtual-Template1

!
DSLAM(config-if)# interface Virtual-Template1

DSLAM(config-if)# ip unnumbered Loopback1

DSLAM(config-if)# ppp authentication chap callin ipcp-method

DSLAM(config-if)# ppp authorization ipcp-method

DSLAM(config-if)# exit

DSLAM(config)# aaa new-model

DSLAM(config)# radius-server host 198.1.2.128 auth-port 1645 acct-port 1646

DSLAM(config)# radius-server key cisco


DSLAM# show ip route

Codes: C - connected, S - static, I - IGRP, R - RIP, M - mobile, B - BGP
       D - EIGRP, EX - EIGRP external, O - OSPF, IA - OSPF inter area
       N1 - OSPF NSSA external type 1, N2 - OSPF NSSA external type 2
       E1 - OSPF external type 1, E2 - OSPF external type 2, E - EGP
       i - IS-IS, L1 - IS-IS level-1, L2 - IS-IS level-2, ia - IS-IS inter area
       * - candidate default, U - per-user static route, o - ODR
       P - periodic downloaded static route

Gateway of last resort is not set

     1.0.0.0/32 is subnetted, 1 subnets
C       1.1.1.1 is directly connected, Loopback1
U       200.1.1.0/25 [1/0] via 200.1.1.1
C       200.1.1.1/32 is directly connected, Virtual-Access10
C    198.1.2.0/24 is directly connected, Ethernet0/0
The global configuration command show atm pvc ppp shows the PPP over ATM characteristics of all PVCs on the ATM interface:
DSLAM# show atm pvc ppp

VCD /                                         Peak Avg/Min Burst
	ATM Int.   Name       VPI   VCI  Type     VA VASt  SC    Kbps  Kbps   Cells VCSt
	2/2.100    167        100     1   PVC      3 UP UBR   10000              ACTIVE
The VA column shows the virtual-access interface used for this particular PPP over ATM session. A subsequent show interface virtual-access command gives the PPP specific characteristics of the session:
DSLAM# show interface virtual-access 2

Virtual-Access2 is up, line protocol is up
  Hardware is Virtual Access interface
  Internet address is 10.123.1.1/24
  MTU 1500 bytes, BW 100000 Kbit, DLY 100000 usec, rely 255/255, load 1/255
  Encapsulation PPP, loopback not set, keepalive not set
  DTR is pulsed for 5 seconds on reset
  LCP Open
  Open: IPCP
  Bound to ATM2.2.100 VCD: 167, VPI: 0, VCI: 34
    Cloned from virtual-template: 1
  Last input 01:04:26, output never, output hang never
  Last clearing of "show interface" counters 5d02h
  Queueing strategy: fifo
  Output queue 0/40, 0 drops; input queue 0/75, 0 drops
  5 minute input rate 0 bits/sec, 0 packets/sec
  5 minute output rate 0 bits/sec, 0 packets/sec
     782 packets input, 30414 bytes, 0 no buffer
     Received 3 broadcasts, 0 runts, 0 giants, 0 throttles
     0 input errors, 0 CRC, 0 frame, 0 overrun, 0 ignored, 0 abort
     395 packets output, 5540 bytes, 0 underruns
     0 output errors, 0 collisions, 0 interface resets
     0 output buffer failures, 0 output buffers swapped out
     0 carrier transitions
The lines included in this example show the Layer 3 protocols enabled on this interface, the VPI and VCI numbers, and the master virtual template from which this virtual access interface was cloned.
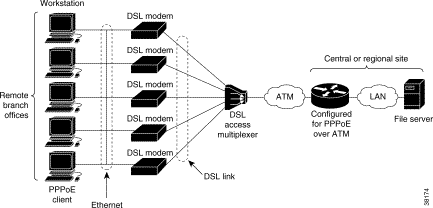
PPPoE on ATM provides the ability to connect a network of hosts over a simple bridging-access device to a remote access concentrator. With this model, each host utilizes its own PPPoE stack and the user is presented with a familiar user interface. Access control, billing and type of service can be done on a per-user, rather than a per-site, basis. Before a point-to-point connection over Ethernet can be provided, each PPP session must learn the Ethernet address of the remote peer and establish a unique session identifier. A unique session identifier is provided by the PPPoE Discovery Stage protocol.
Figure 7-7 shows a sample network topology using PPPoE on ATM.
PPPoE has two distinct stage protocols. The stage protocols are summarized in Table 7-7.
There are four steps to the discovery stage:
1. Host broadcasts a PPPoE Active Discovery Initiation (PADI) packet.
2. When the access concentrator receives a PADI that it can serve, it replies by sending a PPPoE Active Discovery Offer (PADO) packet to the host.
3. Because the PADI was broadcast, the host might receive more than one PADO packet. The host looks through the PADO packets it receives and chooses one. The choice can be based on the AC name or the services offered. The host then sends a single PPPoE Active Discovery Request (PADR) packet to the access concentrator that it has chosen.
4. When the access concentrator receives a PADR packet, it prepares to begin a PPP session. It generates a unique SESSION_ID for the PPPoE session and replies to the host with a PPPoE Active Discovery Session-confirmation (PADS) packet.
When a host wishes to initiate a PPPoE session, it must first perform discovery to identify the Ethernet MAC address of the peer and establish a PPPOE SESSION_ID. Although PPP defines a peer-to-peer relationship, discovery is inherently a client/server relationship. In the discovery process, a host (the client) discovers an access concentrator (the server). Based on the network topology, there may be more than one access concentrator that the host can communicate with. The Discovery Stage allows the host to discover all access concentrators and then select one. When discovery is completed, both the host and the selected access concentrator have the information they will use to build their point-to-point connection over Ethernet.
The PPPoE on ATM provides DSL support. As you begin DSL deployments, two of your most significant goals are to ease and facilitate consumer end adoption and to preserve as much of the dialup model as possible. PPPoE serves to advance both of these goals by leveraging Ethernet scale curves and embedded base (such as ATM NICs) and by preserving the point-to-point session used by internet service providers (ISPs) in the dialup model.
Using a PPPoE client (available from RouterWare), you can initiate a PPP session on an Ethernet connected client through a standard DSL modem. The session is transported over the ATM DSL link through RFC 1483 Ethernet bridged frames and can terminate either in the LAN emulation client (LEC) central office or the ISP point of presence (POP).
As you deploy asymmetric DSL (ADSL), you will encounter the need to enable users to access remote-access concentrators over simple bridges connecting Ethernet and ATM networks.
The following restrictions apply when PPPoE on ATM is used:
Before you can configure PPPoE on ATM, you need to configure a virtual private dial-up network (VPDN) group using the accept-dialin command, enable PPPoE, and specify a virtual template for PPPoE sessions.
See the following sections for configuration tasks for the PPPoE on ATM feature:
After you configure the Cisco router or access server for Ethernet encapsulation, you must configure the physical interface with the PVC and apply a virtual template with PPP encapsulation to the PVC that it applies to. To configure the physical interface that will carry the PPPoE session and link it to the appropriate virtual template interface, use the following commands, beginning in global configuration mode:
Prior to configuring the ATM PVC for PPPoE on ATM, you typically create and configure a virtual template. To create and configure a virtual template, use the following commands, beginning in global configuration mode:
Other optional configuration commands can be added to the virtual template configuration. For example, you can enable the PPP authentication on the virtual template using the ppp authentication chap command. Refer to the "Virtual Interface Template Service" chapter in the Cisco IOS Dial Solutions Configuration Guide for additional information about configuring the virtual template.
All PPP parameters are managed within the virtual template configuration. Configuration changes made to the virtual template are automatically propagated to the individual virtual access interfaces. Multiple virtual access interfaces can be created from a single virtual template; therefore, multiple PVCs can use a single virtual template.
Cisco IOS software supports up to 25 virtual template configurations. If greater numbers of tailored configurations are required, an authentication, authorization, and accounting (AAA) server can be employed. Refer to the "Per-User Configuration" chapter in the Cisco IOS Dial Solutions Configuration Guide for further information on configuring an AAA server.
If the parameters of the virtual template are not explicitly defined before the ATM PVC is configured, the PPP interface is brought up using default values from the virtual template identified. Some parameters (such as an IP address) take effect only if specified before the PPP interface comes up. Therefore, we recommend that you explicitly create and configure the virtual template before configuring the ATM PVC to ensure such parameters take effect. Alternatively, if parameters are specified after the ATM PVC has already been configured, you should issue a shutdown command followed by a no shutdown command on the ATM subinterface to restart the interface; this restart causes the newly configured parameters (such as an IP address) to take effect.
Network addresses for the PPP-over-ATM connections are not configured on the main ATM interface or subinterface. Instead, these connections are configured on the appropriate virtual template or obtained through AAA.
The virtual templates support all standard PPP configuration commands; however, not all configurations are supported by the PPP-over-ATM virtual access interfaces. These restrictions are enforced at the time the virtual template configuration is applied (cloned) to the virtual access interface. These restrictions are described in the following paragraphs.
Only standard first-in, first-out (FIFO) queueing is supported when applied to PPP-over-ATM virtual access interfaces. Other types of queueing that are typically configured on the main interface are not (for example, fair queueing). If configured, these configuration lines are ignored when they are applied to a PPP-over-ATM interface.
Although Cisco Express Forwarding (CEF) switching is supported, fast switching, flow, and optimum switching are not; these configurations are ignored on the PPP-over-ATM virtual access interface. CEF is enabled by default for IP. All other protocol traffic is processed switched.
|
Note The PPP reliable link that uses Link Access Procedure, Balanced (LAPB) is not supported. |
Because an ATM PVC is configured for this feature, the following standard PPP features are not applicable and should not be configured:
After you create a virtual template for PPPoE on ATM, specify a multipoint or point-to-point subinterface per PVC connection. To specify an ATM multipoint subinterface, use one of the following commands in global configuration mode:
After you create a virtual template and specify an ATM subinterface, you must create an ATM PVC. To create an ATM PVC, use the following commands beginning in interface configuration mode:
| Command | Purpose | |
|---|---|---|
Step 1 | DSLAM(config-if)# pvc [name]
vpi/vci
| Creates an ATM PVC. |
Step 2 | DSLAM(config-if-atm-vc)#
encapsulation aal5snap
|
The peak rate value is typically identical to the average rate or some suitable multiple thereof.
Set the average rate value to the line rate available at the remote site, because the remote line rate typically has the lowest speed of the connection.
For example, if the remote site has a T1 link, set the line rate to 1.536 Mbps. Because the average rate calculation on the ATM PVC includes the cell headers, a line rate value plus 10 or 15 percent might result in better remote line utilization.
The burst size depends on the number of cells that can be buffered by the receiving ATM switches and is coordinated with the ATM network connection provider. If you do not specify this value, the default, which is the equivalent to one maximum length frame on the interface, is used.
Operations, Administration, and Maintenance (OAM) F5 cell loopback is provided by the remote AXIS shelf so that OAM can be enabled. However, PPPoE on ATM is not typically an end-to-end ATM connection; therefore, we do not recommend enabling OAM.
Once you configure the router for PPPoE on ATM, the PPP subsystem starts and the router attempts to send a PPP configure request to the remote peer. If the peer does not respond, the router periodically goes into a "listen" state and waits for a configuration request from the peer. After a timeout (typically, 45 seconds), the router again attempts to reach the remote router by sending configuration requests.
To enable PPPoE on an ATM PVC, use the following command in interface configuration mode:
| Command | Purpose |
|---|---|
DSLAM(config-if)#
protocol pppoe
| Specifies the VPDN group to be used for establishing PPPoE sessions. |
The following example configures PPPoE on ATM to accept dial-in PPPoE sessions. The virtual access interface for the PPP session is cloned form virtual template interface 1. On subinterface atm 2/0.1, ATM PVC with VPI 0 and VCI 60 is configured with Logical Link Control (LLC)/Subnetwork Access Protocol (SNAP) encapsulation and is configured to run PPPoE. Bridged Ethernet protocol data units (PDUs) with destination MAC address set to the ATM interface MAC address and Ethernet type set to 0x8863 for that PVC are enqueued to the PPPoE discovery process. All bridged Ethernet PDUs with destination MAC address set to the ATM interface MAC address and an Ethernet type set to 0x8864 coming in from that PVC are forwarded to the virtual access interface associated with the PPP session.
DSLAM(config)# vpdn
enable
DSLAM(config)# vpdn-group 1
DSLAM(config-vpdn)#
accept-dialin
DSLAM(config-vpdn-acc-in)#
protocol pppoe
DSLAM(config-vpdn-acc-in)# virtual-template 1
DSLAM(config)# interface atm 2/1 point-to-point
DSLAM(config-if)# pvc 0/60
DSLAM(config-if)# encapsulation aal5snap
DSLAM(config-if)#
protocol pppoe
DSLAM(config-if)# interface virtual-template 1
DSLAM(config-if)# ip addr 10.0.1.2 255.255.255.0
DSLAM(config-if)# ip mtu 1492
For PPPoE virtual template interfaces, you must configure "ip mtu 1492" because Ethernet has a maximum payload size of 1500 bytes, the PPPoE header is 6 bytes, and PPP Protocol ID is 2 bytes.
|
Note Dial-out mode is not supported. |
![]()
![]()
![]()
![]()
![]()
![]()
![]()
![]()
Posted: Mon Dec 9 15:06:07 PST 2002
All contents are Copyright © 1992--2002 Cisco Systems, Inc. All rights reserved.
Important Notices and Privacy Statement.