|
|

This chapter describes the Cisco Multiprotocol Label Switching (MPLS) Virtual Private Network (VPN) Mapping of Routed Sessions implementation on all Cisco digital subscriber line access multiplexers (DSLAMs) using the second-generation network interface module (NI-2).
The Cisco MPLS VPN mapping of routed sessions implementation enables Cisco DSLAMs with NI-2 controller cards and connected customer premises equipment (CPE) to participate in MPLS VPNs. This implementation promotes the rapid deployment of secure IP VPNs that enable revenue-generating services, such as:
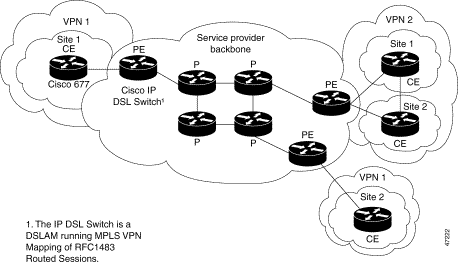
Figure 6-1 shows an example of an MPLS VPN with a service provider (P) backbone network, service provider edge routers (PEs), and customer edge routers (CEs).
In LANs, IP-based intranets have had an impact on the way companies conduct business. Companies meet the needs of their customers, suppliers, and partners by using extranets (an intranet that encompasses multiple businesses). Using extranets, companies reduce business process costs through supply-chain automation, electronic data interchange (EDI), and content hosting services. Virtual Private Networks address these needs by providing secure, private network services over the public Internet.
Cisco provides Layer 2 mechanisms that enable service providers (SPs) to deploy VPNs. To meet the scalability challenges inherent in provisioning fully-meshed Layer 2 VPNs, SPs must:
MPLS VPN mapping of routed sessions provides a solution to both of these problems:
The MPLS VPN mapping of routed sessions also:
Conventional VPNs do not scale well. Layer 2 VPNs are provisioned by creating and maintaining a full mesh of tunnels or permanent virtual circuits among all sites belonging to a particular VPN, using:
The resources and equipment required to provision and manage connection-based schemes cannot be supported in an SP network that must support hundreds or thousands of VPNs, each with multiple sites and thousands or tens of thousands of routes.
MPLS VPNs offer all of the value of traditional VPNs. Furthermore, since MPLS VPNs are created in Layer 3, they are more scalable, and easier to configure and manage than Layer 2 VPNs.
MPLS VPNs offer
The following features are supported for the delivery of MPLS VPN mapping of routed sessions:
This section describes restrictions to Cisco MPLS VPN mapping of routed sessions.
Each IP DSL switch can support up to 50 MPLS VPNs.
MPLS VPN mapping of routed sessions must not be confused with Integrated Routing and Bridging (IRB). IRB is not supported by MPLS VPN mapping of routed sessions.
Do not configure subtended interfaces for MPLS VPN services. Only trunk interfaces support MPLS VPN mapping of routed sessions.
IP DSL switches are not meant to be used as MPLS ATM-Label Switch Routers (ATM-LSRs). When designing your network, keep in mind that IP DSL switches act only as Label Edge Routers (LERs).
MPLS VPN-enabled interfaces do not perform as well as switched VCs.
The following Layer 3 services are not supported:
The following MPLS-related features are not a part of the MPLS VPN mapping of routed sessions:
In IP DSL switches, each DSL interface can support multiple permanent virtual circuits (PVCs), but only one routed MPLS VC.
Cisco DSL Manager (CDM) users can provision switched VCs, but CDM does not support configuring routed termination of RFC 1483 sessions.
Routed termination of IDSL connections is not supported.
Table 6-1 lists old tag switching and more current MPLS terms:
DSLAMs running the MPLS VPN mapping of routed sessions feature are referred to as IP DSL switches.
Your network must be running the following services before you configure MPLS VPN mapping of routed sessions:
This section describes the configuration tasks to enable MPLS VPN mapping on supported DSLAM platforms.
Configuring MPLS VPN mapping of routed sessions is similar to configuring MPLS VPNs on other Cisco MPLS platforms. For general MPLS VPN configuration tasks, examples, and command references, consult the MPLS Virtual Private Networks and MPLS Virtual Private Network Enhancements feature modules.
To enable MPLS VPN mapping of routed sessions, perform the following configuration tasks:
See the software installation documentation for the DSLAM platform on which MPLS VPN mapping of routed sessions will be installed.
To enable Cisco Express Forwarding (CEF) on NI-2 based DSLAMs, enter the following command:
| Command | Purpose |
|---|---|
DSLAM(config)# ip cef
| This command enables Cisco Express Forwarding (CEF). |
DSLAM(config)# ip cef

DSLAM(config)# end

DSLAM#
To define VPN forwarding routing instances (VRFs), use the following commands in router configuration mode on a PE router:
DSLAM(config)# ip vrf vpn1

DSLAM(config-vrf)# rd 100:1

DSLAM(config-vrf)# route-target export 100:1

DSLAM(config-vrf)# route-target import 100:1

DSLAM(config-vrf)# end

DSLAM#
To create a loopback interface and associate it with a VRF, enter the following commands:
| Command | Purpose | |
|---|---|---|
Step 1 | DSLAM(config)# interface loopback
loopback_interface_number
| Creates a loopback interface to associate with the VRF. |
Step 2 | DSLAM(config-if)# ip vrf forwarding vrf-name
| Associates the interface with the VRF. |
Step 3 | DSLAM(config-if)# ip address ip-address subnet-mask
| Assigns an IP address to the loopback interface. |
DSLAM(config)# interface Loopback1

DSLAM(config-if)# ip vrf forwarding vpn1

DSLAM(config-if)# ip address 6.6.6.6 255.255.255.255

DSLAM(config-if)# end

DSLAM#
You should configure a loopback interface on DSLAMs running MPLS VPN mapping of routed sessions configured for label switching. This virtual interface is always active.
The IP address you assign to the loopback interface is used as the Label Distribution Protocol (LDP) identifier for the IP DSL switch.
If a loopback interface:
Therefore, we recommend that you configure a loopback interface. You must associate the VRF with a routed interface using the following commands:
| Command | Purpose | |
|---|---|---|
Step 1 | DSLAM(config)# interface loopback loopback_interface_number
| Enters interface configuration mode. |
Step 2 | DSLAM(config-if)# ip address ip-address subnet-mask
| Assigns an IP address and subnet mask to the loopback interface. |
DSLAM(config)# interface Loopback0

DSLAM(config-if)# ip address 172.16.1.6 255.255.255.255

DSLAM(config-if)# end

DSLAM#
To create a virtual path tunnel from the MPLS uplink port to the service provider network, enter the following commands:
| Command | Purpose | |
|---|---|---|
Step 1 | DSLAM(config)# interface atm slot/port
| Enters interface configuration mode. |
Step 2 | DSLAM(config-if)# atm pvp vpi
| Creates the virtual path tunnel that connecting the uplink interface to the SP network. Note The VPI value created here must match that of the connected MPLS core router. |
Step 3 | DSLAM(config-if)# exit
| Returns to global configuration mode. |
Step 4 | DSLAM(config)# interface atm slot/port.vpi
point-to-point
| Enters configuration mode for the PVP. |
Step 5 | DSLAM(config-subif)# ip unnumbered loopback
loopback_interface_number
| Enables IP processing for this subinterface. Note Insert the loopback_interface_number parameter that you configured in Step 1 of the "Creating a Loopback Interface to Be Associated with the Uplink Interface" section above. |
Step 6 | DSLAM(config-subif)# tag-switching ip
| Enables MPLS for IPv4 packets on this subinterface. |
DSLAM(config)# interface ATM0/1

DSLAM(config-if)# atm pvp 61

DSLAM(config-if)# exit

DSLAM(config)# interface ATM0/1.61 point-to-point

DSLAM(config-subif)# ip unnumbered Loopback0

DSLAM(config-if)# tag-switching ip

DSLAM(config-subif)# end

DSLAM#
To create the PE-to-CE DSL interface using RFC 1483 routing and configure it for membership in an MPLS VPN, enter the following commands:
| Command | Purpose | |
|---|---|---|
Step 1 | DSLAM(config)# interface atm
slot/port
| Creates the ATM interface. |
Step 2 | DSLAM(config-if)# ip vrf forwarding
vrf-name
| Associates the DSL interface with the configured VRF. |
Step 3 | DSLAM(config-if)# ip unnumbered
loopback loopback_interface_number
| Enables IP unnumbered on the ATM interface and assigns the unnumbered interface to the loopback interface that you have created. |
Step 4 | DSLAM(config-if)# pvc vpi/vci
| Creates an ATM PVC on the DSL interface. |
Step 5 | DSLAM(config-if-atm-vc)#
encapsulation encapsulation_type
| Configures the required RFC 1483 encapsulation on the DSL-to-IP DSL switch interface. Note The default encapsulation type is aal5snap. Cisco 600 series CPE devices support only aal5snap encapsulation. The Cisco 827 CPE supports both aal5snap and aal5mux ip encapsulation. |
DSLAM(config)# interface ATM1/2

DSLAM(config-if)# ip vrf forwarding vpn1

DSLAM(config-if)# ip unnumbered Loopback1

DSLAM(config-if)# pvc 1/32

DSLAM(config-if-atm-vc)# encapsulation aal5snap

DSLAM(config-if-atm-vc)# end

DSLAM#
To create the PE-to-CE DSL interface using RBE and configure it for membership in an MPLS VPN, enter the following commands:
| Command | Purpose | |
|---|---|---|
Step 1 | DSLAM(config)# interface atm slot/port
| Creates the ATM interface. |
Step 2 | DSLAM(config-if)# ip vrf forwarding
vrf-name
| Associates the DSL interface with the configured VRF. |
Step 3 | DSLAM(config-if)# ip unnumbered loopback
loopback_interface_number
| Enables IP unnumbered on the ATM interface and assigns the unnumbered interface to the loopback interface that you have created. |
Step 4 | DSLAM(config-if)# atm route-bridged ip
| Enables Route 1483 Ethernet-encapsulated packets. |
Step 5 | DSLAM(config-if)# pvc vpi/vci
| Creates an ATM PVC on the DSL interface. |
Step 6 | DSLAM(config-if-atm-vc)# encapsulation
encapsulation_type
| Configures the required encapsulation on the DSL-to-IP DSL switch interface. Note The default encapsulation type is aal5snap. Cisco 600 series CPE devices support only aal5snap encapsulation. The Cisco 827 CPE supports both aal5snap and aal5mux ip encapsulation. |
DSLAM(config)# interface ATM1/2

DSLAM(config-if)# ip vrf forwarding vpn1

DSLAM(config-if)# ip unnumbered Loopback1

DSLAM(config-if)# atm route-bridged ip

DSLAM(config-if)# pvc 1/32

DSLAM(config-if-atm-vc)# encapsulation aal5snap

DSLAM(config-if-atm-vc)# end

DSLAM#
To create the PE-to-CE DSL interface using PPPoA and configure it for membership in an MPLS VPN, enter the following commands:
| Command | Purpose | |
|---|---|---|
Step 1 | DSLAM(config)# interface
virtual-template 1
| Creates the virtual-template interface. |
Step 2 | DSLAM(config-if)# ip vrf forwarding
vrf-name
| Associates the virtual-template interface with the configured VRF. |
Step 3 | DSLAM(config-if)# ip unnumbered
loopback loopback_interface_number
| Enables IP unnumbered on the virtual-template interface and assigns the unnumbered interface to the loopback interface that you have created. |
Step 4 | DSLAM(config-if)# ppp authentication
chap
| Enables CHAP authentication. |
Step 5 | DSLAM(config-if)# interface atm
slot/port
| Creates the ATM interface. |
Step 6 | DSLAM(config-if)# pvc vpi/vci
| Creates an ATM PVC on the DSL interface. |
Step 7 | DSLAM(config-if-atm-vc)#
encapsulation encapsulation_type
or, for aaal5snap
DSLAM(config-if-atm-vc)#
encapsulation aaal5snap
DSLAM(config-if-atm-vc)# protocol ppp
| Configures the required PPPoA encapsulation on the DSL-to-IP DSL switch interface. Note Encapsulation available on the IP DSL switch interface to support PPP termination is aal5ciscoppp, aal5ciscomux ppp, or aal5snap ppp. |
DSLAM(config)# interface
virtual-template 1
DSLAM(config-if)# ip vrf forwarding vpn1
DSLAM(config-if)# ip unnumbered Loopback1
DSLAM(config-if)# ppp authentication
chap
DSLAM(config)# interface ATM1/2
DSLAM(config-if)# pvc 1/32
DSLAM(config-if-atm-vc)# encapsulation aal5smux ppp virtual-template 1
DSLAM(config-if-atm-vc)# end
DSLAM(config)# interface atm 1/3
DSLAM(config-if-atm-vc)# encapsulation aal5ciscoppp virtual-template 1
DSLAM(config-if-atm-vc)# end
This section describes the routing protocol configuration tasks necessary to enable MPLS VPNs in your network.
To configure an operational MPLS VPN, you must complete the following tasks:
To configure BGP routing sessions in a provider network, use the following commands in router configuration mode on the PE router:
| Command | Purpose | |
|---|---|---|
Step 1 | DSLAM(config)# router bgp autonomous_system_number
| Configures the BGP routing process with the autonomous system number passed along to other BGP routers. |
Step 2 | DSLAM(config-router)# neighbor
{ip-address|peer-group-name} remote-as number
| Specifies a neighbor IP address or BGP peer group, identifying it to the local autonomous system. |
Step 3 | DSLAM(config-router)# neighbor ip-address
update-source loopback-interface
| Specifies a loopback interface as the source for routing updates. |
Step 4 | DSLAM(config-router)# address-family vpnv4 [unicast]
| Defines IBGP parameters for VPNv4 Network Layer Reachability Information (NLRI) exchange. |
Step 5 | DSLAM(config-router-af)# neighbor address
send-community both
| Defines an IBGP session to exchange VPNv4NLRIs. |
Step 6 | DSLAM(config-router-af)# neighbor address activate
| Activates the advertisement of the IPv4 addressfamily. |
DSLAM(config)# router bgp 100

DSLAM(config-router)# neighbor 172.16.0.8 remote-as 100

DSLAM(config-router)# neighbor 172.16.0.8 update-source Loopback0

DSLAM(config-router)# address-family vpnv4

DSLAM(config-router-af)# neighbor 172.16.0.8 send-community both

DSLAM(config-router-af)# neighbor 172.16.0.8 activate

DSLAM(config-router-af)# exit-address-family
Though there are several routing protocols to choose from, the configuration example below uses OSPF as an IGP:
| Command | Purpose | |
|---|---|---|
Step 1 | DSLAM(config)# router ospf process-id
| Creates an OSPF routing process between the IP DSL switch and the core MPLS routers. |
Step 2 | DSLAM(config-router)# network ipaddress
wildcard-mask area area-id
| Defines an interface on which OSPF runs and also defines the area ID for that interface. |
For information on configuring other routing protocols, consult the Cisco IOS IP Command Reference for Cisco IOS Release 12.2.
DSLAM(config)# router ospf 6

DSLAM(config-router)# network 172.16.0.0 0.0.255.255 area 0

DSLAM(config-router)# end

DSLAM#
To configure BGP PE-to-CE routing sessions, use the following commands in router configuration mode on the PE router:
| Command | Purpose | |
|---|---|---|
Step 1 | DSLAM(config)# router rip
| Enables RIP. |
Step 2 | DSLAM(config-router)# address-family ipv4 [unicast]
vrf vrf-name
| Defines RIP parameters for PE-to-CE routingsessions. Note The default is Off for auto-summary and synchronization in the VRF address-family submode. |
Step 3 | DSLAM(config-router-af)# redistribute bgp
[autonomous-system] [metric metric-value]
transparent
| Redistributes VRF BGP routes into the VRF RIPtable. |
Step 4 | DSLAM(config-router-af)# network ip_address_prefix
| Enables RIP on the PE to CE link. |
DSLAM(config)# router rip

DSLAM(config-router)# address-family ipv4 vrf vpn1

DSLAM(config-router-af)# redistribute bgp 100 metric transparent

DSLAM(config-router-af)# network 6.0.0.0

DSLAM(config-router-af)# exit-address-family

DSLAM(config-router)# end

DSLAM#
To verify the proper operation of an MPLS VPN, use the following commands:
| Command | Purpose | |
|---|---|---|
Step 1 | DSLAM# show ip vrf
| Displays the set of defined VRFs and interfaces. |
Step 2 | DSLAM# show ip vrf [{brief | detail |
interfaces}] vrf-name
| Displays information about defined VRFs and associated interfaces. |
Step 3 | DSLAM# show ip route vrf vrf-name
| Displays the IP routing table for a VRF. |
Step 4 | DSLAM# show ip protocols vrf vrf-name
| Displays the routing protocol information for a VRF. |
Step 5 | DSLAM# show ip cef vrf vrf-name
| Displays the CEF forwarding table associated with a VRF. |
Step 6 | DSLAM# show ip interface interface-number
| Displays the VRF table associated with an interface. |
Step 7 | DSLAM# show ip bgp vpnv4 all [tags]
| Displays information about all BGPs. |
Step 8 | DSLAM# show tag-switching forwarding vrf
vrf-name [prefix mask/length][detail]
| Displays label forwarding entries that correspond to VRF routes advertised by the DSLAM. |
This section provides sample configurations of MPLS VPN mapping of routed sessions.
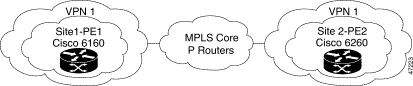
The configuration samples represent a simple hub-and-spoke network with two adjacent IP DSL switches. Figure 6-2 illustrates the network topology for the sample configurations below.
 |
Note Comments are highlighted with two sets of three exclamation points. For example, !!!This is a
comment.!!! Comments appear before the configurations they describe.
|
hostname dsl-6
!
boot system flash:ni2-dslp5-mz.ni2_mpls.20000720
slot 1 ATUC-4FLEXIDMT
!
dsl-profile 4dmt2func
 dmt training-mode standard
 dmt overhead-framing mode1
 dmt bitrate minimum interleaved downstream 8032 upstream 864
 dmt bitrate maximum interleaved downstream 8032 upstream 864

network-clock-select 1 system
ip subnet-zero
!
!!!Define and configure the VRF. See the
"Configuring a VPN Forwarding Routing
Instance" section.!!!

ip vrf vpn1

 rd 100:1

 route-target export 100:1

 route-target import 100:1

!
!!!The following command enables Cisco Express Forwarding. See the
"Enabling Cisco Express Forwarding"
section.!!!
ip cef
!
atm address 47.0091.8100.0000.0010.06ec.9102.0010.06ec.9102.00
atm router pnni
 no aesa embedded-number left-justified
 node 1 level 56 lowest
 redistribute atm-static
!
!!!Create an uplink loopback interface. See the
"Creating a Loopback Interface to Be
Associated with the Uplink Interface" section.!!!
!
interface Loopback0
 ip address 172.16.1.6 255.255.255.255
!
!!!Configure a loopback interface and associate it with a VRF. See the
"Creating a Loopback Interface and
Associating It with a VRF" section.!!!

interface Loopback1
 ip vrf forwarding vpn1
 ip address 6.6.6.6 255.255.255.255

interface ATM0/0
 no ip address
 atm cac service-category abr deny
 atm maxvp-number 0
 atm maxvc-number 4096
 atm maxvci-bits 12
!
interface Ethernet0/0
 ip address 10.1.1.56 255.255.255.0
!
interface ATM0/1
 no ip address
 no atm ilmi-keepalive
 atm cac service-category abr deny

 !!!Create Uplink ATM Subinterfaces. See the

 "Creating Uplink ATM Subinterfaces and
Virtual Path Tunnels and Enabling MPLS" section.!!!
 atm pvp 61
 atm pvp 62
 atm pvp 67
!
!!!Create VP tunnels and enable MPLS. See the
"Creating Uplink ATM Subinterfaces and
Virtual Path Tunnels and Enabling MPLS" section.!!!

interface ATM0/1.61 point-to-point
 ip unnumbered Loopback0
 tag-switching ip
!
!!!Create VP tunnels and enable MPLS. See the
"Creating Uplink ATM Subinterfaces and
Virtual Path Tunnels and Enabling MPLS" section.!!!
!
interface ATM0/1.62 point-to-point
 ip unnumbered Loopback0
 tag-switching ip
!
!!!Create VP tunnels and enable MPLS. See the
"Creating Uplink ATM Subinterfaces and
Virtual Path Tunnels and Enabling MPLS" section.!!!
!
interface ATM0/1.67 point-to-point
 ip unnumbered Loopback0
 tag-switching ip
!
!!!Create a DSL interface and associate it with a VRF. See the
"Configuring the PE-to-CE Interface Using
RFC 1483 Routing" section.!!!
!
interface ATM1/2
 ip vrf forwarding vpn1
 ip unnumbered Loopback1
 dsl profile 4dmt2func
 no atm ilmi-keepalive
 pvc 1/32
!
!!!Configure OSPF as the MPLS core routing protocol.
Configuring MPLS Core Routing Protocols,
page 6-12
router ospf 6
 network 172.16.0.0 0.0.255.255 area 0
 !
!!!Configure RIP PE to CE routing sessions. See the
"Configuring RIP PE-to-CE Routing
Sessions" section.!!!
!
router rip
 address-family ipv4 vrf vpn1
 redistribute bgp 100 metric transparent
 network 6.0.0.0
 no auto-summary
 exit-address-family
!
!!!Configure BGP. See the "Configuring
BGP Routing Sessions" section.!!!
!
router bgp 100
 no synchronization
 neighbor 172.16.1.7 remote-as 100
 neighbor 172.16.1.7 update-source Loopback0
 !
 address-family ipv4 vrf vpn1
 redistribute connected
 redistribute static
 redistribute rip
 no auto-summary
 no synchronization
 exit-address-family
 !
 !!!Enable PE to PE routing sessions. See the

 "Configuring BGP Routing Sessions"
section.!!!
 address-family vpnv4
 neighbor 172.16.1.7 activate
 neighbor 172.16.1.7 send-community both
 exit-address-family
!
ip classless
no ip http server
!
!
line con 0
 exec-timeout 0 0
 privilege level 15
 transport input none
line aux 0
line vty 0 4
 login
!
end
hostname dsl-7
!
boot system flash:ni2-dslp5-mz.ni2_mpls.20000720
slot 1 ATUC-1-4DMT
slot 2 ATUC-1-4DMT
slot 3 ATUC-1-4DMT
slot 4 ATUC-1-4DMT
slot 5 ATUC-1-4DMT
!
dsl-profile 4dmt2func
 dmt training-mode standard
 dmt overhead-framing mode1
 dmt margin downstream 3 upstream 3
 dmt bitrate minimum interleaved downstream 8032 upstream 864
 dmt bitrate maximum interleaved downstream 8032 upstream 864
network-clock-select 1 system
ip subnet-zero
!
!!!Define and configure the VRF. See the
"Configuring a VPN Forwarding Routing
Instance" section.!!!

ip vrf vpn1
 rd 100:1
 route-target export 100:1
 route-target import 100:1
!
!!!The following command enables Cisco Express Forwarding. See the
"Enabling Cisco Express Forwarding"
section.!!!
ip cef
!
atm address 47.0091.8100.0000.0010.06ec.8b02.0010.06ec.8b02.00
atm address 47.0091.8100.0000.0030.b688.3801.0030.b688.3801.00
atm address 47.0091.8100.0000.0060.3e0f.0301.0060.3e0f.0301.00
atm address 47.0091.8100.0000.0060.3e0f.2b01.0060.3e0f.2b01.00
atm address 47.0091.8100.0000.0073.9a88.6301.0073.9a88.6301.00
atm router pnni
 no aesa embedded-number left-justified
 node 1 level 56 lowest
  redistribute atm-static
!
!!!Create an uplink loopback interface. See the
"Creating a Loopback Interface to Be
Associated with the Uplink Interface" section.!!!
!
interface Loopback0
 ip address 172.16.1.7 255.255.255.255
!
!!!Configure a loopback interface and associate it with a VRF. See the
"Creating a Loopback Interface and
Associating It with a VRF" section.!!!
!
interface Loopback1
 ip vrf forwarding vpn1
 ip address 7.7.7.7 255.255.255.255
!
interface ATM0/0
 no ip address
 atm cac service-category abr deny
 atm maxvp-number 0
 atm maxvc-number 4096
 atm maxvci-bits 12
!
interface Ethernet0/0
 ip address 10.1.1.57 255.255.255.0
!
interface ATM0/1
 no ip address
 no atm ilmi-keepalive
 atm cac service-category abr deny
 !!!Create Uplink ATM Subinterfaces. See the

 "Creating Uplink ATM Subinterfaces and
Virtual Path Tunnels and Enabling MPLS" section.!!!
 atm pvp 67
 atm pvp 72
!
!!!Create VP tunnels and enable MPLS. See the
"Creating Uplink ATM Subinterfaces and
Virtual Path Tunnels and Enabling MPLS" section.!!!
!
interface ATM0/1.67 point-to-point
 ip unnumbered Loopback0
 tag-switching ip
!
!!!Create VP tunnels and enable MPLS. See the
"Creating Uplink ATM Subinterfaces and
Virtual Path Tunnels and Enabling MPLS" section.!!!
!
interface ATM0/1.72 point-to-point
 ip unnumbered Loopback0
 tag-switching ip
!
!!!Create a DSL interface and associate it with a VRF. See the
"Configuring the PE-to-CE Interface Using
RFC 1483 Routing" section.!!!
!
interface ATM1/1
 ip vrf forwarding vpn1
 ip unnumbered Loopback1
 dsl profile 4dmt2func
 no atm ilmi-keepalive
 atm cac service-category abr deny
 pvc 1/33
 !
!!!Configure OSPF as the MPLS core routing protocol.
Configuring MPLS Core Routing Protocols,
page 6-12
!
router ospf 7
 router-id 172.16.1.7
 network 172.16.0.0 0.0.255.255 area 0
!
!!!Configure RIP PE to CE routing sessions. See the
"Configuring RIP PE-to-CE Routing
Sessions" section.!!!
!
router rip
 address-family ipv4 vrf vpn1
 redistribute bgp 100 metric transparent
 network 7.0.0.0
 no auto-summary
 exit-address-family
!
!!!Configure BGP. See the "Configuring
BGP Routing Sessions" section.!!!
!
router bgp 100
 no synchronization
 network 10.1.1.0 mask 255.255.255.0
 neighbor 172.16.1.6 remote-as 100
 neighbor 172.16.1.6 update-source Loopback0

 address-family ipv4 vrf vpn1
 redistribute connected
 redistribute static
 redistribute rip
 no auto-summary
 no synchronization
 exit-address-family
 address-family ipv4 vrf vpn
 no auto-summary
 no synchronization
 exit-address-family
 !
 !!!Enable PE to PE routing sessions. See the

 "Configuring BGP Routing Sessions"
section.!!!
 !
 address-family vpnv4
 neighbor 172.16.1.6 activate
 neighbor 172.16.1.6 send-community both
 exit-address-family
!
ip classless
no ip http server
!
line con 0
 transport input none
line aux 0
line vty 0 4
 login
!
end
![]()
![]()
![]()
![]()
![]()
![]()
![]()
![]()
Posted: Mon Dec 9 15:04:45 PST 2002
All contents are Copyright © 1992--2002 Cisco Systems, Inc. All rights reserved.
Important Notices and Privacy Statement.