|
|

Table Of Contents
Configuring Terminal Lines and Modem Support
Setting Communication Parameters
Configuring Automatic Baud Detection
Changing the Default Privilege Level for Lines
Configuring Flow Control for Communication
Defining a Command String for Automatic Execution
Specifying the Transport Protocol for a Specific Line
Establishing Terminal Session Limits
Setting Up Modem Control on the Auxiliary Port
Automatically Answering a Modem
Supporting Dial-In and Dial-Out Modems
Configuring a Line Timeout Interval
Supporting Old-Style Dial-In Modems
Configuring High-Speed Modem Support
Supporting Reverse TCP Connections
Defining Terminal Operation Characteristics
Configuring Terminal Banner Messages
Configuring a Message-of-the-Day Banner
Configuring a Line Activation Message
Configuring an Incoming Message Banner
Configuring an Idle Terminal Message
Enabling or Disabling the Display of Messages
Configuring Terminal Lines and Modem Support
This chapter describes how to configure lines, modems, and terminal settings to access the ATM switch for management purposes. The Cisco DSLAM has two types of terminal lines:
•
A console line
•
Most line setup is the same for all types of lines, but certain commands, such as those having to do with modem control, apply only to the auxiliary port.
This chapter includes these sections:
•
•
Configuring Terminal Lines
Configuring terminal lines is a two-step process:
Step 1
Step 2
The tasks involved in these steps are described in these sections:
•
•
•
•
•
•
•
•
Preparing to Configure Lines
Use line configuration mode to enter line configuration commands that affect a specified console, auxiliary, or virtual terminal line. To enter line configuration mode, use this command in global configuration mode:
DSLAM(config)#line [aux | console | vty] line-number [ending-line-number]
Specify an auxiliary, console, or virtual terminal line to configure.
The terminal from which you locally configure the system is attached to the console port.
Example
This example specifies the console port and begins line configuration mode:
DSLAM(config)# line con 0DSLAM(config-line)#The auxiliary port supports modem connections. See the "Setting Up Modem Control on the Auxiliary Port" section, to set up modem support on the auxiliary port.
Configuring the console port or virtual terminal lines allows you to specify communication parameters and autobaud connections, and configure terminal operating parameters for the terminal you are using. These tasks are described in the "Defining Terminal Operation Characteristics" section.
You can also use the line command to create virtual terminal lines. This example shows how to create and configure the maximum 4 virtual terminal lines with the "no login" feature:
DSLAM(config)#line vty 0 4DSLAM(config-line)#no loginSetting Communication Parameters
You can change the default parameters for terminal communications to meet the requirements of the terminal or host to which you are attached. To do so, use one or more of these commands in line configuration mode:
This example shows how to configure the auxiliary line with a speed of 19,200 bits per second (bps):
DSLAM(config)#line aux 0DSLAM(config-line)#speed 19200Configuring Automatic Baud Detection
You can configure a terminal to automatically detect the baud rate over an asynchronous serial line. This configuration applies to the auxiliary port only.
To set up automatic baud detection, use this command in line configuration mode:
To start communications using automatic baud detection, press Return multiple times at the terminal:
•
•
•
Changing the Default Privilege Level for Lines
To change the default privilege level for a given line or group of lines, use this command in line configuration mode:
Allowable values for the privilege level are 0 through 15.
Configuring Flow Control for Communication
On the auxiliary port, you can set both hardware and software flow control between the DSLAM and the devices attached to it.
To configure flow control between the DSLAM and attached device, use one or more of this commands in line configuration mode:
Allowable values for the start-character and stop-character commands are CHAR or 0 through 255.
Both software and hardware flow control are bidirectional. If you do not specify a direction, the DSLAM enables software flow control in both directions. For information about setting up hardware flow control on the EIA/TIA-232 line, see the hardware installation and maintenance manual for your product.
Defining a Command String for Automatic Execution
You can define a command that automatically executes upon connection to another host. Any appropriate EXEC command and any switch or host name that occurs with the EXEC command is allowed. To do so, use this command in line configuration mode:
DSLAM(config-line)#autocommand command
Define a command string to be automatically executed.
Specifying the Transport Protocol for a Specific Line
You can specify the protocols for individual lines by setting the protocol for incoming and outgoing connections and changing the default (preferred) protocol for a line. The default transport protocol is Telnet.
To specify transport protocols, use one or more of these commands in line configuration mode:
The system accepts a host name entry at the EXEC system prompt as a Telnet command. If you incorrectly type the host name, the system interprets the entry as an incorrect Telnet command and displays an error message indicating that the host does not exist. The transport preferred none command disables this option if you incorrectly type a command at the EXEC prompt, and the system does not attempt to make a Telnet connection.
Establishing Terminal Session Limits
You can set a time limit on a terminal session. To limit terminal sessions, use this commands in line configuration mode:
Setting Up Modem Control on the Auxiliary Port
This section describes modem control and how to configure it on the modem port. These subsections are included:
•
•
•
•
•
•
•
•
Modem Control Process
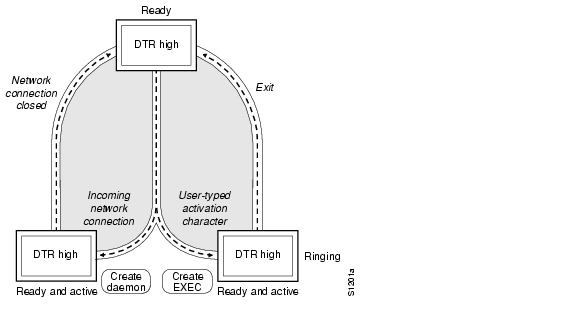
Figure 2-1 illustrates how modem control works on the DSLAM auxiliary port.
Figure 2-1 EXEC and Daemon Creation on a Line with No Modem Control
These figures show two processes:
•
•
In the figures, the current signal state and the signal line are listed inside each box. The state of the line is listed next to the box. (You can display the current state of a line with the show line command.) Events that change that state appear in italics along the event path, with the software actions described within the ovals.
Figure 2-1 illustrates line behavior when no modem control is set. The data terminal ready (DTR) output is always high, and CTS and RING are ignored. The DSLAM creates an EXEC when the activation character is typed. Incoming Transmission Control Protocol (TCP) connections occur instantly if the line is not in use and can be closed only by the remote host.
Configuring Automatic Dialing
With the dialup capability, you can set a modem to automatically dial the phone number of a remote DSLAM. This feature offers cost savings because phone line connections are made as needed. You pay for using the phone line only when there is data to be received or sent. To configure a line for automatic dialing, use this command in line configuration mode:
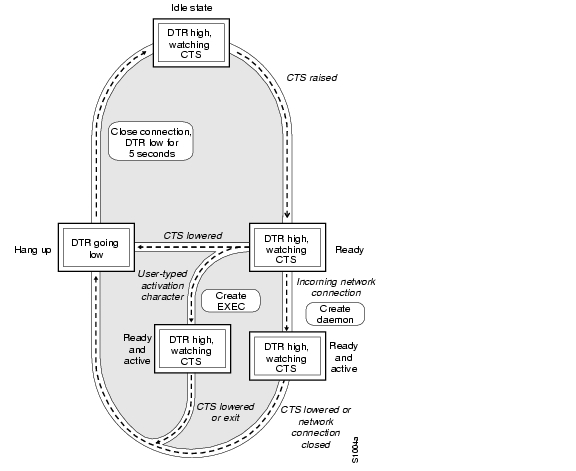
Automatically Answering a Modem
You can configure a line to automatically answer a modem. You also configure the modem to do this:
•
•
•
Note
Wire the modem's CD signal (generally pin 8) to the RING input (pin 22) of the DSLAM, then use this command in line configuration mode:
You can turn on the modem's hardware flow control independently to act on the status of the DSLAM's clear to send (CTS) input. Wire CTS to the signal the modem uses for hardware flow control. If the modem is set to control hardware flow in both directions, you may also need to wire the modem's flow control input to a signal that the DSLAM always sets to high (such as DTR).
Figure 2-2 illustrates the modem dialin process. When the DSLAM detects a signal on the RING input of an idle line, it starts an EXEC or autobaud process on that line. If the RING signal disappears on an active line, the DSLAM closes any open network connections and terminates the EXEC. If the user exits the EXEC or the DSLAM terminates it because of no user input, the line hangs up the modem by lowering the DTR signal for 5 seconds. After 5 seconds, the modem is ready to accept another call.
Figure 2-2 EXEC Creation on a Line Configured for a High-Speed Dial-Up Modem
Supporting Dial-In and Dial-Out Modems
To configure a line for both incoming and outgoing calls, use this command in line configuration mode:
Figure 2-3 illustrates the modem in-out process.
Figure 2-3 EXEC and Daemon Creation on a Line Configured for Incoming and Outgoing Calls
If the line is activated by:
•
•
Note
Configuring a Line Timeout Interval
You can change the interval that the DSLAM waits for CTS after raising DTR in response to RING from the default of 15 seconds. To do so, use this command in line configuration mode:
Closing Modem Connections
You can configure a line to close all connections from a user's terminal when the terminal is turned off, and prevent inbound connections to devices that are out of service. To do so, use this command in line configuration mode:
Figure 2-4 illustrates the modem printer process requirement for a high CTS throughout the use of the line.
Figure 2-4 EXEC and Daemon Creation on a Line Configured for Continuous CTS
If CTS is not high, the user's typed input is ignored and incoming connections are refused (or stepped to the next line in a rotary group).
A DSLAM can reliably detect a CTS signal change if the signal remains in the new state for at least one full second.
Supporting Old-Style Dial-In Modems
The DSLAM supports dial-in modems that use DTR to control the off-hook status of the telephone line. To do this, use this command while in line configuration mode:
Figure 2-5 illustrates the modem call in process.
Figure 2-5 EXEC Creation on a Line Configured for Modem Callin
When a modem dialing line is idle, the DTR is in a low state and waits for a transition to occur on the RING input. This transition causes the line to raise DTR and start watching the CTS signal from the modem. After the modem raises CTS, the DSLAM creates an EXEC on the line. If the timeout interval (set with the modem answer-timeout command) expires before the modem raises CTS, the line lowers DTR and returns to the idle state
Note
Although you can use the modem callin line configuration command with newer modems, the modem dialin line configuration command described earlier in this section is more appropriate. The modem dialin command frees up CTS for hardware flow control. Modern modems do not require the DTR to take a phone line off-hook.
Configuring Rotary Groups
You can make connections to the next free line in a group of lines, also called a rotary or hunt group. A line can be in only one rotary group. A rotary group can consist of a single line or several contiguous lines. The console line (line 0) cannot be in a rotary group.
If you want to assign the rotary as the single auxiliary port line because the auxiliary port is not necessarily the same line number on all hardware. By assigning the line to a rotary group, you do not have to track the actual line number. Another reason to use a rotary group is that if the device supports local area transport (LAT), an inbound service can only be bound to a rotary group. It cannot be bound to a port number.
To configure a rotary group, use this command in line configuration mode:
Configuring High-Speed Modem Support
Modems that operate over normal dial-up telephone lines at speeds of 9600 bits per second (bps) and higher do not guarantee a specific throughput; instead, they operate at a speed that depends on the quality of the line, the effectiveness of data compression algorithms on the data being transmitted, and other variables. These modems use hardware flow control to stop the data from reaching the host by toggling an EIA/TIA-232 signal when they cannot accept any more data.
In addition to hardware flow control, dial-up modems require special software handling. You must configure the modems to:
•
•
•
The DSLAM supports hardware flow control on its CTS input, which is also used by the normal modem handshake. To configure and use a high-speed modem, perform these tasks, beginning in line configuration mode:
Supporting Reverse TCP Connections
The DSLAM can receive incoming connections on the auxiliary port. This capability allows you to attach serial printers, modems, and other shared peripherals to the DSLAM and drive them remotely from other systems. The DSLAM supports reverse TCP connections.
Front-Ending
The specific TCP port or socket to which you attach the peripheral device determines the type of service the DSLAM provides on that line. When you attach the serial lines of a computer system or a data terminal switch to the auxiliary port of the DSLAM, the DSLAM acts as a network front end for a host that does not support the TCP/IP protocols. This arrangement is sometimes called front-ending or reverse connection mode.
To connect the auxiliary port, the remote host or terminal must specify a particular TCP port on the DSLAM. If Telnet protocols are required, that port is 2000 (decimal) plus the decimal value of the line number.
TCP Streams
If a raw TCP stream is required, the port is 4000 (decimal) plus the decimal line number. The raw TCP stream is usually the required mode for sending data to a printer.
The Telnet protocol requires that carriage return characters be translated into carriage return and line feed character pairs. You can turn this translation off by specifying the Telnet binary mode option. To specify this option, connect to port 6000 (decimal) plus the decimal line number.
Defining Terminal Operation Characteristics
In line configuration mode, you can set terminal operation characteristics for that line until you change the line parameters.
You can temporarily change the line settings using the terminal EXEC commands described in the Chapter 1, "Cisco DSLAM User Interface."
Define the terminal operation characteristics by performing the tasks in these sections:
•
•
•
•
•
•
•
Specifying the Terminal Type
You can specify the type of terminal connected to a line. This feature has two benefits: it records the type of terminal attached to a line, and it can inform the remote host of the terminal type for display management. To specify the terminal type, use this command in line configuration mode:
Setting the Terminal Screen Length and Width
By default, the DSLAM provides a screen display of 24 lines by 80 characters. You can reconfigure these values if they do not meet the needs of your terminal by performing these tasks in line configuration mode:
length screen-length
Set the screen length.
width characters
Set the screen width.
The values set can be learned by some host systems that use this type of information in terminal negotiation. Set a value of 0 for the screen length to disable pausing between windows of output.
Defining Escape Character and Other Key Sequences
You can define or modify the default key sequences to execute functions for system escape, terminal activation, disconnect, and terminal pause. To define or change the default sequence, use one or more of these commands in line configuration mode:
Note
Specifying the International Character Display
You can use a 7-bit character set (such as ASCII) or you can enable a full 8-bit international character set (such as ISO 8859) to allow special graphical and international characters for use in banners and prompts, and to add special characters such as software flow control. You can configure these settings globally by interface or locally at the user level. Use these criteria for determining the configuration mode to use when setting up this feature:
•
•
Note
To specify a character set on a global basis, use one or both of these commands in global configuration mode:
To specify a character set based on hardware or software, or on a per-line basis, use the appropriate command in line configuration mode:
Note
Setting Character Padding
You can change the character padding on a specific output character. Character padding adds a number of null bytes to the end of the string and can make a string conform to an expected length. To set character padding, use this command in line configuration mode:
padding ascii-number count
Set padding, count, on a specific output character, ascii-number, for the specified line.
Disabling Enhanced Editing Mode
To disable enhanced editing mode and revert to the editing mode of earlier software releases, use this command in line configuration mode:
You can disable enhanced editing if you have prebuilt scripts that do not interact well when enhanced editing is enabled. You can reenable enhanced editing mode using the editing command.
Providing Line Connection Information after the Login Prompt
You can provide the host name, line number, and location each time an EXEC is started or an incoming connection is made. The line number banner appears immediately after the EXEC banner or incoming banner. It is useful for tracking problems with modems because it lists the host and line for the modem connection. Modem information is also included if applicable.
To provide service line number information, use this command in global configuration mode:
service linenumber
Provide service line number information after the EXEC or incoming banner.
Enabling Password Checking at Login
You can enable password checking on a particular line so that the user is prompted to enter a password at the system login screen. You must then also specify a password. To do so, perform these tasks in line configuration mode:
login
Enable password checking on a per-line basis using the password specified with the password command.
password password
Assign a password to a particular line.
You can enable password checking on a per-user basis so that authentication is based on the user name specified with the username global configuration command. To enable this type of password checking, use one of these commands in line configuration mode:
Use the login tacacs command with Terminal Access Controller Access Control System (TACACS) and extended TACACS Plus. Use the login authentication command with authentication, authorization, and accounting (AAA)/TACACS+.
By default, virtual terminals require passwords. If you do not set a password for a virtual terminal, it responds to attempted connections by displaying an error message and closing the connection. Use the no login command to disable this behavior and allow connections without a password.
Checking Password Examples
This example shows password checking enabled for a virtual terminal line 1:
DSLAM(config)# line vty 1DSLAM(config-line)# loginDSLAM(config-line)# password letmeinThis example shows password checking enabled on a per-user basis:
DSLAM(config)# username jksmith password 0 letmeinDSLAM(config)# username lmjones password 0 littlerockDSLAM(config)# line vty 1DSLAM(config-line)# login localConfiguring Terminal Banner Messages
These sections explain how to configure terminal messages:
•
•
•
•
•
Configuring a Message-of-the-Day Banner
You can configure a message-of-the-day (MOTD) banner to display on all connected terminals. This message is displayed at login and is useful for sending messages that affect all network users, such as impending system shutdowns. To do so, use this command in global configuration mode:
Configuring a Line Activation Message
You can configure a line activation message to display when an EXEC process such as line activation or an incoming connection to a virtual terminal is created. To do so, use this command in global configuration mode:
banner exec c message c
Configure a message to be displayed on terminals with an interactive EXEC.
Configuring an Incoming Message Banner
You can configure a message to display on terminals connected to reverse Telnet lines. This message is useful for providing instructions to users of these types of connections. Reverse Telnet connections are described in more detail in the "Supporting Reverse TCP Connections" section.
To configure the message that will be sent on incoming connections, use this command in global configuration mode:
banner incoming c message c
Configure messages to display on terminals connected to reverse Telnet lines.
Configuring an Idle Terminal Message
You can configure messages to display on a console or terminal that is not in use. Also called a vacant message, this message is different from the banner message displayed when an EXEC process is activated. To configure an idle terminal message, use this command in line configuration mode:
Enabling or Disabling the Display of Messages
You can control display of the MOTD and line activation banners. By default, these banners display on all lines. To suppress or resume these messages, use one of these commands in line configuration mode:
no exec-banner
Suppress banner display.
exec-banner
Resume the display of the EXEC or MOTD banners.
Banner Message Example
This example shows how to use the banner global configuration command and
no exec-banner line configuration command to notify your users that the server will be reloaded with new software:DSLAM(config)# banner exec /Enter TEXT message. End with the character '/'.Unauthorized access prohibited./DSLAM(config)# banner incoming /You are connected to a Hayes-compatible modem.Enter the appropriate AT commands.Remember to reset anything to change before disconnecting./DSLAM(config)# banner motd /The switch will go down at 6pm for a software upgrade./DSLAM(config)# line vty 0 4DSLAM(config-line)# no exec-bannerDSLAM(config-line)#
![]()
![]()
![]()
![]()
![]()
![]()
![]()
![]()
Posted: Fri Dec 3 14:10:34 PST 2004
All contents are Copyright © 1992--2004 Cisco Systems, Inc. All rights reserved.
Important Notices and Privacy Statement.