|
|

This chapter describes the Element Management System (EMS) alarm server, and includes the following sections:
The EMS alarm server application works in conjunction with the UNIX and Windows NT versions of EMS. Alarms are user configurable for each NE.
Launching the EMS alarm server is detailed in "Launching EMS."
Step 2 Double-click the node nameplate (located above the IP address) to open the NE Provisioning window. (See Figure 17-1.)

Step 3 Select Alarm Provisioning in the function bar at the left. (See Figure 17-2.)

Step 4 In the box under the Alarm Destination/Server IP Address field, highlight the first IP address (0.0.0.0).
Step 5 In the Alarm Destination/Server IP Address field, enter the alarm server IP address. (See Figure 17-3.)
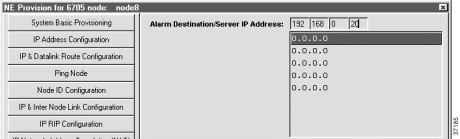
Step 6 Click Apply at the bottom of the screen.
Step 7 Click Exit in the function bar at the left.
From Cisco 6700 NetView, (see Cisco 6700 NetView, Alarm Server Connected), select Applications > Connect Alarm Server from the menu bar.

If the alarm server is connected, the title bar displays the IP address of the alarm server, and the message "Successfully connected to the alarm server..." displays in the message bar at the bottom of the window (not shown in this illustration).
If EMS cannot connect to the alarm server, the title bar reads "Failed to connect to alarm server." Either the alarm server is not running, or it has been provisioned with an incorrect IP address.
The polling interval determines how often the alarm server checks for alarm conditions. To configure the polling interval, select Applications > Configure Polling Interval from the Cisco 6700 NetView menu bar.
 |
Note An alarm server password is required to complete the following procedure. If you do not enter the alarm server password, you can still monitor the alarm server, but you cannot shut it down. Contact your EMS administrator for the alarm server password. |
Step 2 Respond to the login prompt by entering the alarm server password and clicking OK.
EMS launches the alarm server status window, displaying the IP address of the alarm server host and the status of the alarm servers and daemons. (See Figure 17-5.)
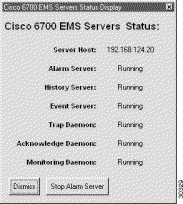
Step 3 To shut down the EMS alarm server, click Stop Alarm Server.
Step 4 Respond to the confirmation prompt by clicking Yes.
Step 5 Click Dismiss to return to Cisco 6700 NetView.
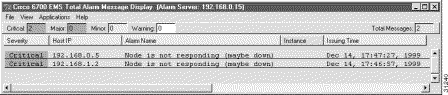
The alarm display lists the following information:
To sort the alarm display by a field type, click on the header bar of the field used as the sort criterion.
|
Note You must scroll to the right to see the entire display. |
The alarm message display window also contains the following menus and menu options:
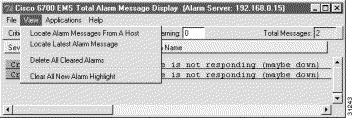
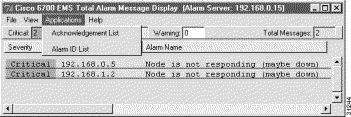
Figure 17-9 shows an example of the alarm ID list. Figure 17-13 shows an example of the alarm acknowledgement list.

You can acknowledge an alarm in EMS by attaching a comment to the alarm. This is not the same as clearing an alarm; an acknowledged alarm is still listed in the alarm display as active.

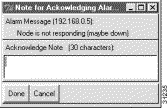
Step 2 Enter an attachment for the alarm, and click Done. EMS returns to the alarm display. The alarm display shows a dark blue background in the Severity field of the acknowledged alarm. (See Figure 17-12.)

Step 3 Right-click on the acknowledged alarm and select Display Acknowledgement Note to show the attachment for the acknowledged alarm.
Step 4 To show a list of all acknowledged alarms, select Applications > Acknowledgement List from the alarm display window. EMS displays the acknowledgement list. (See Figure 17-13.)

Clearing an alarm removes the alarm from the alarm display and any alarm lists.
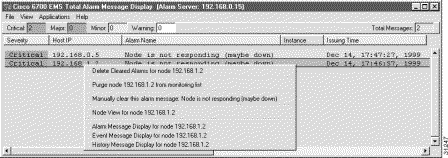
Step 2 Select Manually clear this alarm message from the pop-up menu. (See Figure 17-14.)
Other alarm host options include the following:
You can purge a node from the alarm monitoring list. This disables alarm reporting from the selected node.
Step 2 Respond to the confirmation prompt by clicking Yes. EMS returns to the alarm display window. Purged nodes are shown with a strikeout through the alarm name and a bright green background in the Severity field. (See Figure 17-12.)
The history message display provides a summary of all alarm conditions that have been cleared (resolved) to date. You cannot modify or delete the messages in this display, but you can sort them by time of occurrence, severity, or alarm name.
Step 2 Select History Message Display from the popup menu. (See Figure 17-15.)

|
Note You must scroll to the right to see the entire display. |
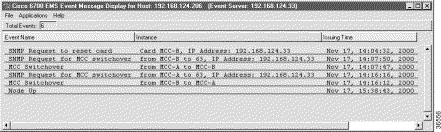
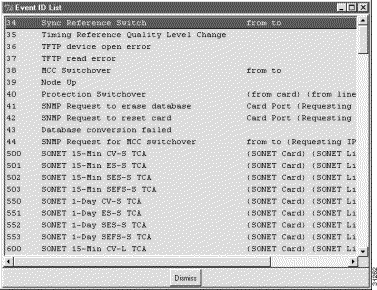
The event message display provides a summary of NE events that do not affect service (such as MCC switchover and timing reference switchover). You cannot modify or delete the messages in this display, but you can sort them by time of occurrence or alarm name. From the event message display, you can view a list of all possible event ID numbers.
Step 2 Select Event Message Display from the popup menu. (See Figure 17-16.)
|
Note You must scroll to the right to see the entire display. |
From the event message display window (see "Viewing the Event Message Display" section), select Applications > Event ID List. EMS displays the event ID list. (See Figure 17-17.)
![]()
![]()
![]()
![]()
![]()
![]()
![]()
![]()
Posted: Mon Feb 5 13:11:52 PST 2001
All contents are Copyright © 1992--2001 Cisco Systems, Inc. All rights reserved.
Important Notices and Privacy Statement.