|
|

This chapter describes upgrade and maintenance procedures for the Cisco 6015 system.
Cisco recommends that you maintain, on a TFTP server, current copies of three files for each Cisco 6015 system:
If you keep copies of these files on a TFTP server, you can easily recover from a fault in an NI-2 card. You can simply replace the NI-2 card and download the software image and configuration file from the TFTP server. Remember to update your backup files whenever you change your configuration or upgrade your Cisco IOS software.
Complete the following steps to copy the Cisco IOS software image and configuration file to a TFTP server:
Step 2 Enter the dir command to display the names of the files:
Step 3 Enter a copy command to copy the IOS software file to the node's TFTP server:
Step 4 Enter a second copy command to copy the configuration file to the node's TFTP server:
This section details the installation and removal procedures for the following field replaceable unit (FRU) hardware components:
 |
Tip See the "General Maintenance Guidelines" section for installation and replacement practices for the Cisco 6015 system cards and modules. |
 |
Caution Proper ESD protection is required whenever you handle Cisco equipment. Installation and maintenance personnel should be properly grounded using ground straps to eliminate the risk of ESD damage to the equipment. Cards are subject to ESD damage whenever they are removed from the chassis. See the "Preventing Electrostatic Discharge Damage" section for ESD grounding jack locations on the Cisco 6015 system. |
The following sections detail the installation and removal procedures for the 4xflexi.
Complete these steps to install the 4xflexi in the Cisco 6015 chassis.
 |
Note The 4xflexi can be used only in a commercial environment. It cannot be used in an outside-plant environment. |
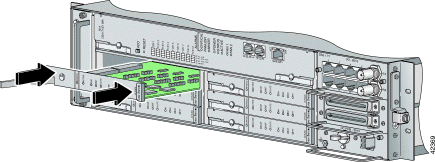
Step 2 Hold the 4xflexi horizontally, with the line card faceplate toward you and the connectors facing the chassis slot.
Step 3 Horizontally align the line card edge with the guides at the right and left of the slot in the Cisco 6015.
Step 4 Lift up on the ejector tab and gently apply pressure to the faceplate while pushing the line card into the slot.
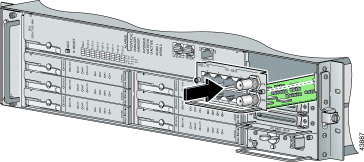
Figure 7-1 shows the 4xflexi installation for a Cisco 6015 chassis.
Step 5 Push on the faceplate of the line card to fully seat the line card.
Step 6 Press down on the ejector tab to secure the line card and connect it to the backplane.
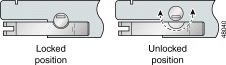
Step 7 Use a flat-head screwdriver to turn the locking tab so that it overlaps the line card ejector tab to prevent inadvertent dislodging. Figure 7-2 shows how to position the locking tab.
Step 8 Verify that the STATUS LED is solid green after the brief self-test. If the STATUS LED is not green after the self-test, see "Troubleshooting," for troubleshooting procedures.
|
Note If you are installing the line card for the first time, refer to the provisioning procedures in the Configuration Guide for Cisco DSLAMs with NI-2. |
Complete the following steps to remove a 4xflexi from the Cisco 6015 chassis:
Step 2 Use a flat-head screwdriver to move the locking tab from the locked to the unlocked position. Be sure to turn the locking tab so that it does not overlap the line card ejector tab, as shown in Figure 7-2.
Step 3 Lift up on the ejector tab. This action disconnects the line card from the backplane.
Step 4 Carefully slide the line card out of the slot.
Either replace the 4xflexi that you remove, or insert a blank faceplate in the empty slot. See the "Installing a 4xflexi" section for 4xflexi installation procedures. See the "Installing a Blank Faceplate" section for blank faceplate installation procedures.
The following sections detail the installation and removal procedures for the 8xDMT.
Complete these steps to install the 8xDMT in the Cisco 6015 chassis.
|
Note Install the 8xDMT with part number ATUC-8-DMT-1 only in a commercial environment. Install the 8xDMT with part number ATUC-8-DMT-1-H only in an outside-plant environment. |
Step 2 Hold the 8xDMT horizontally, with the line card faceplate toward you and the connectors facing the chassis slot.
Step 3 Align the line card edge with the guides at the right and left of the slot in the Cisco 6015.
Step 4 Lift up on the ejector tab and gently apply pressure to the faceplate while pushing the line card into the slot.
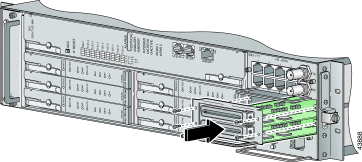
Figure 7-3 shows the 8xDMT installation in a Cisco 6015 chassis.
Step 5 Push on the faceplate of the line card to fully seat the card.
Step 6 Press down on the ejector tab to secure the line card and connect it to the backplane.
Step 7 Use a flat-head screwdriver to turn the locking tab so that it overlaps the line card ejector tab to prevent inadvertent dislodging. Figure 7-4 shows how to position the locking tab.
Step 8 Verify that the STATUS LED is solid green after the brief self-test. If the STATUS LED is not green after the self-test, see "Troubleshooting," for troubleshooting procedures.
|
Note If you are installing the line card for the first time, refer to the provisioning procedures in the Configuration Guide for Cisco DSLAMs with NI-2. |
Complete the following steps to remove an 8xDMT from the Cisco 6015 chassis:
Step 2 Use a flat-head screwdriver to move the locking tab from the locked to the unlocked position. Be sure to turn the locking tab so that it does not overlap the line card ejector tab, as shown in Figure 7-4.
Step 3 Lift up on the ejector tab. This action disconnects the line card from the backplane.
Step 4 Carefully slide the line card out of the slot.
Either replace the 8xDMT that you remove, or insert a blank faceplate in the empty slot. See the "Installing an 8xDMT" section for 8xDMT installation procedures. See the "Installing a Blank Faceplate" section for blank faceplate installation procedures.
The following sections detail the installation and removal procedures for the 8xDMT over ISDN.
Complete these steps to install the 8xDMT over ISDN in the Cisco 6015 chassis.
|
Note The 8xDMT over ISDN is designed for use in a commercial environment only. The 8xDMT over ISDN is designed for use in a Cisco 6015 with a POTS splitter configuration only. Reseating the 8xDMT over ISDN during simultaneous DSL and ISDN traffic operation results in the ISDN signal being temporarily interrupted. To reseat the 8xDMT over ISDN in the chassis, shut down all the subscriber ports on the line card, wait one minute, and then replace the line card. |
Step 2 Hold the line card horizontally, with the module faceplate toward you and the connectors facing the chassis slot
Step 3 Align the line card edge with the guides at the left and right of the slot in the chassis.
Step 4 Lift up on the ejector tab and gently apply pressure to the faceplate while pushing the line card into the slot.
Figure 7-5 shows the 8xDMT over ISDN installation in a Cisco 6015 chassis.
Step 5 Push on the faceplate of the line card until it stops to fully seat the card.
Step 6 Press down on the ejector tab to secure the line card.
Step 7 Use a flat-head screwdriver to turn the locking tab so that it overlaps the line card ejector tab to prevent inadvertent dislodging. Figure 7-6 shows how to position the locking tabs.
Step 8 Verify that the STATUS LED is solid green after the brief self-test. If the STATUS LED is not green after the self-test, see the appropriate hardware guide for your chassis for troubleshooting procedures.
|
Note If you are installing the line card for the first time, refer to the provisioning procedures in the Configuration Guide for Cisco DSLAMs with NI-2. |
Complete the following steps to remove an 8xDMT over ISDN from the Cisco 6015 chassis:
Step 2 Use a flat-head screwdriver to move the locking tab from the locked to the unlocked position. Be sure to turn the locking tab so that it does not overlap the line card ejector tab as shown in Figure 7-6.
Step 3 Lift up on the ejector tab. This action disconnects the line card from the backplane.
Step 4 Carefully slide the line card out of the slot.
Either replace the line card that you remove, or insert a blank faceplate in the empty slot. See the "Installing an 8xDMT over ISDN" section for 8xDMT over ISDN installation instructions. See the "Installing a Blank Faceplate" section for blank faceplate installation instructions.
The following sections detail the installation and removal procedures for the 8xG.SHDSL.
|
Note The 8xG.SHDSL can be used only in a commercial environment. It cannot be used in an outside-plant environment. |
Complete the following steps to install the 8xG.SHDSL in the Cisco 6015 chassis:.
Step 2 Hold the 8xG.SHDSL horizontally, with the line card faceplate toward you and the connectors facing the chassis slot.
Step 3 Align the line card edge with the guides at the right and left of the slot in the Cisco 6015.
Step 4 Lift up on the ejector tab and gently apply pressure to the faceplate while pushing the line card into the slot.
Figure 7-7 shows the 8xG.SHDSL installation in a Cisco 6015 chassis.
Step 5 Push on the faceplate of the line card to fully seat the line card.
|
Note The card must be properly seated in its slot to maintain the EMI emissions containment. Apply gentle pressure if needed to ensure that the board is properly seated. |
Step 6 Press down on the ejector tab to secure the line card and connect it to the backplane.
Step 7 Use a flat-head screwdriver to turn the locking tab so that it overlaps the line card ejector tab to prevent inadvertent dislodging. Figure 7-4 shows how to position the locking tab.
Step 8 Verify that the STATUS LED is solid green after the brief self-test. If the STATUS LED is not green after the self-test, see "Troubleshooting," for troubleshooting procedures.
|
Note If you are installing the line card for the first time, refer to the provisioning procedures in the Configuration Guide for Cisco DSLAMs with NI-2. |
Complete the following steps to remove an 8xG.SHDSL from the Cisco 6015 chassis:
Step 2 Use a flat-head screwdriver to move the locking tab from the locked to the unlocked position. Be sure to turn the locking tab so that it does not overlap the line card ejector tab, as shown in Figure 7-4.
Step 3 Lift up on the ejector tab. This action disconnects the line card from the backplane.
Step 4 Carefully slide the line card out of the slot.
Either replace the 8xG.SHDSL that you remove, or insert a blank faceplate in the empty slot. See the "Installing an 8xG.SHDSL" section for 8xG.SHDSL installation procedures. See the "Installing a Blank Faceplate" section for blank faceplate installation procedures.
Blank faceplates should occupy any empty line card slots in the Cisco 6015 chassis. Blank faceplate installation is similar to line card installation.
The following sections detail the installation and removal procedures for a blank faceplate.
Complete the following steps to install a blank faceplate in the Cisco 6015 chassis:
Step 2 Horizontally align the blank faceplate edge with the guides at the left and right of the slot.
Step 3 Lift up on the ejector tab and gently apply pressure to the faceplate while pushing the blank faceplate into the slot.
Step 4 Push on the faceplate to fully seat the blank faceplate.
Step 5 Press down on the ejector tab to secure the faceplate.
Complete the following steps to remove a blank faceplate from the Cisco 6015 chassis:
Step 2 Lift up on the ejector tab. This action disconnects the line card from the backplane.
Step 3 Carefully slide the line card out of the slot.
Either replace the blank faceplate that you remove, or insert a line card in the empty slot. See the "Installing a Blank Faceplate" section for blank faceplate installation procedures. For line card installation procedures, see either the "Installing a 4xflexi" section or the "Installing an 8xDMT" section.
The following sections detail the installation and removal procedures for the NI-2 card.
 |
Warning The ports labeled "ENET," "CNSL," and "AUX" are SELV circuits. SELV circuits should be connected only to other SELV circuits. Because the DSL circuits are treated like telephone-network voltage, avoid connecting the SELV circuit to the TNV circuits. |
|
Tip Cisco recommends that you label each data cable at both ends to identify its destination. |
|
Caution Service is interrupted for the entire system when the NI-2 card is removed. |
Complete these steps to install the NI-2 card in the Cisco 6015 chassis.
|
Note The DS3+T1/E1 IMA NI-2 card is used in a commercial environment. The ITEMP DS3+T1/E1 IMA NI-2 card is used in an outside-plant environment. |
|
Tip Cisco recommends that you label each data cable at both ends to identify its destination. |
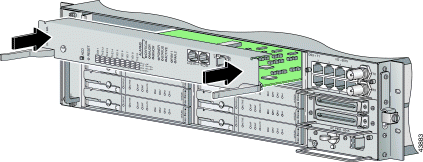
Step 2 Hold the NI-2 card horizontally, with the faceplate toward you and the connectors facing the chassis slot.
Step 3 Horizontally align the card edge with the guides at the right and left of the slot in the Cisco 6015.
Step 4 Lift up on the ejector tabs and gently apply pressure to the faceplate while pushing the card into the slot.
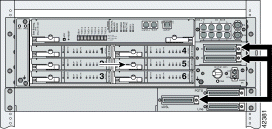
Figure 7-9 shows the module installation in a Cisco 6015 chassis.
Step 5 Push on the faceplate of the card to fully seat the card.
Step 6 Press down on the ejector tabs to secure the card and connect it to the backplane.
Step 7 Use a flat-head screwdriver to turn the locking tabs so that they overlap the NI-2 card ejector tabs to prevent inadvertent dislodging. Figure 7-10 shows how to position the locking tabs.
Step 8 Verify that the STATUS LED is solid green after the brief self-test. If the STATUS LED is not green after the self-test, see "Troubleshooting," for troubleshooting procedures.
|
Note If you are installing the line card for the first time, refer to the provisioning procedures in the Configuration Guide for Cisco DSLAMs with NI-2. |
Step 9 Connect the Ethernet cable to the management network.
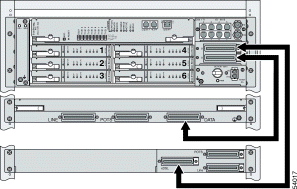
a. Connect the 10BaseT RJ-45 connector to the NI-2 card (ENET). Figure 7-11 shows where to connect the Ethernet cable.
b. Run the cable through the ferrite one time, loop the cable back through the ferrite, and clamp the ferrite shut.
c. Connect the other end of the cable to the management network (for example, a LAN).
Step 10 Connect a VT100-compatible terminal to the system console port on the NI-2 card (CNSL). Connect the terminal to a power source and set it up using the values that are shown in Table 7-1. Figure 7-11 shows where to connect the console cable.
Step 11 Connect a terminal, a modem, or another serial device to the auxiliary port on the NI-2 card (AUX). Figure 7-11 shows where to connect the auxiliary cable.
Complete these steps to remove an NI-2 card from the Cisco 6015 chassis.
|
Note The DS3+T1/E1 IMA NI-2 card is used in a commercial environment. The ITEMP DS3+T1/E1 IMA NI-2 card is used in an outside-plant environment. |
Step 2 Disconnect the RJ-45 connector from the auxiliary port on the NI-2 card (AUX).
Step 3 Disconnect the VT100-compatible terminal connector from the system console port on the NI-2 card (CNSL).
Step 4 Disconnect the 10BaseT RJ-45 connector from the ethernet port on the NI-2 card (ENET).
Step 5 Use a flat-head screwdriver to move the locking tabs from the locked to the unlocked position. Be sure to turn the locking tabs so that they do not overlap the NI-2 ejector tabs, as shown in Figure 7-10.
Step 6 Lift up on the ejector tabs. This action disconnects the card from the backplane.
Step 7 Carefully slide the card out of the slot.
See the "Installing a DS3+T1/E1 IMA or ITEMP DS3+T1/E1 IMA NI-2 Card" section for NI-2 card installation procedures.
Complete these steps to install the NI-2 card in the Cisco 6015 chassis.
|
Warning The ports labeled "ENET," "CNSL," and "AUX" are SELV circuits. SELV circuits should be connected only to other SELV circuits. Because the DSL circuits are treated like telephone-network voltage, avoid connecting the SELV circuit to the TNV circuits. |
|
Tip Cisco recommends that you label each data cable at both ends to identify its destination. |
|
Caution Service is interrupted for the entire system when the NI-2 card is removed. |
|
Caution Installing the cards in the chassis with the power leads reversed can damage the cards. |
|
Warning Do not stare into the beam or view it directly with optical instruments. |
Complete the following steps to install an OC-3c/OC-3c NI-2 card in the chassis. It is important that you complete each step before moving on to the next step.
Step 2 Hold the NI-2 card horizontally, with the faceplate toward you and the connectors facing the chassis slot.
Step 3 Horizontally align the card edge with the guides at the right and left of the slot in the Cisco 6015.
Step 4 Lift up on the ejector tabs and gently apply pressure to the faceplate while pushing the card into the slot.
Figure 7-12 shows the module installation in a Cisco 6015 chassis.
Step 5 Push on the faceplate of the card to fully seat the card.
Step 6 Press down on the ejector lever to secure the card and connect it to the backplane.
Step 7 Use a flat-head screwdriver to turn the locking tabs so that they overlap the NI-2 card ejector levers to prevent inadvertent dislodging.Use a flat-head screwdriver to turn the locking tab so that it overlaps the NI-2 card to prevent inadvertent dislodging, as shown in Figure 7-13.
Step 8 Verify that the STATUS LED is solid green after the brief self-test. If the STATUS LED is not green after the self-test, see "Troubleshooting," for troubleshooting procedures.
|
Note If you are installing the NI-2 card for the first time, refer to the provisioning procedures in the Configuration Guide for Cisco DSLAMs with NI-2. |
Step 9 Attach the RX cable from the ATM switch to the TX connector in the inset on the faceplate of the OC-3c/OC-3c NI-2 card (trunk 1 interface connector TX).
The TX connector is the one closer to the top of the faceplate. The RX connector is closer to the bottom of the faceplate. The connector IDs are silkscreened inside the inset.
Step 10 Attach the TX cable from the ATM switch to the RX connector in the inset on the faceplate of the OC-3c/OC-3c NI-2 card (trunk 1 interface connector RX).
|
Note To cable the chassis for OC-3c subtending, see the appropriate installation chapter for your system. |
Step 11 Connect the Ethernet to the management network.
a. Connect an Ethernet cable to the 10BaseT RJ-45 port (ENET) on the OC-3c/OC-3c NI-2 card faceplate. Figure 7-14 shows where to connect the Ethernet cable.
b. Run the Ethernet cable through the ferrite one time, loop the cable back through the ferrite, and clamp the ferrite shut.
Step 12 Connect the other end of the cable to the management network (for example, a LAN).
Step 13 Connect a VT100-compatible terminal to the system console port on the NI-2 card (CNSL). Connect the terminal to a power source and set it up using the values that are shown in Table 7-1. Figure 7-14 shows where to connect the console cable.
Step 14 Connect a terminal, a modem, or another serial device to the RJ-45 auxiliary port on the NI-2 card (AUX). Figure 7-14 shows where to connect the auxiliary cable.
Complete the following steps to remove an OC-3c/OC-3c NI-2 card from the chassis. It is important that you complete each step before moving on to the next step.
Step 2 Disconnect the cable connected to the RJ-45 auxiliary port (AUX) on the NI-2 card, as necessary.
Step 3 Disconnect the cable connected to the VT100-compatible terminal from the system console port (CNSL) on the NI-2 card, as necessary.
Step 4 Disconnect the cable connected to the 10BaseT RJ-45 port (ENET) on the NI-2 card, as necessary.
Step 5 Disconnect the RX cable from the TX connector in the inset on the faceplate of the NI-2 card (trunk 1 interface connector TX).
Step 6 Disconnect the TX cable from the RX connector in the inset on the faceplate of the NI-2 card (trunk 1 interface connector RX).
Step 7 Disconnect the RX subtend 2 interface connector in the inset on the faceplate of the NI-2 card, if necessary.
Step 8 Disconnect the TX subtend 2 interface connector in the inset on the faceplate of the NI-2 card, if necessary.
Step 9 Use a flat-head screwdriver to move the locking tabs on the faceplate from the locked to the unlocked position. Be sure to turn the locking tabs so that they do not overlap the NI-2 card locking levers, as shown in Figure 7-10.
Step 10 Lift up on the locking levers. This action disconnects the card from the backplane.
Step 11 Carefully slide the card out of the slot.
See the "Installing an OC-3c/OC-3c NI-2 Card" section for NI-2 card installation procedures.
The following sections detail the installation and removal procedures for the I/O module.
|
Tip Cisco recommends that you label each data cable at both ends to identify its destination. |
|
Tip The term subtending refers to the host chassis, and subtended refers to the downstream chassis in a subtended network. |
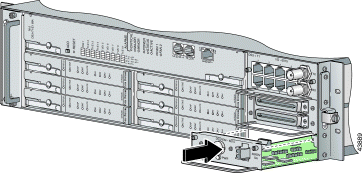
Complete the following steps to install the I/O module in the Cisco 6015 chassis:
Step 2 Power off the Cisco 6015.
a. If you are using AC power and the power cord is plugged into the wall outlet, unplug it.
b. If you are using DC power and the fuses are installed in the fuse and alarm panel, remove them. You can replace the fuses after the system is installed and connected.
Step 3 Horizontally align the module edge with the module guides at the right and left of the slot in the Cisco 6015.
Figure 7-15 shows the I/O module installation.
Step 4 Hold the handle on the front of the module and gently apply pressure while pushing the module into the slot.
Step 5 Push on the faceplate of the module to fully seat the module.
Step 6 Use a flat-head or Phillips-head screwdriver to attach the two I/O module screws to the Cisco 6015 chassis.
Step 7 If you are installing a subtended network, complete the following steps. If you are not installing a subtended network, proceed to Step 8.
|
Note For more information on a subtended network configuration, see the
"Subtended Network Configuration"
section. If unshielded cable is used for FCC Class B or EN55022 Class B compliance, the cables will need to be looped through ferrites. |
a. Connect one end of an RJ-48 cable to one of the RJ-48 receptacles on the I/O module in the subtending host chassis.
b. Connect the other end of the cable to one of the RJ-48 receptacles on the I/O module in a subtended node chassis.
c. Repeat Step 7a and Step 7b to connect the subtending host chassis to each subtended node chassis.
|
Note If you are using a T1 or E1 trunk to the network, the trunk connection will originate at one of the eight RJ-48 receptacles on the I/O module. Therefore, you can subtend only seven node chassis. |
Step 8 Complete the following steps to connect the DS3+T1 I/O module to the network using a DS3 connection. If you are using a T1 connection, proceed to Step 9; if you are using an E1 connection, proceed to Step 10.
a. Verify that you have a DS3+T1 I/O module installed in the Cisco 6015 chassis. The I/O module DS3 connections attach to the ATM switch. Two 75-ohm DS3 Bayonet-Neill-Concelman (BNC) connectors are provided for DS3 TX and RX. Attach one end of a coaxial cable (type 734A or equivalent) to the TX DS3 BNC connector on the I/O module.
b. Attach the other end of the cable that originates at the TX DS3 BNC connector to the RX DS3 BNC connector on the ATM switch.
c. Attach one end of a coaxial cable (type 734A or equivalent) to the RX DS3 BNC connector on the I/O module.
d. Attach the other end of the cable that originates at the RX DS3 BNC connector to the TX DS3 BNC connector on the ATM switch.
Step 9 Complete the following steps to connect the DS3+T1 I/O module to the network using a T1 connection. If you are using an E1 connection, proceed to Step 10.
a. Verify that you have a DS3+T1 I/O module installed in the Cisco 6015 chassis.
b. Connect one end of an RJ-48 cable to one of the RJ-48 receptacles on the I/O module. If you have a subtended network configuration installed, this connection must be made from the I/O module in the subtending host chassis.
|
Note If unshielded cable is used for FCC Class B or EN55022 Class B compliance, the cables will need to be looped through ferrites. |
Step 10 Complete the following steps to connect the E1 I/O module to the network using an E1 connection:
a. Verify that you have an E1 I/O module installed in the Cisco 6015 chassis.
b. Connect one end of an RJ-48 cable to one of the RJ-48 receptacles on the I/O module. If you have a subtended network configuration installed, this connection must be made from the I/O module in the subtending host chassis.
|
Note If unshielded cable is used for FCC Class B or EN55022 Class B compliance, the cables will need to be looped through ferrites. |
Step 11 Plug the AC power cord into the wall outlet or reinsert the fuses in the fuse and alarm panel.
Step 12 Set the circuit breaker on the DC PEM to the ON (1) position.
Complete the following steps to remove an I/O module from the Cisco 6015 chassis:
|
Note If you are using AC power and the power cord is plugged into the wall outlet, unplug it. If you are using DC power and the fuses are installed in the fuse and alarm panel, remove them. You can replace the fuses after the system is installed and connected. The fuse and alarm panel is not provided by Cisco. |
Step 2 Set the circuit breaker on the DC PEM to the OFF (0) position.
Step 3 Disconnect the two DS3 BNC connections from the front of the I/O module, as necessary.
Step 4 Disconnect the T1 or E1 RJ-48 cables from the RJ-48 receptacles on the front of the I/O module, as necessary.
Step 5 Use a flat-head or Phillips-head screwdriver to unscrew the two screws that hold the I/O module to the Cisco 6015 chassis.
Step 6 Hold the extraction handle on the front of the module and carefully slide the module out of the slot.
See the "Installing an I/O Module" section for I/O module installation procedures.
The following sections detail the installation and removal procedures for the DSL interface module.
|
Note If you are using AC power and the power cord is plugged into the wall outlet, unplug it. If you are using DC power and the fuses are installed in the fuse and alarm panel, remove them. You can replace the fuses after the system is installed and connected. The fuse and alarm panel is not provided by Cisco. |
|
Tip Cisco recommends that you label each data cable at both ends to identify its destination. |
Complete the following steps to install the DSL interface module in the Cisco 6015 chassis:
Step 2 Set the circuit breaker on the DC PEM to the OFF (0) position.
Step 3 Horizontally align the module edge with the module guides at the right and left of the slot in the Cisco 6015.
Figure 7-16 shows the DSL interface module installation.
Step 4 Hold the extraction handle on the front of the module and gently apply pressure while carefully pushing the module into the slot.
Step 5 Push on the faceplate of the module to fully seat the module.
Step 6 Use a flat-head or Phillips-head screwdriver and four screws to attach the DSL interface module to the Cisco 6015 chassis.
Step 7 Connect the DSL interface module to the POTS splitter (Cisco 6015 with a POTS splitter configuration) or MDF (Cisco 6015 without a POTS splitter configuration).
Use the cables that are described in the "Required Tools and Equipment" section to connect the DSL interface module to the POTS splitter or MDF. For cabling procedures for each POTS splitter, refer to the appropriate vendor documentation.
|
Note If unshielded cable is used for FCC Class A or EN55022 Class A compliance, the cables will need to be looped through ferrites. |
Figure 7-17 shows the cabling between the DSL interface module and a third-party POTS splitter. These connections are for xDSL data flow between the Cisco 6015 and the POTS splitter.
A system configuration using 8xDMT or 8xDMT over ISDNs requires the installation of an additional POTS splitter. The additional POTS splitter expands the system capacity to 48 subscriber ports. Figure 7-18 shows the cabling between the DSL interface module and two third-party POTS splitters. These connections are for xDSL data flow between the Cisco 6015 and the POTS splitters.
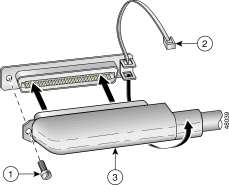
Step 8 Use a flat-head screwdriver to screw in the Champ connectors, and tie wrap the connector to the chassis, as shown in Figure 7-19.
Step 9 Plug the AC power cord into the wall outlet or reinsert the fuses in the fuse and alarm panel.
Step 10 Set the circuit breaker on the DC PEM to the ON (1) position.
Complete the following steps to remove a DSL interface module from the Cisco 6015 chassis:
Step 2 Set the circuit breaker on the DC PEM to the OFF (0) position.
Step 3 Disconnect the two Champ connector cables from the front of the DSL interface module.
Step 4 Use a flat-head or Phillips-head screwdriver to unscrew the four screws that hold the DSL interface module to the Cisco 6015 chassis.
Step 5 Hold the extraction handle on the front of the module and firmly pull the module out of the slot.
See the "Installing a DSL Interface Module" section for DSL interface module installation procedures.
The following sections detail the installation and removal procedures for the DC PEM.
Complete the following steps to install the DC PEM in the Cisco 6015 chassis:
|
Note If you are using AC power and the power cord is plugged into the wall outlet, unplug it. If you are using DC power and the fuses are installed in the fuse and alarm panel, remove them. You can replace the fuses after the system is installed and connected. The fuse and alarm panel is not provided by Cisco. |
Step 2 Set the circuit breaker on the DC PEM to the OFF (0) position.
Step 3 Horizontally align the module edge with the module guides at the right and left of the slot in the Cisco 6015.
Figure 7-20 shows the DC PEM installation.
Step 4 Hold the extraction handle on the front of the module and gently apply pressure while carefully pushing the module into the slot.
|
Note Forcefully inserting the DC PEM in the slot could cause damage to the EMI gasketing located on the top of the faceplate. |
Step 5 Push on the faceplate of the module to fully seat the module.
Step 6 Use a flat-head or Phillips-head screwdriver and two screws to attach the DC PEM to the Cisco 6015 chassis.
Step 7 If you are using AC power, connect the DC PEM to the AC/DC converter.
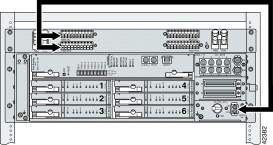
a. Attach one end of the DC power cable (part number 72-2178-01) to the DC PEM, as shown in Figure 7-21.
b. Attach the other end of the cable to the AC/DC converter, as shown in Figure 7-21.
|
Caution If the power connections are improperly connected and power is applied while the cards are installed, the cards and chassis could be damaged. |
Step 8 If you are using DC power, connect the DC PEM to the fuse and alarm panel.
a. Attach one end of the DC power cable (part number 72-2223-01) to the DC PEM, as shown in Figure 7-22.
b. Attach the red wire coming from the DC PEM to a fuse and alarm panel POS (positive) DC connector, as shown in Figure 7-22.
c. Attach the black wire coming from the DC PEM to a fuse and alarm panel NEG (negative) DC connector, as shown in Figure 7-22.
|
Note Connect each Cisco 6015 system component to a separate fuse. Do not power the components in the rack
by chaining them together. See the "DC Power" section for the calculation tables that are necessary to determine the minimum power requirement for each component that is wired to the fuse and alarm panel. |
Step 9 Plug the AC power cord into the wall outlet or reinsert the fuses in the fuse and alarm panel.
Step 10 Set the circuit breaker on the DC PEM to the ON (1) position.
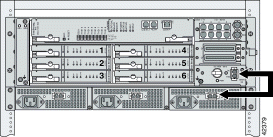
Step 11 Verify that the DC PEM is operational by locating the LEDs on the front of the DC PEM. If the LED is
Step 12 Verify that the AC/DC converter is operational by locating the LEDs on the front of the AC/DC converter.
Complete the following steps to remove a DC PEM from the Cisco 6015 chassis:
Step 2 Set the circuit breaker on the DC PEM to the OFF (0) position.
Step 3 Unplug the power cord from the wall outlet, if you are using AC power.
Step 4 Remove the fuses from the fuse and alarm panel, if you are using DC power.
Step 5 Disconnect the cable that runs from either the fuse and alarm panel or the AC/DC converter to the DC PEM.
Step 6 Use a flat-head or Phillips-head screwdriver to unscrew the two screws that hold the DC PEM to the Cisco 6015 chassis
Step 7 Hold the extraction handle on the front of the module and carefully slide the module out of the slot.
See the "Installing a DC PEM" section for DC PEM installation procedures.
The following sections detail the installation and removal procedures for the fan module.
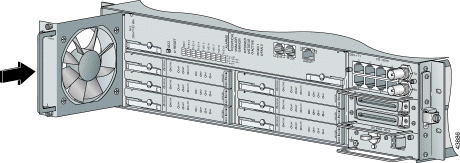
Complete the following steps to install the fan module in the Cisco 6015 chassis:
Step 2 Vertically align the module edge with the module guides at the top and bottom of the slot in the Cisco 6015.
Figure 7-23 shows the fan module installation.
Step 3 Hold the extraction handle on the right side of the module and gently apply pressure while pushing the module into the slot.
Step 4 Push on the faceplate of the module to fully seat the module.
Step 5 Align the two screws that are located at the top and bottom of the module with the screw holes in the Cisco 6015 chassis.
Step 6 Use a flat-head or Phillips-head screwdriver to tighten the screws to secure the fan module.
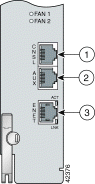
Step 7 Verify that the LEDs on the fan module are solid green once the module is installed and secured. If the LEDs are not green, see "Troubleshooting," for troubleshooting procedures.
Complete the following steps to remove the fan module from the Cisco 6015 chassis:
Step 2 Use a flat-head or Phillips-head screwdriver to unscrew the two screws that hold the fan module to the Cisco 6015 chassis.
Step 3 Hold the extraction handle on the right side of the module and carefully slide the module out of the slot.
|
Caution The Cisco 6015 requires that a fan module be installed when the system is in operation. See the "Installing the Fan Module" section for fan module installation procedures. |
For installation and removal procedures for the AC/DC converter, refer to the AC/DC converter documentation.
![]()
![]()
![]()
![]()
![]()
![]()
![]()
![]()
Posted: Wed Jan 8 12:44:42 PST 2003
All contents are Copyright © 1992--2002 Cisco Systems, Inc. All rights reserved.
Important Notices and Privacy Statement.