|
|

This chapter provides an overview of the Cisco 6015 system. This chapter contains the following sections:
The Cisco 6015 system is part of the Cisco digital subscriber line (DSL) product family that provides end-to-end service by carrying data between a subscriber's home or office and a network, which can be managed by one of the following:
The Cisco 6015 system is also designed for use in multitenant/multiple dwelling units (MTU/MDUs) and can be deployed in either a commercial or an outside-plant environment, such as at a digital loop carrier (DLC) remote site.
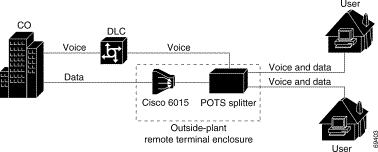
Figure 1-1 details a high-level network architecture diagram of a Cisco 6015 installed in an outside-plant environment.
The Cisco 6015 system sends and receives subscriber data (often Internet service) over existing copper telephone lines and concentrates all traffic onto a single high-speed trunk for transport to the Internet or a corporate intranet. Asymmetric digital subscriber line (ADSL) or single-pair high-speed digital subscriber line, also known as symmetric high bit rate digital subscriber loop (SHDSL), customer premises equipment (CPE) devices, which are connected to PCs or routers at the subscriber site, modulate data so that it can travel over telephone lines to the Cisco 6015 system.
 |
Note For detailed information on the various components in the Cisco DSL product family (including central office [CO] and CPE devices), see the "Related Documentation" section. |
The Cisco 6015 system includes the following hardware and software components:
|
Note The 4xflexi, 8xG.SHDSL, commercial environment 8xDMT, and the 8xDMT over ISDN can be used only in a commercial environment. They cannot be used in an outside-plant environment. For line card intermixing information, see the "Cisco 6015 Cards and Modules" section. |
|
Note The OC-3c/OC-3c NI-2 card can only be used in a commercial environment. The ITEMP DS3+T1/E1 IMA NI-2 card is the only NI-2 card designed for use in an outside-plant environment. |
|
Note The AC/DC converter can be used only in a commercial environment. It cannot be used in an outside-plant environment. |
|
Note Third-party POTS splitters can be installed in a Cisco 6015 with a POTS splitter configuration.
Please verify the compatibility with your Cisco representative. For POTS splitter information, refer to the vendor documentation. A system configuration using 8xDMTs or 8xDMT over ISDNs requires a POTS splitter that expands the system capacity to 48 subscriber ports. Depending on the POTS splitter selected for your configuration, the installation of an additional POTS splitter may be necessary. |
Cisco EMF is based on an object model in which network elements or modules represent the managed entity. Each object is defined by a class and specific attributes. An object can represent a network element or a more abstract entity such as a link relationship, a network, or a container such as a site, shelf, or region.
|
Note See the "Hardware Specifications" section for minimum software and network management release requirements per Cisco 6015 chassis component. |
The Cisco 6015 system includes the following features:
|
Note The Cisco 6015 can also serve as the subtending host chassis to, or a subtended node chassis from, the Cisco 6100, Cisco 6130, Cisco 6160, and Cisco 6260. |
This guide details the installation steps for the following configurations:
The Cisco 6015 with a POTS splitter configuration supports up to 48 subscribers through directly connected modems using ADSL technology. To increase subscribership, you can add additional chassis to your system.
This configuration includes the following hardware components:
|
Note A system configuration using 8xDMTs or 8xDMT over ISDNs requires a POTS splitter that
expands the system capacity to 48 subscriber ports. Depending on the POTS splitter selected for
your configuration, the installation of an additional POTS splitter may be necessary. The 8xDMT over ISDN is designed for use in a configuration with a POTS splitter only. |
Figure 1-2 shows the components that can be used in a Cisco 6015 with a POTS splitter configuration.
|
Note In North America, the DS3+T1 I/O module will be installed in the chassis. In world-wide environments, the E1 I/O module will be installed in the chassis. |
The Cisco 6015 without a POTS splitter configuration supports up to 48 subscribers through directly connected modems using ADSL or SHDSL technology. To increase subscribership, you can add additional chassis to your system.
This configuration includes the following hardware components:
In this configuration, the Cisco 6015 connects directly to the main distribution frame (MDF) in a commercial environment or the enclosure protection block in an outside-plant environment.
Figure 1-3 shows the components that can be used in a Cisco 6015 without a POTS splitter configuration.
|
Note In North America, the DS3+T1 I/O module will be installed in the chassis. In world-wide environments, the E1 I/O module will be installed in the chassis. |
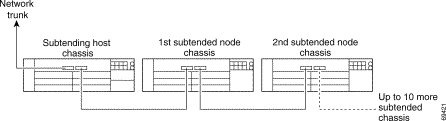
A subtended network configuration
|
Note The Cisco 6015 can also serve as the subtending host chassis to, or a subtended node chassis from, the Cisco 6100, Cisco 6130, Cisco 6160, and Cisco 6260. |
The term subtending refers to the host chassis, and subtended refers to the downstream chassis in a subtended network.
The following subtended network configurations are supported:
The following sections detail the different types of subtending network connections.
In a subtended network configuration using a DS3+T1/E1 IMA NI-2 card or an ITEMP DS3+T1/E1 IMA NI-2 card, you can subtend up to 12 Cisco 6015 chassis through a daisy-chain configuration of IMA links, or a star configuration of IMA links. The subtending chassis connect through one subtending host chassis with a DS3 connection to the ATM backbone.
You can also make the host chassis ATM trunk connection through a T1 or IMA group, but that disables the DS3 interface. See the "IMA Configuration" section for more information on using IMA group or individual links.
|
Note The Cisco 6015 can also serve as the subtending host chassis to, or as a subtended node chassis from, the Cisco 6100, Cisco 6130, Cisco 6160, or Cisco 6260. |
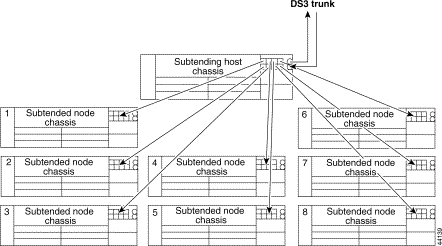
Figure 1-4 shows an example of a subtended network with a star topology. Subtended Network—Star Topology. The subtending host chassis in the middle of the star topology connects directly to the ATM switch. With a DS3 trunk, you can have up to eight subtended node chassis connected to the subtending host chassis.
The DS3+T1/E1 IMA NI-2 card uses IMA technology to aggregate multiple low-speed links into one larger virtual trunk or IMA group. An inverse multiplexer appears to your ATM switch router as one logical pipe. IMA provides you with modular bandwidth to access the ATM network between T1 or E1 and DS3 or E3 rates. The Cisco 6015 allows you to combine up to a maximum of eight T1 or E1 lines to form an IMA group.
IMA breaks up the ATM cell stream, distributes the cells over the multiple physical links of an IMA group, then recombines the cells into a single stream at the other end of the connection. The ATM cells are distributed in a round-robin fashion over the physical links of the IMA group, recombined at the receiving IMA group, and passed in their original form to the ATM layer (see Figure 1-5). Using the multiple links of an IMA group increases the logical link bandwidth to approximately the sum of the individual link rates. The physical links should be nominally the same length to avoid excessive intra-group delay. Cisco recommends that all of the links in an IMA group be bundled together between the source and the destination.
The T1 and E1 IMA I/O modules have eight ports. You can use the eight ports on the T1 and E1 IMA I/O modules as independent ATM links or in the IMA mode. The following bullets are examples of possible IMA groups, independent ATM links, and mixed modes. Examples of IMA groups assume two links per group.
The T1 (1.544 Mbps) and E1 (2.048 Mbps) IMA port adapters provide trunk or subtend connectivity and are used for intercampus or wide-area links. The T1 and E1 IMA port adapters support unshielded twisted-pair (UTP) connectors. The order of assignment of links to an IMA group is not restricted.
The IMA group interfaces use a modified naming convention from the other interfaces in the system. These interfaces are named with the convention atm<slot>/ima<group>, where <slot> is the slot number for the DS3+T1/E1 IMA NI-2 card and <group> is the IMA group number from 0 to 3. Table 1-1 lists the interface naming conventions.
In a subtended network configuration using OC-3c/OC-3c NI-2 cards (SMF or MMF), you can subtend up to 12 OC-3c configured chassis in a daisy chain, all connecting through one subtending host chassis to the ATM backbone (see Figure 1-6).
|
Note The Cisco 6015 can also serve as the subtending host chassis to, or as a subtended node chassis from, the Cisco 6100, Cisco 6130, Cisco 6160, or Cisco 6260. |
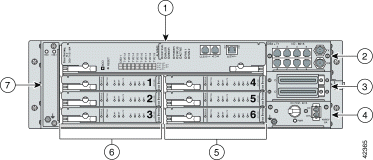
The Cisco 6015 chassis uses a front-access, six-slot multiport line-card architecture capable of supporting up to 48 xDSL ports that are connected either directly or through a POTS splitter.
|
Note For hardware specifications for the Cisco 6015, see the "Cisco 6015 System Specifications" section on page A-2. |
The chassis supports the following hardware components:
|
Note You can purchase blank faceplates for empty Cisco 6015 module slots. The 8xDMT over ISDN can be used only in a Cisco 6015 system with a POTS splitter configuration. |
Figure 1-7 identifies the Cisco 6015 card and module slots. Each line card slot on a chassis is numbered along the left edge of the card slot (slots 1 through 6). In the guide illustrations, the slot numbers are shown on the cards for easy reference and readability. These slots are referred to in subsequent sections of this chapter and elsewhere in this guide.
| 1 | 5 | ||
| 2 | 6 | ||
| 3 | 7 | ||
| 4 |
The following sections detail these Cisco 6015 hardware components:
This section contains the following information about Cisco 6015 cards and modules:
The Cisco 6015 chassis supports line card intermixing. However, mixing cards with different types of encoding (ADSL or SHDSL) on the same side of the chassis could result in decreased performance of the loop due to overlapping frequency spectrums. To minimize potential performance degradation in the binder, install ADSL and SHDSL line cards in separate halves of the chassis. For example, if you install 4xflexis on the left side of the chassis (slots 1 to 3), install 8xSHDSLs on the right side of the chassis (slots 4 to 6).
|
Note The 4xflexi cannot be used in an outside-plant environment. For line card intermixing information, see the "Cisco 6015 Cards and Modules" section on page 1-11. |
If provisioned, the 4xflexi rate adapts to the maximum bit rate negotiable on the line. The maximum bit rate settings are provisioned in the management software.
|
Note For hardware specifications for the 4xflexi, see the "4xflexi Specifications" section A-3. |
The Cisco 6015 chassis can include up to six 4xflexis for a total of 24 ADSL modem connections.
The edge connector key, located on the rear of the 4xflexi, connects the 4xflexi to the backplane of the chassis. You can install only the edge connector key with seven notches in the Cisco 6015.
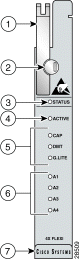
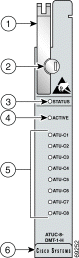
Figure 1-8 shows a close-up of the 4xflexi faceplate.
| 1 | 5 | ||
| 2 | 6 | ||
| 3 | 7 | ||
| 4 |
Table 1-2 describes the 4xflexi LED indicator functions.
The 8xDMT can be installed in the following environments:
If provisioned, the 8xDMT rate adapts to the maximum bit rate negotiable on the line. The maximum bit rate settings are provisioned in the management software.
|
Note For hardware specifications for the 8xDMT, see the
"8xDMT Specifications" section
A-4. For line card intermixing information, see the "Cisco 6015 Cards and Modules" section on page 1-11. |
The Cisco 6015 chassis can include up to six 8xDMTs for a total of 48 ADSL modem connections.
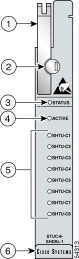
Figure 1-9 shows a close-up of the 8xDMT commercial environment faceplate.
Figure 1-10 shows a close-up of the 8xDMT outside-plant environment faceplate.
Table 1-3 describes LED functions on both the commercial and the outside-plant versions of the 8xDMT.
| LED | State | Function |
|---|---|---|
|
Note The 8xDMT over ISDN cannot be used in an outside plant environment. For hardware specifications for the 8xDMT over ISDN, see the "8xDMT Over ISDN Specifications" section on. |
Figure 1-11 shows a close-up of the 8xDMT over faceplate.
Table 1-4 describes the 8xDMT over ISDN LED indicator functions.
|
Note The 8xG.SHDSL cannot be used in an outside-plant environment. For line card intermixing information, see the "Cisco 6015 Cards and Modules" section on page 1-11. For hardware specifications for the 8xG.SHDSL, see the "8xG.SHDSL Specifications" section A-6. |
The Cisco 6015 chassis can include up to six 8xG.SHDSLs for a total of 48 SHDSL modem connections.
|
Note The 8xG.SHDSL line card supports multiple line rates ranging from 72 kbps to 2312 kbps in fixed mode. In rate adaptive mode, the 8xG.SHDSL line card supports rates ranging from 2312 kbps to 200 kbps in 64 kbps decrements. In rate adaptive mode, line rate is negotiated and then locked when the line trains. |
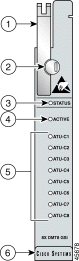
Figure 1-12 shows a close-up of the 8xG.SHDSL faceplate.
Table 1-5 describes the 8xG.SHDSL LED indicator functions.
The DS3+T1/E1 IMA NI-2 card can be installed in the following environments:
The DS3+T1/E1 IMA NI-2 card provides a high-speed connection for aggregated data traffic from the xTU-C line cards. The NI-2 card performs central processor, host, and system controller functions. The NI-2 card runs and is controlled by Cisco IOS software.
The DS3+T1/E1 IMA NI-2 card performs the following system tasks:
The ITEMP DS3+T1/E1 IMA NI-2 card motherboard and IOS daughter card are populated with industrial temperature components so that the NI-2 card can operate in an outside-plant environment.
The NI-2 card operation mode (DS3/T1 or E1) is determined by the type of I/O module, DS3+T1 or E1, installed in the Cisco 6015 chassis. For more information on the I/O modules, see the "I/O Module Overview" section.
|
Note For hardware specifications for the DS3+T1/E1 IMA NI-2 card, see the "DS3+T1/E1 IMA and ITEMP DS3+T1/E1 IMA NI-2 Cards Specifications" section. |
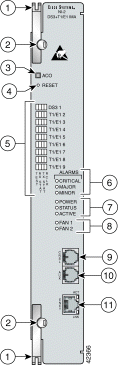
Figure 1-13 shows a close-up of the DS3+T1/E1 IMA NI-2 card faceplate.
|
Note The only cosmetic difference between the DS3+T1/E1 IMA NI-2 card and the ITEMP DS3+T1/E1 IMA NI-2 card is the word "ITEMP" silkscreened on the card faceplate. |
| 1ACO = alarm cutoff |
Table 1-6 describes the LED group indicators and their functions.
| LED Group | LED | State | Function |
|---|---|---|---|
Interface status LED (5 in Figure 1-13) |
Cisco IOS detects that an obtrusive test (loopback) is active on this interface. |
||
System alarm (6 in Figure 1-13) |
|||
Card status (7 in Figure 1-13) |
|||
When lit, this LED indicates that the NI-2 card is operating as the active network interface in the chassis. |
|||
Fan alarm (8 in Figure 1-13) |
The fan module or fan tray is not operational and is in alarm mode. |
||
The fan module or fan tray is not operational and is in alarm mode. Note Because there is only one fan module in the Cisco 6015, this LED is not operational. |
|||
ENET interface LED (11 in Figure 1-13) |
|||
| 1RX = receive
2TX = transmit 3RCLK = receive clock |
|
Note The BITS interface is connected through a header located on the back of the Cisco 6015 chassis. The OC-3c/OC-3c NI-2 card can only be used in a commercial environment. |
|
Note The OC-3c/OC-3c NI-2 card cannot be used in an outside-plant environment. Use of the OC-3c/OC-3c NI-2 card in the Cisco 6015 disables whichever I/O module is installed in the chassis. Therefore, neither I/O module will affect the OC-3c/OC-3c NI-2 card operation in the Cisco 6015. For hardware specifications for the OC-3c/OC-3c NI-2 card, see the "OC-3c/OC-3c NI-2 Card Specifications" section. |
The OC-3c/OC-3c NI-2 card functions are managed by Cisco IOS software. The IOS software operates and integrates controller, network trunk, and subtending functionality from this single NI-2 card.
The SMF and MMF OC-3c/OC-3c NI-2 cards operate in conjunction with network interfaces that are supplied by optical interface connectors on the OC-3c/OC-3c NI-2 card faceplate. The OC-3c/OC-3c NI-2 card faceplates have two optical connector pairs:
Both the SMF and MMF OC-3c/OC-3c NI-2 cards support the aggregation of up to 12 additional subtended Cisco 6015 chassis in a daisy chain configuration.
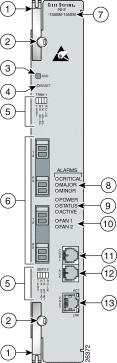
Figure 1-14 shows a close-up of the OC-3c/OC-3c NI-2 card faceplate.
Table 1-7 describes the LED group indicators and their functions.
| LED Group | LED | State | Function |
|---|---|---|---|
Interface status LED (5 in Figure 1-14) |
Cisco IOS detects that an obtrusive test (loopback) is active on this interface. |
||
System alarm (7 in Figure 1-14) |
|||
Card status (8 in Figure 1-14) |
|||
When lit, this LED indicates that the NI-2 card is operating as the active network interface in the chassis. |
|||
Fan alarm (9 in Figure 1-14) |
The fan module or fan tray is not operational and is in alarm mode. |
||
The fan module or fan tray is not operational and is in alarm mode. Note Because there is only one fan module in the Cisco 6015, this LED is not operational. |
|||
ENET interface LED (12 in Figure 1-14) |
|||
The I/O module performs the following system tasks:
Figure 1-15 shows the location of the I/O module in the Cisco 6015 chassis.
Currently, there are two versions of the I/O module:
|
Note Use of the OC-3c/OC-3c NI-2 card in the Cisco 6015 disables whichever I/O module is installed in the
chassis. However, an I/O module must be installed in the chassis for the system to operate correctly. The
OC-3c/OC-3c NI-2 card does not support the DS3, E1, or T1 interfaces found on the front of the I/O
modules. Therefore, the trunk and subtending interfaces are provided on the front of the OC-3c/OC-3c
NI-2 card. For hardware specifications for the I/O module, see the "I/O Module Specifications" section A-9. |
The two versions of the I/O module are detailed in the following sections.
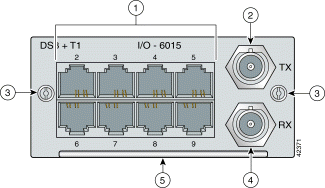
The DS3+T1 I/O module is used in North America. Figure 1-16 shows a close-up of the DS3+T1 I/O module faceplate.
| 1 | Eight RJ-481 receptacle connectors for eight T1 trunk or subtending interfaces |
4 | |
| 2 | 5 | ||
| 3 |
| 1An RJ-48 is a receptacle for an RJ-45 connection.
2RX = receive. 3TX = transmit. |
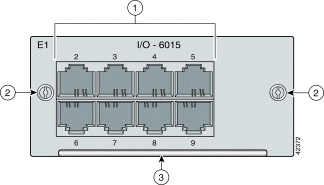
The E1 I/O module is used world wide, except for North America. Figure 1-17 shows a close-up of the E1 I/O module faceplate.
| 1 | Eight RJ-481 receptacle connectors for eight E1 trunk or subtending interfaces |
3 | |
| 2 |
| 1An RJ-48 is a receptacle for an RJ-45 connection. |
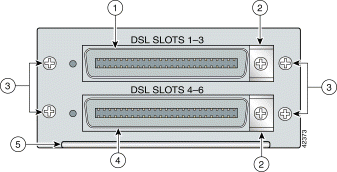
The DSL interface module enables you to
|
Note For hardware specifications for the DSL interface module, see the "DSL Interface Module Specifications" section on. |
Figure 1-18 shows a close-up of the DSL interface module faceplate.
| 1 | 4 | ||
| 2 | 5 | ||
| 3 |
The Cisco 6015 chassis follows the FCC part 68 industry standard convention for Tip and Ring connections on the twisted pairs of the 50-pin Champ connector. The Champ connectors are pinned out to accommodate quad-port or octal-port xTU-C line cards. If you are not currently using octal-port xTU-C line cards but plan to in the future, Cisco recommends that you use Champ cables that can accommodate higher density line cards.
|
Note See Table 2-6,
"Tool and Equipment Requirements
Checklist" for information on the types of cables needed. See "Cable and Port Mapping Specifications" for port mapping tables. |
Each Cisco 6015 is equipped with a -48/-60V DC PEM, which distributes DC power within the chassis. Each DC PEM can be connected in one of the following ways:
|
Note The AC/DC converter can be used only in a commercial environment. It cannot be used in an outside-plant environment. |
|
Note For hardware specifications for the DC PEM, see the "DC PEM Specifications" section A-10. |
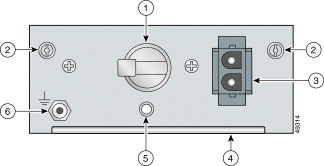
Figure 1-19 shows a close-up of the DC PEM faceplate.
| 1 | Two-position circuit breaker. The positions are Off (0) and On (1). |
4 | |
| 2 | 5 | ||
| 3 | Two-pin connector to cable to the facility DC power or the AC/DC converter. |
6 |
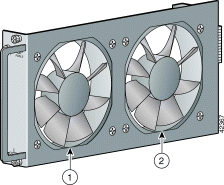
The fan module houses two fans that provide system cooling. The Cisco 6015 requires that a fan module be installed when the system is in operation. Figure 1-20 shows the fan module.
|
Note The fan module is installed in the chassis when it is shipped. If the fan module fails, replace it immediately. |
|
Note For hardware specifications for the fan module, see the "Fan Module Specifications" section A-11. |
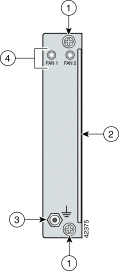
Figure 1-21 shows a close-up of the fan module faceplate.
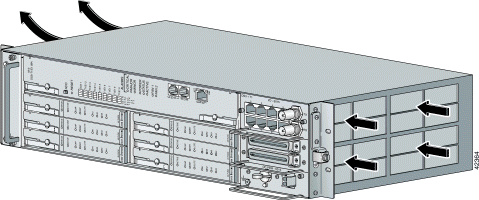
The fan module pulls air from the right of the chassis, through the modules, and out the left of the chassis, as shown in Figure 1-22.
The only rear-accessible chassis component is the 5-pin header that connects the BITS interface (network clocking) and the facility alarm input.
See Figure 1-23 for a close view of the pinouts that are located on the back of the Cisco 6015 chassis.
Table 1-8 lists the pinout descriptions for the header contacts.
An optional AC/DC converter must be installed and connected to the DC PEM if the system is powered by AC power. The AC/DC converter converts 120/240V AC power to -48V DC power for the Cisco 6015 system. The AC/DC converter is orderable through Cisco.
|
Note The AC/DC converter can be used only in a commercial environment. It cannot be used in an outside-plant environment. |
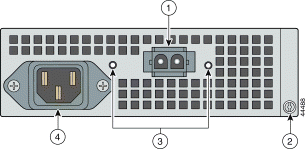
Figure 1-24 shows a close-up of the AC/DC converter faceplate.
|
Note An AC power cord applicable to your country's electrical specifications will accompany the AC/DC converter. |
An AC/DC converter tray is available to house up to three AC/DC converters. The AC/DC converter tray is installed directly below the Cisco 6015 chassis. Extenders are available for the tray if you are installing the system in a 23-inch rack.
|
Note For hardware specifications for the AC/DC converter, see the "Cisco 6015 System Specifications" section on page A-2. |
You can provision and manage the Cisco 6015 system through the following management software:
Cisco EMF is based on an object model in which network elements or modules represent the managed entity. Each object is defined by a class and specific attributes. An object can represent a network element or a more abstract entity such as a link relationship, a network, or a container such as a site, shelf, or region.
|
Note If your network contains multiple Sun workstations, you must dedicate one workstation as the server and all additional workstations as clients. The server should be the repository and distributor of database information from which the clients request information. The client workstations allow multiple users to monitor the managed network. |
|
Note See the "Hardware Specifications" section on page A-1 for minimum software and network management release requirements per Cisco 6015 chassis component. |
The supported alarms that are generated by the management software are
Critical alarm indications are cleared when the alarm condition is resolved.
Major alarm indications are cleared when the alarm condition is resolved.
Minor alarm indications are cleared when the alarm condition is resolved.
The facility alarm input, which is located on the rear of the chassis, allows an external event to trigger an alarm on the NI-2 card. (See the "Rear Interface Header" section for more information.)
Audible alarms can be turned off by pressing the ACO button.
For more information on alarms that are generated in the management software, see "Troubleshooting".
![]()
![]()
![]()
![]()
![]()
![]()
![]()
![]()
Posted: Tue Jan 7 16:13:27 PST 2003
All contents are Copyright © 1992--2002 Cisco Systems, Inc. All rights reserved.
Important Notices and Privacy Statement.