|
|

This chapter describes how to configure the Cisco ONS 15104 and includes the following sections:
The following sections provide minimum software configuration information. Detailed software configuration information is available in the Cisco IOS Software Configuration Guide and command reference publications. You can use the same command line interface-based network management system for Cisco 12000 series GSRs and the Cisco ONS 15104 to track network statistics and resources. (See the section "If You Need More Information" in the preface "About This Guide" for information.)
When you power up the Cisco ONS 15104 for the first time, it goes through a system bootstrap startup sequence and power-on self test (POST). After the POST, the Cisco IOS software is installed from Flash memory. If there are no problems, the green system ready LED goes on, and the
Cisco ONS 15104 automatically starts the setup command facility.
If fatal errors are detected during the POST, and the red system fail LED goes on, proceed to section "Cisco ONS 15104 Alarms and Alerts" in "Troubleshooting the Cisco ONS 15104."
If the system bootstrap startup sequence completes successfully, proceed with the configuration method that fits your network configuration and Cisco IOS software experience level.
If you are not familiar with Cisco IOS commands, the Cisco ONS 15104 will automatically enter the preconfigured defaults through the AutoInstall System Configuration Dialog when you answer a prompt. (See "Using AutoInstall".)
If you are familiar with Cisco IOS commands, you can answer a prompt that invokes the Configuration Mode Dialog and use the Cisco IOS commands to manually configure the
Cisco ONS 15104. (See "Using Set-Up Configuration Mode to Configure the Cisco ONS 15104".)
 | TimeSaver To verify network IP addresses before you begin to configure the Cisco ONS 15104, ask your system administrator or review the network plan. |
| TimeSaver To ensure that AutoInstall works properly, your system administrator must preconfigure the Transmission Control Protocol/Internet Protocol (TCP/IP) host on your network and put the required configuration files in the Cisco ONS 15104's nonvolatile random-access memory (NVRAM). |
This section describes how to boot the Cisco ONS 15104. When you boot the Cisco ONS 15104, the configuration files are loaded from NVRAM, and a valid Cisco IOS software image is usually loaded from Flash memory.
The preloaded system software consists of the following:
The configuration register settings determine the source of the Cisco IOS software image (either Flash memory or a Trivial File Transfer Protocol [TFTP] server). The factory-default setting for the configuration register is 0x102, which indicates that the Cisco ONS 15104 first tries to load a Cisco IOS software image from Flash memory.
The following boot sequence occurs each time you power on the Cisco ONS 15104:
1. The Cisco ONS 15104 runs a POST to verify basic operation of the CPU, memory, and interfaces. When all of the configuration files finish loading, the system prompts you to start configuring the Cisco ONS 15104 using the AutoInstall configuration. (See the "Using AutoInstall" section.)
2. If a valid Cisco IOS software image is not found in Flash memory after five attempts to load, the Cisco ONS 15104 reverts to ROM monitor mode, so that you can install or upgrade a Cisco IOS software image. The system ready LED flashes when the Cisco ONS 15104 is in ROM monitor mode.
3. After configuring the Cisco ONS 15104's interfaces for the first time, save the configuration to a file in NVRAM. (For details, see the "Saving Configuration Changes" section.)
This section describes configuration options that include:
AutoInstall starts when the Cisco ONS 15104 is connected to the Ethernet port. You can use AutoInstall to automatically configure the Cisco ONS 15104 after the power-on self test completes.
To start AutoInstall on the Cisco ONS 15104 do the following:
Step 2 When AutoInstall completes successfully, enter the copy running-config startup-config command in privileged EXEC mode to save the configuration settings to the
Cisco ONS 15104's NVRAM:
Regen# copy running-config startup-config

Regen#
Step 3 At the end of AutoInstall, press Return or enter no to accept the default answers and begin the System Configuration Dialog.
First, would you like to see the current interface summary? [yes]: no


Any interface listed with OK? value "NO" does not have a valid configuration

00:00:03:%SYS-5-CONFIG_I:Configured from memory by console
00:00:03:%SYS-5-RESTART:System restarted --
Cisco Internetwork Operating System Software
IOS (tm) REGEN48 Software (REGEN48-I4-M)
12.0(19991208:213216)
Copyright (c) 1986-1999 by cisco Systems, Inc.
Compiled Thu 17-Dec-98 12:19
00:00:03:%LINK-3-UPDOWN:Interface Ethernet0, changed state to up
00:00:03:%LINK-5-CHANGED:Interface SDCC0, changed state to administratively down
00:00:03:%LINK-5-CHANGED:In
Regen> Return
During AutoInstall, the Ethernet interface and the SDCC0 and SDCC1 interfaces were assigned default IP addresses. If necessary, you can change the IP addresses on the interfaces to match the IP addresses on the your network. (See the "Configuring Cisco ONS 15104 Interfaces to Match the Network" section.)
To check the current configuration status, enter the show running configuration command in privileged EXEC mode:
Regen# show running configuration

Regen#
The following show running configuration command output example shows the default IP addresses that were assigned during AutoInstall:
Regen# show running-config

Building configuration...

Current configuration:
!
version 12.0
no service pad
service timestamps debug uptime
service timestamps log uptime
no service password-encryption
!
hostname Regen
!
logging buffered 4096 debugging
!
ip subnet-zero
!
!
controller REGEN 0
!
controller REGEN 1
!
!
interface Ethernet0
 ip address 10.1.0.2 255.255.0.0
 no ip directed-broadcast
 no keepalive
!
interface SDCC0
 ip address 11.1.0.2 255.255.0.0
 no ip directed-broadcast
 bandwidth 192

 crc 32
!
interface SDCC1
 ip address 12.1.0.2 255.255.0.0
 no ip directed-broadcast
 bandwidth 192

Regen#
(Remainder of displayed text is omitted from example.)
You can isolate the Cisco ONS 15104's default interface configuration settings by entering the show ip interface brief command, in privileged EXEC mode:
Regen# show ip interface brief

Interface              IP-Address      OK? Method Status                Protocol
Ethernet0              10.1.0.2        YES NVRAM  up                    up
SDCC0                  11.1.0.2        YES NVRAM  up                    up
SDCC1                  12.1.0.2        YES NVRAM  up                    up
Regen#
To change the Cisco ONS 15104's default interface configuration settings to match the IP addresses on the existing network, enter the global configuration mode to specify each interface. In interface configuration mode, change each interface IP address, as shown in the following example:
Regen# configure terminal

Enter configuration commands, one per line.  End with CNTL/Z.
Regen(config)# interface ethernet0

Regen(config-if)# ip address 20.1.0.1 255.255.255.0

Regen(config-if)# interface sdcc0

Regen(config-if)# ip address 22.1.0.1 255.255.0.0

Regen(config-if)# interface sdcc1

Regen(config-if)# ip address 33.1.0.1 255.255.0.0

Regen(config-if)# exit

Regen(config)# exit


Regen#
To verify that the interface configuration settings match the IP addresses on the existing network, enter the show ip interface brief command in privileged EXEC mode. Note that the output shows that the interface configuration settings were modified manually.
Regen# show ip interface brief

Interface              IP-Address      OK? Method Status               Protocol
Ethernet0              20.1.0.1 	YES manual up                   up
SDCC0                  22.1.0.1        YES manual up                   up
SDCC1                  33.1.0.1        YES manual up                   up
Regen#
You can manually configure the Cisco ONS 15104 by using Set-Up Configuration mode. The
Cisco ONS 15104 will invoke Set-Up Configuration mode when it is connected to the network through either the Ethernet port or the OC-48 regenerator ports.
To enter set-up configuration mode, you must boot the Cisco ONS 15104 without any default configuration settings, by following these procedures:
Step 2 At the prompt to enter the initial System Configuration Dialog, enter yes to go into Configuration mode:
Would you like to enter the initial dialog? [yes]: yes


00:00:03:%SYS-5-CONFIG_I:Configured from memory by console
00:00:03:%SYS-5-RESTART:System restarted --
Cisco Internetwork Operating System Software
IOS (tm) REGEN48 Software (REGEN48-I4-M)
12.0(19991208:213216)
Copyright (c) 1986-1999 by cisco Systems, Inc.
Compiled Thu 17-Dec-98 12:19
00:00:03:%LINK-3-UPDOWN:Interface Ethernet0, changed state to up
00:00:03:%LINK-5-CHANGED:Interface SDCC0, changed state to administratively down
00:00:03:%LINK-5-CHANGED:Interface SDCC1, changed state to administratively down
Regen> Return
After about 30 seconds, information similar to the System Configuration Dialog displays on the console screen with user-interactive prompts that allow you to manually:
First, would you like to see the current interface summary? [yes]: no


Any interface listed with OK? value "NO" does not have a valid configuration

         --- System Configuration Dialog ---

Would you like to enter the initial configuration dialog? [yes/no]: no


At any point you may enter a question mark '?' for help.
Use ctrl-c to abort configuration dialog at any prompt.
Default settings are in square brackets '[]'.

Basic management setup configures only enough connectivity for management of the
system, extended setup will ask you to configure each interface on the system

Would you like to enter basic management setup? [yes/no]: yes

Configuring global parameters:

  Enter host name [Router]: Regen


The enable secret is a password used to protect access to privileged EXEC and
configuration modes. This password, after entered, becomes encrypted in the
configuration.
  Enter enable secret: coins


The enable password is used when you do not specify an enable secret password, with
some older software versions, and some boot images.
  Enter enable password: coins

% Please choose a password that is different from the enable secret
  Enter enable password: q


The virtual terminal password is used to protect access to the router through a network
interface.
  Enter virtual terminal password:
% No defaulting allowed
  Enter virtual terminal password:
% No defaulting allowed
  Enter virtual terminal password: coins

  Configure SNMP Network Management? [yes]:
    Community string [public]:

Current interface summary

Any interface listed with OK? value "NO" does not have a valid configuration

Interface              IP-Address      OK? Method Status                Protocol
Ethernet0              unassigned      NO  unset  up                    up
SDCC0                  unassigned      NO  unset  up                    down
SDCC1                  unassigned      NO  unset  up                    down

Enter interface name used to connect to the
management network from the above interface summary: ethernet0


Configuring interface Ethernet0:
  Configure IP on this interface? [yes]: y

    IP address for this interface: 20.15.5.9

    Subnet mask for this interface [255.0.0.0] : 255.255.255.0

    Class A network is 20.0.0.0, 24 subnet bits; mask is /24

Enter interface name used to connect to the
management network from the above interface summary:SDCC0


Configuring interface SDCC0:
  Configure IP on this interface? [yes]: y

    IP address for this interface:22.1.0.1

    Subnet mask for this interface [255.255.0.0] : 255.255.0.0

    Class B network is 171.71.0.0, 16 subnet bits; mask is /16

The following configuration command script was created:

hostname Regen
enable secret 5 $1$2L5i$uvs2s6LBlE/Rvp2blzklg0
enable password p
line vty 0 4
password coins
snmp-server community public
!
no ip routing

!
interface Ethernet0
no shutdown
ip address 20.15.5.9 255.255.255.0
!
interface SDCC0
shutdown
no ip address
!
interface SDCC1
shutdown
no ip address
!
end

[0] Go to the IOS command prompt without saving this config.
[1] Return back to the setup without saving this config.
[2] Save this configuration to nvram and exit.

Enter your selection [2]:
Building configuration...
Use the enabled mode 'configure' command to modify this configuration.
Regen>
Password:
Step 3 When you finish configuring the Cisco ONS 15104, enter the exit command repeatedly until you return to the privileged EXEC prompt:
Regen(config)# exit

Regen#
Step 4 To save the configuration changes to NVRAM, enter the copy running-config startup-config command in privileged EXEC mode:
Regen# copy running-config startup-config

Regen#
Following the Set-Up Configuration, check the configuration status by entering the show running configuration command in privileged EXEC configuration mode:
Regen# show running configuration

Building configuration...

Current configuration:
!
version 12.0
service config
no service pad
service timestamps debug uptime
service timestamps log uptime
no service password-encryption
!
hostname Regen
!
logging buffered 4096 debugging
enable secret 5 $1$2L5i$uvs2s6LBlE/Rvp2blzklg0
enable password p
!
ip subnet-zero
no ip routing
!
!
controller REGEN 0
 regen loopback
!
controller REGEN 1
 regen loopback
!
!
interface Ethernet0
 ip address 20.15.5.9 255.255.255.0
 no ip directed-broadcast
 no ip route-cache
!
interface SDCC0
 no ip address
 no ip directed-broadcast
 no ip route-cache
 bandwidth 192
 shutdown
 crc 32
!
interface SDCC1
 no ip address
 no ip directed-broadcast
 no ip route-cache
 bandwidth 192
 shutdown
 crc 32
!
Regen#
(Remainder of displayed text is omitted from example.)
The previous show running configuration command output verifies that an IP address is assigned to the Ethernet interface, but no IP addresses are assigned to the SDCC0 and SDCC1 interfaces.
The following examples show how to assign an IP address to the SDCC0 and SDCC1 interfaces that will match the IP addresses on your network:
Regen# configure terminal

Enter configuration commands, one per line.  End with CNTL/Z.
Regen(config)# interface sdcc0

Regen(config-if)# ip address 22.1.0.1 255.255.255.0

Regen(config-if)# no keepalive

Regen(config-if)# no shutdown

00:17:18: %LINK-3-UPDOWN: Interface SDCC0, changed state to up
00:17:19: %LINEPROTO-5-UPDOWN: Line protocol on Interface SDCC0, changed state to up
Regen(config-if)# exit

Regen(config)#
Regen(config)# interface sdcc1

Regen(config-if)# ip add 33.1.0.1 255.255.255.0

Regen(config-if)# no keepalive

Regen(config-if)# no shutdown

Regen(config-if)#
00:17:44: %LINK-3-UPDOWN: Interface SDCC1, changed state to up
00:17:45: %LINEPROTO-5-UPDOWN: Line protocol on Interface SDCC1, changed state to up
Regen(config-if)#
Regen(config-if)# controller regen 0

Regen(config-controller)# no regen loopback

Regen(config-controller)# exit

Regen(config-if)# exit

Regen(config)# exit

Regen#
For details on configuring each type of interface, see the following section, "Configuring Interfaces."
If you want to change the IP address of the Cisco ONS 15104's interface to match other IP addresses and the subnet mask that is used on the network, see the following sections to configure each interface:
You can use the show controller ? command in privileged EXEC mode to list commands that will show the status of the Cisco ONS 15104's interfaces:
Regen# show controller ?


SDCC      Show SDCC parameters
ethernet  Show ethernet controllers
regen     show regen controller state
|         Output modifiers
Regen#
You can configure the Ethernet interface to connect to a local-area network (LAN). The
Cisco ONS 15104 supports only one LAN interface connection. To configure the Ethernet interface parameters, you need to know the IP address and subnet mask.
In the following configuration output example, the Ethernet0 interface was configured with a default IP address and subnet mask during AutoInstall, as follows:
interface Ethernet0
 ip address 10.1.0.2 255.255.0.0
 no ip directed-broadcast
 no keepalive
!
Follow these steps if you want to change the default IP address that was configured during AutoInstall, and assign a new IP address to the Ethernet interface:
Regen# configure terminal

Regen(config)#
Step 2 Enter the interface name:
Regen(config)# interface ethernet0

Regen(config-if)#
Step 3 Enter the ip address and subnet mask
Regen(config-if)# ip address 20.15.5.9 255.255.255.0

Regen(config-if)# exit

Regen(config)# exit

Regen#
Step 4 Verify the new Ethernet IP address by entering either of the following commands:
Regen# show running-config

Regen#
or
Regen# show interface Ethernet0

Regen#
Step 5 To save the configuration changes to NVRAM, enter the copy running-config startup-config command.
Regen# copy running-config startup-config

Regen#
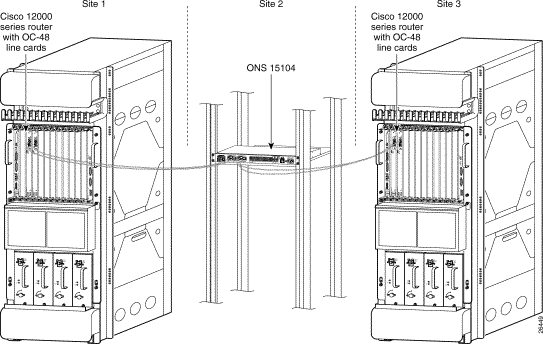
The Cisco ONS 15104 supports LAN interface connections through two OC-48 regeneration ports that contain two SDCC interfaces, SDCC0 and SDCC1. Figure 5-1 shows the Cisco ONS 15104 connected to OC-48 line card ports. The SDCC interfaces must be configured with sequential IP addresses, which means that the router IP addresses must follow in sequential numbers, for example, 10, 11, 12, and so on. You may have to reconfigure the SDCC interfaces to achieve this. Follow the steps in this section to verify the prerequisites and configure both the SDCC interfaces.
One of the following must be true for SDCC interfaces to work properly:
1. All SDCC interfaces that are on the same subnet, for example, 11.11.11.x and IP routing must be enabled.
or
2. All SDCC interfaces can be on different subnets. IP routing and Routing Information Protocol (RIP) must be enabled on each Cisco ONS 15104.
The configuration tasks in this section explain how to enable RIP on two subnets through the
Cisco ONS 15104 and configure the SDCC0 interface. The IP address for SDCC must overlap the networks configured for the RIP protocol.
To enable RIP on the Cisco ONS 15104 on two subnets, enter the following commands:
Regen# configure terminal
Regen(config)# router rip
Regen(config)# network 10.0.0.0 (subnet 1)
Regen(config)# network 11.0.0.0 (subnet 2)
Regen(config)# exit
Regen#
Follow these steps to configure the SDCC0 interface:
Regen# configure terminal

Regen(config)#
Step 2 Enter the interface name:
Regen(config)# interface SDCC0

Regen(config-if)#
Step 3 To configure the SDCC0 interface, enter the IP address and subnet mask:
Regen(config-if)# ip address 10.a.b.c 255.255.255.0
Step 4 Enter exit to return to global configuration mode, then privileged EXEC mode:
Regen(config-if)# exit

Regen(config)# exit

Regen#
Step 5 After you assign an IP address, add the following commands to the SDCC0 interface to keep the interfaces up and prevent data traffic shutdowns:
Regen# configure terminal

Regen(config)# interface SDCC0

Regen(config-if)# ip address 10.a.b.c 255.255.255.0

Regen(config-if)# keepalive

Regen(config-if)# no shut

Regen(config-if)# exit

Regen(config)# exit

Regen#
Step 6 Verify the new IP address for the SDCC0 interface by entering the show interface command:
Regen# show interface SDCC0


interface SDCC0
bandwidth 192
ip address 10.a.b.c 255.255.255.0
ip directed-broadcast
keepalive
crc 32
!
To configure the SDCC1 interface:
Regen# configure terminal

Regen(config)#
Step 2 Enter the interface name:
Regen(config)# interface SDCC1

Regen(config-if)#
Step 3 To configure the SDCC1 interface, enter the IP address and subnet mask:
Regen(config-if)# ip address 11.x.y.z 255.255.255.0

Regen(config-if)#
Step 4 Enter the exit command to return to privileged EXEC mode.
Regen(config-if)# exit

Regen(config)# exit

Regen#
Step 5 After you assign an IP address, add the following commands to the SDCC1 interface to keep the interfaces up and prevent data traffic shutdowns:
Regen# configure terminal

Regen(config)# interface SDCC1

Regen(config-if)# ip address 11.x.y.z 255.255.255.0

Regen(config-if)# keepalive

Regen(config-if)# no shut

Regen(config-if)# exit

Regen(config)# exit

Regen#
Step 6 Verify the new IP address for the SDCC1 interface by entering the show interface command:
Regen# show interface SDCC1


interface SDCC1
bandwidth 192
ip address 11.x.y.z 255.255.255.0
ip directed-broadcast
keepalive
crc 32
!
Regen#
This section explains how to configure the two Cisco ONS 15104 controller module interfaces, Regen 0 and Regen 1, that monitor the SONET section overhead on incoming data.
The OC-48 regeneration ports provide access to the Cisco ONS 15104 controller module interfaces, Regen 0 and Regen 1. When you connect the Cisco ONS 15104 to an OC-48 controller through the OC-48 fiber connectors, the Regen controller module interfaces are automatically up. After you configure the two Cisco ONS 15104 controller module interfaces, you can send configuration commands that will monitor and operate the SONET section overhead on incoming data.
Regen> enable

Regen# show controller regen 0


Regen0 is up
Error Count:
  RxClockFail = 0          SLOS = 1          SLOF = 1
  BIP(B1) = 0

Active Defects: LOS LOF
Active Alarms:  SLOS
Alarm reporting enabled for: RxClockFail SLOS SLOF B1-TCA

B1 TCA threshold:  B1 = 10e-6


Framer 0, addr=0x68004000:

general_cntrl=0x0, active_led=0x1 ,gpio_port_mode=0x0,
gpio_port_data=0x0, gpio_port_cntrl=0xF ,mask_3=0x0,
mask_2=0xFF, mask_1=0xFF ,diag=0x0 ,
rsp_cntrl_1=0x10, ttog_cntrl=0x0 ,ttog_ovrhd_src_1=0x8C ,
Link Status=0xE0, LED control=0x80 ,regen_cntrl=0xA0 ,
Regen#
Step 2 To verify the status of the Regen 1 controller enter the show controller regen 1 command:
Regen> enable

Regen# show controller regen 1


Regen1 is up
Error Count:
  RxClockFail = 0          SLOS = 1          SLOF = 1
  BIP(B1) = 0

Active Defects: LOS LOF
Active Alarms:  SLOS
Alarm reporting enabled for: RxClockFail SLOS SLOF B1-TCA

B1 TCA threshold:  B1 = 10e-6


Framer 1, addr=0x68001000:

 general_cntrl=0x0, active_led=0x1 ,gpio_port_mode=0x0 ,
 gpio_port_data=0x0, gpio_port_cntrl=0xF ,mask_3=0x0 ,
mask_2=0xFF, mask_1=0xFF ,diag=0x0 ,
 rsp_cntrl_1=0x10, ttog_cntrl=0x0 ,ttog_ovrhd_src_1=0x8C ,
 Link Status=0xE0, LED control=0x80 ,regen_cntrl=0xA0 ,
Regen#
Table 5-1 explains the output from the show controller regen command.
| Output Field | Description |
|---|---|
Regen0 is up | Regenerator 0 interface is administratively up. |
Error Count | Error Count on regenerator 0 interface. |
RxClockFail | Receive clock failed error. |
SLOS | Loss of signal. There must be a clear, unobstructed path between the transmitters and receivers. |
SLOF | Loss of frame. Indicates a SONET or SDH framing error. |
BIP(B1) | Bit Interleaved Parity. Bit errors in the payload can then be detected and reported as maintenance information. |
Active Defects: | Indicates which types of errors have active defects. |
Active Alarms: | Indicates which types of alarms are active. |
Alarm reporting enabled for: | Indicates which type of alarm reports you selected. |
B1 TCA threshold: | B1 BER threshold crossing alarm. Reports B1 bit error rate (BER) threshold crossing alarm errors |
Framer 0, addr=0x68004000: | Describes the framer setting and the contents of the packet overhead. |
Step 3 Enter the configure controller command to access the controller configuration commands:
Regen# configure controller

Regen(config-controller)#
Step 4 In controller configuration mode, enter the query command ? to determine which Regen controller configuration commands are active:
Regen(config-controller)# ?


Controller configuration commands:
default      Set a command to its defaults
description  Controller specific description
exit         Exit from controller configuration mode
help         Description of the interactive help system
no           Negate a command or set its defaults
regen        Modify regen controller parameters
Step 5 Enter the regen ? command to determine which Regen controller configuration subcommands are active:
Regen(config-controller)# regen ?

ais-shut       Send LAIS when shutdown
b1-threshold   Set BER threshold for B1 TCA alarm
framing        Specify framing format
j0             Specify Section Trace byte value
loopback       Set 4402 as facility-loopback
report         Enable reporting of selected alarms
sdcc-passthru  Set section dcc channel passthru
shutdown       Shut down the REGEN controller
Step 6 Enter the regen overhead ? query command to determine which options are active.
Regen(config-controller)# regen overhead ?

j0  0x01 for compatibility, 0xCC is default
Step 7 Enter the regen overhead j0? command to determine the range of the values for j0.
Regen(config-controller)# regen overhead j0 ?

<0-255>  byte value
Step 8 Enter the regen flag j0 ? command to find valid values to configure the section trace:
Regen(config-controller)# regen flag j0 ?

<0-255>  0x1 for compatibility, 0xCC is default
Step 9 Enter the regen framing command to provision the framer format. The default is sonet.
Regen(config-controller)# regen framing sonet

Regen(config-controller)#
Step 10 Enter the regen report ? query command to enable the Cisco ONS 15104's alarms:
Regen(config-controller)# regen report ?

b1-tca      B1 BER threshold crossing alarm
j0-mismatch Section Trace Mismatch
rxclk-fail  Receive Clock failed
slof        Section Loss of Frame
slos        Section Loss of Signal
Enter the [no] regen report command to disable the Cisco ONS 15104's alarms
Step 11 Enter the regen threshold b1-tca ? query command to determine the values of the
Cisco ONS 15104's B1-threshold (for B1 TCA):
Regen(config-controller)# regen threshold b1-tca ?

  <3-9>  Bit error rate (10 to the minus n)
Regen(config-controller)#
Enter the [no] regen threshold command to disable the Cisco ONS 15104's alarms
Any time you change the Cisco ONS 15104 configuration, you must save the changes to NVRAM or to a disk, or they will be lost if there is a system reload or power outage. This section describes how to save configuration changes.
There are two types of configuration files:
To display the current running configuration:
Step 2 Enter the show running-config command.
Step 3 Enter the copy running-config startup-config command to save the current running configuration to the startup configuration file in NVRAM.
Regen> enable

Regen# show running-config

Regen# copy running-config startup-config

Regen#
To display the startup configuration:
Step 2 Enter the show startup-config command.
Step 3 Enter the copy startup-config running-config command to write the startup configuration to the running configuration:
Regen> enable

Regen# show startup-config

Regen# copy startup-config running-config

Regen#
To erase both configuration files and start over:
Step 2 Enter the write erase and reload commands:
Regen> enable

Regen# write erase

Regen# reload

Regen#
 | Caution This command sequence will erase the entire configuration in NVRAM. |
The following is an example of the system response to the write erase commands:
Regen# write erase

Erasing the nvram filesystem will remove all files! Continue? [confirm]
[OK]
Erase of nvram: complete
For more information about Cisco ONS 15104 software configuration, refer to the Cisco IOS Configuration Guide and Command Reference publications. These are available on the documentation CD-ROM that accompanied your Cisco ONS 15104, or you can order printed copies. See "If You Need More Information" in the "About This Guide" preface for ordering information.
![]()
![]()
![]()
![]()
![]()
![]()
![]()
![]()
Posted: Fri Jan 5 07:47:16 PST 2001
All contents are Copyright © 1992--2001 Cisco Systems, Inc. All rights reserved.
Important Notices and Privacy Statement.