|
|

This chapter explains how to install the workgroup EISA SGI adapter software. If the software needs to be removed from your system, see the appendix "Running the FDDI deinstall Script."
To install the EISA SGI adapter software, you need an SGI Indigo2 workstation with a DDS digital audio tape (DAT) drive.
You should be familiar with the UNIX system and a UNIX text editor. You also need to know the following:
For the SGI IRIX Version 5.1.x installation, you should have 600 kilobytes (KB) of disk space in the /usr directory. If you are installing a new kernel (linkable driver), make sure you have available space in your root directory for the new kernel. Use the df command to check available disk space.
The IRIX driver DDS tape contains an installation script file called install.fddi that modifies the existing kernel.
Perform the following tasks to load the new IRIX driver files:
Step 1 Log in to your system as root and change your directory to /usr/local.
Step 2 Insert the IRIX driver installation tape into the DDS tape drive.
Step 3 Use the tar command to copy files from the DDS tape to the hard disk, for example:
tar -xvf /dev/tape
A cfddi subdirectory will be created in /usr/local.
tar -xvf /dev/tapens
Use the previous command to change the tape device to a no-swap device.
dd if=/dev/tape of=filename conv=swab
tar xvf filename
Use these commands to translate the files on the tape to no-byte-swapped format and copy them to a file name you designate, then copy the newly translated files to your system.
Step 4 Confirm that the cfddi directory contains the following files:
README deinstall.fddi
download_flash.5X download_flash.6X
download_flash.README eisa44.rom
fddistat.5X fddistat.6X
if_cfddi if_cfddi.51.o
if_cfddi.53.o if_cfddi.60.o
if_cfddi.mtune if_cfddi.sm
install.fddi network_download
ttcp.5X ttcp.6X
 | Caution If an error disrupts the installation script, stop the installation immediately by pressing Ctrl-C. Review the installation instructions up to this point to make sure that the steps you took were accurate and complete. If you repeat the installation process and continue to see errors, stop the installation and contact the Cisco Systems Technical Assistance Center. |
Now you need to invoke the EISA SGI adapter software installation script using the install.fddi command.
The script asks various questions about the type of installation you want to perform, and about your system. Specifically, it asks for the following information:
The following steps describe the installation of the IRIX EISA SGI adapter driver software:
Step 1 Change directory to /usr/local/cfddi.
Step 2 To start running the EISA SGI installation script, enter ./install.fddi. The following information appears:
console 6# ./install.fddi
You have invoked the install.fddi script.
Which is used to install software for FDDI EISA Adapters.
1) Install FDDI EISA driver.
Do you wish to install the EISA FDDI driver (y/n) [y] ? y
Step 3 When the FDDI EISA SGI installation prompt appears, enter y. The following information appears:
How many FDDI interfaces are being installed in this machine [1] ? 1
Step 4 Enter the number of FDDI interfaces installed on this workstation. The EISA adapter slot number prompt appears.
Enter eisa slot number (1-4) for FDDI interface [1] 1
Step 5 Enter the physical slot number (1 to 4) where the EISA adapter, will be or is, installed. The FDDI interface host name prompt appears:
Enter hostname for FDDI interface fddi0 [console-fddi]:
Step 6 Enter the new name of this workstation or use the default name assigned (the existing name with the -fddi modification). The IP address prompt appears:
Enter IP address for FDDI interface 1 [198.133.219.99]:
Step 7 Enter the IP address for this workstation or press Return to enter the default IP address. The following prompt appears:
modifying /etc/hosts
Enter netif number for FDDI interface 1 [ 1 ]: 2
Step 8 Enter the netif (network interface) number for this interface. The follow prompt appears:
Is EISA FDDI Adapter currently installed in the workstation (y/n) [y] ? y
Step 9 If the interface card is installed enter y, if not enter n. After some system configuration information is displayed, the kernel rebuild confirmation appears:
configuring kernel...................done
Installation of FDDI EISA driver complete.
You should now halt the system, power down,
and install the FDDI EISA Adapter.
A log of the installation is in ./install.fddi.log
console 7#
Step 10 Power down the system and install the EISA SGI adapter or if the adapter is already installed, log out and reboot to cause the system to run using the new rebuilt kernel. Refer to the chapter, "Installing the Workgroup EISA SGI Adapter Hardware."
See the section "EISA SGI Driver Installation Script Example" for a complete version of the previous installation script.
| Caution If your system is running Network Information Service (NIS), you must also update the NIS databases with the host name and IP address. Refer to the Silicon Graphics, Inc. Personal System Administration Guide for instructions on how to update NIS databases. You must have an NIS server on the newly created FDDI subnet. |
The following text is an example of the ./install.fddi.log file created using the previous installation procedures:
console 6# ./install.fddi

You have invoked the install.fddi script.
Which is used to install software for FDDI EISA Adapters.
1) Install FDDI EISA driver.
Do you wish to install the EISA FDDI driver (y/n) [y] ? y

How many FDDI interfaces are being installed in this machine [1] ? 1

Enter eisa slot number (1-4) for FDDI interface [1] 1

Enter hostname for FDDI interface 1 [console-fddi]:
Enter IP address for FDDI interface 1 [198.133.219.99]:
modifying /etc/hosts
Enter netif number for FDDI interface 1 [ 1 ]: 2

Is EISA FDDI Adapter currently installed in the workstation (y/n) [y] ? y

configuring kernel...................done
Installation of FDDI EISA driver complete.
You should now halt the system, power down,
and install the FDDI EISA Adapter.
A log of the installation is in ./install.fddi.log
console 7#
The /etc/config/netif.options files will need to be modified to allow the network connection to the EISA SGI adapter. The modifications will vary depending on the configuration of the EISA SGI adapter in the network. The three basic configurations of the EISA SGI adapter in the network are:
The following example will modify the /etc/config/netif.options file for the netif number 2 adapter installed in the previous example. This example will configure the EISA SGI adapter as the secondary network interface with the Ethernet as primary. Complete the following steps to edit the netif.options file:
Step 1 Log in as superuser.
Step 2 Open the /etc/config/netif.options file using a text editor such as vi using the following command:
vi /etc/config/netif.options
The following file will appear:
# netif.options:
#
# The network startup script, /etc/init.d/network, computes typical
# primary and gateway interface names and addresses for most systems.
# Netif.options provides a place for site-dependent network interface
# definitions. You need to modify this file only if:
# 1) the computed primary and/or gateway interface names are incorrect, or
# 2) you don't like convention used to define addresses for interfaces, or
# 3) the host has more than 2 interfaces.
#
# /etc/init.d/network uses two variables to configure each interface.
# The script uses "if1name" and "if1addr" for the primary interface,
# "if2name" and "if2addr" for the first gateway interface, etc.
#
# An ifXname variable (where X=1,2,3...) is the interface's device name as
# reported by "/usr/etc/netstat -i". Valid names include ec0, et0, enp0,
# enp1, fxp0, fxp1, ipg0, ipg1, etc., but NOT lo0.
#
# An ifXaddr variable is a hostname containing $HOSTNAME or a hostname
# in /etc/hosts or an IP address in dot notation. ($HOSTNAME is the host's
# name in /etc/sys_id.) By convention, gateway interfaces use the
# "gate-", "gate2-" and "gate3-" prefixes in front of $HOSTNAME.
# If you don't like this convention, change the appropriate ifXaddr variables.
# For the system to boot correctly, make sure that names specified in ifXaddr
# variables have entries in /etc/hosts.
# The following shell variables have the form "var=value", with no spaces
# before or after the = character (for example: if1name=fxp1).
# Lines with the leading : character are commented out.
# Append the interface name and remove the leading : to override
# the primary interface selection.
: if1name=ec0
# To override the primary interface address, change the value part
# and remove the leading : character.
: if1addr=$HOSTNAME
# To override the name and/or address of the first gateway interface,
# change the value part and remove the leading : character.
: if2name=
: if2addr=gate-$HOSTNAME
# If this host has more than 2 interfaces, you must define values for
# if3name (and if4name if appropriate). Change if3addr (and if4addr) to
# the appropriate names in /etc/hosts if your site has different naming
# conventions.
if3name=
if3addr=gate2-$HOSTNAME
if4name=
if4addr=gate3-$HOSTNAME
# If this host has more than 8 network interfaces, set the number of
# interfaces that the network startup script will configure.
: if_num=8
Step 3 Find the following lines of text that correspond to the network interface number (netif#) entered when you ran the install.fddi script. The following example will install netif number 2:
# To override the name and/or address of the first gateway interface,
# change the value part and remove the leading : character.
: if2name=
: if2addr=gate-$HOSTNAME
Step 4 Edit the line and add the following information:
if2name=fddi0
Delete the leading colon and space and add fddi0.
Step 5 Edit the line of text:
: if2addr=gate-$HOSTNAME
Step 6 Edit the line and add the following information:
if2addr=$HOSTNAME-fddi
Delete the leading colon, space, and gate-, and add -fddi to the end.
Step 7 Save and close the file.
Step 8 Proceed to the chapter, "Installing the Workgroup EISA SGI Adapter Hardware" to install the EISA SGI adapter.
The following text is an example of the /etc/config/netif.options file modified using the previous procedure:
# netif.options:
#
# The network startup script, /etc/init.d/network, computes typical
# primary and gateway interface names and addresses for most systems.
.
.
(information omitted)
.
.
# Append the interface name and remove the leading : to override
# the primary interface selection.
: if1name=ec0
# To override the primary interface address, change the value part
# and remove the leading : character.
: if1addr=$HOSTNAME
# To override the name and/or address of the first gateway interface,
# change the value part and remove the leading : character.
if2name=fddi0
if2addr=$HOSTNAME-fddi

# If this host has more than 2 interfaces, you must define values for
# if3name (and if4name if appropriate). Change if3addr (and if4addr) to
# the appropriate names in /etc/hosts if your site has different naming
# conventions.
if3name=
if3addr=gate2-$HOSTNAME
if4name=
if4addr=gate3-$HOSTNAME
# If this host has more than 8 network interfaces, set the number of
# interfaces that the network startup script will configure.
: if_num=8
When you install an FDDI EISA SGI adapter in a system with an existing Ethernet interface, it automatically becomes a router serving both the FDDI and Ethernet networks. The router is known to the Ethernet network by its Ethernet IP address and host name, and to the FDDI network by its FDDI IP address and host name.
Stations on an internetwork can be reached via multiple routes. When a standard IRIX system is booted, the route daemon (routed) sends out packets over both the Ethernet and the FDDI networks. The route daemon determines the optimal route between stations by relative hop count, not by the speed of the interface. Therefore, in cases where the hop counts are equal, the use of FDDI is not guaranteed. You can guarantee the use of FDDI for network commands by specifying the FDDI host name or IP address of the destination machine.
In Figure 3-1, two commands will each resolve the same physical file on the workstation called Aria. 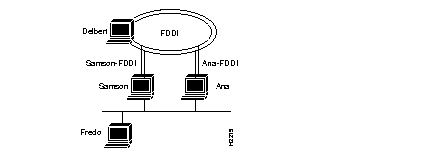
If a user on Fredo mounts files on Delbert, then NFS traffic goes over the Ethernet to either Samson or Aria and from there over an FDDI network to Delbert. However, if a user on Samson mounts files on Aria, the NFS traffic can go over either the FDDI or Ethernet. The user can specify which interface to use by including Aria's FDDI or Ethernet host name in the mount command as follows:
fredo@samson => mount aria:/usr/etc/install/usr/etc/install
fredo@samson => mount aria-FDDI:/usr/etc/install/usr/etc/install
Both these commands mount to the same physical files on Aria. However, the first results in NFS traffic being routed over the Ethernet networks while the second results in NFS traffic being routed over the FDDI network.
|
|