|
|

This chapter explains how to install the workgroup EISA SGI single attachment and dual attachment adapters in the Indigo2 workstation, connect the cables, check the LEDs, and confirm the network connections.
To install the EISA SGI adapter, make sure you complete the following procedures and have the required tools available. See the chapter, "Preparing for Installation."
This section provides general instructions for installing the EISA SGI single attachment and dual attachment adapters in the Indigo2 workstation. Included are brief instructions you can follow for SGI Indigo2 workstations. For specific instructions for these and other models, refer to the Indigo2 Workstation Owner's Guide, which is provided with your workstation.
 | Warning Make sure that your workstation is powered down before you begin this procedure. |
Perform the following steps to remove the cover from your Indigo2 workstation:
Step 1 Remove the front bezel by pressing down on the tabs at each side. (See Figure 4-1.)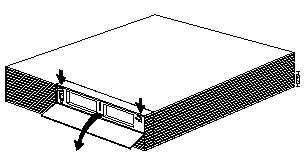
Step 2 Pull the cover up and rotate toward the back of the chassis. (See Figure 4-2.)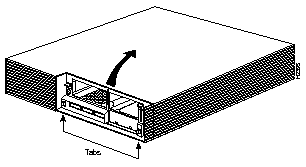
After you remove the workstation's top cover and locate an available
bus-master EISA slot, you can insert the EISA SGI adapter.
Step 1 Make sure the system is powered down.
Step 2 Face the rear of the workstation and locate the EISA slots on the right side of the workstation. (See Figure 4-3.)
Step 3 Open the access panel by pulling up and rotating down to expose the EISA slot covers. (See Figure 4-3.)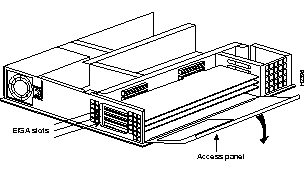
Step 4 Remove the slot cover to expose the desired EISA slot. The EISA slots are numbered at the top 1, through 4. Use the slot cover screws to secure the adapter. (See Figure 4-4.)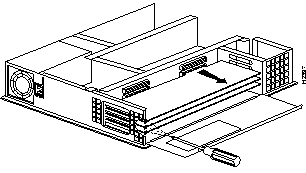
Step 5 Without touching any electrical components, slide the adapter into the slot. Press firmly into place. (See Figure 4-5.)
Step 6 Secure the adapter with the screw that held the slot cover.
Step 7 Reassemble the system.
Connect the EISA SGI adapter to the network as follows:
Step 1 Connect one end of the cable to the EISA SGI adapter port.
Step 2 Connect the other end of the cable to a CDDI/FDDI network outlet.
Step 3 Verify that your adapter is connected to the concentrator and that the concentrator is plugged in and connected to the network.
You can connect an optional bypass switch to dual attachment adapters to maintain connectivity to the FDDI ring. If a station enters a fault condition or is powered down or rebooted, the ring will not wrap if a bypass switch is present on the faulty station. Figure 4-6 shows how the bypass switch connects to the network and dual attachment adapter.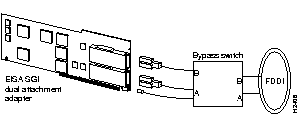
After completion of the EISA SGI adapter hardware installation and cabling procedures, refer to the following chapter "Confirming the Installation" and, if needed, the chapter "Troubleshooting the Workgroup EISA SGI Adapter."
|
|