|
|

This chapter discusses cable connections to your network and includes the following information:
This chapter also includes power warnings for the U.K., France, and Germany.
This section discusses connecting a console terminal to the admin. interface port at the rear of the concentrator. Use the terminal for initial setup of the concentrator. Continued use of a terminal is optional. You also can access the admin. interface using Telnet (if you have configured an IP address and subnet mask). You can have only one Telnet connection per concentrator. The admin. interface port is an EIA/TIA-232 DTE device, configured at the factory with the following communications parameters: 9,600 baud, no parity, eight data bits, one stop bit.
After you connect a terminal, you can use the admin. interface set baud command, in privileged mode, to change the line speed. For information on this command, refer to the section "set baud" in the appendix "Command Reference."
To connect a terminal to the admin. interface port, use the supplied RJ-45-to-DB-25 modular adapter cable. (See Figure 4-1.) For admin. port pinout information, refer to the section "Admin. Port Cabling" in the appendix "Cabling Specifications."

In a CDDI or FDDI network, CDDI or FDDI A ports connect to CDDI or FDDI B ports, and B ports connect to A ports. (See Figure 4-2.) You can avoid A-to-A and B-to-B connections by using the tabs on the FDDI connectors and applying labels to each cable segment. A-to-B and B-to-A UTP cabling requires a modular, cross-connect cable to correctly attach the transmit and receive pairs. Both 1-foot (30.5 cm) and 7-foot (2.13 m) cross-connect, category 5, data-grade, modular cables are available from us.
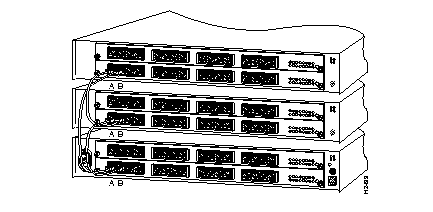
To ensure proper operation, the correct A-to-B and B-to-A relationship is very important.
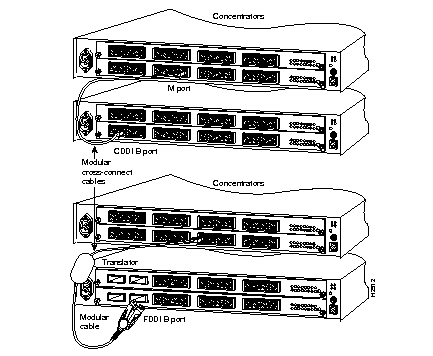
In a cascaded configuration, the A or B port of a concentrator connects to the M port of another concentrator. If the A or B port is a CDDI port, use an RJ-45 modular, cross-connect cable to connect to the CDDI M port of the other concentrator. If the A or B port is an FDDI port, use a CDDI-FDDI translator to convert to CDDI and allow a connection to the CDDI M port. Figure 4-3 shows two examples of cascaded concentrators--CDDI and FDDI.
In a dual homing configuration, both the A and B ports of a concentrator connect to the FDDI M ports of two other concentrators. (See Figure 4-4.)
 | Warning Invisible laser radiation present. To see translated versions of this warning, refer to the appendix "Translated Safety Warnings." |
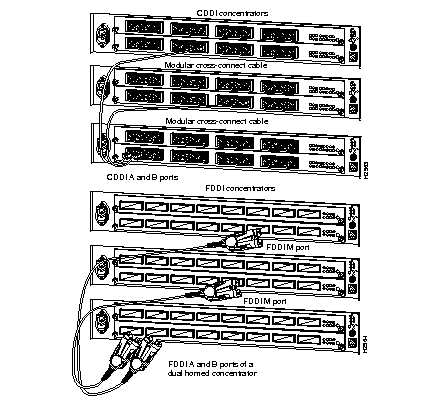
If the A and B ports of the dual homed concentrator have CDDI interfaces, use modular, cross-connect cables to connect to the M ports of the other concentrators. (See Figure 4-4.)
In a mixed configuration (CDDI/FDDI), use a CDDI-FDDI translator (Model Number WS-C703) to connect between the two media: modular UTP (category 5) or STP and optical fiber. In Figure 4-5, a modular, cross-connect cable is used to connect a CDDI port on a switch to a CDDI-FDDI translator. A MIC is used to connect the other side of the translator to an FDDI port on a concentrator.
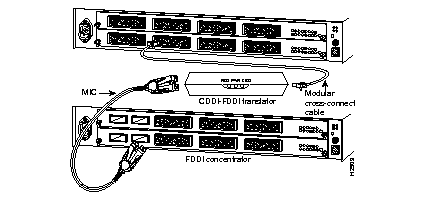
For more information on CDDI-FDDI translator connections for CDDI/MLT-3, refer to the appendix "Cabling Specifications."

Invisible laser radiation present. To see translated versions of this warning, refer to the appendix "Translated Safety Warnings."
You can connect an optical bypass switch to maintain connectivity to the FDDI ring. If the concentrator enters a fault condition or is powered down or rebooted, the ring will not wrap if an optical bypass switch is present on the faulty concentrator.
Figure 4-6 shows how the optical bypass switch connects to the ring and concentrator. The dashed lines in the optical bypass switch show its function when it is in use. Make certain to maintain the A-to-B and B-to-A relationships.
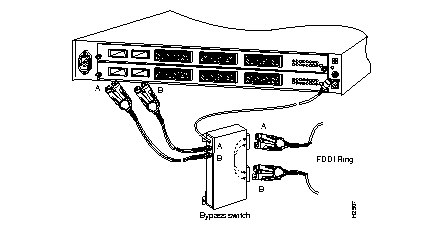
After you connect the optical bypass switch and reset the concentrator, check the show system display (see the "show system" section of the appendix "Command Reference"). The Bypass field should indicate that the switch is present.

Invisible laser radiation present. To see translated versions of this warning, refer to the appendix "Translated Safety Warnings."
Following are the instructions for connecting your CDDI/FDDI Workgroup WS-C1400 Concentrator to a patch panel, inside wiring, and wall jack.
Figure 4-7 shows a complete wiring configuration from the concentrator (top) to the workstation (bottom).
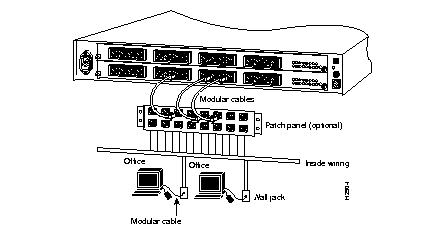
Step 1 Connect the concentrator ports to the patch panel.
Use only an approved, high-performance, category 5, data-grade, modular UTP cable to connect ports on the concentrator to the patch panel. (See Figure 4-8.) Modular cables are available from us or other vendors. Use only cross-connect cables to connect the CDDI ports.
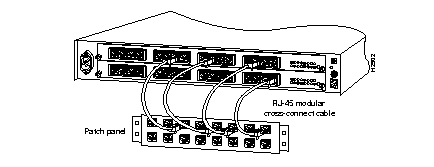
Step 2 Terminate the horizontal wiring at a patch panel.
The term horizontal wiring refers to the cables installed from the wall jacks (at various office locations) to the wiring closet. Terminate your horizontal wiring at the patch panel according to the AT&T 258A or EIA-568 standards.
Step 3 Terminate the horizontal wiring at each wall jack.
Connect the horizontal wiring at each wall jack according to the AT&T 258A or EIA-568 standards. Wall jacks must be compatible with category 5, data-grade components.
Step 4 Connect the workstation to the wall jack.
Workstations should be connected to RJ-45 wall jacks with high-performance, category 5, UTP, modular cables. (See Figure 4-9.) A one-foot or seven-foot cable is also available from Cisco Systems.

Before you apply power, inspect the concentrator thoroughly. Verify that all cables are installed correctly. Check for proper ventilation at both sides. After power is applied, verify that the status LED is green.
The chassis does not have an on/off power switch. Power is on when the chassis is connected to the AC source. Check the power rating of your electrical outlet before connecting any devices to the wall outlet or a power strip. Contact the facilities manager or a qualified electrician if you are not sure what type of power is supplied to your building.
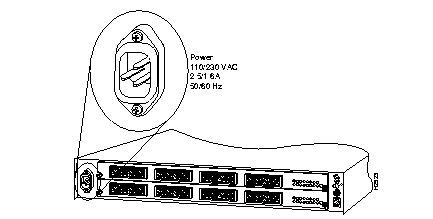
The concentrator requires 110 VAC, 3.0A, 60 Hz or 230 VAC, 1.6A, 50 Hz power. The power supply in the concentrator automatically switches to match the input power.
Use the supplied power cable to connect the concentrator to a properly grounded electrical outlet. After ensuring proper power, plug the female end of the supplied power cord into the connector on the rear of the concentrator. (See Figure 4-10). Then plug the male end of the power cord into a properly grounded electrical outlet.
Read the warning messages in this section for important power-related information.
 | Warning The device is designed to work with TN power systems. To see translated versions of this warning, refer to the appendix "Translated Safety Warnings." |
 | Warning Care must be given to connecting units to the supply circuit so that wiring is not overloaded.To see translated versions of this warning, refer to the appendix "Translated Safety Warnings." |
 | Warning A voltage mismatch can cause equipment damage and may pose a fire hazard. If the voltage indicated on the label is different from the power outlet voltage, do not connect the chassis to that receptacle. To see translated versions of this warning, refer to the appendix "Translated Safety Warnings." |
 | Warning This equipment is intended to be grounded. Ensure that the host is connected to earth ground during normal use. To see translated versions of this warning, refer to the appendix "Translated Safety Warnings." |
 | Warning When installing the unit, the ground connection must always be made first and disconnected last. To see translated versions of this warning, refer to the appendix "Translated Safety Warnings." |
 | Warning This product relies on the building's installation for short-circuit (overcurrent) protection. Ensure that a fuse or circuit breaker no larger than 120 VAC, 15A U.S. (240 VAC, 10A international) is used on the phase conductors (all current-carrying conductors). To see translated versions of this warning, refer to the appendix "Translated Safety Warnings." |
 | Warning Do not touch the power supply when the power cord is connected. For systems with a power switch, line voltages are present within the power supply even when the power switch is off and the power cord is connected. For systems without a power switch, line voltages are present within the power supply when the power cord is connected. To see translated versions of this warning, refer to the appendix "Translated Safety Warnings." |
To apply power to the device, connect the power cord. To disconnect power to the device, disconnect the power cord. There is no on/off switch. Use only a properly grounded electrical outlet. The electrical outlet must be installed near the equipment, easily accessible, and properly grounded.
Power should come from a building branch circuit. Use a maximum breaker current rating of 20A for 110V, or 8A for 230V. Note the power consumption ratings of each device before you connect to a power source.
The device is designed to work with single phase power systems having a grounded neutral conductor. To reduce the risk of electric shock, do not plug the device into any other type of power system. Contact your facilities manager or qualified electrician if you are not sure what type of power is supplied to your building.
Not all power cords have the same current ratings. Household extension cords do not have overload protection and are not designed for use with computing devices. Do not use household extension cords with your device.
Pour mettre le dispositif sous tension, connectez le câble d'alimentation. Pour le mettre hors tension, déconnectez le câble d'alimentation. Il n'y a pas de bouton marche-arrêt. Utilisez exclusivement une prise de courant électrique correctement mise à la terre. Cette prise de courant doit se trouver à proximité du matériel, facile d'accès, et correctement mise à la terre.
L'alimentation électrique doit être fournie par un circuit de branchement du bâtiment. Utilisez un disjoncteur d'une puissance nominale maximum de 20 A en 110 V ou de 8 A en 230 V. Notez la puissance consommée par chaque dispositif avant d'établir la connexion à une source d'alimentation.
Le dispositif est conçu pour fonctionner avec des systèmes d'alimentation monophasés munis d'un conducteur neutre mis à la terre. Pour éviter tout risque d'électrocution, ne branchez pas le dispositif dans un système d'alimentation différent. En cas de doute quant au type d'alimentation électrique du bâtiment, adressez-vous au directeur de l'exploitation ou à un électricien qualifié.
Tous les câbles d'alimentation n'ont pas la même intensité nominale. Les rallonges d'usage domestique n'offrent pas de protection contre les surcharges et ne sont pas conçues pour être utilisées avec les systèmes d'ordinateurs. N'utilisez pas de rallonge d'usage domestique avec ce dispositif.
Das Gerät wird durch Anschließen des Netzkabels ein- und durch Herausziehen des Netzkabels ausgeschaltet. Es ist kein Netzschalter vorhanden. Verwenden Sie nur ordnungsgemäß geerdete elektrische Steckdosen. Die Steckdose muß in der Nähe des Geräts, mühelos zugänglich und ordnungsgemäß geerdet sein.
Der Strom sollte von einer Abzweigleitung des Gebäudes stammen. Der maximale Nennstrom des Unterbrechers sollte 20 Ampere bei 110 Volt und 8 Ampere bei 230 Volt betragen. Stellen Sie vor dem Anschließen an eine Stromquelle den Nennleistungsverbrauch aller Gerät fest.
Das Gerät ist für Einphasennetze mit geerdetem Mittelleiter ausgelegt. Schließen Sie das Gerät nicht an andere Netzarten an, da sonst Elektroschockgefahr besteht. Wenn Sie sich nicht sicher sind, mit welcher Art von Netzstrom Ihr Gebäude versorgt wird, wenden Sie sich an den Anlagenverwalter oder einen qualifizierten Elektriker.
Nicht alle Netzkabel sind für den gleichen Nennstrom ausgelegt. Haushaltsverlängerungskabel Gewöhnliche Haushalts haben keinen Überlastungsschutz und sind nicht für den Gebrauch mit EDV-Geräten geeignet. Verwenden Sie keine Haushaltsverlängerungskabel für das Gerät.
 | Warning Ultimate disposal of this product should be handled according to all national laws and regulations. To see translated versions of this warning, refer to the appendix "Translated Safety Warnings." |
|
|