|
|

Table Of Contents
Information About SM Configuration and Management Methods
How to Configure a Subscriber Management Solution
Configuring the Subscriber Management Solution
Parsing CLU Operations and Options
Reloading the SM Configuration (p3sm)
How to Manage Subscribers, Mappings, and Properties (p3subs)
Managing the Subscriber Database (p3subsdb)
Viewing and Connecting Network Elements (p3net)
Viewing Subscriber Domains (p3domains)
Managing the Cable Support Module (p3cable)
Installing an Application (p3inst)
Viewing Information of the PRPC Interface Server (p3rpc)
Managing a Cluster of Two SM Nodes (p3cluster)
Viewing Statistics of the RADIUS Listener (p3radius)
Configuration and Management
This module describes how to configure and manage the SM.
•
Information About SM Configuration and Management Methods
•
Information About SM Configuration and Management Methods
Configure and manage the Subscriber Manager using:
•
•
The configuration file and Command-Line Utilities (CLU) give you complete control over the SM; including subscriber management, database management, and SCE network configuration and management.
Configuration File
The SM uses a configuration file, p3sm.cfg, located in ~pcube/sm/server/root/config/. For a detailed description of the configuration file parameters, see Configuration File Options.
The configuration file, together with the Command-Line Utilities, is used for configuring all the parameters that define the behavior of the SM application.
The configuration file contains the following types of parameters:
•
•
•
•
•
–
–
–
•
•
–
–
•
•
•
Usually, the parameters in the configuration file are specified once when setting up the system, and are valid throughout the system lifetime. To modify the configuration file parameters, edit the file using any text editor and reload it using the CLU (see Reloading the SM Configuration (p3sm). The configuration file can be loaded on starting or restarting the SM and by explicitly running the CLU command.
The configuration file is designed so that the same configuration file can be used in multiple SM applications of a high availability setup. This enables the user to replicate the configuration by simply copying the file from one machine to another.
Command-Line Utilities
The SM provides a set of Command-Line Utilities (CLU), which you use, together with the configuration file, to configure the parameters that might change during the operation of the SM.
The CLU enables the user to configure the SM using shells installed on the machine. CLU commands are executable only when the user is logged in to the machine using the pcube user account, which is always installed (see Installation and Upgrading). The CLU is used mainly for viewing and for subscriber management.
In high availability setups, you cannot use the CLU to perform subscriber management operations on the standby SM. Moreover, the standby SM refreshes the database before performing subscriber display operations, so the operation takes longer (than for the active SM). Therefore, it is recommended to perform all subscriber operations on the active SM.
This module explains how to perform various tasks using the appropriate CLU, but it does not describe the CLU in detail. For a complete, detailed description of the CLU, see Command-Line Utilities.
How to Configure a Subscriber Management Solution
This section explains the procedure for configuring a Cisco Service Control deployment consisting of several SCE platforms and Subscriber Manager (SM) systems in order to make it ready for subscriber integration.
This section uses the terminology and tools explained in previous chapters and, when needed, terms and configuration tools explained in the SCE 1000 and SCE 2000 User Guides.
•
•
Configuring the Subscriber Management Solution
This configuration procedure applies to a single group, consisting of the following:
•
•
•
Every subscriber management solution can be divided into such groups, and this procedure can be applied to each of these groups.
Prerequisites
Before configuring any of the components in your subscriber management solution, verify that all the items on the following checklist have been successfully completed:
•
•
•
•
•
•
•
SUMMARY STEPS
1.
2.
3.
4.
5.
6.
7.
8.
9.
10.
11.
12.
DETAILED STEPS
Step 1
Step 2
Use the p3net CLU command to verify the connection state of each SCE Platform that should be provisioned by the SM.
After the physical installation of an SCE platform (by being connected to the management network), it must be explicitly added to the SM list, or repository, of existing SCE platforms before the SM will recognize it. Conversely, after the removal of an SCE platform from that list, the SM will no longer recognize it, even though it is still physically connected.
Each SCE.XXX section defines the following configuration parameters that represent a single SCE platform, where XXX represents the SCE logical name:
•
Defines the IP address of a standalone SCE device or the two IP addresses of a cascade SCE pair.
•
Defines the port through which to connect to the SCE platform. The default is 14374.
To view the SCE platforms, use the p3net CLU. See Information About the p3net Utility.
For further information, see SCE.XXX Section.
a.
b.
p3sm --load-configc.
p3net --showd.
p3net --show-allStep 3
Use the p3domains command to verify the domain configuration and that the SCE platforms are set to these domains.
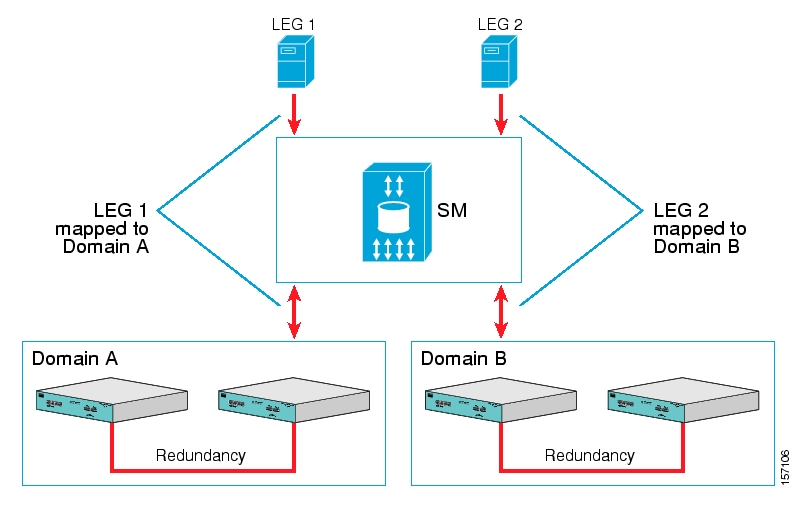
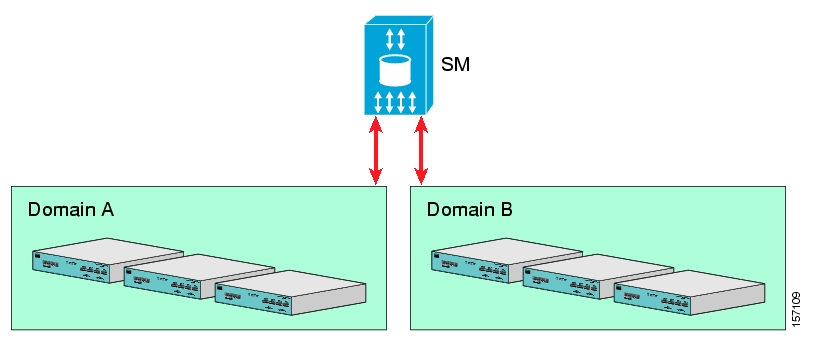
When a system has more than one SCE platform, they can be configured into groups, or domains. A subscriber domain is one or more SCE platforms that share a specified group of subscribers. Before adding an SCE platform to a domain, you must add the SCEplatform to the SCE platform repository.
Note
Each Domain.XXX section specifies the elements (SCE platforms), aliases, and properties for one domain. It contains the following parameters:
•
Specifies the names of the SCE platforms that are part of the domain.
•
Defines domain aliases. When subscriber information is received from the LEG with one of the aliases (for example, alias1 ), the information is distributed to the domain that matches this alias (for example, domain_name1 ). A typical alias could be a network device IP address, where, for example, each string in the values can be the IP address of a NAS or a CMTS.
Note
•
Note
•
Defines the default policy property values for a domain. Unless the LEG/API overrides these defaults when it introduces the subscriber to the SM, the subscriber policy is set according to the default policy property values of its domain. Property values must be integers.
To view the domains, use the p3domains CLU. See Information About the p3domains Utility.
For further information, see Domain.XXX Section.
Step 4
This section of the configuration file is relevant to any deployment topology. It addresses the following system-wide parameters:
•
Defines whether the SM introduces the subscribers to the SCE platforms immediately after a login operation (Push mode), or only when the SCE requests the subscriber specifically (Pull mode).
•
Defines whether to lock subscriber-related operations (login, logout, etc.) at the application level. Set this flag to true in the cases when several LEG components can update subscribers simultaneously.
•
Defines whether the SM supports the solution where a Cisco 7600/6500 is used for load-balancing among several SCE platforms. In this solution, when one SCE platform fails, subscriber traffic is redistributed to a different SCE platform. The SM must remove these subscribers from the failed SCE platform and send the relevant subscriber information to the new SCE platform. This parameter is relevant only in the Pull mode.
•
Defines whether to enable the logging of subscriber logon events.
To view the SM settings, use the p3smCLU. See Information About the p3sm Utility.
Note
Step 5
The Data Repository section defines the SM operation with the TimesTen In-Memory Database, via the following parameters:
•
Defines whether the SM supports IP-Ranges.
Note
•
Defines the interval, in seconds, for calling the TimesTen checkpoints. Reducing the value affects performance, increasing the value increases vulnerability to power-down.
•
Determines the maximum IP range size used in the system. This parameter is used for improving performance of the SM in Pull mode when the [Data Repository] section is configured with support_ip_ranges=yes.
Note
For further information, see Data Repository Section.
Step 6
The High Availability section defines in what kind of topology the SM should work, via the parameter:
•
Defines in what kind of topology the SM should work (cluster or standalone).
For further information, see SM High Availability Setup Section.
Step 7
This step should be performed only when using manual integration, or when performing a setup prior to the beginning of the automatic integration.
A csv file is a simple text file where each line consists of comma-separated values. Because each line may contain subscriber properties, which are application dependant, the documentation of the application that you installed on your system describes the format of a csv import file.
In most cases, when importing csv files, you should use the p3subsdb --importCLU command. When integrating with a cable AAA system and working in the CPE as Subscriber mode (see CPE as Subscriber in Cable Environment ), importing cable modems requires the p3cable --import-cmCLU command.
Step 8
This step should be performed only when using the Pull mode to introduce subscribers, or when performing a special operation on SM-SCE connection failure. Use the SCE platform Command-Line Interface (CLI) to configure several configuration parameters, as discussed below.
Configuring these parameters ensures that the SCE platform correctly applies appropriate defaults to subscribers in the period between subscriber detection and pull response (for unmapped subscribers). For additional details, see the SCE 1000 or SCE 2000 User Guides.
•
When the SCE platform encounters network traffic that is not classified to any introduced subscriber, it checks whether the mapping of the unfamiliar subscriber belongs to one of the anonymous groups. If the subscriber belongs to an anonymous group, a new anonymous subscriber is created, and a request for an updated subscriber record is sent to the SM. The properties of the anonymous subscriber are taken from the subscriber template that is assigned to the newly created subscriber anonymous group.
•
An anonymous group is a specified IP range, possibly assigned a subscriber template (defined in the next section). If a subscriber template has been assigned to the group, the anonymous subscribers generated have subscriber properties as defined by that template. If no subscriber template has been assigned, the default template is used.
Use the appropriate CLI commands to import anonymous group information from a csv file, or to create or edit these groups explicitly.
•
Values for various subscriber properties for unmapped or anonymous subscriber groups are assigned in the system based on subscriber templates. A number from 0 to 199 identifies subscriber templates. CSV formatted subscriber template files define the subscriber templates 1 to 199. However, template 0 cannot change; it always contains the default values. If a template is not explicitly assigned to an anonymous group, the group uses template 0.
Use the appropriate CLI commands to import subscriber templates from a csv file, or edit these templates from the command line. Additionally, use the appropriate CLI commands to assign subscriber templates to the anonymous groups.
•
To prevent SCE capacity problems in Pull mode, configure the aging of introduced subscribers. The aging parameter defines a timeout, and any subscriber that does not generate traffic during this timeout interval will be automatically logged out from the SCE.
•
To prevent incorrect classification of a subscriber's traffic during a lengthy connection failure between the SM and the SCE, configure the SM connection failure parameters.
The SCE has several alternatives for connection failures handling:
–
–
–
•
System Configuration Examples
This section presents and explains common subscriber management scenarios, including the correct configuration parameters for these scenarios. The following scenarios are described:
•
•
•
Automatic Introduction of Subscribers, with Push Mode and Fail-Over of SCE Platforms: Example
This example assumes the following:
•
•
•
Figure 5-1 Cable Topology with Automatic Integration with a DHCP Server, Push Mode, and Fail-Over of SCE Platforms
Note
The following general steps describe how to configure the SM for this scenario:
1.
2.
3.
4.
This scenario does not need an SCE platform configuration.
Manual Introduction of Subscribers with Pull Mode: Example
This example assumes the following:
•
•
•
Note
Figure 5-2 Topology with Manual Introduction of Subscribers and Pull Mode
The following general steps describe how to configure the SM for this scenario:
1.
2.
3.
4.
5.
–
–
–
SM Fail-over Configuration (General): Example
When using a set-up with SM fail-over (based on two SM nodes connected in a cluster), the configuration is identical to the regular configuration, with one exception:
•
Other than that, SM fail-over configuration is performed normally via the p3sm.cfg configuration file. Manually copy the configuration file from the active SM to the standby SM.
For additional information of how to configure the VCS, see Veritas Cluster Server.
How to Use the CLU
This section introduces the Command-Line Utilities (CLU), and describes how to use the CLU for viewing, subscriber management, and other tasks when working with the SM.
Note
The procedures explained in the following sections invoke the following CLU commands:
p3batchp3cablep3clup3clusterp3dbp3domainsp3instp3logp3netp3radiusp3rpcp3smp3subsp3subsdbInformative Output
All CLU commands support the following operations for informative output:
--helpPrints the help for the specified CLU command, then exits.
--versionPrints the SM program version number, then exits.
Parsing CLU Operations and Options
Place in quotation marks a command operation or option containing any of the following characters:
•
•
•
A command operation or option that contains any of the following characters must have that character preceded by an escape character:
•
•
•
The following table shows several examples of the above rules:
One-letter abbreviations are available for some of the operations and options. For example, -dis an abbreviation for --domain. Note that only one hyphen (-), not two, precedes the letter for an abbreviation, and that if the operation or option takes a parameter, there is a space and not an equal sign before the parameter.
The abbreviations are useful if you want to specify an expression to be expanded by the UNIX shell, for example:
Reloading the SM Configuration (p3sm)
Use the p3sm utility to configure the SM by reloading the SM configuration file p3sm.cfg. Use any standard text editor to edit the configuration file.
Step 1
The configuration file is loaded, and the SM configuration updated accordingly.
The --remote option loads the configuration first to the local SM, and afterward to the remote SM (in High Availability setups).
Managing the SM (p3sm)
Use the p3sm utility to manage the SM on an ongoing basis. The p3sm utility enables you to start, stop, and resynchronize the SM.
Step 1
For a full list of p3smoperations and options, see Information About the p3sm Utility.
Examples for Managing the SM
Stopping and Restarting the Server: Example
This example shows how to stop the server operation and then restart it.
p3sm --restartResynchronizing an SCE: Example
This example shows how to resynchronize an SCE whose logical name is SCE_1000A .
p3sm --resync --ne-name=SCE_1000AExtracting Support Information: Example
This example shows how to extract the SM support information to a file named support.zip.
p3sm --extract-support-file --output=support.zipHow to Manage Subscribers, Mappings, and Properties (p3subs)
Use the p3subs utility to manage specific subscribers. You can add or remove subscribers. You can also manage subscriber properties and mappings with this utility.
Managing Subscribers, Mappings, and Properties (p3subs)
Step 1
The command should be in the following general format:
p3subs operation --subscriber=Subscriber-Name[--ip=IP-address] [--vlan-id=VLAN]
[--mpls-vpn=VPN-ID@PE-IP] [--property=property-name=value] [--domain=domain-name]
[--overwrite]
The subscriber on whom the operation is to be performed is specified by using the format --subscriber=subscriber-name. A mapping (IP address, VLAN, or MPLS/VPN specification), property, or domain, if specified, uses the format displayed.
Note
For a full list of p3subsoperations and options, see Information About the p3subs Utility.
Examples for Managing Subscribers, Mappings, and Properties
Managing Subscribers
The following examples show how to manage subscribers.
Example 1:
The following example shows how to add a subscriber with the specified IP address.
p3subs --add --subscriber=jerry --ip=96.142.12.7Example 2:
The following example shows how to overwrite subscriber information. Because the subscriber named "jerry" already exists, the add operation would fail; however, the overwrite option allows the IP address to be overwritten.
p3subs --add --subscriber=jerry --ip=96.128.128.42 --overwriteManaging Mappings
This example shows how to removes all the mappings for a specified subscriber.
p3subs --remove-all-mappings --subscriber=jerryMappings Specification
You can specify the following mapping types for each subscriber:
•
•
•
Note
Note
SCE2000#>configure
SCE2000(config)#>in li 0
SCE2000(config if)#>VLAN symmetric classify
Managing Properties
The application property names depend on the application running on your system. To find descriptions of the application property names and values, see the documentation provided with the application installed on your system.
This example shows how to set a property value for a specified subscriber.
p3subs --set --property=packageId=1 --subscriber=jerryClearing the Subscriber Applicative State
This example shows how to clear the applicative state of the specified subscriber. Note that this command clears only the backup copy at the SM. It does not clear the applicative state record in the SCE platform.
p3subs --clear-state --subscriber=jerryManaging the Subscriber Database (p3subsdb)
Use the p3subsdbutility to manage the SM database. You can import subscriber information for a group of subscribers from a CSV file into the SM database. You can also export subscriber information from the SM database to a CSV file.
Note
For a full list of p3subsdboperations and options, see Information About the p3subs Utility.
Step 1
Examples for Managing the Subscriber Database
List all Subscribers: Example
This example shows how to list all subscribers in a specified domain.
p3subsdb --show-domain --domain=mainDomainImporting Subscribers from a CSV File: Example
This example shows how to import subscribers from the specified CSV file.
p3subsdb --import --file=goldSubscriberFile.csvExporting Subscribers to a CSV File: Example
This example shows how to export subscribers with filtering options to a specified CSV file.
p3subsdb --export --prefix=a --output=silverSubscriberFile.csvViewing and Connecting Network Elements (p3net)
Use the p3net utility for viewing the connection status of network elements and trying to reconnect disconnected elements.
For a full list of p3netoperations and options, see Information About the p3net Utility.
Step 1
Example:
The following example shows how to display a network element's connection status.
p3net --show --ne-name=mainNEViewing Subscriber Domains (p3domains)
Use the p3domains utility for viewing the subscriber domains. As explained in Introducing the Subscriber Manager, subscriber domains are groups of SCE devices that serve the same subscribers.
For a full list of p3domainsoperations and options, see Information About the p3domains Utility.
Step 1
Managing the Cable Support Module (p3cable)
•
•
Managing the Cable Support Module
In the cable environment, the SM supports two modes of operation: CM as Subscriber and CPE as Subscriber, as described in CPE as Subscriber in Cable Environment.
This section only discusses the support of the CPE as Subscriber mode. In this mode, the CPE is modeled as the subscriber, and it inherits its policy and domain from the cable modem (CM) through which it connects to the network. Each cable modem is linked with one or more CPEs. (For background information about special characteristics of the CPE as Subscriber mode in the cable environment, see CPE as Subscriber in Cable Environment ).
Use the p3cable utility commands to import cable modem information from a CSV file to the SM, and to export the cable modem information from the SM to a CSV file. You can also use this utility to clear the repository of all cable modems, and to show whether to allow or deny the login of CPEs that belong to unfamiliar cable modems; i.e., cable modems that do not exist in the SM database. However, for specifying whether to allow or deny such a login, use the Cable Adapter Section section of the p3sm.cfg configuration file.
For a full list of p3cable operations and options, see Information About the p3cable Utility.
Step 1
Examples for Managing the Cable Support Module
Importing Cable Modems from a CSV File: Example
This example shows how to import cable modems from a CSV file.
p3cable --import-cm --file=CMFile.csvClearing the Repository: Example
This example shows how to clear the repository of all cable modems:
p3cable --clear-all-cmDisplaying the Login Status of CPEs: Example
This example shows how to display login status (allow/deny) of CPEs that belong to cable modems that do not exist in the SM database:
p3cable --show-dynamic-modeInstalling an Application (p3inst)
Use the p3inst utility to install or uninstall an application ( pqi file). You can install an application on the SM to customize the components. You can also upgrade an existing application to a new version, or uninstall a previously installed application.
For a full list of p3inst operations and options, see Information About the p3inst Utility.
Step 1
Examples for Installing an Application
Installing a File: Example
This example shows how to install the specified installation file.
p3inst --install --file=myInstallation.pqiUninstalling a File: Example
This example shows how to uninstall the specified installation file.
p3inst --uninstall --file=oldInstallation.pqiViewing Information of the PRPC Interface Server (p3rpc)
Cisco provides a proprietary RPC (Remote Procedure Call) interface to the SM. Use the p3rpc utility to view the configuration and statistics of the PRPC server.
For a full list of p3rpc operations and options, see Information About the p3rpc Utility.
Step 1
Examples for Viewing Information of the PRPC Interface Server
This example displays the statistics of the PRPC server.
p3rpc --show-statisticsManaging a Cluster of Two SM Nodes (p3cluster)
Use the p3cluster utility to view the redundancy state of the SM and its components. This utility also supports operations that alter the redundancy state of the SM. These operations are used by the SM Cluster Agent and for administrative tasks.
For a full list of p3cluster operations and options, see Information About the p3cluster Utility.
Step 1
Examples for Managing a Cluster of Two SM Nodes
This example displays the redundancy status of the SM and it components.
p3cluster --showManaging the User Log (p3log)
Use the p3log utility to configure and manage the user log. All user-related events and errors are directed to the SM user log. You can extract the contents of the user log to a specified file in order to read and save its contents. You can also clear the user log.
For a full list of p3logoperations and options, see Information About the p3log Utility.
Step 1
Examples for Managing the User Log
This following example displays how to extract the user log to a specified file.
p3log --extract --output=myfileViewing Statistics of the RADIUS Listener (p3radius)
Use the p3radiusutility to view the statistics of the RADIUS Listener LEG. For information about this CLU, see the Cisco SCMS SM RADIUS Listener LEG Reference Guide .
Step 1
Utilities
Running a Batch File (p3batch)
Use the p3batch utility to run a batch file and execute its commands. Using any text editor, you can create a batch file that contains a series of CLU commands, one command per line. This operation ( p3batch) enables you to run multiple operations on a single connection to the SM.
For a full list of p3batch operations and options, see Information About the p3batch Utility.
Step 1
Examples for Running a Batch File
Running a Batch File (Halt on Error): Example
This example shows how to run a batch file that will halt if an error occurs.
p3batch --file=mainBatchFile.txtRunning a Batch File (No Halt on Error): Example
This example shows how to run a batch file that will not halt if an error occurs.
p3batch --file=mainBatchFile.txt --skip-errorsPrinting General Help About CLU Commands (p3clu)
Step 1
All CLU commands will be printed.
Database Operations
Use the p3db utility to manage and monitor the TimesTen database. The CLU exposes capabilities of the some of TimesTen CLUs with respect to specific needs of the SM.
For a full list of p3db operations and options, see Information About the p3db Utility.
Step 1
Examples for Database Operations
This example shows how to request the status of the replication agent, and also lists a typical response:
p3db --rep-status
Peer name         Host name                 Port    State  Proto
----------------  ------------------------ ------  ------- -----
PCUBE_SM_REPOSITORY  SM_REP1          Auto   Start      11
Last Msg Sent Last Msg Recv Latency TPS     RecordsPS Logs
------------- ------------- ------- ------- --------- ----
00:00:02      00:00:00         1.15    2723      5447    1
the subscriber DB is ok
Command terminated successfully
![]()
![]()
![]()
![]()
![]()
![]()
![]()
![]()
Posted: Wed Aug 15 17:46:03 PDT 2007
All contents are Copyright © 1992--2007 Cisco Systems, Inc. All rights reserved.
Important Notices and Privacy Statement.