|
|

This chapter describes how to install the hardware and software for the Cisco DVB Interactive Network Adapter INA2320. This chapter contains the following sections:
The Cable DVB/DAVIC Management Program is described in "Cable DVB/DAVIC Management Program."
The Cisco DVB INA2320 is delivered with all ordered modules installed and all ordered channels enabled. The unit is configured to the default settings at the factory.
 |
Note Should any item be damaged or missing, notify the carrier and your local Cisco representative. |
Check that you have the following items:
Read the instructions in the table to ensure correct installation and operation:
| Item | Description |
|---|---|
Before any other connection is made, connect the unit to a protected earth terminal via a 3-wire power cable. | |
Check that the AC power source voltage corresponds to the power input voltage for the unit; the voltage must be in the range of 100-250 V AC. |
 |
Warning Do not attempt to extract or insert a module before you have powered down the unit and pulled the main plug out. For instructions on how to replace a module, see the "Replacing a Module in the Cisco DVB INA2320" section. |
The coaxial cables used to connect the Cisco DVB INA2320 at the headend should be very high-quality cables. Cisco recommends that you use a double-shielded coaxial cable to connect the Cisco DVB INA2320 to the hybrid fiber-coaxial (HFC) network.
Unless properly installed, the Cisco DVB INA2320 demodulators are sensitive to RF signals induced on the cables at the upstream frequencies.
To ensure the immunity of the Cisco DVB INA2320 Demodulator module all cables connected to the INA must be of a high quality, with double screening or solid outer conductor. RG216 cables or bamboo cables are recommended.
Signal couplers should be located as close to the Cisco DVB INA2320 as possible, preferably in the same rack section, and connected to the Cisco DVB INA2320 by the shortest possible sections of cable.
The CPU-LAN, the Modulator, and Demodulator modules are equipped with contact springs at the front panels. When replacing the modules, it is important that the springs remain undamaged. Even small openings in the front panel make the Cisco DVB INA2320 sensitive to electrostatic discharge.
To install the Cisco DVB INA2320 in a 19-inch rack:
Step 2 Mount it to the rack using four screws.
Step 3 Check that the power switch is in the "0" (off) position.
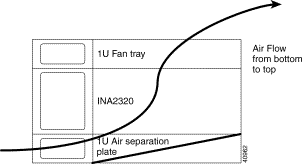
Step 4 Mount the supplied air separation plate below the Cisco DVB INA2320.
Step 5 Mount a fan tray above the Cisco DVB INA2320. See also the "Ventilation Requirements" section.
Step 6 Plug a standard 3-wire IEC power cable into the plug marked POWER.
When operating the Cisco DVB INA2320, you must take precautions to avoid overheating the system. To prevent the Cisco DVB INA2320 from overheating, it is mandatory that you mount an air separation plate below the Cisco DVB INA2320 and that you install a fan tray above the unit, as described in the following paragraphs. Figure 2-1 illustrates how to mount fan tray units and air separation plates.
 |
Caution Make sure that the air in the room is circulated by means of a ventilation unit. To avoid overheating, the air around the Cisco DVB INA2320 must be circulated. Normal convection cooling is not enough to prevent the unit from overheating. |
|
Caution Nothing that would impede the airflow and cause the unit to overheat should be placed directly in front of or behind the unit. |
To avoid overheating, make sure that the following requirements are fulfilled:
Step 2 Mount a 1U fan tray above the Cisco DVB INA2320 to circulate air through the unit. The fan tray draws cooling air in through the intake at the bottom of the fan tray and moves the air vertically through the Cisco DVB INA2320. (See Figure 2-1.)
Step 3 Mount a 1 U air separation plate (included in the delivery) underneath the Cisco DVB INA2320 to divert heat generated by units placed underneath the Cisco DVB INA2320.
Step 4 Make sure that the airflow around the Cisco DVB INA2320 is not prohibited.
Step 5 With several Cisco DVB INA2320s in one rack, follow the instructions from Step 2 through Step 4.
|
Note The fan tray must contain three fans. Do not use a fan tray with two fans only, because this would leave important areas of the INA not cooled. |
|
Note All cable connections are made at the front plate of the INA, the unit is designed to be operated indented in the rack. Make sure that the fan tray is indented accordingly, or use a fan tray drawing the air in from the front. |
The type of fuse installed in the power socket in the fuse drawer of the power connector is 5x20 mm, 1A, medium blow.
On the front plate of the modules installed in the INA there are LEDs indicating the module state. The following table shows on which events the LEDs on the front panel of the single modules are lit:
| LED lit | Description |
|---|---|
Run/User on the module CPU LAN | The RUN/RESET LED indicates the CPU-LAN board status:
The User LED has the following states:
|
Module Failure on the module Modulator | Red LED, error occurred on the Modulator module |
Channel 1 Tx on the module Modulator | Lit when transmitting data on the downstream channel number 1. When no real data is sent, the LED blinks periodically due to system control messages. |
Channel 2 Tx on the module Modulator | Lit when transmitting data on the downstream channel number 2. When no real data is sent, the LED blinks periodically due to system control messages. |
Major on the module Modulator | Lit when there is a major alarm. A major alarm activates a relay contact in the connector labeled Alarm on the Modulator module, see also "Alarm Out Pin Allocation Table" section. |
Minor on the module Modulator | Currently not used. |
Module Failure on the module Demodulator | Red LED, error occurred on the Demodulator module |
Channel 1 Rx on the module Demodulator (respectively for channel 2 to 8) | Lit when receiving data on the upstream channel number 1. When no real data is sent, the LED blinks periodically due to system control messages. |
Channel 1 Coll on the module Demodulator (respectively, for channel 2 to channel 8) | Lit when there is data collision on the upstream channel number 1. |
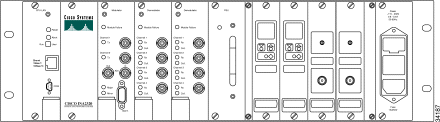
This section describes how to connect the Cisco DVB INA2320 to the cable TV network and how to connect the cables for the upstream and downstream channels. The downstream channels are connected to the Modulator module, the upstream channels are connected to the Demodulator module.
To enable data traffic between the Cisco DVB INA2320 and the backbone network, establish a connection between the backbone network and the Ethernet interface of the Cisco DVB INA2320. The Cisco DVB INA2320 is configured and supervised using the Cable DVB/DAVIC Management Program via the Ethernet.
In the "Laboratory Setup" section, there is an illustration of a laboratory setup with technical details on splitters used and attenuation
To connect the upstream and downstream channels and the Ethernet connection:
Step 2 Connect the cable for the downstream channel 2 to the BNC connector marked Channel 2 on the Modulator module.
Step 3 When connecting the coaxial cables for the upstream channels, you must connect the cables in the following order:
a. Upstream channel 1 to 4 to connector labeled Channel 1 to Channel 4 on Demodulator module 1 (left)
b. Upstream channel 5 to 8 to connector labeled Channel 1 to Channel 4 on Demodulator module 2 (right)
|
Note Do not omit a connector; ensure that they are connected in sequence, one after the other. |
Connect the cable for the upstream channel number 1 to the BNC connector marked Channel 1 on the Demodulator module. Connect the cable for the upstream channels number 1 to 4 on the Demodulator module 1 (left demodulator module seen from the front) to the BNC connectors marked 1 to 4, see the illustration of the Cisco DVB INA2320 front panel above.
Step 4 Connect the cable for upstream channels 1 to 4 on the Demodulator module 2 (the right demodulator module seen from the front) to the BNC connectors marked 1 to 4. (See Figure 2-2.)
Step 5 Power on the Cisco DVB INA2320 by switching it on at the power connector.
Step 6 Connect the 10/100 Ethernet adapter to the module marked E-LAN using a 100BASE-TX/10BASE-T Ethernet connector.
Toward the backbone network, a router or a switch is typically connected to the Ethernet LAN interface of the Cisco DVB INA2320. The INA supports routing tables, but it has no routing protocol functionality.
At this connector, the DVB MPEG-2 Transport Stream according to the DVB Standard EN 500 83-9 is available for further processing and remultiplexing in the transport stream.
The following ASI connectors are available on the Modulator module:
| Connector Label | Connector Type | Description |
|---|---|---|
ASI Input | BNC | Asynchronous Serial Interface input (not supported) |
ASI Output | BNC | Asynchronous Serial Interface output |
If the Cisco DVB INA2320 is operated in In-Band mode, MPEG frames will always be available at the ASI output. In Out-of-Band operation there is no signal available at the ASI output.
|
Note The connectors marked ASI IN are not supported. |
You can connect the Cisco DVB INA2320 to external alarm systems to monitor the unit and report alarm situations. The unit supports minor and major alarms. A major alarm activates the relay contact in the Cisco DVB INA2320; the relay contact then activates an external alarm system.
For minor alarms, the LED for minor alarms labeled Minor on the front plate of the Modulator module and the LED Module Failure on the front plate of the specific module are lit.
The following table shows the pin allocation of the alarm connector.
| Pin Number | Description |
|---|---|
1 | + Alarm_Major |
2 | - Alarm_Major |
3 | Not connected |
4 | + Alarm_Minor |
5 | - Alarm_Minor |
6 | Alarm_Major |
7 | Not connected |
8 | Not connected |
9 | Alarm_Minor |
To indicate an alarm, an isolated relay contact is in the following state:
This is valid for the Alarm_Minor accordingly.
The major alarm will automatically be activated in the event of a power failure.
The output signals from the alarm connector are low-pass filtered on the backplane to reduce RFI emissions and susceptibility.
The following paragraphs describe the software installation necessary to run and operate the Cisco DVB INA2320 and the Cable DVB/DAVIC Management Program.
The Cisco DVB INA2320 is delivered with a software image in its Flash memory. To configure the unit, you need to install the Cable DVB/DAVIC Management Program. See the "Installing the Cable DVB/DAVIC Management Program" section. Selected settings during and after startup can also be changed by using a terminal program. See also "Connecting to the Cisco DVB INA2320 Using a Terminal Program" section.
Verify that you have the following items:
|
Note Read the Release Notes document before you continue the Cisco DVB INA2320 software installation. This document contains important, last-minute changes and information about this Cisco DVB INA2320 software version. Cisco recommends that you keep the document together with the Cisco DVB INA2320 user documentation. |
At the first power on, the INA has a Flash image with default settings installed at the factory. Switch the unit on, and it starts up automatically with the default settings.
The variables are saved on the INA CPU board. The INA has received its default IP address on the Ethernet interface and the default configuration settings. To verify that the INA software is running correctly, check that the LEDs on the Modulator module and the Demodulator module turn from red to off. Afterward, the Modulator LED TX blinks.
To change the configuration settings of the Interactive Network Adapter, use the Cable DVB/DAVIC Management Program or any other SNMP MIB browser program like HP OpenView. If you want to save reference settings for a Cisco DVB INA2320, use the command Save settings to create a reference settings file for later use.
You can change several Cisco DVB INA2320 settings by sending commands via the serial port of a personal computer connected to the serial COM port at the CPU-LAN module. Every time the Cisco DVB INA 2320 boots, the COM port is checked.
The Terminal program has the following syntax:
To use a Terminal program for a first-time connection:
Step 2 Connect the supplied serial console cable to the serial interface of your PC.
Step 3 Connect the other end of the supplied serial console cable to the connector labeled COM on the front plate of the CPU LAN module.
Step 4 Set the Terminal program to the following parameters:
Step 5 Switch on the INA.
Step 6 Press ESC within 10 seconds to enter the initial setup mode.
Step 7 At the prompt in the Terminal program type p and press Enter to list the current boot settings.
Step 8 Type c and press Enter to change the parameters line by line.
If you want to keep the current parameter, press Enter without typing a new value.
The following parameters are the default values:
| Parameter | Setting | Description | ||
|---|---|---|---|---|
fl0 | INA boot mode, FTP, or Flash memory:
| |||
unit number | 0 | Main unit number, internal setting, to be set to 0. | ||
processor number | 0 | CPU module number, internal setting, to be set to 0. | ||
cisco001 | INA name for your information. | |||
INA/inakernel | This is the path where the Cisco DVB INA2320 loads its software from. This is the default path and should ALWAYS be /INA/..../inakernel, where .... is a path in the FTP server connected to the Ethernet to which the INA has access. | |||
192.168.1.1:ffffff00 | The IP of the INA, 192.168.1.1. This is the default setting of the INA towards the backbone network. Set the IP address up to fit into your system.
| |||
192.168.1.2 | This is the IP address of the FTP server containing the INA software. 192.168.1.2 is default value; set the IP address up to fit into your system. | |||
This field can be empty, because a gateway is not needed if the Cisco DVB INA2320 and the FTP server are on the same subnet. | This is the INA default gateway. 192.168.1.2 is the default value; set the gateway to fit into your system. This is typically the IP address of the router connected to the Ethernet interface of the Cisco DVB INA2320. | |||
ina | This is the user name used when the Cisco DVB INA2320 connects the FTP server. | |||
ina | This is the password used when the Cisco DVB INA2320 connects the FTP server. | |||
flags (f) | 0x0 | Internal setting; leave unchanged (0x0) | ||
target name (tn) | INA001 | This is the name you set for this Cisco DVB INA2320, for your own information. This information is viewed in the Cable DVB/DAVIC Management Program. |
Step 9 Reboot the Cisco DVB INA2320 by typing @ and pressing Enter. Wait and then check that it starts up correctly. After the initialization phase, only green LEDs are lit. If the Cisco DVB INA2320 does not start correctly, verify the INA settings in the Terminal program.
Step 10 When the Cisco DVB INA2320 starts up correctly, configure the unit using the Cable DVB/DAVIC Management Program.
There is no need to use the Terminal program when the Cisco DVB INA2320 is set up correctly for your system. Use the Cable DVB/DAVIC Management Program for changing the configuration.
You can also start the INA from an FTP server. This is mainly used for upgrading the Cisco DVB INA2320 software. To upgrade software for the Cisco DVB INA2320, you must set up an FTP server to download the configuration software into the Interactive Network Adapter. "FTP Server Setup (Microsoft WIN NT4.0)" provides a step-by-step procedure to install and set up an FTP server program.
When the INA is set to boot from an FTP server, the INA must load the software in the following situations:
To download the INA software from a connected FTP server:
Step 2 Set up the FTP server with the IP address and gateway of the FTP server to the values specified for the FTP server in the INA. The INA asks for these values to locate and get the INA software files.
For the Cable DVB/DAVIC Management Program, you can find these values in the "INA Software" section; in the Terminal program, you can find the values at host inet and gateway inet.
Step 3 Insert the CD-ROM containing the INA software in the CD-ROM drive of the management station PC that also contains the FTP server program.
Step 4 Run the file setup.exe. The following steps are handled by the install script:
a. Create the directory named ftproot/INA on the FTP server.
b. Copy the required installation files from the CD ROM into the directory ftproots/ina.
Step 5 When the software installation is finished, add the user ina to the PC with the FTP server program. The following steps describe how to add a user to the PC:
a. User with the identification "ina"
b. Password "ina"
c. Give read-write access to the directory ftproot/INA and all directories below this
|
Note If you have specified a different username in the Terminal program or the Cable DVB/DAVIC Management Program, set the respective FTP username here. |
Step 6 Switch the power switch on the INA to position I.
Step 7 The INA asks via the Ethernet for the FTP server with the specific IP address for the FTP server. The PC with the FTP server program holds the software files, responds to the INA, and sends the necessary data to the INA.
The up converter module converts the modulated signal that is coming from the modulator module and has passed through the IF amplifier module to the RF frequency used in the HFC network. The module converts the intermediate frequency coming from the modulator module and amplified by the IF amplifier to the RF output frequency. This signal is fed into the HFC network.
Two upconverter versions are available:
For the frequency ranges covered and output voltage levels, see the table containing the"Upconverter setting" section.
To configure the upconverter module use the buttons on the front plate of the module. You can set the following parameters:
|
Note When you connect the RF output to the HFC network, wait until the output from the upconverter module is stable. This is also valid when the frequency has been changed. |
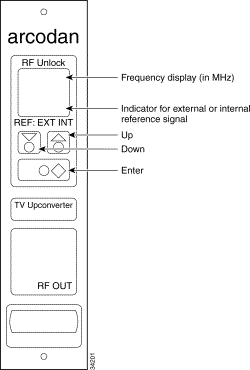
To change a setting in the upconverter module, use the menus in the module. To get access to the menus:
Step 2 PROG MODE appears.
Step 3 To change a parameter in the up converter, press the Up or Down button and scroll to the parameter you want to set. The following parameters are available:
Step 4 Press Enter to accept the selected parameter. The upper line in the display blinks, indicating that this parameter is selected.
Step 5 Scroll to the wanted value by pressing the Up or Down button.
The following table shows the valid ranges for each parameter:
| Upconverter setting | Display text | Valid range and description |
|---|---|---|
CENTER 217 | Type 94312 for VHF: 9.5 to 466.5 MHz in 1 MHz steps Type 94313 for UHF: 472.75 to 858.75 MHz | |
Frequency for use of external reference oscillator | EX.REF 2.5 | Not currently used. |
IF FRQ 36.15 | Set the intermediate frequency to 36.15 MHz. | |
LEVEL (bar view) | Set the converter to the RF output voltage level needed. VHF Type 94312: 101-111 dBµV UHF Type 94313: 100-110 dBµV For digital TV applications, the output voltage is specified as RMS value. |
Step 6 Press Enter to accept the selection.
Step 7 Press the Up or Down button to scroll to another parameter you want to change.
Step 8 Press Enter to select the parameter.
Step 9 To leave the menu, press the two buttons Up and Down simultaneously for 2 seconds.
When the setting is stored, the upconverter displays STORE DATA. The setting is changed and stored, and the keyboard is locked again. The display shows LOCK.
The up converter stores and locks automatically if the keys have not been activated for 30 seconds.
|
Note The uppermost line in the display of the upconverter module flashes until the output frequency is stable. |
The IF amplifier is used to amplify the output level of the IF signal coming from the modulator module to the specified input level at the upconverter. The amplifier gain can be adjusted in the range of 2 to 22 dB. Use the output test point to adjust the output level without interrupting the signal.
To check the RF signal output level:
Step 2 Check that the output level is 79 dBµV.
![]()
![]()
![]()
![]()
![]()
![]()
![]()
![]()
Posted: Fri Feb 23 03:18:37 PST 2001
All contents are Copyright © 1992--2001 Cisco Systems, Inc. All rights reserved.
Important Notices and Privacy Statement.