|
|

This chapter describes how to use the Cable DVB/DAVIC Management Program to configure the Cisco DVB INA2320 and collect data from the connected cable modems. This chapter contains the following sections:
In the section MIB File Descriptions you find a description of the entire Management Information Base for the Cisco DVB INA2320.
The Cisco DVB Interactive Network Adapter INA2320 is configured and supervised using a management program based on Simple Network Management Protocol (SNMP). This program is called the Cable DVB/DAVIC Management Program. Install the Cable DVB/DAVIC Management Program and the Management Information Base (MIB) file on the management station PC that is connected to the same Ethernet as the Cisco DVB INA2320. Using this program, you can get and set all parameters in the Cisco DVB INA2320.
The Cable DVB/DAVIC Management Program and the MIB file for the INA are included in the delivery of the Cisco DVB INA2320. The Cable DVB/DAVIC Management Program runs under the Windows NT 4.0 operating system.
In the Cable DVB/DAVIC Management Program, you have access to the following parts of the Interactive Network Adapter:
For more detailed information how to install and use the Cable DVB/DAVIC Management Program, see the "Installing the Cable DVB/DAVIC Management Program" section.
For each connected modem the Cisco DVB INA2320 performs the following functions:
The results are displayed in a modem table. The cable modem is identified by its MAC address.
Using the Cable DVB/DAVIC Management Program you can monitor the data traffic for all connections for each cable modem and the data traffic at the Ethernet interface of the Cisco DVB INA2320. The Cisco DVBINA2320 displays the values for the number of bytes sent to and received from each modem. It also displays the number of bytes sent to the backbone on a given connection. For further details see the "Connection Details" section.
The Cisco DVB INA2320 has an SNMP agent. This SNMP agent communicates with the SNMP client, which is a part of the Cable DVB/DAVIC Management Program. The Cable DVB/DAVIC Management Program is a Windows application.
The Cisco DVB INA2320 operates as a RADIUS client and is responsible for passing authentication and accounting information from the connected cable modems or set-top boxes to the RADIUS servers.
The Cable DVB/DAVIC Management Program supports two different user access levels:
Specify individual passwords for read-only and for read and write.
When connected to the Cisco DVB INA2320, you can save the current INA configuration in a file as a backup or for cloning other Cisco DVB INA2320s. Load the configuration file again when needed or use it for another Cisco DVB INA2320, which needs identical unit settings.
The software includes a log function where you can recall the latest messages stored in the Cisco DVB INA2320. The messages can be displayed on the screen and are useful when troubleshooting the unit. For further information on the log function, go to the "INA Log Function" section.
The Cable DVB/DAVIC Management Program is installed on the network management PC. This PC can also be configured as an FTP server and can be used for downloading the INA software into the Cisco DVB INA2320. For further information how to set up the management PC as an FTP server, refer to "FTP Server Setup (Microsoft WIN NT4.0)."
The Cisco DVB INA2320 supports SNMP v2c. As the MIB file is compliant to SNMP v1, the management of the Cisco DVB INA2320 and the connected cable modems can thus be integrated into existing management systems. The Cisco DVB INA2320 MIB file contains all the necessary information including the available commands and the valid parameter ranges.
The Cisco DVB INA2320 MIB file is included in the delivery.
Check that you have the following items:
The PC requirements for the management station to run the Cable DVB/DAVIC Management Program are
 |
Note The PC for the management station can be the same as the one for the FTP service. |
You need the Cable DVB/DAVIC Management Program to configure the Cisco DVB INA2320 and control modem connections. The supplied CD-ROM contains the files necessary to install the Cable DVB/DAVIC Management Program. The files for the Cable DVB/DAVIC Management Program are in the directory /MS.
To install the software:
Step 2 Click Start.
Step 3 Click Run.
Step 4 Browse to /MS/setup.exe on the supplied CD-ROM.
Step 5 Click OK.
Step 6 Follow the instructions on the screen.
During the installation process, you can change the destination directory for the files. You can also select where the program icon is added to the Program folder.
Having installed the Cable DVB/DAVIC Management Program successfully, the software is added to the list of programs in the Start / Programs menu in Windows.
|
Note Make sure that the PC with the Cable DVB/DAVIC Management Program has access to the Ethernet interface of the Cisco DVB INA2320. |
If you want to remove the Cable DVB/DAVIC Management Program from the network management PC again, use the Uninstall function to remove all the relevant files from the system.
To uninstall the Cable DVB/DAVIC Management Program:
Step 2 Double-click Add/Remove Programs.
Step 3 Click Cable DVB/DAVIC Management Program.
Step 4 Click Add/Remove.
The Cable DVB/DAVIC Management Program is displayed in a tree structure and looks very similar to a common MIB and file browser application. In the menu line, there are general commands you need to start a connection to the INA and the path to the MIB file. You can set the program to display the MIB variables in a text converted or a MIB type display. The following sections in this manual show the variables in the text converted display.
The Cable DVB/DAVIC Management Program is made in the same modular structure as the INA, the commands are grouped according to their functionality. To find the setting you want to view or change, scroll to the respective section of the MIB file. Then click on the parameter you want to view or configure. Set the parameter to the desired value and send it to the Cisco DVB INA2320.
The following windows are available:
Click on the MIB section that you want to read and/or edit. You can resize the window to your specific needs by pointing the cursor on the edge and dragging until the window is the required size.
The following menus are available in the Cable DVB/DAVIC Management Program:
In all the sections of the MIB that are marked with a plus sign you can display more detailed information. You find a sub menu called Tables, click on one of the entries to display the additional information on this connection. This listing in the right window contains further information tables with configuration and statistics data.
For each field or command available, the help text in the Properties window provides descriptive information about the parameter and the valid parameter range, if applicable. (See Figure 3-1.)
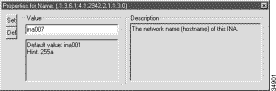
The following table gives a short description of the hints which are given in the Properties window in which format you need to enter the data.
| Hint | Description |
|---|---|
1x | This hint represents media- or physical-level addresses, a MAC address defined by IEEE 802.1a. enter the data in hexadecimal format. |
255a | This hint represents that the syntax may not exceed 255 characters in length |
|
Note Active after Reboot: If this is mentioned in the description of a command, the new setting will first be available in the INA2320 after a reboot has been performed and the INA is fully operational again. |
The management software does not poll the Cisco DVB INA 2320 at regular intervals, the user requests the settings using the management software.
To start the Cable DVB/DAVIC Management Program and connect to a Cisco DVB INA2320:
Step 2 Click Start.
Step 3 Click Programs.
Step 4 Select Cable DVB/DAVIC Management Program and click on the application.
The fields are empty, because there is no connection established to the Interactive Network Adapter.
Step 5 Address the Cisco DVB INA2320 via the Ethernet interface by using the IP address of the Ethernet interface of the Cisco DVB INA2320.
Before you can configure a Cisco DVB INA2320, the INA must be powered up. Then you have to establish a connection to the Cisco DVB INA2320.
The first time you establish a connection to the Cisco DVB INA2320 you must use the default IP address and default netmask and gateway values. When you have connected to the Cisco DVB INA2320 using the its default settings change the IP address, netmask and gateway to your specific settings.
|
Note The Cisco DVB INA2320 might have been set to different values than the default values. |
To get a first-time connection to the Cisco DVB INA2320 follow the instructions:
To use the Cable DVB/DAVIC Management Program:
The Cisco DVB INA2320 starts up using software in its Flash memory or by downloading the INA software from a connected FTP server.
|
Note If the INA2320 is to be started from an FTP server, ensure that the FTP server setup has the correct path and file name and that the INA software files to be downloaded are in the correct directory on the FTP server. There is a step-by-step procedure for the installation of an FTP server in "FTP Server Setup (Microsoft WIN NT4.0)." |
Step 2 In the menu Network Devices, select New.
Step 3 The New Network Device window appears.
Step 4 Enter the name of the Cisco DVB INA2320 in the Name field.
Step 5 Enter the IP Address of the Ethernet interface of the Cisco DVB INA2320. The default IP address of the INA after the first power on is 192.168.1.1.
Step 6 Enter the Community password.
There are two user security levels available:
|
Note Public and private are default access passwords in the SNMP standard. Cisco recommends changing the default passwords to secure the INA from being reconfigured accidentally. |
Step 7 Click OK.
Step 8 Having established the connection, you can change the IP address from the Cable DVB/DAVIC Management Program. For instructions on how to proceed, see the "INA System" section.
Step 9 Click the Values menu and select Get all.
The PC contacts the INA, in the status bar the text Working is displayed, the INA sends the requested data to the management PC. All the current INA settings are available in the Cable DVB/DAVIC Management Program now.
Step 2 Click on the Values menu.
a. Click Get to get the current setting for a single section or table. The keyboard shortcut for Get is F4.
b. Click Get All to get all the current settings from the Cisco DVB INA2320. The keyboard shortcut for Get All is F5.
Step 3 To retrieve a specific parameter, click on the section that holds the parameter.
Step 4 Click on the parameter.
Step 5 Click Values and then Get to retrieve the current value for this parameter from the Cisco DVB INA2320.
The INA sends its settings to the management PC each time you request them via the Cable DVB/DAVIC Management Program.
To write a new value into the Cisco DVB INA2320:
Step 2 In the Community field enter the write password, the default write password is "private."
Step 3 Click Values, then Get All.
Step 4 Click on the section for the parameter to be changed.
Step 5 Click on the parameter to be changed.
Step 6 In the Properties window, type in the new value for the parameter.
Step 7 Click Set in the Properties window.
As soon as you click Set, the new value is sent to the INA. If you do not click Set, the new setting is not sent to the Cisco DVB INA2320.
|
Note For many commands, the Cisco DVB INA2320 must perform a reboot before the requested changes become active. When a reboot is necessary to effectuate the configuration changes, it is indicated in the description of the affected command. |
For service purposes it is very useful that you can save the configuration settings of a unit in a file. The configuration file can then be sent to your support centre for analysis purposes or for later reference.
To save the INA configuration data:
Step 2 Click Save to file....
Step 3 Select the destination of the settings file on the PC.
Step 4 Edit the file name and directory, if needed.
Step 5 Click Save.
The status line shows Working. When the status line displays "OK," the saving process is finished.
If you need to reload a specific INA configuration for cloning a Cisco DVB INA2320 or to load the settings into a replacement unit, you can load a stored configuration file from the PC into the Cisco DVB INA2320. This feature is useful if the unit has been serviced and taken out of operation and you want to reconfigure it to the settings it had previously.
To load the INA configuration data:
Step 2 Click on Load from file...
Step 3 Scroll to the file you want to load and select it.
Step 4 Click Open.
The status line shows "Working." When the status line displays "OK," the loading process is finished.
When you click on the menu Help a window is displayed containing information about the version number of the Cable DVB/DAVIC Management Program. Help information for the single parameters is displayed in the Properties window, that contains information of the type:
The Properties window is displayed when you select a specific parameter in a branch of the MIB tree.
If you want to leave the Cable DVB/DAVIC Management Program:
Step 2 Click Exit to leave the Cable DVB/DAVIC Management Program.
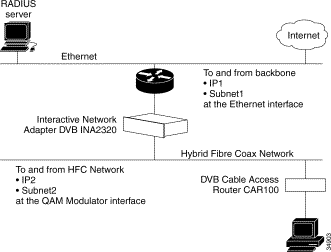
To set up the Ethernet and the HFC interfaces of the Cisco DVB INA2320 to the Ethernet and to the HFC network, specify the address parameters for both interfaces. (See Figure 3-2.)
To make a quick configuration of the Cisco DVB INA2320:
Step 2 Address the INA you want to configure by typing in the IP address of the Ethernet interface IP address of the Cisco DVB INA2320.
Step 3 By default, the MIB tree is expanded to display Private, INA, Objects, then the sub menus to configure the INA are displayed.
Step 4 To configure the Ethernet interface IP address, go to the System section.
Step 5 Enter the new values for:
a. IP Address, this is the new IP address of the Ethernet interface of the Cisco DVB INA2320.
b. New value for Netmask, this is the subnet mask of the Ethernet interface of the Cisco DVB INA2320.
c. New value for Gateway, this is the default gateway on the Ethernet, to forward IP addresses which are not in the same subnet.
Step 6 Set the downstream modulation frequency.
Step 7 Set the modulation type, if necessary.
Step 8 To configure the connection to the HFC network, go to the Routing section.
Step 9 Click Subnet Table. The subnets available route the traffic to the cable modems connected to this subnet. The entries in the Subnet Table ware the IP addresses of the Cisco DVB INA2320 at the HFC Interface. There are 32 subnet entries available, that is 32 IP addresses at the HFC interface of the Cisco DVB INA2320.
Step 10 Double-click on a subnet table entry and click IP Address.
Step 11 Enter the correct value for the subnet IP address and, if necessary, the Prefix length.
 |
Tips Set the date and time in the Cisco DVB INA2320 after start-up. This is necessary for identifying the log messages. Go to the section "System" in the Cable DVB/DAVIC Management Program. |
The following paragraphs guide you through all parameter sections the Cable DVB/DAVIC Management Program describing the following sections:
All parameters available in the Cisco DVB INA2320 are described in this chapter.
In the section INA System you find the current MIB version in the INA and the INA serial number, addresses and password fields. In this section you reboot the Interactive Network Adapter.
The following table lists the INA identification fields and the reboot parameters:
| Parameter | Description | ||
|---|---|---|---|
ina Mib Version | This field shows the current MIB file version used by the INA. Read-only field | ||
This field can have the states defaultValues, reboot or ready. To perform a reboot:
| |||
Name | Enter the identification of the INA in the network in this field. To change the name:
This name is used for naming the configuration files. | ||
Set the IP address of the Ethernet connection of the INA in this field. To change the Ethernet interface IP address:
The Ethernet interface IP address and the gateway must be in the same subnet. Active after INA reboot. | |||
Change the netmask of the INA Ethernet interface in this field. To change the netmask:
Active after INA reboot. | |||
Change the gateway of the INA Ethernet interface in this field. To change the gateway:
If there is no gateway, set the value to the same as set in the INA boot server (FTP server) in the section INA Software. If the data is to be sent to an address in the same subnet, the data is not sent to the Gateway. Active after INA reboot. | |||
The number indicates how often a reboot has been performed since the INA left the factory. (Read-only field.) | |||
Read Community |
To change the password, type in the new password. The password length must be in the range of 0 to 128 characters.
| ||
Write Community | This is the password for write access to SNMP objects in the INA. It allows access by set, get and get-next PDUs. To change the password, type in the new password. The password length must be in the range of 0 to 128 characters.
| ||
This field shows the current date of the INA. Set the date by entering a new value. The date format is YYYY/MM/DD. The length is 10 characters. | |||
This field shows the current time of the INA. You can set the time by entering a new value. The time format is hh/mm/ss. The length is 8 characters. | |||
System Error Reset | Possible states:
| ||
Software Error Reset | Possible states:
|
In this section of the Cable DVB/DAVIC Management Program, you set software upgrade parameters and boot device. To find the INA software files when booting from an FTP server, the INA needs the IP address and the path where it can find the INA software files for down-load. The FTP Server is a server running an FTP server application where the INA configuration files and programs are located. The INA needs to load these files during power-up when the INA is set to power-up from network.
The following table describes the fields available in the section INA Software of the Cable DVB/DAVIC Management Program. The first five fields are only of interest, if the INA is booted from a connected FTP server on the network.
In the field Boot Device you set the software boot device, that is whether the INA starts to load its software from an FTP server on the network or from its Flash memory.
| Parameter | Description | ||||||
|---|---|---|---|---|---|---|---|
Server | This field shows the IP address of the FTP server used for software upgrades and downloading INA settings. The FTP server must either be in the same subnet as the INA IP address on the Ethernet connection (backbone) or can be accessed via a gateway. Active after INA reboot. | ||||||
Path | This field shows the FTP path where all INA software files are located. Length: 0 to 128 characters Default value: ina/
| ||||||
In this field you can force the INA to read INA software from a connected FTP server and load the upgraded software into the flash memory. This feature is used for software upgrade purposes. To perform a Software upgrade, click on upgradeFromMgt. This field has the following values:
If you set the INA to boot from flash and the flash image is corrupt or wrong, it will boot from the FTP server. | |||||||
This is the user identification for the FTP server, which the INA uses to access the FTP server. Length: 0 to 64 characters Default value: ina | |||||||
Password | This is the password the INA uses to access the FTP server. Length: 0 to 64 characters Default value: ina | ||||||
This field shows the different methods of booting the INA. Change the INA boot setting if necessary: flash0: The INA boots from the INA Flash memory. network: The INA boots using an FTP server containing the software files, and connected to the Ethernet (default). Active after INA reboot. | |||||||
Shows the INA BIOS revision number. | |||||||
Shows the version number of the current INA software. | |||||||
Shows the version of the system saved in flash. |
To reset and clear the log table:
Step 2 Select and click Reset.
Step 3 Change the setting from Ready to Reset to clear the log table. The index number is not reset to 1, it continues to number the log entries.
Step 2 Click Log Table.
Step 3 The Log Table appears in the right window.
Step 4 You can double-click on a log entry to display this log entry only.
The event log contains the following columns:
| Column | Description |
|---|---|
Index | Shows the running number of the log messages. |
Time | Shows the time of the log message. |
Description | Shows the time when the event happened, the error code and a descriptive text. For the software version implementation dependent description of the log event see "Log Message Overview" for a list of the codes and their description. |
If you save the settings to a file, the log messages will be saved in this text file. The maximum size for the log file is 0.5 Mbyte, the file is kept in the flash memory. If the log message queue is full, the oldest log messages will be discarded.
This section of the Cable DVB/DAVIC Management Program is used for service purposes.
The first field sets the maximum number of concurrent open connections for this specific INA and the table of connections currently in use. The valid range is 1000 to 8192, the default value is 8192. The field Active Count shows how many connections are currently established by the INA to connected modems.
You can see more details for a specific connection in a Connection Table. To display a specific Connection Table do the following:
Step 2 Click Active VCs Table, the current connections for each downstream are displayed in the right window.
Step 3 Click Stat Table, a list of the current connections is displayed in the right window.
Step 4 Double-click on the connection you want details on.
The connections are listed in number order. After you have displayed a connection, you can recognize a cable modem by means of the displayed cable modem MAC address. Each connection provides the columns listed in the table below.
The following table shows the fields available for a selected connection. All fields in a connection table are read-only fields.
| Connection Field | Description |
|---|---|
Index | Virtual circuit identifier, number of the virtual connection, this is the virtual circuit number for the connection (Vpi:Vci) For each INA there is one connection for broadcast MAC messages, one for MAC control messages and one for each connected cable modem. |
VPI | Virtual Path Identifier, Identification of the Virtual Circuit is made of VPI:VCI. |
VCI | Virtual Circuit Identifier, Identification of the Virtual Circuit is made of VPI:VCI. |
Mac Address | |
Create Time | Shows the time when the connection was established |
DS Bytes | Number of downstream bytes sent by the INA to the modem on this connection since the last reboot |
US Bytes | Shows the number of transmitted upstream bytes on this connection from the modem to the INA since the last reboot |
From Backbone Bytes | Shows the number of bytes received from the backbone on this connection and sent from the INA to the modem. |
To Backbone Bytes | Shows the number of bytes sent to the backbone on this connection and sent from the modem to the INA. |
Multi Up Bytes | |
DS Channel No | Shows the number of the downstream channel to which this Vc is related to. |
In this section, you can configure each of the connected cable modems and set the type of authentication for all connected modems. For each configured modem, you can set whether the modem should use authentication or not. You can also display details on each active modem connected to the Cisco DVB INA2320.
The following tables are available in the section Modem:
In these tables you can display detailed information for each cable modem that is signed on. For each modem connection you can display a statistics table and a MAC statistics table. These two tables read out data from the connected cable modem and display it in the Cable DVB/DAVIC Management Program. All the parameters listed in modem tables are described in the following paragraph.
You can configure each new modem being added to the Cisco DVB INA2320, for further details on this procedure, see the "To Create a New Cable Modem or Set-Top-Box Configuration" section. During a sign-on procedure, the cable modem sends its MAC address to the Cisco DVB INA2320.
The parameters are available in the section Modem:
| Parameter | Description |
|---|---|
Statistics Update | Set in this field the time interval in milliseconds between the INA updates the modem statistics counter. The valid range is 10000 to 300000 ms. The default value is 60000 ms. |
Select one of the following values:
Set in this field whether modems have to be configured from the INA to be allowed to sign on, whether they should use RADIUS authentication or whether modems just can sign on without fulfilling any conditions. Active after INA reboot. | |
Max Modems | This item shows the maximum number of modems that can be connected to the INA simultaneously. The valid range is 250 to 2000. Default value: 2000 Active after INA reboot. |
Configured Modems | This item shows the number of modems currently configured by the INA. |
Active Count | This item shows the number of modems currently active, they are physically connected to the INA and currently signed on (connected at MAC level). |
You can configure a cable modem or a Set-Top Box by entering data in a configuration table and saving it. The configuration data are only applicable for the specific cable modem or Set-Top-Box.
You use the cable modem or STB configurations for the following reasons:
When using INA authentication, you have to enter configuration data for all cable modems or STBs connected to the Interactive Network Adapter. If you do not configure a cable modem or STB, the unit cannot sign on.
The data is stored in an internal database and validated each time a configured unit tries to sign on to the network.
|
Note All modems which use a defined Quality of Service level must be configured in a modem configuration table. Modems which are not configured will use automatically the Quality of Service index 1, for further details on assigning Quality of Service levels see Quality of Service Entry. The QoS index 1 is the default value which is assigned to all modems that are not configured. |
To configure a new cable modem or STB connected to the Cisco DVB INA2320:
Step 2 Click New Entry. A new window with the title Select Table appears with the following selections:
Step 3 To create a new cable modem configuration, click inaMdTable, then Select. The window title changes to Create Table Entry, configure the following parameters:
| Parameter | Description | ||
|---|---|---|---|
Click on MAC Address to enter the MAC address of the modem, finish by clicking OK. The modem MAC address is a unique value that identifies the modem to which this entry is applicable. Enter the MAC address in hexadecimal form. Example: 00.10.FD.00.04.3E
| |||
Use this field to stop the modem from accessing the network, if no authentication is selected. Identify the modem by using its MAC address. To disable this specific cable modem, set Disabled to True. This setting disables the modem from sign on (default value), the modem cannot sign on. Use this setting to stop modem traffic on a specific modem. To enable this specific cable modem set Disabled to False. This setting enables the modem to sign on, the modem can sign on at any time, even if Authentication is set to none.
| |||
Demodulator | In this file you can set which demodulator the configured cable modem should use. When set to 0, the INA will decide which demodulator the cable modem should use. Valid range: 0, 1, 2 Default: 0 | ||
Channel | In this field, you can force a cable modem to use a specified upstream channel. This is an optional setting. During sign-on, the cable modem uses a service channel to sign on to the network. After successful sign-on, it moves the upstream communication to the specified upstream channel. The service channel and the backup service channel are the first two upstream channels in the Demodulator module. As a default setting the Cisco DVB INA2320 controls for all cable modems which upstream channels the cable modems should use. | ||
In this field you can set the quality of service index entry that is used for this modem configuration, for further details see the "Quality of Service" section. The default value of the QoS level is 1. | |||
If a DHCP server is not a chosen option by the service provider for automatic IP addressing, the INA can be informed about the modem IP address.
In the field IP Address you enter a static IP address of the cable modem. This is the IP address which the cable modem uses to sign on to the INA. Only use this field when you are not using a BootP or DHCP server for automatic assignment of modem addresses. | |||
Permanent | Set to true(1) if the cable modem entry is permanent. Default value: true |
Step 4 To create a Set-Top-Box configuration, click inaIpEncapTable, then Select. The window title changes to Create Table Entry, configure the following parameters:
| Parameter | Description | ||
|---|---|---|---|
IP Address | Click on IPAddress to enter the IP address of the Set-Top-Box, finish by clicking OK. | ||
Click on MAC Address to enter the MAC address of the Set-Top-Box, finish by clicking OK. The STB MAC address is a unique value that identifies the STB to which this entry is applicable. Enter the MAC address in hexadecimal form. Example: 00:10:FD:00:04:3E
| |||
PID | Enter the PID (Packet IDentifer) number of the IP encapsulation entry. Enter zero to use the inaDsmccPid. Valid range: 0 or 16 to 8190 Default value: 0 |
For each cable modem connection you can display tables containing general information and information for service purposes. You can display the following two table types:
The data readout from the modem is valuable when the modem is not functioning properly.
For each configured cable modem you can display the parameters for this modem. To display a modem table:
Step 2 Click Modem Table.
Step 3 Click on the connection for which you want to display the modem table. The Index is the MAC address of the cable modem.
Step 4 A list of parameters is displayed. Click on the parameter you want to change or view.
The following table describes the parameters available
.
| Parameter | Description | ||
|---|---|---|---|
Row Status | The row status available are: This software version can only support createAndGo, destroy and active. | ||
Click on MAC Address to view the MAC address of the modem. The modem MAC address is a unique value that identifies the modem to which this entry is applicable. Enter the MAC address in hexadecimal form. Example: 00.10.FD.00.04.3E | |||
Use this field to stop the modem from accessing the network. Identify the modem by using its MAC address. To disable this specific cable modem, set Disabled to True. This setting disables the modem from sign on (default value), the modem cannot sign on. Use this setting to stop modem traffic on a specific modem. To enable this specific cable modem set Disabled to False. This setting enables the modem to sign on, the modem can sign on at any time, even if Authentication is set to none.
| |||
Demodulator | In this file you can set which demodulator the configured cable modem should use. When set to 0, the INA will decide which demodulator the cable modem should use. Valid range: 0, 1, 2 Default: 0 | ||
Channel | In this field, you can force a cable modem to use a specified upstream channel. This is an optional setting. During sign-on, the cable modem uses a service channel to sign on to the network. After successful sign-on, it moves the upstream communication to the specified upstream channel. The service channel and the backup service channel are the first two upstream channels in the Demodulator module. As a default setting the Cisco DVB INA2320 controls for all cable modems which upstream channels the cable modems should use. | ||
QoS Index | In this field you can set the quality of service index entry that is used for this modem configuration, for further details see the "Quality of Service" section. The default value of the QoS level is 1. | ||
IP Address | If a DHCP server is not a chosen option by the service provider for automatic IP addressing, the INA can be informed about the modem IP address.
In the field IP Address you enter a static IP address of the cable modem. This is the IP address which the cable modem uses to sign on to the INA. Only use this field when you are not using a BootP or DHCP server for automatic assignment of modem addresses. |
The status table for a cable modem connection contains information on a cable connection seen from the INA. To display a cable modem status table:
Step 2 Click Status Table.
All cable modem connections for this Interactive Network Adapter are listed.
Step 3 If necessary, use the scroll bar to select the cable modem you want to see details on.
Step 4 Double-click on the cable modem. The window content is updated and a list of parameters available is displayed containing the status table for this cable modem.
The following table shows the fields in the Modem Status Table (read-only fields)
| Parameter | Description |
|---|---|
Index | Shows the MAC address in decimal format |
Sign On Time | Shows the date and time when the modem has signed on |
MAC Address | Shows the MAC address of the modem. This value is unique and identifies the modem to which this entry is applicable. |
On Time | Shows the time the modem is connected and has received or sent data, in seconds. |
Off Time | Shows the time the modem has been connected without sending or receiving data (MAC layer). |
Demodulator | This field shows the number of the Demodulator module by the modem.
|
Number of the upstream channel used by this modem.
| |
Downstream Bytes | Number of bytes sent from the INA to the modem |
Upstream Bytes | |
To Backbone Bytes | Number of bytes sent from the modem to the backbone—this contains only the backbone traffic. |
From Backbone | Number of bytes sent from the backbone to the modem—this contains only the backbone traffic. |
Multi Up Bytes | |
Current VC Count | |
This field shows whether the modem has been authenticated by the INA or RADIUS.
|
This table is related to specifications in the DVB standard ETS 300 800. The modem MAC statistics table is a read-only table on a given cable modem. To display the cable modem MAC statistics table do the following:
Step 2 Click MAC Status Table.
All cable modems for this Cisco DVB INA2320 are listed. If necessary, use the scroll bar to select the connection you want to see details on.
Step 3 Double click on the connection. The window content is updated and a list of parameters available is displayed containing the MAC status table for this connection.
The following table shows the fields in the Modem MAC Statistics Table:
| Parameter | Description |
|---|---|
Status | NIU/STB_Status as returned by the modem in the Sign-On Response message. See the DVB standard ETS 300 800 for further details. |
Error Code | NIU/STB_Error_Code as returned by the modem in the Sign-On Response message. See the DVB standard ETS 300 800 for further details. |
Retry Count | NIU/STB_Retry_Count as returned by the modem in the Sign-On Response message, indicating the number of Sign-On Response messages sent since the start of the Sign-On procedure. |
Capability Encapsulation | Encapsulation is an 3-bit field that indicates the type(s) of encapsulation supported by the NIU/STB (read-only). Possible values:
|
Capability US Bitrate | This field indicates the upstream bit rate(s) supported by the NIU/STB. Possible values (read-only):
|
Capability DS OOB Bitrate | This field indicates the downstream out-of-band bit rates supported by the NIU/STB: {1.544 Mbit/s, 3.088 Mbit/s, reserved 2..3} (read-only) Possible values:
|
Capability Resource Request Capable | This field indicates if the NIU is able to send <MAC> Resource Request Messages (read-only). Possible values:
|
Capability Fragmented MAC Messages | This field indicates that the NIU/STB is able to support MAC messages having the compound MAC_Information_Elements field of 1 to 512 bytes in size. This flag is also for backwards compatibility with NIU/STBs not supporting MAC message fragmentation and reassembly. By not setting this bit, the NIU/STB indicates that it does not support fragmented MAC messages at all, and will not understand or utilize the Fragment_No_MAC_Address and Fragment_MAC_Address_Included MAC message syntax types. (read-only) Possible values:
|
Capability Security Supported | This field indicates that the NIU/STB is able to support the security extensions specified in this protocol (read-only). Possible values:
|
Capability Minislots for Reservation | This field indicates that the NIU/STB can handle minislots (read-only). Possible values:
|
Capability IB Signaling | This field indicates that the NIU/STB can handle IB signaling (read-only). Possible values:
|
Capability OOB Signalling | This field indicates that the NIU/STB can handle IB signaling (read-only). Possible values:
|
Slot Configuration Errors | Modem error parameter. The number of errors in Slot_Configuration_CRC-Error_Count as found by the CDC decoder. |
ATM Packet Loss | Modem error parameter. This field shows the ATM cells on the upstream which are damaged or lost, either due to unrecoverable Reed-Solomon errors or because of an erroneous HEC of the ATM cell header. |
SL-ESF CRC Error | Modem error parameter. SL_ESF_CRC_Error_Count, the number of CRC errors found in consecutive C1-C6. |
SL ESF Frame Count | Modem error parameter. SL-ESF-Frame_Count, the number of frames the statistics apply on. |
Slot Configuration Count | Modem error parameter. The number of R-bytes sets (Rxa-Rxc) used to calculate Slot_Configuration_CRC_Count. |
RS Errors | Modem error parameter. This field shows the number of errors corrected by the Reed-Solomon decoder. The Reed Solomon Errors are low level communication errors. When this number increases drastically, the connection to the cable modem should be monitored closely. Downstream channel data. |
RS Correctable Errors | Modem error parameter. MPEG frames received with correctable Reed-Solomon errors (In band only). Downstream channel data. |
RS Not Correctable Errors | Modem error parameter. MPEG frames received with non-correctable Reed-Solomon errors (In band only). Downstream channel data. |
Number of connections | Shows the number of connections used by a modem. |
Connection ID1 | Shows the modem connection identification for connection 1. |
US Power Control Setting | For service purposes. Modem physical layer parameter, power control setting, the actual power sent by the modem for the upstream transmission. Unit: dBµV |
US Time Offset Value | For service purposes. Modem physical layer parameter, time offset value, the relative offset of the upstream transmission timing. A negative value indicates an adjustment forward in time. A positive value indicates an adjustment back in time. Unit: 100 ns |
US Frequency | For service purposes. Modem physical layer parameter. This field shows the upstream frequency used by the modem. Unit: Hz |
DS OOB Frequency | For service purposes. Modem physical layer parameter. This field shows the out of band downstream frequency used by the modem. It shows zero if it is not significant. Unit: Hz |
DS IB Frequency | For service purposes. Modem physical layer parameter. This field shows the in band downstream frequency used by the modem. It shows zero if it is not significant. Unit: Hz |
DS SNR Estimated | For service purposes. Modem physical layer parameter. This field shows the estimated signal to noise ratio of the downstream carrying the MAC messages. It shows zero if it is not estimated. The value is read out from the cable modem tuner. Unit: dB |
DS Power Level Estimated | Shows the power level estimated, from the downstream. Modem physical layer parameter. This field shows the estimated power level of the modem for the downstream carrying the MAC messages. It shows zero if it is not estimated. (EuroModem required) Unit: dBµV |
MAC Address | This field shows the modem MAC address |
The Cisco DVB INA2320 has one Modulator module containing two downstream channels. In the section Modulator, you can set In-band or Out-of-band bandwidth types, the modulation scheme applied and the downstream frequency.
To set the modulator:
| Parameter | Description |
|---|---|
This field shows the manufacturer's serial number of the modulator module. (Read-only field) | |
Channel Count | Shows the number of configured modulator channels. Valid range: 0 to 1 |
Module Failure | Shows whether the Module Failure activity LED on the modulator module is on or off. (Read-only field) |
Major | Shows whether the system general failure LED on the modulator module on or off. (Read-only field) |
Minor | Not used, always off. (Read-only field) |
Shows the number of MAC MPEG frames transmitted. (Read-only field) | |
3ms Interrupt | Shows the number of 3ms interrupts generated by the INA2320. (Read-only field) If this is a high number, it indicates that the system is busy (CPU overload) and the INA is too busy to send the upstream marker in the downstream channels. |
Shows the bit rate at the ASI output. Unit: bps | |
Asi Idle Cells | You can set the INA2320 to insert idle MPEG frames in the ASI output up to the maximum bit rate. Possible values:
|
Step 2 To display a table listing the parameters available for a Modulator module click on the + sign to expand the branch. Two entries become available, one for each downstream channel.
Step 3 Click on one of the entries to display the Modulator table with a list about the settings for one downstream.
| Parameter | Description | ||
|---|---|---|---|
Channel | Shows which downstream channel is configured:
| ||
In this field you set the bandwidth type for the downstream modulation. Select one of the following bandwidth settings:
This is the downstream bandwidth used by the INA modulator.
Active after INA reboot. | |||
In this field you set the modulation scheme applied to the downstream channel. The following modulation schemes are supported:
Active after INA reboot. | |||
Shows the downstream symbol rate. This field is only applicable for In-band operation. In band downstream symbol rates available:
Unit: Mbaud Active after INA reboot. | |||
In this field you set the downstream RF output frequency at the up converter in Hz, enter a value in the range of:
Default value: 650 000 000 Hz Active after INA reboot. | |||
Shows the selected downstream IF output frequency at the modulator in Hz, can be set to
Active after INA reboot. | |||
Spectral inversion can be turned on. It is set to off per default. Active after INA reboot. | |||
Pro Chan Frequency | Specify which frequency the connected CPE devices should use for the provisioning channel.
When set to 0, the CPE devices use the downstream channel frequency as the provisioning channel frequency. | ||
Mac Ctrl Frames | Number of MAC control messages generated by the INA2320. | ||
Missed Mac Ctrl Frames | Number of MAC control messages not sent. | ||
Mac Frames | Number of MAC frames generated by the INA2320. | ||
Data Frames | Number of downstream data frames sent by the INA2320. | ||
Multiple Dsmcc Enable | You can set the INA2320 to insert multiple DSMCC frames in one MPEG frame.
|
The Cisco DVB INA2320 has one or two Demodulator modules installed, depending on the ordered INA2320 configuration. With one Demodulator module installed, the Cisco DVB INA2320 enables four upstream channels, with two Demodulator modules installed, the Cisco DVB INA2320 enables 8 upstream channels.
In the INA Demodulator Setup you configure each of the installed Demodulator modules separately. The Cable DVB/DAVIC Management Program indicates how many Demodulator modules are installed currently. The upstream channels available are numbered 1 to 4, the connectors on the front plate are labelled accordingly.
To upgrade from 4 upstream channels to 8 upstream channels, you have to order an upgrade kit, contact your local Cisco Systems representative.
To display the Demodulator configuration for a specific Demodulator module:
Step 2 Under Demodulator, click on Demodulator Table. In the right window the enabled upstream channels are displayed in detail. The column marked Index indicates the Demodulator number and the upstream channel number. Example: 1.4 designates the upstream channel number 4 in Demodulator module number 1 (left).
Step 3 Double-click on the upstream channels to display the settings for this upstream channel in a listing. The contents of the window is updated.
Step 4 Select the parameter you want to change or view.
Step 5 The Properties window appears.
Step 6 View or set the parameters required. All Demodulator parameters and their values are listed in the table below.
The following table shows the details of the selected upstream channel:
| Parameter | Description |
|---|---|
Index | The index shows which Demodulator module and which Upstream channels are enabled. Example: 1.1 is the upstream channel number one in the Demodulator module number 1 (left in front view). |
No | Shows the demodulator module number (read-only) |
Channel No | Shows the upstream channel number (read-only) |
This field shows the status of the selected Demodulator channel. Possible settings:
(Read-only field) | |
Set the upstream bandwidth type; the following bandwidths are supported:
Active after INA reboot | |
Frequency | Shows the currently selected upstream frequency. To change the upstream channel frequency for this demodulator module, enter a new value and click on Set.
Default value: 20 000 000 Hz Active after INA reboot. |
Shows the required upstream signal level in the demodulator, it is a value in the range 43 to 84 dBµV. This is the signal level value needed at the connector of the Demodulator module (no internal loss). Default value: 66 dBµV Active after INA reboot. | |
Shows the manufacturer's serial number of the demodulator module. (Read-only) | |
Downstream Channel No | Shows the number of the downstream channel related to this upstream channel. You can set this upstream to use downstream channel 1 or downstream channel 2. Default Value: dsChannel 1 Active after INA reboot. |
The following parameters in the INA Demodulator setup are read-only fields for service purposes.
| Parameter | Description |
|---|---|
Timing Errors | This field shows the number of upstream ATM cells received with timing error. (Read-only) |
Power Errors | This field shows the number of upstream ATM cells received with signal level error. (Read-only) |
Reed Solomon Errors | This field shows the number of upstream ATM cells received with Reed-Solomon errors. (Read-only) |
HEC Errors | This field shows the number of upstream ATM cells received with Header Error Control errors. (Read-only) |
Other Errors | This field shows the number of upstream ATM cells received with e.g. collision errors or out-of-burst sequence. (Read-only) |
AAL5 Frames | Number of AAL5 frames received on the upstream channel. (Read-only) |
AAL5 CRC Errors | Number of AAL5 frames received with CRC errors. (Read-only) |
AAL5 Too Large | Number of AAL5 frames received, which are too large. (Read-only) |
AAL5 Aborted | Number of AAL5 frames received, which were aborted due to connection breakdown. (Read-only) |
This section of the Cable DVB/DAVIC Management Program is used by the service personnel for advanced service purposes.
|
Note During normal operation nothing has to be edited in this section. |
One set of configuration parameters is sent per enabled downstream channel. You can view this set of configuration parameters in the Cable DVB/DAVIC Management Program. For further details on the MAC parameters, consult the DVB standard ETS 300 800.
To display the MAC setup:
Step 2 Select the parameter you want to change or view in the right window.
Step 3 The Properties window appears.
Step 4 View the parameters required.
The following table shows the parameters available in the MAC setup:
| Parameter | Description | ||
|---|---|---|---|
Sign On Increase Power Retry Count | The number of attempts the modem tries to enter the system at the same power level before incrementing its power level. This field is used in DAVIC 1.1 and 1.2, it is not used in DVB 2.0. Valid range: 1 to 10 Default value: 2 Unit: attempts | ||
Service Channel Frame Length | The number of slots in the upstream Contention-less (fixed rate) based Service Channel The valid range is 0 to 65535. Default value: 3 slots | ||
Service Channel Last Slot | The last slot in the Service Channel. The valid range is 0 to 65535. Default value: 1007 (slot number) | ||
The maximum power level the modem should start on to transmit upstream data. The valid range is 68 to 120 dBµV. Default value: 120 dBµV | |||
The minimum power level the modem shall be allowed to use to transmit upstream data.
The valid range is 68 to 120 dBµV. Default value: 68 dBµV | |||
Max Backoff Exponent | The maximum value of the back off exponent counter, used by the modem for its contention algorithm. The valid range is 1 to 32. Default value: 10 | ||
Min Backoff Exponent | The minimum value of the back off exponent counter, used by the modem for its contention algorithm. The valid range is 1 to 32. Default value: 1 | ||
Idle Interval | The interval between MAC Idle Messages to be sent by the modem if it has nothing else to send. The value of zero indicating that no Idle Messages shall be sent is currently not supported. The valid range is 1 to 3600 s. Default value: 30 s | ||
The default time offset which is used when first signing on. It is used to secure correct timing between upstream and downstream data traffic.
Valid range: -32768 - 32767 Default value = 0 Unit: 100 ns | |||
Round Trip Delay | Set this parameter to add additional round trip delay for long distance cable networks. Unit: 100 ns Range: -32768 to 32767 Default value: 0 | ||
Frequency Ranging Step | Only used for LMDS (EN 301 199) Valid range: 0 to 255 Default value: 0 Unit: steps | ||
Max Contention Access Msg Len | 'Connect Message' parameter: 'Maximum Contention Access Message Length' The maximum length of a message that may be transmitted using contention access. Any message greater than this should use reservation access. The valid range is 0 to 255 ATM cells. Default value: 1 ATM cell | ||
Max Reservation Access Msg Len | "Connect Message" parameter: "Maximum Reservation Access Message Length" The maximum length of a message that can be transmitted using a single reservation access. Any message greater than this should be transmitted by making multiple reservation requests. The valid range is 0 to 255 ATM cell. Default value: 50 ATM cells | ||
The time the modem waits after sending the Reservation_Request_Message or after receiving the last Reservation_Grant_Message, with an entry addressed to the modem containing a nonzero Remaining_Slot_Count, before initiating a Reservation_Status_Request_Message Valid range: 100 to 60000 Default value: 100 Unit: ms
| |||
Timeout 00 | Time-Out value: Head-End Time-Out, No frequency change Values: t60000, t30000, t9000, t6000, t3000, t900, t600, t300, t90, t60, t30, t9, infinite Default = t300 Unit: ms | ||
Timeout 01 | Time-Out value: Head-End Time-Out, Frequency change Values as in Timeout 00, default value: t9000. | ||
Timeout 02 | Time-Out value: Terminal Time-Out, Intervals Values as in Timeout 00, default value: t900. | ||
Timeout 03 | Time-Out value: Terminal Time-Out, Short Values as in Timeout 00, default value: t90. | ||
Timeout 04 | Time-Out value: Terminal Time-Out, Long Values as in Timeout 00, default value: t300. | ||
Timeout 0D | Time-Out value: Terminal Time-Out, Security Sign-On Values as in Timeout 00, default value: t90. | ||
Timeout 0E | Time-Out value: Terminal Time-Out, Main key exchange Values as in Timeout 00, default value: t600. | ||
Timeout 0F | Time-Out value: Terminal Time-Out, Quick/Explicit key exchange Values as in Timeout 00, default value: t300. | ||
Status Req. Msg Interval | Status_Request_Message interval Values as in Timeout 00 | ||
Number Of Retries | Time out, number of retries before giving up. The valid range is 3 to 10 attempts, default value: 5 | ||
Sign On Msg Interval Min | Minimum value of the interval between 'SignOn Request Message's sent continuously by the Headend on the downstream channel The valid range is 10 to. 10000 ms, default value: 900 ms | ||
Sign On Msg Interval Max | Maximum value of the interval between "SignOn Request Messages" sent continuously by the Headed on the downstream channel The valid range is 10 to 10000 ms, default value: 90 ms | ||
Sign On Msg Recalculation Interval | The interval between recalculation of the interval between "SignOn Request Messages" The valid range is 1000 to 60000 ms. Default value: 10000 ms | ||
Sign On Msg Recalculation Few Collisions | The "few" number of collisions for recalculation of the interval between "SignOn Request Messages" The valid range is 1 to 100 Default value: 9000 | ||
Sign On Msg Recalculation Many Collisions | The "many" number of collisions for recalculation of the interval between "SignOn Request Messages" The valid range is 10 to 10000. Default value: 9000 | ||
Us Slot Marker Pointer | MAC Control Message: Upstream Slot Marker Pointer, the time between the first symbol of the next Sync byte and the next 3msec marker Valid range: 0 to 3000 us Default value: 3000 us | ||
Grant Offset | Slot reservation: Minimum time from a grant message to the slots granted by that message Valid range: 1 to 30 ms Default value: 12 ms | ||
Protocol Type | Select the protocol type which standard to use. This is dependent upon the connected CPE devices | ||
Min Contention Slot | You can set the minimum number of contention slots in one 3 ms period. Valid range: 1 to 15 Default value: 1 | ||
Max Contention Slot | You can set the maximum number of contention slots in one 3 ms period. Valid range: 1 to 15 Default value: 11 |
This section of the Cable DVB/DAVIC Management Program is used for setting up internal routing entries and explains the DHCP, NAT and IGMP multicast configurations.
When allowing internal routing, data traffic between two cable data modems connected to the same INA are not sent to the default gateway. As they are routed internally in the INA, the default gateway is not unnecessarily loading the backbone network, the data traffic stays on the HFC side of the Cisco DVB INA2320.
The Internet Group Management Protocol (IGMP) is supported by the INA. It keeps a list of multicast group memberships and a timer for each membership for the attached network. IGMP is an integral part of IP. The cable modems can subscribe to a multicast group membership. The INA registers multicast group subscribers and provides the data traffic to the subscribe cable modems.
To display the IP section:
Step 2 Select the parameter you want to change or view in the right window.
Step 3 The Properties window appears.
Step 4 View or set the parameters required.
The following parameters appear in the table:
| Parameter | Description | ||
|---|---|---|---|
In this field you enter or view the number of minutes that multicast addresses are kept in the ARP cache, the maximum value disables time out. Valid range: 1 to 65536 Default value: 15 Unit: minutes | |||
Allow Internal Routing | In this field you specify if the INA is allowed to route internally between cable modems. If set to no, the packets are sent to the backbone via the default gateway. Values:
| ||
Allow Backbone Routing | In this field you specify if the INA is allowed to route to the backbone. If set to no, packets are dropped Values:
| ||
Set this field to true if the INA should relay DHCP messages to the cable modems. Values:
Default value: True | |||
In this field you set the INA to use NAT (Network Address Translation) on the Ethernet port. Values:
Default value: False
| |||
NAT Max No Of Connections | You can set the maximum number of concurrent connections to or from modems for this INA. Valid range: 16 to 20480 Default value: 8192 Active after INA reboot. | ||
In this field you set the IP address used for the NAT connections. Set this typically to the INA Ethernet IP address, for the INA Ethernet IP address see the "INA System" section. Default value: 192.168.1.1 Active after INA reboot. | |||
NAT Connection Timeout | In this field you set the number of seconds to keep a NAT connection open without traffic being sent. Valid range: 1 to1000000 Default value: 60 Unit: seconds Active after INA reboot. | ||
In this field you can set whether the INA to work as an IP Router or a MAC bridge Values: | |||
Specifies the encapsulation of data from the INA on the HFC network. Use this parameter to set the INA to routing or MAC bridging mode. Values:
| |||
DHCP Server Address | This field is used as a DHCP helper address, that allows the DHCP server to be placed in a subnet different than the subnet on the Ethernet side of the INA2320. The default value is 0.0.0.0, which indicates that no DHCP helper address is used. Active immediately after setting. | ||
DHCP Backup Server Address | This field is used when there is a backup DHCP server in the network. The default value is 0.0.0.0, that indicates that no DHCP Backup server is used.
Active immediately after setting. | ||
Use CSRC | The Cisco DVB INA2320 can be set to support the Cisco Subscriber Registration Center software for automatic provisioning of CPE devices.
| ||
Use Option 82 | The Cisco DVB INA2320 can insert option 82 in DHCP messages.
| ||
Use Sub Option 82 | The Cisco DVB INA2320 can insert the sub options of option 82 in DHCP messages.
| ||
The Cisco DVB INA2320 can run in IP encapsulation mode. In this mode the unit provides an IP encapsulated data stream at the ASI output connector.
| |||
This parameter is only used in MAC bridging mode. When set to true, all data traffic is allowed. When set to false, you can use the parameters Allow IP and Allow PPPoE to filter data traffic types.
| |||
This parameter is only used in MAC bridging mode.
When set to true, IP data traffic is allowed and the existing IP filter tables are used. | |||
This parameter is only used in MAC bridging mode.
When set to true, all IP data traffic is not allowed and the existing IP filter tables are not used. |
You can specify on which interface of the INA multicast is supported. Furthermore you specify timing for multicast sender and subscriber to send queries. Various queries can be setup to customize the multicast parameters to your specific needs, including a retry counter to tune for expected packet loss.
To configure IGMP:
Step 2 Click on IGMP Table.
Step 3 Double-click on one of the two entries, cableNet or Ethernet, to configure the selected part. Index 1 is used to configure the Cisco DVB INA2320 to support IGMP on the HFC interface (cableNet), Index 2 is used to configure the Cisco DVB INA2320 to support IGMP on the Ethernet interface.
Step 4 View or set the parameters required.
The following table shows the parameters and the valid settings to configure the multicast function.
| Parameter | Description |
|---|---|
Index | This field shows which interface of the INA is displayed currently for configuring IGMP. |
Set this to true if IGMP should be used to support multicast addresses on the respective interface. Values:
Default Value: True | |
Robustness | This parameter is used for tuning to expected packet loss. Set this parameter to the number of times IGMP messages are retried. Valid range: 1 to 10 Default value: 2 |
The INA asks on the selected interface whether there is a subscriber for a given multicast address. You can set the time interval for which the INA sends a query. Set the seconds between two queries sent by the querying INA Valid range: 1 to 1000 Default value = 125 Unit: seconds | |
Query Response Interval | Set the maximum response time from the subscriber unit to the multicast group. Valid range: 10 to 10000 Default value: 100 Unit: 1/10 s |
Startup Query Interval | Set the interval between general queries sent by the querying party on startup. Valid range: 1 to 1000 Default value: 30 Unit: s |
Startup Query Count | Set the number of queries sent out on startup of the INA2320, separated by the StartupQueryInterval Valid range: 1 to 10 Default value: 2 |
Last Member Query Interval | Set the maximum response time inserted into group specific queries sent in response to leave group messages. The time is in units of 1/10 of a second Valid range: 1 to 1000 Default value: 10 Unit: 0.1 s |
Last Member Query Count | Set the number of group specific queries sent before the Cisco DVB INA2320 assumes there are no local members Valid range: 1 to 10 Default value: 2 |
Unsolicited Report Interval | Set the time between repetitions of a host´s initial report of membership in a group Valid range: 1 to 100 Default value: 10 Unit: s |
In this section of the Cable DVB/DAVIC Management Program, you set the necessary parameters for the Interactive Network Adapter to send and receive authentication and accounting information to and from a RADIUS server. You specify the IP address of the RADIUS server and timing parameters like time out and retries. Furthermore various parameters for accounting and port information on the RADIUS server are set from the INA.
To display the RADIUS parameters in the Cable DVB/DAVIC Management Program:
Step 2 Select the parameter you want to change or view in the right window.
Step 3 The Properties window appears.
Step 4 View or set the parameters required.
The following parameters are available in this section:
| Parameter | Description |
|---|---|
Use Accounting | Set the field to one of the following values:
Default: False |
Min Accounting Update Interval | Enter the number of seconds between accounting information is sent from the INA to the RADIUS server. Valid range: 60 to 10.000.000 Default value: 3600 Unit: s |
Max Accounting Delay | The number of seconds the INA queues an accounting request when the RADIUS server is not responding. Valid range: 0 to 1200 Default value: 600 Unit: s |
Request Timeout | The interval in milliseconds between retransmission of RADIUS requests from the Cisco DVB INA2320 to the RADIUS server. Valid range: 1000 to 60000 Default value: 3000 Unit: ms |
Request Retries | Enter the number of times a RADIUS request message should be re transmitted from the INA. Valid range: 2 to 10 Default value: 3 |
Multi Operation | This specifies whether the RADIUS server is able to handle several authentication/accounting requests at the same time. True—the RADIUS handles several requests simultaneously False—the RADIUS server only handles one request at a time Default value: true |
Shared Secret | Enter the shared secret string for RADIUS security. The shared secret encryption is used for security between the INA and the RADIUS server. Default: empty string The maximum number of characters allowed is 16. |
Support Acct Input Packets | This parameter defines whether Accounting Input Packets attributes are supported by the RADIUS server or not. Set the field to:
Default: true |
Support Acct Output Packets | This configuration parameter defines whether the Accounting Output Packets attributes are supported by the RADIUS server.
Default: true |
Authentication Port Number | Select in this field which port number to use when accessing the RADIUS server authentication port:
|
Accounting Port Number | Select in this field which port number to use when the INA messages access the RADIUS server accounting port:
|
Server Ip Address | In this field you specify the IP address of the RADIUS server. |
No of Concurrent Requests | In this field you specify the maximum number of concurrent RADIUS requests allowed to be outstanding at the RADIUS server. Valid range: 1 to 50 Default value: 20 |
This feature works both ways, from the cable modem to the Cisco DVB INA2320 and from the Cisco DVB INA2320 to the cable modem. By using IP routing and IP filtering functionality, you can set the INA to discard unwanted data traffic by filtering IP addresses and making data flow more effective using well defined routing entries according to your network structure. By setting the prefix length that has to be matched to be considered as a valid route you can specify the data path in your network very precisely - down to routing to a single IP address.
The Cisco DVB INA2320 can be set up to perform IP routing and filtering. You can configure up to 1024 routing entries and up to 64 filter entries to avoid unnecessary data traffic. The Cisco DVB INA2320 supports multiple subnets on the HFC interface. You can define up to 32 subnet table entries to support the multiple subnets.
|
Note To operate the Cisco DVB INA2320 in routing mode, check that the setting Router Type in IP details is set to ipRouter. |
Using the routing function, the Cisco DVB INA2320 routes IP packets from a specified source IP address to a specified destination IP address. There are 1024 static routing entries available in the Cisco DVB INA2320. For each of the entries in the routing table, you can display and change the settings by clicking on the respective entry number.
The IP routing functionality is used to direct IP traffic to PCs connected to cable modems. In this case, the cable modems have to be operated without Network Address Translation (NAT). The modems function as gateways for the IP traffic sent to a PC connected to a cable modem.
To display the a routing entry window in the Cable DVB/DAVIC Management Program:
Step 2 Select the routing entry you want to change or view in the right window.
Step 3 Double-click on the entry. The contents in the right window is updated.
Step 4 Click on the parameter you want to view or edit.
Step 5 The Properties window for this entry appears.
Step 6 View or set the IP addresses required.
Step 7 Set the prefix length according to your requirements.
Example: If you set the prefix length to 8, the first group of numbers in the IP address must match the IP address to be routed to the Gateway IP. If you set the prefix length to 16, the first two groups of numbers (six digits) in the IP address must match the IP address to be routed to the Gateway IP.
The following parameters are available for each routing table in the Cable DVB/DAVIC Management Program:
| Parameter | Description | ||
|---|---|---|---|
Index | The index number for this routing table. This cannot be changed. | ||
Active | Set to yes, if this entry should be considered when routing. Values:
| ||
IP | Enter the IP address to base routing on. | ||
Prefix Length | By setting the prefix length, you set the filtering criteria fro the IP address. Number of bits of the IP address to consider when routing Valid range: 0 to 32 Default value: 24 If you set this value to 16, the first two groups of numbers in the IP address must match the IP address to be routed to the Gateway IP. | ||
Enter the IP address of the gateway used for this routing entry.
|
In the filter table you set the IP filtering parameters for the Cisco DVB INA2320. The filtering can be used to block off unwanted data traffic to and from specified IP addresses.
The filtering works for data traffic from the HFC network and traffic from the Ethernet after the best-match principle.
|
Note The data traffic going to the INA Ethernet IP address cannot be denied. You can deny subnets on the HFC side to cut off cable modem traffic. |
You can configure up to 64 filtering entries. For each entry in the filter table you can display and change the settings by clicking on the respective entry number.
The following parameters are available in the Filter Table section:
| Parameter | Description | ||
|---|---|---|---|
Index | Index into the filter table. This cannot be changed. Valid range: 1 to 64 | ||
Set this field to yes if this entry should be considered when routing. Settings available:
| |||
Filter Type | Set the type of traffic to apply this filter to. Settings available:
| ||
Permit | Data traffic is allowed if this is set to permit, otherwise data traffic is denied. Settings available:
| ||
Destination IP Address | Destination IP address to apply this filter on. All data passing through this filter are sent to the destination IP address. | ||
Destination Prefix Length | By setting the prefix length you set the filtering criteria for the IP address. Number of bits of the Destination IP address to consider when filtering Valid range: 0 to 32 Default value: 0 | ||
Destination Port ID | Destination Port Id to apply this filter on. Default value: 0 If set to 0, all destination ports of the selected filter type are filtered. | ||
Source IP Address | Source IP address to apply this filter on. All data coming from this IP address will be subject to the filter. | ||
Source Prefix Length | By setting the prefix length you set the filtering criteria for the IP address. Number of bits of the Source IP address to consider when filtering Valid range: 0 to 32 Default value: 0 | ||
Source Port ID | Source Port Id to apply this filter on. Default value: 0 If set to 0, all destination ports of the selected filter type are filtered. |
By specifying the prefix length to be matched by the IP address you can size you subnets down to a single modem, if you set the prefix length to 24, only the IP address matching the given IP address in the subnet table can pass data into this subnet.
|
Note In the subnet table you set the IP address of the HFC cable network interface. The first entry is the default entry for the IP address of the INA on the HFC network. This entry will be used as the return address for DHCP/BootP requests. |
The following parameters are available to configure IP filtering with multiple subnets.
| Parameter | Description |
|---|---|
Index | This is the index number for the subnet table |
IP Address | IP address of the subnet |
Prefix Length | Set the prefix length for the IP address to match the criteria for IP filtering. Set the number of bits of the IP address used to specify the subnet. Valid range: 0 to 32 Default value: 24 |
If you set the prefix length to 8, the first three digits in the IP address must match the Subnet IP address to be sent to this subnet.
If you set this value to 16, the first six digits in the IP address must match the Subnet IP address to be sent to this subnet.
If you set this value to 32, the complete IP address must match the subnet address before the data can pass through.
Use the Multicast Mapping Table to configures to map specific IP addresses to a specific connection (VCI).
The following parameters are available in the Multicast Mapping Table section:
| Parameter | Description | ||
|---|---|---|---|
Multicast Mapping Index | Index into the multicast mapping table. | ||
Multicast Mapping Active | Set this field to Yes to activate the multicast mapping entries. Settings available:
| ||
Multicast Mapping IP | Destination IP address to apply this filter on. All data coming from this IP address will be subject to the filter. | ||
Multicast Mapping Prefix Length | By setting the prefix length you set the filtering criteria for the IP address. Number of bits of the Source IP address to consider when filtering Valid range: 0 to 32 Default value: 0 | ||
Multicast Mapping Vci | Identification of the VCI to be used to for the IP address mapping. |
You can set the Cisco DVB INA2320 to provide up to 32 different profiles of quality of service (QoS). Any profile can be assigned to a cable modem. You assign a class to each entry. The classes supported are best effort, committed data rate or fixed rate. Additionally you can specify a minimum and maximum bandwidth for both the upstream and the downstream channels.
Having defined the 32 QoS entries, you assign one QoS entry (or index) to each of the configured modems, see the "To Create a New Cable Modem or Set-Top-Box Configuration" section.
How Quality of Service is Handled
When starting transmitting data, the INA gives as much bandwidth as possible on the cable modem connection. When the limit for a particular slot is reached, the throughput is adjusted according to the defined QoS index for this connection.
Example 1
You can experience that when the window size is large and the QoS limit is very low, while the available bandwidth is very high, the time the modem is allowed to use the available bandwidth is very short.
Example 2
The QoS is set to 200 kbps, the window size is set to the standard value 2 s. This gives 2x200 kbps = 400 kbit per window.
When starting the data transmission, let us assume that 1 Mbps is available for this connection. The cable modem sends at 1 Mbps until the window limit is reached, that is 400 kbit divided by 1Mbps, meaning after 0,4 s. After the period of 0,4 seconds, the cable modem is only allowed to send at 200kbps.
The same principle applies also for the downstream traffic. The amount of time the cable modem is allowed to use the maximum bandwidth is dependent on both the QoS limit and the window size. If the window size is very small, for example 20 ms, the amount of time where the available capacity in the channel can be used, is very small, even if the QoS limit is large. A 20 ms window at QoS 400 kbps with 4 Mbps available, only allows for 4 Mbps throughput for a period of 2 ms.
At a large window size, the maximum throughput time is relatively long, especially if the maximum throughput is near the limit of the QoS. A 30 second window at QoS 400 kbps with 1Mbps available, allows 1 Mbps throughput for a period of 12 s.
|
Tips The best compromise between bandwidth and feel of speed is around the default window size 2 s. |
If it is desired to have very little overswing - or very large overswing - the window size can be used to adjust to the wanted effect.
|
Note Boot the cable modems after changing the applied QoS profile in order to activate the new settings. |
The following table shows the parameters available in the QoS section of the Cable DVB/DAVIC Management Program.
| Parameter | Description |
|---|---|
Set this parameter to true to set the Cisco DVB INA2320 to use the Quality of Service Index. The default Quality of Service Index is 1, non-configured modems will use this entry as a default value. The following settings are available:
Default value: false |
In the Quality of Service Entry window you define a Quality of Service Index. Up to 32 profiles are available, for each entry you set the following:
You specify all four parameters separately for the upstream and downstream channel.
To define a QoS profile index:
Step 2 Select the class of service for the upstream channel in US Class of Service.
Step 3 Specify the upstream channel window size.
Step 4 Specify the minimum upstream bandwidth, if you have selected Committed Rate.
Step 5 Specify the maximum upstream bandwidth, if you have selected Committed Rate.
Step 6 Select the class of service for the downstream channel in DS Class of Service.
Step 7 Specify the downstream channel window size.
Step 8 Specify the minimum downstream bandwidth, if you have selected Committed Rate.
Step 9 Specify the maximum downstream bandwidth, if you have selected Committed Rate.
The following table lists the above mentioned parameters more detailed.
| Parameter | Description | ||
|---|---|---|---|
Index | This is the index into the Quality Of Service table. Index 1 is the default index and is used as a default value for all modems which are not configured.
| ||
Select the class of Service for the upstream channel. Values available:
Default value: BestEffort | |||
US Window Size | Set the number of milliseconds used for the Quality of Service window in the upstream channel. Valid range: 10 to 60000 Default value: 2000 Unit: ms | ||
If committed rate is selected, this value is the number of kbit/s which is guaranteed. This is only used for fixed rate, and not for the classes BestEffort or Fixed Rate traffic. Valid range: 0 to 6000 Default value: 0 Unit: kbits/s | |||
This value is the maximum bandwidth allowed on the upstream channel in kbits/s. Valid range: 0 to 6000 Default value: 64 Unit: kbits/s | |||
Select the class of Service for the downstream channel. Values available:
Default value: BestEffort | |||
DS Window Size | Set the number of milliseconds used for the Quality of Service Window in the downstream channel. Valid range: 10 to 60000 Default value: 2000 Unit: ms | ||
If committed rate is selected, this is the number of kbit/s which is (attempted) guaranteed. This is not used for the classes BestEffort or Fixed Rate traffic. Valid range: 0 to 6000 Default value: 0 Unit: kbits/s | |||
This is the maximum bandwidth allowed on the downstream channel in kbits/s. Valid range: 0 to 6000 Default value:64 Unit: kbits/s |
In this section you can set the PID (Program Identifier) to be used when transmitting In-band (downstream) data.
This PID value is set when data is sent to the HFC network. The default MAC PID 0x001C is defined by the DVB standard to be used for MAC messages sent from the INA to the connected cable modems. The Dsmcc Pid is the Packet Identifier for the data packets.
To enter a new value in this field, do the following:
Step 2 Click on PID in the right window.
Step 3 Enter the new PID value and click OK. The valid range is 0 to 8191, the default value is 2048.
|
Note The DSM-CC PID is displayed in decimal format. |
![]()
![]()
![]()
![]()
![]()
![]()
![]()
![]()
Posted: Fri Feb 23 03:19:45 PST 2001
All contents are Copyright © 1992--2001 Cisco Systems, Inc. All rights reserved.
Important Notices and Privacy Statement.
