|
|

This chapter describes basic maintenance for the Cisco DVB Interactive Network Adapter INA2320. This chapter contains the following sections:
The Cisco DVB INA2320 is delivered with all ordered modules mounted.
All modules are 2 units wide. Expansion plates are used to cover the gaps between the modules mounted in the chassis.When there are no modules inserted in the INA, you can see the green gliding rails for the module position.
Figure 5-1 shows the module positions that will ensure proper functioning of the unit.
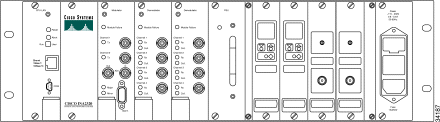
If external upconverter modules are used and installed, they must be positioned as shown in Figure 5-1.
From the left, the order of the modules is:
You need the following items to replace or insert a module:
 |
Caution Before you start replacing a module or inserting a new module, power down the Cisco DVB INA2320. The Cisco DVB INA2320 does not support on-line insertion and removal. |
If you need to replace the CPU-LAN module:
Step 2 Power down the Cisco DVB INA2320.
Step 3 Unscrew the top screw and the screw under the black release lever.
Step 4 Press the release lever down, the module is released and pushed out of the chassis by the release lever.
Step 5 Extract the module carefully from the chassis.
Step 6 Take the new CPU-LAN module out of the plastic ESD packaging.
 |
Note Make sure that you do not touch the board, only touch the card by its edges and the front plate. |
Step 7 Insert the CPU-LAN module into the chassis on the green gliding rails in the slot.
Step 8 Insert it carefully but firmly and press the module into the chassis so it plugs in correctly in the connector at the backplane of the Cisco DVB INA2320 chassis, use the black lever to push the module in its position.
Step 9 Tighten the top screw and the screw under the black release lever.
Step 10 Reconfigure the INA by setting the IP address and other communication parameters and loading the INA settings from the file.
Step 11 Send the faulty module to repair.
|
Caution The CPU-LAN Module contains a Lithium battery. Danger of explosion if battery is incorrectly replaced. |
If you need to replace the Modulator module:
Step 2 Unscrew the top screw and the screw underneath the black release lever.
Step 3 Press the release lever down, the module is released and pushed out of the chassis by the release lever.
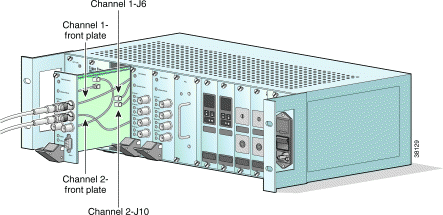
Step 4 Extract the module carefully and slowly from the chassis (approx. 1 inch) until you can see the four coaxial cables connecting to the up converter through the back of the INA.
|
Note The four coaxial cables for the downstream channels connecting to the upconverter must be disconnected before the Modulator can be extracted fully. |
Step 5 Disconnect the four MCX connectors. Two cables are connected to the back side of the Modulator front plate, the other cables are connected to sockets positioned on the modulator print board.
To detach the cables, refer to Figure 5-2.
Step 6 Take the new Modulator module out of the plastic ESD packaging.
|
Note Make sure that you do not touch the board, only touch the card by its edges and the front plate. |
Step 7 Insert 2/3 of the module into the chassis on the green gliding rails in the slot.
Step 8 Connect the two pairs of coaxial cables (2 for each downstream channel) connecting to the upconverter modules. The cables are marked at both ends.
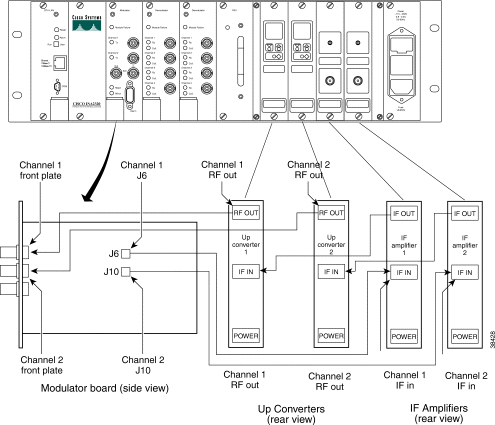
Step 9 Plug the shorter cables into the sockets J6 and J10 on the modulator board
Step 10 Plug the longer cables into the backside of the modulator front plate.
Step 11 Insert the module carefully but firmly and press the module into the chassis so it plugs in correctly in the connector at the backplane of the Cisco DVB INA2320 chassis.
Step 12 Tighten the top screw and the screw under the black release lever.
Step 13 Send the faulty module to repair, if necessary.
This section describes how to replace a Demodulator module, and how to add a new Demodulator module to the chassis.
If you need to replace a Demodulator module:
Step 2 Unscrew the top screw and the screw under the black release lever.
Step 3 Press the release lever down. The module is released and pushed out of the chassis by the release lever.
Step 4 Extract the module carefully and slowly from the chassis.
Step 5 Take the new Demodulator module out of the plastic ESD packaging.
|
Note Make sure that you do not touch the board, only touch the card by its edges and the front plate. |
Step 6 Insert the module carefully but firmly and press the module into the chassis so it plugs in correctly in the connector at the backplane of the Cisco DVB INA2320 chassis.
Step 7 Tighten the top screw and the screw under the black release lever.
Step 8 Send the faulty module to repair, if necessary.
If you need to add a Demodulator module:
Step 2 Unscrew the screws holding the blind plate to the right of the installed Demodulator module.
Step 3 Remove the blind plate.
Step 4 Take the new Demodulator module out of the plastic ESD packaging.
|
Note Make sure that you do not touch the board; only touch the card by its edges and the front plate. |
Step 5 Insert the module carefully but firmly and press the module into the chassis so it plugs in correctly in the connector at the backplane of the Cisco DVB INA2320 chassis.
Step 6 Tighten the top screw and the screw under the black release lever.
Step 7 Send the faulty module to repair.
If you need to replace the PSU module:
Step 2 Unscrew the top screw and the bottom screw.
Step 3 Extract the module carefully from the chassis.
Step 4 Take the new PSU module out of its packaging.
Step 5 Insert the PSU module on the green gliding rails in the slot into the chassis.
Step 6 Insert it carefully but firmly and press the module into the chassis so it plugs in correctly in the connector at the backplane of the INA2320 chassis.
Step 7 Tighten the top screw and the bottom screw.
Step 8 Send the faulty module to repair, if necessary.
To replace an Upconverter module:
Step 2 Unplug the Ethernet connection and HFC connectors.
Step 3 Take the Cisco DVB INA2320 out of the rack.
Step 4 Unscrew the 10 screws holding the rear plate and the bottom screw.
Step 5 Unscrew the top screw and the bottom screw at the Upconverter front plate.
Step 6 Disconnect the power cord at the DIN connector (marked Power at the rear of the Upconverter module)
Step 7 Disconnect the cable from the connector marked IF IN using an 11-mm spanner.
.
Step 8 Disconnect the cable from the connector marked RF OUT using an 11-mm spanner.
Step 9 Extract the module carefully from the front of the chassis.
Step 10 Take the new Upconverter module out of its packaging.
Step 11 Insert the module in the slot from the front into the chassis.
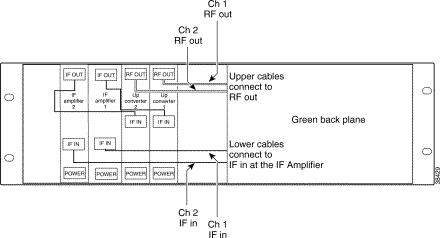
Step 12 At the back of the module, connect the cable coming from the IF Amplifier to the connector marked IF IN.
Step 13 Connect the cable labeled CHx-RF out to the connector marked RF OUT.
Step 14 Connect the DIN connector of the power cord to the power cable coming from the backplane.
Step 15 Mount the rear plate and tighten the 10 screws.
Step 16 Send the faulty Upconverter module to repair, if necessary.
To replace an IF Amplifier module:
Step 2 Unplug the Ethernet connection and HFC connectors.
Step 3 Take the Cisco DVB INA2320 out of the rack.
Step 4 Unscrew the 10 screws holding the rear plate and the bottom screw.
Step 5 Unscrew the top screw and the bottom screw at the Upconverter front plate.
Step 6 Disconnect the power cord at the DIN connector (marked Power at the rear of the IF amplifier module)
Step 7 Disconnect the cable from the connector marked IF IN using an 11-mm spanner.
Step 8 Disconnect the cable from the connector marked IF OUT using an 11-mm spanner.
.
Step 9 Take the new IF Amplifier module out of its packaging.
Step 10 Insert the module in the slot from the front into the chassis.
Step 11 At the back of the module, connect the cable coming from the green backplane to the connector marked Chx-IF.
Step 12 Connect the short cable on the IF Amplifier to IF IN on the upconverter.
Step 13 Connect the DIN connector of the power cord to the power cable coming from the backplane.
Step 14 Mount the rear plate and tighten the 10 screws.
Step 15 Send the faulty IF Amplifier module to repair, if necessary.
If the Cisco DVB INA2320 constantly resets, you can disable the Hardware Watchdog Timer to stop the request to the INA to perform a reset. The following paragraphs describe how to disable and enable the Hardware Watchdog Timer. It is located on the CPU-LAN module.
You can control the system watchdog using the MIB variable System Error Reset in the Cable DVB/DAVIC Management Program.
You find the following parameters in the section System of the Cable DVB/DAVIC Management Program.
| Parameter | Description |
|---|---|
System Error Reset | Possible states:
Active after reboot. |
To disable the Watchdog timer:
Step 2 To locate the switch SW5-1 and SW5-2, see Figure 5-6.
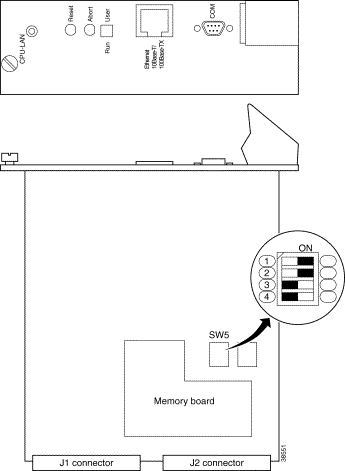
Step 3 Set the switch SW5 in the following way:
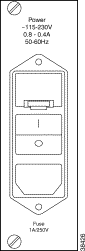
The fuse is located in a fuse drawer in the Power module, which holds the power cord. To replace a blown fuse:
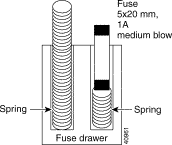
Step 2 To take out the fuse drawer, insert a flat-bladed screwdriver (see Figure 5-7).
Step 3 Press the fuse drawer downward and flip the drawer out. The fuse drawer is located above the O/I switch.
Step 4 Take out the fuse drawer.
The fuse drawer has two compartments, one holding the fuse, the other compartment holding a long spring.
Step 5 Extract the blown fuse.
Step 6 Insert the new fuse. The fuse is of the type 5x20 mm, 1A, medium blow.
|
Note Make sure that the spring is inserted in the compartment next to the fuse compartment. There is also a spring in the compartment holding the fuse, this spring cannot be taken out. |
Step 7 Insert the fuse drawer firmly until it clicks.
Step 8 Insert the power cord and power up the unit.
To display the log window:
Step 2 Establish an IP connection to the Cisco DVB INA2320.
Step 3 In the Cable DVB/DAVIC Management Program scroll to the section Log.
Step 4 Expand the Log section by clicking on the plus sign.
Step 5 Click on Log Table, the right window is updated with the current log messages.
For more information about the log function, see "INA Log Function" section. For a list of all the log messages, see "Log Message Overview."
This section describes how to perform a software upgrade from INA software version 2.2 and higher. For a software upgrade from version 2.1 to 2.2, refer to the readme.txt file delivered with the new INA software version 2.2.
All the software and configuration information are stored in the INA Flash memory. The flash image is contained in the file inasys.bin. To download a software upgrade from CCO, download the zip file, extract the files and copy them to the FTP server. The files needed for a software upgraded are listed in the downloaded readme.txt file.
The following items have to be in the INA memory when being operated:
Typically the unit will be powered on from Flash memory. For debugging purposes or software upgrade, it can also be started from a connected FTP server.
In the Cable DVB/DAVIC Management Program program you set whether the INA is to boot from an FTP server (setting network), or whether it should boot from Flash memory (setting Flash). The INA can only boot from Flash memory when you have downloaded the INA software into the operating unit, check the specific settings for your installation.
The following paragraphs give a step-by-step description how to load INA software in the Flash. Follow the instructions to load the necessary data into the Flash memory:
In the section Software, set Admin Status to allow sw upgrade. Make sure that the path for the FTP server and the software file name in the FTP server setup are correctly.
Set the boot device to boot from network and boot the INA.
Step 2 In the section Software in the Cable DVB/DAVIC Management Program set Boot Device to flash0.
Step 3 To load the software into Flash memory, set Admin Status to upgradeFromMgt.
|
Note When the software upgrade is finished, this field displays ignoreSwUpgrade. Performing a software upgrade takes a long time. Approximately 2 MB of data are downloaded into the INA Flash memory. Wait until this field shows ignoreSwUpgrade. |
|
Caution Do not disconnect power during software upgrade! Do not reboot the INA during the software download process, rebooting will corrupt the software in the INA. |
Step 4 The INA software is now stored in the Flash memory and available on the next Cisco DVB INA2320 reboot.
Step 5 The software upgrade has been finished successfully when the Admin Status line shows ignoreSwUpgrade. You may need to refresh the management window.
Step 6 In the section System set Reset Now to reboot and click on Set.
The reset command reboots the INA using the new downloaded software.
To set the INA to boot from Flash see the instructions in "INA System" section.
![]()
![]()
![]()
![]()
![]()
![]()
![]()
![]()
Posted: Mon Mar 19 01:42:05 PST 2001
All contents are Copyright © 1992--2001 Cisco Systems, Inc. All rights reserved.
Important Notices and Privacy Statement.