|
|

Each LightStream 2020 enterprise ATM switch in a network requires its own configuration information. This information is structured as a series of attributes, or parameters, for which you supply values. These attributes determine the operation of the LightStream switch in the network.
To help you define configuration attributes, the LightStream network management capability provides a set of configuration programs, collectively called the StreamView configurator. The configurator resides on your network management system (NMS). The configurator features a user-friendly graphical interface that, in many cases, reduces complex configuration tasks to clicking a mouse button. It also performs consistency and error checking on the information that you enter.
Read this chapter for general information on the LightStream configurator.
Before you can use the configurator, you must have the appropriate hardware and software installed as described in the following LightStream documents:
To communicate with LightStream switches, your NMS must be connected to at least one LightStream switch in a LightStream network. Through that switch, you can configure all of the other LightStream switches in the network.
Initially, you will use the LightStream configurator to create configurations for all the LightStream switches in your network. You can then use the configurator to change existing configurations or to add new ones as your network grows.
The configurator is designed around a series of dialog boxes that let you perform functions such as creating database objects that represent chassis (nodes), cards, and ports; setting the attributes of each object; and saving database changes. With the configurator, you can create, edit, or back up the configuration file of your LightStream network.
The following subsections provide an overview of the configurator and the database files you create with it.
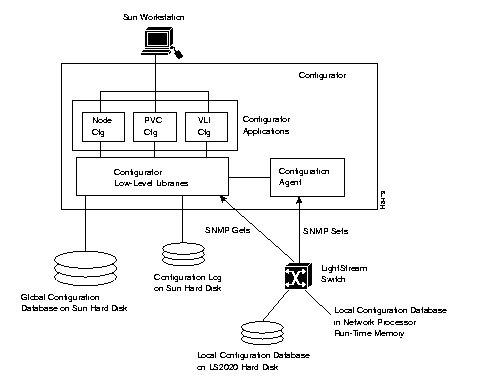
The configurator applications run under Motif/X11. As shown in Figure 1-1, the configurator applications write to the configuration database on the Sun's hard disk through low-level libraries. The configuration agent, cfg_a, translates the database information into Simple Network Monitoring Protocol (SNMP) set commands that send the information to a LightStream switch; this is called an update. The configuration agent produces log files for each update of each switch, which are stored on the Sun's hard disk. The configurator applications can also retrieve configuration information from a LightStream switch through SNMP get commands.

Configuration information for the entire LightStream network is stored in a single logical database, called the global configuration database. The global database resides on the hard disk of the Sun workstation that you are using to run the configurator.
Each switch in a LightStream network has a database with only its own configuration information, called a local configuration database. The information in a local database is vital to the node's operation; without a local database, the node cannot bring up any of its interfaces--in other words, it cannot pass traffic.
You have to explicitly send a local configuration database to its intended LightStream switch; this is called an update. The local database is extracted from the global database by the configurator when it performs the update. The local database is stored in run-time memory on the NP and on the NP's hard disk.
The information is transferred from the Sun workstation to the switch through SNMP set commands over an Ethernet interface. In order to send configuration to LightStream switches, the NMS must be connected to at least one LightStream switch. It may be connected via the Ethernet port on a LightStream network processor card (NP), or it may be connected through a LightStream Ethernet or FDDI port. In either case, through a connection to a single LightStream switch, you can configure all of LightStream switches in the network.
There are, then, actually three copies of a switch's configuration file in the system:
There is only one way to change the file on the NMS's hard disk: by using the configurator.
There are two ways to change the file in run-time memory and on the switch's hard disk:
The values in run-time memory are reset whenever the node or the NP is reset. In this case, NP software resets the attributes in the following sequence:
If the same attribute is specified in more than one place, the setting in the last file read by the NP software during the reset process is the one that is used.
The EEPROM may contain attributes that are not specified in defaults or the local database. For instance, if you have specified some custom filters for a port with the CLI, and not used the CLI command that saves them to the switch's hard disk, those values are retained in EEPROM but not in the local database. When the node is restarted, the values are written to run-time memory from the EEPROM. Therefore, values that you thought were temporary can show up in your run-time memory even though you didn't commit them to your hard disk. (See the LightStream 2020 Command and Attribute Reference Guide for more information on attributes stored in EEPROM.)
The LightStream configuration database is based on the SNMP Management Information Base (MIB). In the SNMP model, a managed system is a collection of objects that can be read and/or written by an external system. Internally, the objects may correspond to different parts of the managed system; externally, however, they appear as a single coherent database, called a MIB. The local configuration database, or MIB, contains all information accessible to external management systems for the local switch.
The attributes you can set using LightStream's configurator are specified in standard MIBs, such as MIB-2 and Ethernet, and also in the LightStream private section of the MIB. For more information on the MIBs, refer to the LightStream 2020 Command and Attribute Reference Guide.
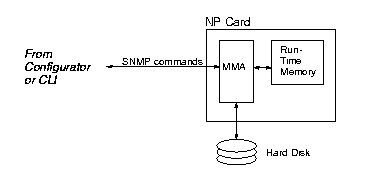
The Master Management Agent (MMA) is a software process running on the NP. The MMA binds the different objects in the local configuration database together in order to present the database as a unified image. The MMA acts as the local configuration database manager and provides access to the database for the CLI and configurator. Figure 1-2 shows the flow of configuration information through the MMA.

If you have installed management software according to the LightStream 2020 Installation and Troubleshooting Manual, then the global database files you create on the Sun are called configure.netdb.pag and configure.netdb.dir. The default database file is automatically opened when you start the configurator. If you are running under HP OpenView, the file is stored in /usr/OV/databases. If you aren't running HP OpenView, it is stored in /usr/LightStream-2.0/db.
The default database file name and path name are defined by the LSC_DATABASE environment variable. (See the section "Installing Management Software on a Sun" in the LightStream 2020 Installation and Troubleshooting Manual for more information on setting this variable.)
| **before** You can use a different name for your database file. However, cfg_a can only use the file specified by the LSC_DATABASE variable to perform updates. It also automatically opens the file specified by the variable when the configurator is started. @@before@@ | Caution **after** You can use a different name for your database file. However, cfg_a can only use the file specified by the LSC_DATABASE variable to perform updates. It also automatically opens the file specified by the variable when the configurator is started. @@after@@ |
The local database consists of two files, mma.db.dir and mma.db.pag, which reside on the hard disk in each node in the directory /usr/app/base/config.
Changes made to a local database configuration by the configurator are recorded in log files. A separate log file is created for each update of each switch or switch pair in the case of PVCs. If you are running under HP OpenView, the log files are stored on the Sun hard disk in the /usr/OV/log directory. If you aren't running HP OpenView, they are stored in /usr/LightStream-2.0/log.
Before you use the configurator, you must have several environment variables defined in a file that the shell reads on login--for example, the Bourne shell (sh), the C shell (csh), and GNU Bourne-Again shell (bash). The environment variables you need to define depend on whether you are running under HP Openview or not and what shell is invoked when you log in. For information on setting these variables, see the LightStream Installation and Troubleshooting Manual.
Table 1-1 gives a brief description of what each variable specifies.
Configuration changes made with the LightStream configurator are permanent: they are saved in the global and local configuration database. The configurator provides an easy-to-use graphical interface, as well as consistency and error checking on the information that you enter. For these reasons, you should use the configurator for making permanent changes to your configuration.
You can also use the CLI to access configuration attribute values on a local switch. The CLI provides commands that allow you to change and display the settings of configuration attributes. It also allows you to make those changes in the NP's run-time memory only or to run-time memory and the switch's hard disk. You should use the CLI for troubleshooting or fine-tuning network performance. See the LightStream 2020 Operations Guide and the LightStream 2020 Command and Attribute Reference Guide for information on using the CLI.
When you use CLI to change any configuration attribute values, then the configuration values on the switch are out of synch with your global database. If you want to enter your local changes into the global database, you can do so with the configurator's verify function. The verify function retrieves the attribute values from the run-time memory of a designated switch, and allows you to save them to the global database.
On the other hand, if you want to restore the values on the switch to global database settings, you can delete the local database and use the configurator to update the local switch. Updating the switch replaces any local settings (in both run-time memory and the hard disk) with the global ones.
You use the configurator to configure or reconfigure whenever you
This section describes the graphical elements that make up the dialog boxes of the configurator and explains how to use them. It also provides an overview of the types of tasks you can perform with the configurator.
The configurator displays a variety of dialog boxes that you can use to enter or change information. The dialog boxes are made up of a number of different graphical elements, which are used to display, enter, and change information. These graphical elements are
Each of these elements is described in the following subsections.
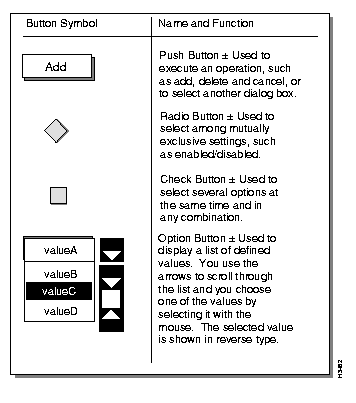
Buttons are used to provide a quick way to perform commands or select an attribute setting. If a button is not available for use, it is shown in gray. (All button types are defined by OSF/Motif.) Figure 1-3 describes the various types of buttons used in the configurator.

In addition to these generic types of buttons, each dialog box also contains the specific push buttons described in the following subsection.
Click on the OK button to save the changes that you have made to the information in that dialog box. The information is saved and you are then returned to the previous dialog box.
Click on the Help button to obtain a list of items for which online help is available.
Click on the Cancel button if you want to discard any changes you have made to the dialog box and close it. Information specified in the dialog box is not saved, and you are then returned to the previous dialog box. (If you performed a save during the configuration session, then only changes made after the save was performed are discarded.)
Field boxes are used to enter information. They look like push buttons except they contain a cursor and are labeled either above or beside the box. You click inside the field box with the mouse and then type in your information. You use either an associated command button or the OK button to store the information.
To move around a field box, use the left and right arrows on the right keypad. To select an entry, you can either double click on the entry or depress the left mouse button and, keeping it down, drag it over the text you wish to select. To delete a selected entry or a character, use the [Back Space] key.
Lists are used to display a set of choices currently available for a field, for example chassis names. You modify a list by using its associated field box and push buttons. You can add to the Chassis list on the Configuration Manager dialog box, for instance, by typing in its associated field box and then clicking on the Add push button.
In some lists, it is possible to select multiple and non-contiguous entries in a list. You can select multiple contiguous items by depressing the mouse button and, keeping it down, drag it over the desired entries. To select multiple non-contiguous entries, depress the [Control] key and click the mouse button on the desired entries. You can also depress the [Control] key and depress the mouse button and, keeping it down, highlight the desired entries.
The remainder of this chapter discusses, in general, the types of configuration tasks you can perform using the configurator. Specific procedures for performing each task are provided in the chapter "Configuration Procedures."
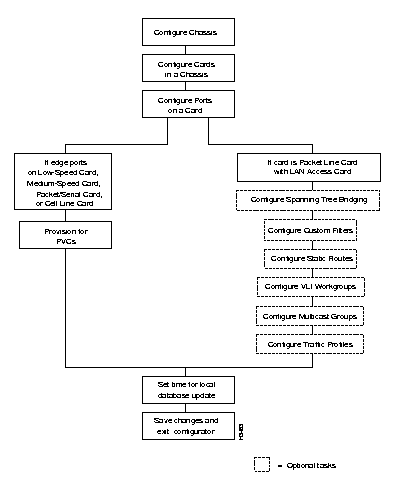
Figure 1-4 shows the general steps you follow to create a configuration for a new switch. You begin configuration by creating a chassis object, assigning it a name, and filling in the chassis ID, IP addresses, and so on. Next, you create card objects within the chassis, then create ports for the cards.
If you have configured edge ports on any low-speed line cards (LSCs), medium-speed line cards (MSCs) or cell line cards (CLCs), then you need to configure permanent virtual circuits (PVCs). This is called provisioning and is necessary for these line card types.
If you have configured any packet line cards (PLCs), then you are planning to use the LightStream network as an extended bridge. In this case, you can configure bridge and Virtual LAN Internetworking (VLI) attributes. However, you can't provision for any PVCs for the PLC. The PLC automatically establishes virtual circuits (VCs); this is called implicit set-up.
When you complete a configuration, you must save it to the global database. Then you can deploy it to the switches in your network. You specify the update time and date, and the configurator updates every switch's local configuration database, one at a time.

You can use the configurator to change or add to the global database file. When you set the update time, and save the configuration, additions are sent to the local switch to update local database files as scheduled.
The configurator lets you perform other simple operations: you can rename or delete database objects. The subsections that follow describe these manipulations and their effects on existing circuits.
If you update an operating node and the new data changes the attributes of existing ports or lines, the flow of traffic can be briefly interrupted. Therefore, the configurator allows you to specify a convenient time for the update.
You can change the name of any chassis, card, or port. Renaming has no effect on circuits.
You can remove any chassis or card from the configuration database. However, if any PVCs have been configured for the object, you must delete the PVCs first.
You cannot change the type of a card or port. For example, instead of changing an edge card to a trunk, or a low-speed line card to a medium-speed line card, you must delete the unwanted object and create a new one. (The only exception is that you can change between frame forwarding and frame relay for a low-speed card edge port.)
If you make changes to an existing configuration or create a new one, you must update the local database affected by the changes. To update a local database, you must select the update time and the type of update. You can choose an immediate update, in which case the configurator updates the local database immediately after you have saved the configuration. You can also specify some time in the future for the update. In that case, the configurator updates the switch at the specified time.
You must also choose the type of update. If you choose a full update, all attribute values are updated from the global database. If you choose to update only the changed attributes, then the configurator compares the global attribute values against the previous values in the global database that were last sent to the switch.
Updates to the local database are stored in each target NPs run-time memory and on its hard disk.
When a local database on a LightStream switch is updated, the new information becomes active immediately. Updating a local database of an operating node with a new configuration can cause brief interruptions of service on lines whose configurations are affected; therefore, the configurator can also be set to update the local database at a specified time. This allows you to select the most convenient time to make the changes.
You can use the configurator's verify function to retrieve information from run-time memory on a switch. You can either update the global database to incorporate all local changes or discard the local changes to keep the global database as it is. If you want to replace the local database setting with the global ones, then you update the local database as described in the previous section.
Some attributes can affect network performance and operation in subtle ways, and you must have an in-depth knowledge of the LightStream network to change them. An expert user, such as a system administrator, would typically use these attributes to fine-tune system or circuit performance.
In order to access these attributes, you must enter the configurator in expert mode. The configurator dialog boxes then provide access to these attributes. Appendix A explains how to enter expert mode, shows the screens that are affected, and explains the settings for expert-mode attributes.
You have to configure a LightStream switch for a wide variety of attributes. An attribute may be as straightforward as the chassis name and identification or a card type. It may also be more complicated and require an understanding of network operations, for instance, configuring endpoints of PVCs. In general, the types of information that you must configure fall into the following categories:
The following chapter provides some background information on these topics. However, we recommend that you read the LightStream 2020 System Overview before attempting to configure your LightStream switch. It provides much more detailed information on these critical concepts.
|
|