|
|

This chapter provides safety information and describes the tasks you must perform before you install the LightStream 100 ATM switch.
This chapter contains the following sections:
The following guidelines will help to ensure your general safety and protect the equipment:
 | Warning Class 1 laser product. To see this warning in multiple languages, refer to the "Class 1 Laser Product Warning" section in the "Translated Safety Warnings" appendix. |
| Warning Do not stare into the beam or view it directly with optical instruments. To see this warning in multiple languages, refer to the "Laser Beam Warning" section in the "Translated Safety Warnings" appendix. |
Follow these guidelines when working on equipment powered by electricity:
| Warning Before working on a chassis or working near power supplies, unplug the power cord on AC units; disconnect the power at the circuit breaker on DC units. To see this warning in multiple languages, refer to the "Power Supply Disconnection Warning" section in the "Translated Safety Warnings" appendix. |
| Warning The device is designed to work with TN power systems. To see this warning in multiple languages, refer to the "TN Power Warning" section in the "Translated Safety Warnings" appendix. |
Electrostatic discharge (ESD) can damage equipment and impair electrical circuitry. It occurs when electronic components are improperly handled and can result in complete or intermittent failures.
Always follow ESD-prevention procedures when removing and replacing components. Ensure that the chassis is electrically connected to earth ground. Wear an ESD-preventive wrist strap, ensuring that it makes good skin contact. Connect the clip to an unpainted chassis frame surface to safely channel unwanted ESD voltages to ground. To properly guard against ESD damage and shocks, the wrist strap and cord must operate effectively. If no wrist strap is available, ground yourself by touching the metal part of the chassis.
 | Caution For safety, periodically check the resistance value of the antistatic strap, which should be within the range of 1 and 10 megohms (Mohms). |
Install the LightStream 100 ATM switch in an area that meets the following conditions:
This section provides information about the contents of containers used to transport the LightStream 100 ATM switch.
The LightStream 100 switch comes in two containers: the LightStream 100 main unit container and the LINF card container. Ensure that the containers are labeled with each type of equipment before opening them.
The LightStream 100 main unit includes the following parts:
The LINF card box contains the LINF card set (a LINF card and front panel with window):
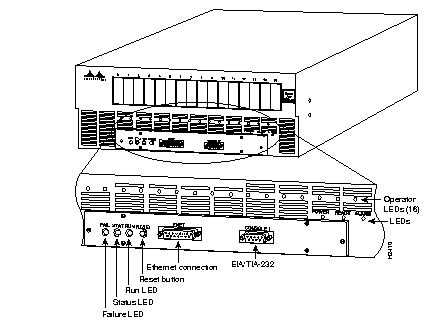
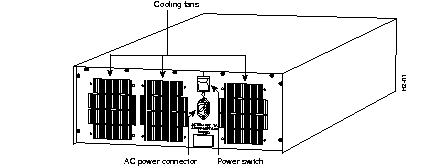
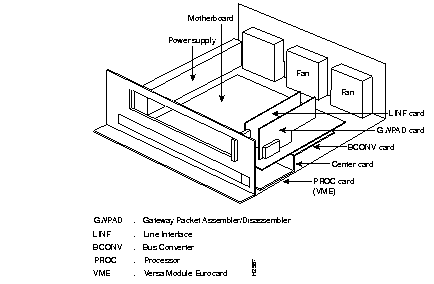
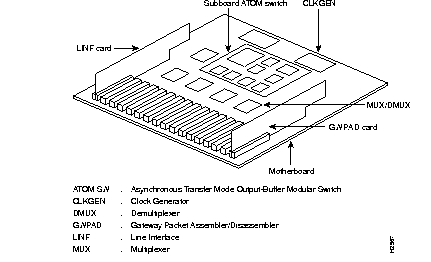
References throughout this publication refer to the LightStream 100 ATM switch front and rear panel layouts. Figure 2-1 shows the front panel layout, and Figure 2-2 shows the rear panel layout. Figure 2-3 and Figure 2-4 show LightStream 100 switch internal views.
|
|