|
|

Table Of Contents
Configuring WDS, Fast Secure Roaming, and Radio Management
Role of Access Points Using the WDS Access Point
Understanding Fast Secure Roaming
Understanding Radio Management
Configuring WDS and Fast Secure Roaming
Requirements for WDS and Fast Secure Roaming
Configuring the WMIC to use the WDS Access Point
Configuring the Authentication Server to Support Fast Secure Roaming
Using CLI Commands to Enable the WDS Server
Using CLI Commands to Enable the Root Device
Configuring WDS, Fast Secure Roaming, and Radio Management
This chapter describes how to configure access points for Wireless Domain Services (WDS), fast, secure roaming of client devices, and radio management. This chapter contains these sections:
•
Understanding Fast Secure Roaming
•
•
Understanding WDS
The following sections describe WDS even though the Cisco wireless mobile interface card (WMIC) cannot be configured as a WDS server even when it is configured as an access point. However, when configured as an access point, the WMIC can use a WDS server and can act as a WDS authenticator (client).
When you configure an access point to provide WDS, other access points (such as your WMIC, if it is configured as an access point) on your wireless LAN use the WDS access point to provide fast, secure roaming for client devices and to participate in radio management.
Fast, secure roaming provides rapid reauthentication when a client device roams from one access point to another, preventing delays in voice and other time-sensitive applications.
Access points participating in radio management forward information about the radio environment (such as possible rogue access points and client associations and disassociations) to the WDS access point. The WDS access point aggregates the information and forwards it to a wireless LAN solution engine (WLSE) device on your network.
Role of the WDS Access Point
The WDS access point performs several tasks on your wireless LAN:
•
•
•
•
Role of Access Points Using the WDS Access Point
The access points on your wireless LAN interact with the WDS access point in these activities:
•
•
•
•
Understanding Fast Secure Roaming
Access points in many wireless LANs serve mobile client devices that roam from access point to access point throughout the installation. Some applications running on client devices require fast reassociation when they roam to a different access point. Voice applications, for example, require seamless roaming to prevent delays and gaps in conversation.
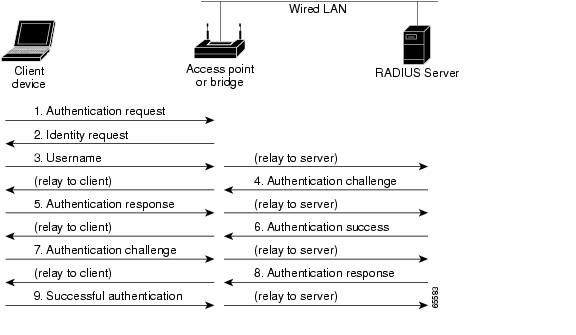
During normal operation, Light Extensible Authentications Protocol (LEAP)-enabled client devices mutually authenticate with a new access point by performing a complete LEAP authentication, including communication with the main RADIUS server, as in Figure 10-1.
Figure 10-1 Client Authentication Using a RADIUS Server
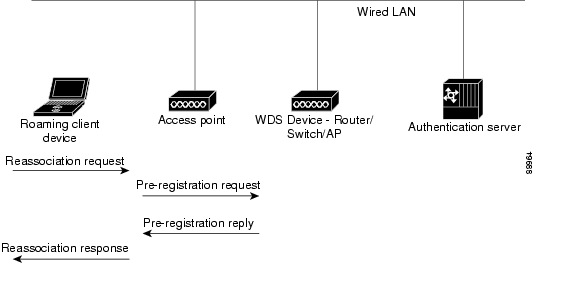
When you configure your wireless LAN for fast, secure roaming, however, LEAP-enabled client devices roam from one access point to another without involving the main server. Using Cisco Centralized Key Management (CCKM), an access point configured to provide WDS takes the place of the RADIUS server and authenticates the client so quickly that there is no perceptible delay in voice or other time-sensitive applications. Figure 10-2 shows client reassociation using CCKM.
Figure 10-2 Client Reassociation Using CCKM and a WDS Access Point
The WDS access point maintains a cache of credentials for CCKM-capable client devices on your wireless LAN. When a CCKM-capable client roams from one access point to another, the client sends a reassociation request to the new access point, and the new access point relays the request to the WDS access point. The WDS access point forwards the client's credentials to the new access point, and the new access point sends the reassociation response to the client. Only two packets pass between the client and the new access point, greatly shortening the reassociation time. The client also uses the reassociation response to generate the unicast key.
Understanding Radio Management
Access points participating in radio management scan the radio environment and send reports to the WDS access point on such radio information as potential rogue access points, associated clients, client signal strengths, and the radio signals from other access points. The WDS access point forwards the aggregated radio data to the WLSE device on your network. Access points participating in radio management also assist with the self-healing wireless LAN, automatically adjusting settings to provide coverage in case a nearby access point fails.
Configuring WDS and Fast Secure Roaming
This section describes how to configure WDS and fast, secure roaming on your wireless LAN. This section provides information on the following topics:
•
•
•
•
•
•
Guidelines for WDS
You cannot configure your WMIC as a WDS access point. However, when you configure your WMIC as an access point, you can also configure it to use the WDS access point.
Requirements for WDS and Fast Secure Roaming
The wireless LAN on which your WMIC resides must meet these requirements:
•
•
•
•
•
Configuring the WMIC to use the WDS Access Point
Your WMIC must be configured as an access point before you can configure it to use WDS. Configure the WMIC to authenticate through the WDS access point and participate in CCKM.
AP# configure terminalAP(config)# wlccp ap username APWestWing password 7 wes7win8AP(config)# endIn this example, the WMIC is enabled to interact with the WDS access point, and it authenticates to your authentication server using APWestWing as its username and wes7win8 as its password. You must configure the same username and password pair when you set up the access point as a client on your authentication server.
Also, to configure an access point to use a WDS access point, the access point must be configured for an encryption cipher and authentication methods. For example:
encryption mode ciphers ckip-cmic!ssid kin_leapauthentication network-eap eap_methodsauthentication key-management cckmSee Chapter 9, "Configuring Authentication Types," for more information.
Configuring the Authentication Server to Support Fast Secure Roaming
The WDS access point and all access points participating in CCKM must authenticate to your authentication server. On your server, you must configure usernames and passwords for the access points and a username and password for the WDS access point.
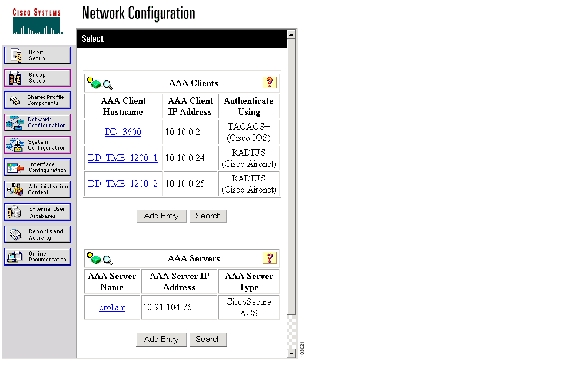
Follow these steps to configure the access points on your server:
Step 1
Figure 10-3 Network Configuration Page
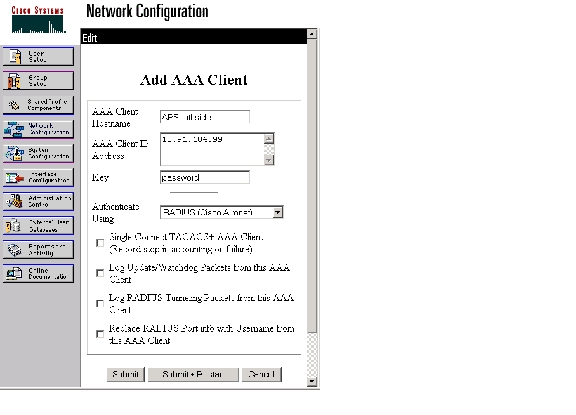
Step 2
Figure 10-4 Add AAA Client Page
Step 3
Step 4
Step 5
Step 6
Step 7
Step 8
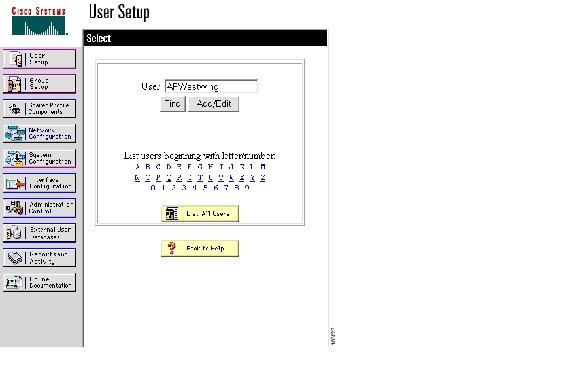
Step 9
Figure 10-5 User Setup Page
Step 10
Step 11
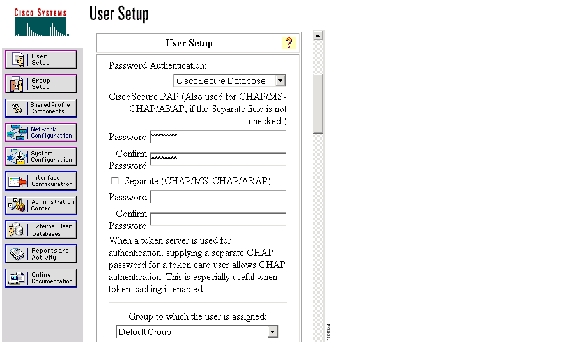
Step 12
Figure 10-6 ACS User Setup Box
Step 13
Step 14
Step 15
Step 16
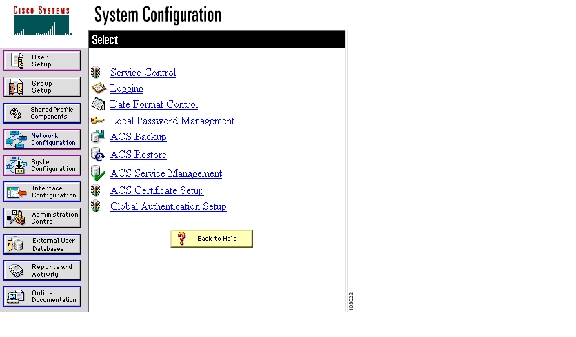
Step 17
Figure 10-7 ACS System Configuration Page
Using CLI Commands to Enable the WDS Server
The following command-line interface (CLI) commands are required to enable the WDS server. The no form of the commands disables the WDS server. The same configuration applies for Central WDS server and per subnet WDS server.
[no] wlccp wds priority <1-255> interface BVI1[no] wlccp authentication-server infrastructure <method_infra>where <method_infra> is <authentication server list name>[no] wlccp authentication-server client [any | eap | leap | mac] <method_client>where <method_ client > is <authentication server list name>[no] aaa group server radius infra[no] server <IP address of RADIUS server> auth-port <Port number> acct-port <Port number>[no] aaa group server radius client[no] server <IP address of RADIUS server> auth-port <Port number> acct-port <Port number>[no] aaa authentication login <method_infra> group infrawhere <method_infra> is <named authentication list>[no] aaa authentication login <method_client> group clientwhere <method_ client > is <named authentication list>Using CLI Commands to Enable the Root Device
The following CLI commands are required to enable the root device to communicate with the Central WDS server. The no form disables the WDS server. This configuration also allows the root device to authenticate with per subnet WDS server if the Central WDS server fails.
[no] wlccp ap wds ip address <IP address of the WDS>[no] wlccp ap username <WLCCP user name> password 0 <The UNENCRYPTED (cleartext) LEAP password>[no] interface Dot11Radio0[no] encryption mode ciphers [aes-ccm | tkip | wep128 | wep40][no] ssid <radio Service Set ID>[no] authentication network-eap <eap_methods>where <eap_methods> is <leap list name>[no] authentication key-management cckm[no] aaa group server radius rad_eap[no] server <IP address of RADIUS server> auth-port <Port number> acct-port <Port number>[no] aaa authentication login <eap_methods> group rad_eapwhere <eap_methods> is <named authentication list>
The authentication network-eap <eap_methods> command allows traffic to and from the client while it is being authenticated by the root device. This command should be entered on all the root devices located in zone boundaries and on all the clients.
authentication network-eap <eap_methods> <non-blocking>where <non-blocking> allows a client to send or receive traffic while the root device is authenticating the client.
To enable blocking of client traffic during authentication, enter the command without the non-blocking keyword.
authentication network-eap <eap_methods>Refer to http://www.cisco.com/univercd/cc/td/doc/product/software/ios123/123cgcr/ibm_r1/ib1_a1g.pdf for details on configuring access control lists on an access point to allow clients to send traffic to a home agent only.
Refer to http://www.cisco.com/univercd/cc/td/doc/product/software/ios123/123cgcr/iprmb_r/ip4bookg.pdf for details on Mobile IP configuration commands.
Refer to http://www.cisco.com/univercd/cc/td/doc/product/software/ios123/123newft/123t/123t_7/gtfamoip.htm for details on the foreign agent local routing feature and its configuration details.
dot11 interface speed Command
The dot11 interface speed command supports only 4.9-GHz data rates. The configured spacing has precedence over the default spacing. For example, if 5-MHz spacing is configured, only data rates corresponding to 5-MHz spacing can be specified in the speed command. If an incorrect data rate is specified for the currently configured spacing, an error message appears, "Incorrect data rate for currently configured spacing."
[no] interface Dot11Radio0
[no] speed <data rate>
where data rate can be one of the following:
Table 10-1 summarizes data rates in the 4.9-GHz bands.
Table 10-1 Data Rates
1.5
Allow 1.5 Mbps
5-MHz
2.25
Allow 2.25 Mbps
5-MHz
3.0
Allow 3.0 Mbps
5-MHz and 10-MHz
4.5
Allow 4.5 Mbps
5-MHz and 10-MHz
6.0
Allow 6.0 Mbps
5-MHz and 10-MHz
9.0
Allow 9.0 Mbps
5-MHz and 10-MHz
12.0
Allow 12.0 Mbps
5-MHz and 10-MHz
13.5
Allow 13.5 Mbps
5-MHz
18.0
Allow 18.0 Mbps
10-MHz
24.0
Allow 24.0 Mbps
10-MHz
27.0
Allow 27.0 Mbps
10-MHz
basic-1.5
Require 1.5 Mbps
5-MHz
basic-2.25
Require 2.25 Mbps
5-MHz
basic-3.0
Require 3 Mbps
5-MHz and 10-MHz
basic-4.5
Require 4.5 Mbps
5-MHz and 10-MHz
basic-6.0
Require 6 Mbps
5-MHz and 10-MHz
basic-9.0
Require 9 Mbps
5-MHz and 10-MHz
basic-12.0
Require 12 Mbps
5-MHz and 10-MHz
basic-13.5
Require 13.5 Mbps
5-MHz
basic-18.0
Require 18 Mbps
10-MHz
basic-24.0
Require 24 Mbps
10-MHz
basic-27.0
Require 27 Mbps
10-MHz
default
Set default rates
Table 10-2 shows the default rates.
range
Set rates for best range
Table 10-2 shows the best range.
throughput
Set rates for best throughput
Table 10-2 shows the best throughput rates.
Viewing WDS Information
On the CLI in privileged exec mode, use these commands to view information about the current WDS access point and other access points participating in CCKM:
Using Debug Messages
In privileged exec mode, use these debug commands to control the display of debug messages for devices interacting with the WDS access point:
![]()
![]()
![]()
![]()
![]()
![]()
![]()
![]()
Posted: Wed Feb 13 22:51:52 PST 2008
All contents are Copyright © 1992--2008 Cisco Systems, Inc. All rights reserved.
Important Notices and Privacy Statement.