|
|

Table Of Contents
Configuring Authentication Types
Understanding Authentication Types
Open Authentication to the WMIC
Shared Key Authentication to the WMIC
EAP Authentication to the Network
MAC Address Authentication to the Network
Configuring Certificates Using the crypto pki CLI
Configuration Using the Cut and Paste Method
Configuration Using the TFTP Method
Adding the Trustpoint to the dot1x Credentials
Configuring Authentication Types
Default Authentication Settings
Assigning Authentication Types to an SSID
Configuring Authentication Holdoffs, Timeouts, and Intervals
Matching Authentication Types on Root Devices and Non-Root Bridges
Configuring Authentication Types
This chapter describes how to configure authentication types on the Cisco wireless mobile interface card (WMIC). This chapter contains the following sections:
•
Understanding Authentication Types
•
•
•
Understanding Authentication Types
This section describes the authentication types that you can configure on the WMIC. The authentication types are tied to the service set identifier (SSID) that you configure on the WMIC.
Before wireless devices can communicate, they must authenticate to each other using open, 802.1x/Extensible Authentication Protocol (EAP)-based or shared key authentication. Among these authentication types, for maximum security, wireless devices should authenticate using EAP authentication, which relies on an authentication server on the network. The supplicant and the back-end RADIUS authenticate each other using the certificates for each other that are obtained from the same CA server.
The WMIC uses four authentication mechanisms or types and can use more than one at the same time:
•
•
•
•
Open Authentication to the WMIC
Open authentication allows any wireless device to authenticate and then attempt to communicate with another wireless device. Open authentication does not rely on a RADIUS server on your network.
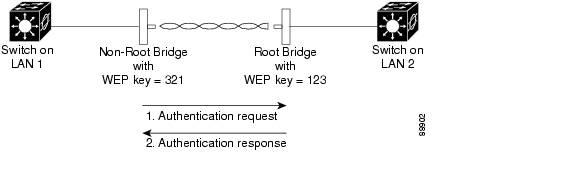
Figure 9-1 shows the authentication sequence between a non-root bridge and a root device using open authentication. In this example, the non-root bridge's WEP key does not match the bridge's key, so it can authenticate but it cannot pass data.
Figure 9-1 Sequence for Open Authentication
Shared Key Authentication to the WMIC
Cisco provides shared key authentication to comply with the IEEE 802.11b and IEEE 802.11g standards. However, because of shared key's security flaws, we recommend that you use another method of authentication, such as EAP, in environments in which security is an issue.
During shared key authentication, the root device sends an unencrypted challenge text string to the client device that is attempting to communicate with the root device. The client device that is requesting authentication encrypts the challenge text and then sends it back to the root device.
Both the unencrypted challenge and the encrypted challenge can be monitored, however, which leaves the root device open to attack from an intruder who can calculate the WEP key by comparing the unencrypted and encrypted text strings.
Figure 9-2 shows the authentication sequence between a device trying to authenticate and a bridge using shared key authentication. In this example the device's WEP key matches the bridge's key, so it can both authenticate and communicate.
Figure 9-2 Sequence for Shared Key Authentication
EAP Authentication to the Network
EAP authentication to the network provides the highest level of security for a wireless network. By using the Extensible Authentication Protocol (EAP) to interact with an EAP-compatible RADIUS server, the root device helps the authenticating device and the RADIUS server perform mutual authentication and derive a dynamic session key, which the root device and the authenticating device use to further derive the unicast key. The root generates the broadcast key and sends it to the authenticating device after encrypting it with unicast key. The unicast key is used to exchange unicast data between the root device and authenticated device, and the broadcast key is used to exchange multicast and broadcast data between them.
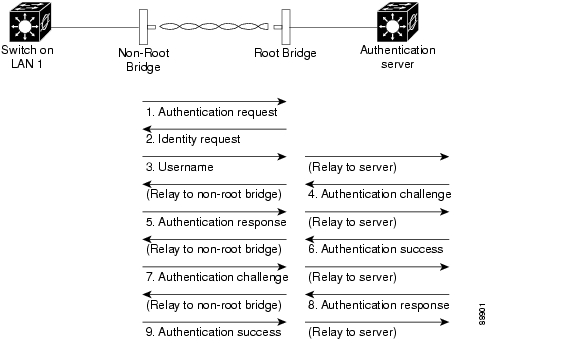
When you enable EAP on your bridges, authentication to the network occurs in the sequence shown in Figure 9-3.
Figure 9-3 Sequence for EAP Authentication
In Figure 9-3, a non-root bridge and a RADIUS server on a wired LAN use 802.1x and EAP to perform a mutual authentication through the root device. The RADIUS server sends an authentication challenge to the non-root bridge. The non-root bridge uses a one-way encryption of the user-supplied password to generate a response to the challenge and sends that response to the RADIUS server. Using information from its user database, the RADIUS server creates its own response and compares that to the response from the non-root bridge. When the RADIUS server authenticates the non-root bridge, the process repeats in reverse, and the non-root bridge authenticates the RADIUS server.
When mutual authentication is complete, the RADIUS server and the non-root bridge determine a session key that is unique to this session between the RADIUS server and the non-root bridge and that provides the non-root bridge with an appropriate level of network access. The RADIUS server encrypts and sends the session key over the wired LAN to the root device. The root device and the non-root bridge derive the unicast key from this session key. The root generates the broadcast key and sends it to the non-root bridge after encrypting it with the unicast key. The non-root bridge uses the unicast key to decrypt it. The non-root bridge and the root device activate WEP and use the unicast and broadcast WEP keys for all communications during the remainder of the session.
There is more than one type of EAP authentication, but the bridge behaves the same way for each type. It relays authentication messages from the wireless client device to the RADIUS server and from the RADIUS server to the wireless client device. See the "Assigning Authentication Types to an SSID" section for instructions on setting up EAP on the WMIC.
Note
EAP-TLS
EAP-Transport Layer Security (TLS) uses public key infrastructure (PKI) to acquire and validate digital certificates. A digital certificate is a cryptographically signed structure that guarantees the association between at least one identifier and a public key. It is valid for a limited time period and use, subject to certificate policy conditions. The Certificate Authority (CA) issues certificates to client and server.
The supplicant and the back-end RADIUS server must both support EAP-TLS authentication. The root device acts as an AAA client and is also known as the network access server (NAS). The root devices must support 802.1x/EAP authentication process although they are not aware of the EAP authentication protocol type. The NAS tunnels the authentication messages between the peer (user machine trying to authenticate) and the AAA server (such as the Cisco ACS). The NAS is aware of the EAP authentication process only when it starts and ends.
The following notes apply to EAP-TLS authentication:
•
•
•
•
EAP-FAST
Extensible Authentication Protocol-Flexible Authentication via Secure Tunneling (EAP-FAST) encrypts EAP transactions within a TLS tunnel. The TLS tunnel encryption helps prevent dictionary attacks that are possible using Light Extensible Authentication Protocol (LEAP). The EAP-FAST tunnel is established using shared secret keys that are unique to users. Because handshakes based upon shared secrets are intrinsically faster than handshakes based upon a PKI infrastructure, EAP-FAST is significantly faster than Protected Extensible Authentication Protocol (PEAP) and EAP-TLS.
EAP-FAST operates in three phases:
•
•
•
After successful client authentication to the EAP-FAST server, a RADIUS Access-accept message is passed to the root device (along with the master session key) and an EAP success message is generated at the root device (as with other EAP authentication protocols). Upon receipt of the EAP-success packet, the client derives a session key using an algorithm that is complementary to that used at the server to generate the session key passed to the root device.
EAP-TTLS
EAP-Tunneled TLS (TTLS) is an 802.1X authentication type supported by Funk Software. It uses TLS (server certificates) and supports a variety of client authentication mechanisms, including legacy mechanisms. EAP-TTLS supports both username/password and mutual authentication.
MAC Address Authentication to the Network
The access point relays the wireless client device's MAC address to a RADIUS server on the network, and the server checks the address against a list of allowed MAC addresses. Because intruders can create counterfeit MAC addresses, MAC-based authentication is less secure than EAP authentication. However, MAC-based authentication does provide an alternate authentication method for client devices that do not have EAP capability.
Tip
Tip
Using CCKM Key Management
Using Cisco Centralized Key Management (CCKM), EAP-authenticated client devices can roam from one root device to another without any perceptible delay during reassociation. A root device or switch on the network provides Wireless Domain Services (WDS) and creates a cache of security credentials for CCKM-enabled devices on the subnet. The WDS device's cache of credentials dramatically reduces the time required for reassociation when a CCKM-enabled client device roams to a new root device.
When a client device roams and tries to reassociate to a root device served by the same WDS device that served the previous root device, the WDS device authenticates the client by using its cache of clients' credentials rather than requiring the RADIUS server to authenticate the client. The reassociation process is reduced to a two-packet exchange between the roaming client device and the new root device. Roaming client devices reassociate quickly enough for there to be no perceptible delay in voice or other time-sensitive applications
See the "Assigning Authentication Types to an SSID" section for instructions on enabling CCKM on your bridge.
Using WPA Key Management
Wi-Fi Protected Access (WPA) is a standards-based, interoperable security enhancement that strongly increases the level of data protection and access control for existing and future wireless LAN systems. It is derived from the IEEE 802.11i standard. WPA leverages Temporal Key Integrity Protocol (TKIP) and/or Advanced Encryption Standard (AES) for data protection.
WPA key management supports two mutually exclusive management types: WPA and WPA-pre-shared key (WPA-PSK). Using WPA key management, the client device and the authentication server authenticate with each other using the EAP authentication method, and the client device and server generate a pairwise master key (PMK). Using WPA, the server generates the PMK dynamically and passes it to the root device. With WPA-PSK, you configure a pre-shared key on both the client device and the root device, and that pre-shared key is used as the PMK.
Note
See the "Assigning Authentication Types to an SSID" section for instructions on configuring WPA key management on your bridge.
Configuring Certificates Using the crypto pki CLI
This section explains how to import CA and router certificates using the crypto PKI CLI and how to add a trustpoint to the dot1x credentials. Before any PKI operations can begin, the CA generates its own public key pair and creates a self-signed CA certificate; thereafter, the CA can sign certificate requests and begin peer enrollment for the PKI.
Note
You can import the CA and router certificates in any of the following ways:
•
•
•
Configuration Using the Cut and Paste Method
To manually configure a trustpoint and import the CA and router certificate, follow these steps:
The following example shows the manual configuration method:
maldives-ap#maldives-ap#conf tEnter configuration commands, one per line. End with CNTL/Z.maldives-ap(config)#crypto pki trustpoint TFTP-CUT-PASTEmaldives-ap(ca-trustpoint)#enrollment terminalmaldives-ap(ca-trustpoint)#rsakeypair manual-keys 1024maldives-ap(ca-trustpoint)#exit!maldives-ap#show run...crypto pki trustpoint TEST-TFTPenrollment terminalrsakeypair manual-keys 1024!After the trustpoint was defined for enrollment via the terminal, the CA certificate must be imported:maldives-ap(config)#crypto pki authenticate TFTP-CUT-PASTEEnter the base 64 encoded CA certificate.End with a blank line or the word "quit" on a line by itself-----BEGIN CERTIFICATE-----MIIC5zCCApGgAwIBAgIQdngf6fp6ZqdEX1QPnzgqiDANBgkqhkiG9w0BAQUFADB9MQswCQYDVQQGEwJBVTEMMAoGA1UECBMDTlNXMQ8wDQYDVQQHEwZTeWRuZXkxFjAUBgNVBAoTDUNpc2NvIFN5c3RlbXMxFDASBgNVBAsTC1dOQlUgU3lkbmV5MSEwHwYDVQQDExh3bmJ1LXN5ZC1hY3MtYS5jaXNjby5jb20wHhcNMDUwNjE1MDQ1MzQ5WhcNMDgwNjE1MDUwMzM0WjB9MQswCQYDVQQGEwJBVTEMMAoGA1UECBMDTlNXMQ8wDQYDVQQHEwZTeWRuZXkxFjAUBgNVBAoTDUNpc2NvIFN5c3RlbXMxFDASBgNVBAsTC1dOQlUgU3lkbmV5MSEwHwYDVQQDExh3bmJ1LXN5ZC1hY3MtYS5jaXNjby5jb20wXDANBgkqhkiG9w0BAQEFAANLADBIAkEAnDZq1u+RhYyC8uNdsuXDwOve1yEZvKJerrb6XFVyJZV4jfSKSnZ2ZRNf3VX3NcRyQxKSszgCHMGcUyBnH350ZwIDAQABo4HsMIHpMAsGA1UdDwQEAwIBxjAPBgNVHRMBAf8EBTADAQH/MB0GA1UdDgQWBBSB9hMkazhsebKHX3b9qw8VPilQRzCBlwYDVR0fBIGPMIGMMEOgQaA/hj1odHRwOi8vd25idS1zeWQtYWNzLWEvQ2VydEVucm9sbC93bmJ1LXN5ZC1hY3MtYS5jaXNjby5jb20uY3JsMEWgQ6BBhj9maWxlOi8vXFx3bmJ1LXN5ZC1hY3MtYVxDZXJ0RW5yb2xsXHduYnUtc3lkLWFjcy1hLmNpc2NvLmNvbS5jcmwwEAYJKwYBBAGCNxUBBAMCAQAwDQYJKoZIhvcNAQEFBQADQQA7G8rL3ZHFfc3EdeklxMz72qdSnXg05uZZ51USuAMJKc1rGJUTC0Bkre8+ov2xmZGVHC8xOpDk7bZzs/iinLnq-----END CERTIFICATE-----quitCertificate has the following attributes:Fingerprint: 45EC6866 A66B4D8F 2E05960F BC5C1B76% Do you accept this certificate? [yes/no]: yesTrustpoint CA certificate accepted.% Certificate successfully importedThe next step is to generate the keys and an enrollment request (see below). Note that although it is possible to explicitly generate the keys, it is not necessary as the enrollment process will automatically generate (or re-generate if previously configured) the required keys. This request must then be submitted to the Certificate Authority to have it signed and a certificate issued.maldives-ap(config)#crypto pki enroll TEST-CUT-PASTE% Start certificate enrollment..% The fully-qualified domain name in the certificate will be: maldives-ap.cisco.com% The subject name in the certificate will be: maldives-ap.cisco.com% Include the router serial number in the subject name? [yes/no]:yesJun 29 12:17:08.232: %CRYPTO-6-AUTOGEN: Generated new 1024 bit key pair% The serial number in the certificate will be: 80AD5AD4% Include an IP address in the subject name? [no]:Display Certificate Request to terminal? [yes/no]: yesCertificate Request follows:MIIBmDCCAQECAQAwNzE1MA8GA1UEBRMIODBBRDVBRDQwIgYJKoZIhvcNAQkCFhVtYWxkaXZlcy1hcC5jaXNjby5jb20wgZ8wDQYJKoZIhvcNAQEBBQADgY0AMIGJAoGBAOexwH9eW7n+3MEivmSHpBO3kqSdvZnf5dvOKyVoy8ZJpM2O6j0jfzOTD3IxHeQEMUiEzWKybt2k/HQTuND+zVhbgWQd9J3JnCrvUMij48fV7MydyZYQ2eHDgQEN64d4RBPFi51C+2xX1SzELJfGU2oxeQ6AsW/A/2S7GCycFW7rAgMBAAGgITAfBgkqhkiG9w0BCQ4xEjAQMA4GA1UdDwEB/wQEAwIFoDANBgkqhkiG9w0BAQQFAAOBgQBoph/jDHMh7U4yN0lYUS3OfpCtDl8e5QBp1MFYqMDP4aWeL/AdKVTNWBBElQh+M96uMyY2/AEwFfsJsU1q6u3Kg4kJWht8F7a60OhQRfQ1CSiy18Z9vqA4KY15hbWhwj3JtuTAkpqCzR30u+auN7WuS/PnVr+vnSCMt69P6wLHHw==---End - This line not part of the certificate request---Redisplay enrollment request? [yes/no]: nomaldives-ap(config)#After the certificate (or multiple certificates if separate signature and encryption certs are required) is issued by the CA, it must be imported into the device via:maldives-ap(config)#crypto pki import ?WORD Trustpoint label to associate certificate or pkcs-12 file withmaldives-ap(config)#crypto pki import TEST-CUT-PASTE ?certificate Import a certificate from a TFTP server or the terminalpem Import from PEM filespkcs12 Import from PKCS12 filemaldives-ap(config)#crypto pki import TEST-CUT-PASTE certificate% The fully-qualified domain name in the certificate will be: maldives-ap.cisco.comEnter the base 64 encoded certificate.End with a blank line or the word "quit" on a line by itself-----BEGIN CERTIFICATE-----MIIERjCCA/CgAwIBAgIKHVHsoQAAAAAAJzANBgkqhkiG9w0BAQUFADB9MQswCQYDVQQGEwJBVTEMMAoGA1UECBMDTlNXMQ8wDQYDVQQHEwZTeWRuZXkxFjAUBgNVBAoTDUNpc2NvIFN5c3RlbXMxFDASBgNVBAsTC1dOQlUgU3lkbmV5MSEwHwYDVQQDExh3bmJ1LXN5ZC1hY3MtYS5jaXNjby5jb20wHhcNMDUwNjI5MDExMzQyWhcNMDYwNjI5MDEyMzQyWjA5MREwDwYDVQQFEwg4MEFENUFENDEkMCIGCSqGSIb3DQEJAhMVbWFsZGl2ZXMtYXAuY2lzY28uY29tMIGfMA0GCSqGSIb3DQEBAQUAA4GNADCBiQKBgQDnscB/Xlu5/tzBIr5kh6QTt5Kknb2Z3+XbzislaMvGSaTNjuo9I38zkw9yMR3kBDFIhM1ism7dpPx0E7jQ/s1YW4FkHfSdyZwq71DIo+PH1ezMncmWENnhw4EBDeuHeEQTxYudQvtsV9UsxCyXxlNqMXkOgLFvwP9kuxgsnBVu6wIDAQABo4ICUDCCAkwwDgYDVR0PAQH/BAQDAgWgMB0GA1UdDgQWBBRdEW6dE+j3/3/CCJrjDCzA9r47oDCBtwYDVR0jBIGvMIGsgBSB9hMkazhsebKHX3b9qw8VPilQR6GBgaR/MH0xCzAJBgNVBAYTAkFVMQwwCgYDVQQIEwNOU1cxDzANBgNVBAcTBlN5ZG5leTEWMBQGA1UEChMNQ2lzY28gU3lzdGVtczEUMBIGA1UECxMLV05CVSBTeWRuZXkxITAfBgNVBAMTGHduYnUtc3lkLWFjcy1hLmNpc2NvLmNvbYIQdngf6fp6ZqdEX1QPnzgqiDCBlwYDVR0fBIGPMIGMMEOgQaA/hj1odHRwOi8vd25idS1zeWQtYWNzLWEvQ2VydEVucm9sbC93bmJ1LXN5ZC1hY3MtYS5jaXNjby5jb20uY3JsMEWgQ6BBhj9maWxlOi8vXFx3bmJ1LXN5ZC1hY3MtYVxDZXJ0RW5yb2xsXHduYnUtc3lkLWFjcy1hLmNpc2NvLmNvbS5jcmwwgcYGCCsGAQUFBwEBBIG5MIG2MFgGCCsGAQUFBzAChkxodHRwOi8vd25idS1zeWQtYWNzLWEvQ2VydEVucm9sbC93bmJ1LXN5ZC1hY3MtYV93bmJ1LXN5ZC1hY3MtYS5jaXNjby5jb20uY3J0MFoGCCsGAQUFBzAChk5maWxlOi8vXFx3bmJ1LXN5ZC1hY3MtYVxDZXJ0RW5yb2xsXHduYnUtc3lkLWFjcy1hX3duYnUtc3lkLWFjcy1hLmNpc2NvLmNvbS5jcnQwDQYJKoZIhvcNAQEFBQADQQCEqZgEAMExlMAiQ3aOiajY/NjuKeXXA5yMsTxQIWxVmj+o1U4T2dvYk60/ab/9hV1n6h3msKVcoYUFj8otLtAs-----END CERTIFICATE-----quit% Router Certificate successfully importedThe following show commands can be used to view the trustpoint and certificates status:maldives-ap#sh crypto pki trust TEST-CUT-PASTETrustpoint TEST-CUT-PASTE:Subject Name:cn=wnbu-syd-acs-a.cisco.comou=WNBU Sydneyo=Cisco Systemsl=Sydneyst=NSWc=AUSerial Number: 76781FE9FA7A66A7445F540F9F382A88Certificate configured.maldives-ap#show crypto pki cert TEST-CUT-PASTECertificateStatus: AvailableCertificate Serial Number: 1D51ECA1000000000027Certificate Usage: General PurposeIssuer:cn=wnbu-syd-acs-a.cisco.comou=WNBU Sydneyo=Cisco Systemsl=Sydneyst=NSWc=AUSubject:Name: maldives-ap.cisco.comSerial Number: 80AD5AD4hostname=maldives-ap.cisco.comserialNumber=80AD5AD4CRL Distribution Point:http://wnbu-syd-acs-a/CertEnroll/wnbu-syd-acs-a.cisco.com.crlValidity Date:start date: 12:13:42 AEST Jun 29 2005end date: 12:23:42 AEST Jun 29 2006renew date: 11:00:00 AEST Jan 1 1970Associated Trustpoints: TEST-CUT-PASTEConfiguration Using the TFTP Method
TFTP certificate enrollment is similar to manual enrollment, except that a TFTP server supplies the CA and router certificates. To use TFTP, follow these steps, beginning in privileged EXEC mode:
Note the following regarding the TFTP method:
•
•
•
•
The following example shows the TFTP configuration method:
maldives-ap#show run...crypto pki trustpoint TEST-TFTPenrollment url tftp://10.67.64.21/ndupreez/my-acsrevocation-check crlrsakeypair 1024Configuration Using SCEP
Configuration using Certificate Enrollment Protocol (SCEP) is available when a Windows 2003 server is used as the CA server, and is a convenient way of importing CA and router certificates. Follow these steps to use SCEP:
Tip
It is recommended that you use Windows Server 2003 Enterprise Edition as the Windows operating system when SCEP is selected to acquire a certificate under the Enterprise Certificate Server (CA) mode for the Windows CA server that works with the Cisco ACS server. Windows Server 2003 Enterprise Edition allows the modification of the CA server template. For use of SCEP with the Enterprise CA server, you must modify the IPSec template (offline request) so that its enhanced key usage extension is same as that for the user template. Use certtmpl.msc to modify the template and ertsrv.msc to install the modified template.
The following example shows SCEP certificate enrollment:
maldives-ap#maldives-ap#conf tEnter configuration commands, one per line. End with CNTL/Z.maldives-ap(config)#crypto pki trustpoint TEST-SCEPmaldives-ap(ca-trustpoint)#enrollment url http://10.67.73.11/certsrv/mscep/mscep.dllmaldives-ap(ca-trustpoint)#rsakeypair scep-keys 1024maldives-ap(ca-trustpoint)#exitmaldives-ap(config)#!maldives-ap#show run...crypto pki trustpoint TEST-SCEPenrollment mode raenrollment url http://10.67.73.11:80/certsrv/mscep/mscep.dllserial-numberip-address BVI1revocation-check crlrsakeypair scep-keys 1024!And to retrieve the CA certificate:maldives-ap(config)#crypto pki authenticate TEST-SCEPCertificate has the following attributes:Fingerprint: 45EC6866 A66B4D8F 2E05960F BC5C1B76% Do you accept this certificate? [yes/no]: yesTrustpoint CA certificate accepted.maldives-ap(config)#Finally to enroll the router certificate(s):maldives-ap(config)#maldives-ap(config)#crypto pki enroll TEST-SCEP%% Start certificate enrollment..% Create a challenge password. You will need to verbally provide thispassword to the CA Administrator in order to revoke your certificate.For security reasons your password will not be saved in the configuration.Please make a note of it.Password:Jun 29 13:18:46.606: %CRYPTO-6-AUTOGEN: Generated new 1024 bit key pairRe-enter password:% The fully-qualified domain name in the certificate will be: maldives-ap.cisco.com% The subject name in the certificate will be: maldives-ap.cisco.com% Include the router serial number in the subject name? [yes/no]: yes% The serial number in the certificate will be: 80AD5AD4% Include an IP address in the subject name? [no]: yesEnter Interface name or IP Address[]: BVI1Request certificate from CA? [yes/no]: yes% Certificate request sent to Certificate Authority% The certificate request fingerprint will be displayed.maldives-ap(config)#Jun 29 13:19:12.776: CRYPTO_PKI: Fingerprint: 6BF9EAC9 BE515B76 E7767395 8FA00FCCJun 29 13:19:12.776:Jun 29 13:19:15.161: %PKI-6-CERTRET: Certificate received from Certificate Authoritymaldives-ap(config)# endThe crypto show commands are used to view the certificates associated with the trustpoint, in this case both the CA and single router certificate:maldives-ap#show crypto pki cert TEST-SCEPCertificateStatus: AvailableCertificate Serial Number: 1D89524F000000000028Certificate Usage: General PurposeIssuer:cn=wnbu-syd-acs-a.cisco.comou=WNBU Sydneyo=Cisco Systemsl=Sydneyst=NSWc=AUSubject:Name: maldives-ap.cisco.comIP Address: 10.67.73.49Serial Number: 80AD5AD4hostname=maldives-ap.cisco.comipaddress=10.67.73.49serialNumber=80AD5AD4CRL Distribution Point:http://wnbu-syd-acs-a/CertEnroll/wnbu-syd-acs-a.cisco.com.crlValidity Date:start date: 13:14:13 AEST Jun 29 2005end date: 13:24:13 AEST Jun 29 2006Associated Trustpoints: TEST-SCEPCA CertificateStatus: AvailableCertificate Serial Number: 76781FE9FA7A66A7445F540F9F382A88Certificate Usage: SignatureIssuer:cn=wnbu-syd-acs-a.cisco.comou=WNBU Sydneyo=Cisco Systemsl=Sydneyst=NSWc=AUSubject:cn=wnbu-syd-acs-a.cisco.comou=WNBU Sydneyo=Cisco Systemsl=Sydneyst=NSWc=AUCRL Distribution Point:http://wnbu-syd-acs-a/CertEnroll/wnbu-syd-acs-a.cisco.com.crlValidity Date:start date: 15:53:49 AEST Jun 15 2005end date: 16:03:34 AEST Jun 15 2008Associated Trustpoints: TEST-SCEP WEBCERT-01Adding the Trustpoint to the dot1x Credentials
To specify the trustpoint to be used for the authentication, follow these steps:
Note
The following example shows how to specify a trustpoint:
keeling-ap#conf tEnter configuration commands, one per line. End with CNTL/Z.keeling-ap(config)#dot1x credentials testkeeling-ap(config-dot1x-creden)#username mynamekeeling-ap(config-dot1x-creden)#password mypasskeeling-ap(config-dot1x-creden)#pki-trustpoint TP_001keeling-ap(config-dot1x-creden)#endkeeling-ap#sh run | beg testdot1x credentials testusername mynamepassword 7 060B16314D5D1Apki-trustpoint TP_001Configuring Authentication Types
This section describes how to configure authentication types. You attach authentication types to the WMIC's SSID. See Chapter 5, "Configuring SSIDs," for details on setting up the WMIC SSID. This section contains these topics:
•
•
•
Default Authentication Settings
The default SSID on the WMIC is autoinstall. Table 9-1 shows the default authentication settings for the default SSID:
Assigning Authentication Types to an SSID
Beginning in privileged EXEC mode, follow these steps to configure authentication types for SSIDs on the root device:
Step 1
configure terminal
Enters global configuration mode.
Step 2
dot11 ssid ssid-string
Creates an SSID. The SSID can consist of up to 32 alphanumeric characters. SSIDs are case sensitive.
Note
Step 3
authentication open [mac-address list-name [alternate]] [[optional] eap list-name]
Sets the authentication type to open for this SSID. Open authentication allows any client device to authenticate and then attempt to communicate with the WMIC.
Note
•
Use the alternate keyword to allow client devices to join the network using either MAC or EAP authentication; clients that successfully complete either authentication are allowed to join the network.
•
Use the optional keyword to allow client devices using either open or EAP authentication to associate and become authenticated. This setting is used mainly by service providers that require special client accessibility.
Note
Step 4
authentication shared
[mac-address list-name] [eap list-name]Sets the authentication type for the SSID to shared key.
Note
Note
Note
•
•
Step 5
authentication network-eap list-name [mac-address list-name]
Sets the authentication type for the SSID to use EAP for authentication and key distribution.
Note
•
Step 6
authentication key-management {[wpa] [cckm]} [optional]
(Optional) Sets the key-management type for the SSID to WPA, CCKM, or both. If you use the optional keyword, client devices not configured for WPA or CCKM can use this SSID. If you do not use the optional keyword, only WPA or CCKM client devices are allowed to use the SSID.
To enable CCKM for an SSID, you must also enable Network-EAP authentication. To enable WPA for an SSID, you must also enable open authentication or Network-EAP or both.
Note
Note
Note
Note
Step 7
end
Returns to privileged EXEC mode.
Step 8
copy running-config startup-config
(Optional) Saves your entries in the configuration file.
Configuring Up 2.4 the WMIC Radio as an EAP Client
Beginning in privileged EXEC mode, follow these steps to configure authentication types for SSIDs on the non-root side:
Setting up a 2.4 WMIC as a EAP client requires three major steps:
•
•
•
To configure EAP authentication type for SSID on the client side, follow these steps, beginning in privileged EXEC mode:
Step 1
configure terminal
Enters global configuration mode.
Step 2
dot1x credentials profile
Creates a dot1x credentials profile and enters the dot1x credentials configuration submode.
Step 3
username name
Specifies the authentication user name for the WMIC.
Step 4
password password
Specifies the authentication password for the WMIC.
Step 5
crypto pki trustpoint name
Specifies the name of the trustpoint.
Step 6
exit
Returns to global configuration mode.
Step 7
eap profile profile-name-string
Creates the EAP profile.
Step 8
method [ fast | gtc | leap | md5 | mschapv2 | tls ]
Chooses an EAP authentication method for authentication purpose.
Note
Note
Step 9
exit
Returns to global configuration mode.
Step 10
dot11 ssid ssid-string
Enters global ssid mode.
Step 11
authentication network-eap list-name
(Optional) Sets the authentication type for the SSID to use EAP for authentication and key distribution.
Step 12
dot1x credentials profile
Specifies the dot1x credentials profile created in Step 2 and enters the dot1x credentials configuration submode.
Step 13
eap profile profile-name-string
Specifies the EAP profile created in Step 7.
Step 14
authentication key-management {[wpa] [cckm]} [optional]
(Optional) Sets the key-management type for the SSID to WPA, CCKM, or both. If you use the optional keyword, client devices not configured for WPA or CCKM can use this SSID. If you do not use the optional keyword, only WPA or CCKM client devices are allowed to use the SSID.
To enable CCKM for an SSID, you must also enable Network-EAP authentication. To enable WPA for an SSID, you must also enable Open authentication or Network-EAP or both.
Note
Note
Note
Note
Step 15
end
Returns to privileged EXEC mode.
Step 16
copy running-config startup-config
(Optional) Saves your entries in the configuration file.
Use the no form of the SSID commands to disable the SSID or to disable SSID features.
The following example sets authentication type for the SSID bridgeman to perform EAP authentication with AES encryption on the root device. The root device using this SSID attempts authentication using the EAP method name eap_adam. The example also shows the related RADIUS/AAA configuration on the root side.
bridge# configure terminalbridge(config)# dot11 ssid bridgemanbridge(config-ssid)# authentication network-eap eap_adambridge(config-ssid)# authentication key-management wpabridge(config-ssid)# infrastructure-ssidbridge(config-ssid)# exitbridge(config)# interface dot11radio 0bridge(config-if)# encryption mode ciphers aes-ccmbridge(config-if)# ssid bridgemanbridge(config-if)# endbridge# configure terminalbridge(config)# aaa new-modelbridge(config)# aaa group server radius rad_eapbridge(config-sg-radius)# server 13.1.1.99 auth-port 1645 acct-port 1646bridge(config)# aaa authentication login eap_adam group rad_eapbridge(config)# aaa session-id commonbridge(config)# radius-server host 13.1.1.99 auth-port 1645 acct-port 1646 key 7 141B1309bridge(config)# radius-server authorization permit missing Service-Typebridge(config)# ip radius source-interface BVI1bridge(config)# endThe following example sets the authentication type for the SSID bridgeman to perform EAP-TLS authentication with AES encryption on the client device (workgroup bridge or non-root bridge).
bridge# configure terminalbridge(config)# eap profile authProfilebridge(config-eap-profile)# method tlsbridge(config-eap-profile)# exitbridge(config)# dot1x credentials authCredentialsbridge(config-dot1x-creden)# username adambridge(config-dot1x-creden)# password adambridge(config-dot1x-creden)# exitbridge(config)# dot11 ssid bridgemanbridge(config-ssid)# authentication network-eap eap_adambridge(config-ssid)# authentication key-management wpabridge(config-ssid)# dot1x eap_profile authProfilebridge(config-ssid)# dot1x credentials authCredentialsbridge(config-ssid)# infrastructure-ssidbridge(config-ssid)# exitbridge(config)# interface dot11radio 0bridge(config-if)# encryption mode ciphers aes-ccmbridge(config-if)# ssid bridgemanbridge(config-if)# endbridge# configure terminalbridge(config)# aaa new-modelbridge(config)# aaa group server radius rad_eapbridge(config-sg-radius)# server 13.1.1.99 auth-port 1645 acct-port 1646bridge(config)# aaa authentication login eap_adam group rad_eapbridge(config)# aaa session-id commonbridge(config)# radius-server host 13.1.1.99 auth-port 1645 acct-port 1646 key 7 141B1309bridge(config)# radius-server authorization permit missing Service-Typebridge(config)# ip radius source-interface BVI1bridge(config)# endSetting Up a Non-Root Bridge as a LEAP Client for 4.9 WMIC Radios
For 4.9-GHz radios, you can set up a non-root bridge to authenticate to your network like other wireless client devices. After you provide a network username and password for the non-root bridge, it authenticates to your network using LEAP, the Cisco wireless authentication protocol, and receives and uses dynamic WEP keys.
Setting up a non-root bridge as a LEAP client requires three main steps:
1.
2.
3.
Beginning in privileged EXEC mode, follow these steps to configure authentication types for SSIDs on the non-root side:
Step 1
configure terminal
Enters global configuration mode.
Step 2
dot11 ssid ssid-string
Enters global SSID mode.
Step 3
authentication network-eap list-name
(Optional) Sets the authentication type for the SSID to use LEAP for authentication and key distribution. Cisco bridges support only LEAP, while other wireless clients may support other EAP methods such as EAP, PEAP, or TLS.
Step 4
authentication client username username password password
Specifies the user name and password for the LEAP client.
Step 5
authentication key-management {[wpa] [cckm]} [optional]
(Optional) Sets the key management type for the SSID to WPA, CCKM, or both. If you use the optional keyword, non-root bridges not configured for WPA or CCKM can use this SSID. If you do not use the optional keyword, only WPA or CCKM bridges are allowed to use the SSID.
To enable CCKM for an SSID, you must also enable Network-EAP authentication. To enable WPA for an SSID, you must also enable open authentication or Network-EAP or both.
Note
Note
Note
Note
Step 6
end
Returns to privileged EXEC mode.
Step 7
copy running-config startup-config
(Optional) Saves your entries in the configuration file.
The following example sets authentication type for the SSID bridgeman to perform LEAP authentication with AES encryption on the client device (workgroup bridge or non-root bridge).
bridge(config)# interface dot11radio 0bridge(config-if)# encryption mode ciphers aes-ccmbridge(config)# dot11 ssid bridgemanbridge(config-ssid)# authentication network-eap eap_adambridge(config-ssid)# authentication key-management wpabridge(config-ssid)# authentication client username adam password adambridge(config-ssid)# infrastructure-ssidbridge(config-if)# endConfiguring the Root Device to Interact with the WDS Device
To support non-root bridges using CCKM, your root device must interact with the WDS device on your network, and your authentication server must be configured with a username and password for the root device. For detailed instructions on configuring WDS and CCKM on your wireless LAN, see Chapter 11 in the Cisco IOS Software Configuration Guide for Cisco Access Points.
On your root device, enter this command in global configuration mode:
bridge(config)# wlccp ap username username password passwordYou must configure the same username and password pair when you set up the root device as a client on your authentication server.
Configuring Additional WPA Settings
Use two optional settings to configure a pre-shared key on the bridge and adjust the frequency of group key updates.
Setting a Pre-Shared Key
To support WPA on a wireless LAN where 802.1x-based authentication is not available, you must configure a pre-shared key on the bridge. You can enter the pre-shared key as ASCII or hexadecimal characters. If you enter the key as ASCII characters, you enter between 8 and 63 characters, and the bridge expands the key using the process described in the Password-based Cryptography Standard (RFC 2898). If you enter the key as hexadecimal characters, you must enter 64 hexadecimal characters.
Configuring Group Key Updates
In the second optional WPA setting, the root device distributes a group key to the authenticated non-root bridge. You can use these optional settings to configure the root device to change and distribute the group key based on association and disassociation of non-root bridges:
•
•
To configure a WPA pre-shared key, follow these steps, beginning in privileged EXEC mode.
This example shows how to configure a pre-shared key for non-root bridges using WPA:
bridge# configure terminalbridge(config)# dot11 ssid batmanbridge(config-ssid)# wpa-psk ascii batmobile65bridge(config-ssid)# endConfiguring Authentication Holdoffs, Timeouts, and Intervals
Beginning in privileged EXEC mode, follow these steps to configure holdoff times, reauthentication periods, and authentication timeouts for non-root bridges authenticating through your root device:
Use the no form of these commands to reset the values to default settings.
Matching Authentication Types on Root Devices and Non-Root Bridges
To use the authentication types described in this section, the root device authentication settings must match the settings on the non-root bridges that associate to the root device.
Note
Table 9-2 lists the settings required for each authentication type on the root and non-root bridges.
![]()
![]()
![]()
![]()
![]()
![]()
![]()
![]()
Posted: Wed Feb 13 22:29:46 PST 2008
All contents are Copyright © 1992--2008 Cisco Systems, Inc. All rights reserved.
Important Notices and Privacy Statement.