|
|

This chapter describes the following processes for upgrading your Cisco AccessPath Model 531 system up from one configuration level to the next level:
Devices and cables are added in each Cisco AccessPath Model 531 system configuration upgrade. Cisco provides accessory kits that contain the required devices and cables to streamline the upgrades.
Appendix B provides specifications for all cables for the Cisco AccessPath Model 531 system.
Read and adhere to the following warnings carefully before performing any of the procedures outlined in this chapter:
Warning The Ethernet 10BaseT, serial, console, and auxiliary ports contain safety extra-low voltage (SELV) circuits. PRI circuits are treated like telephone-network voltage (TNV) circuits. Avoid connecting SELV circuits to TNV circuits.
The following list shows the required and optional tasks to upgrade a Cisco AccessPath-TS3 Model 531 Integrated Access System Entry-Level configuration up to a Midrange configuration:
The Switch Shelf becomes the primary means of switched communication within a Midrange system, replacing the Ethernet switch module in the Router Shelf.
Note If you follow the outlined procedures in the documentation when you upgrade between an Entry-Level and Midrange configuration, you will maintain system connectivity during the upgrade. Your Cisco AccessPath-TS3 system routes temporarily to the failover (10BaseT) path during upgrading. After you have completed all procedures, the data is routed from the failover path to the primary Fast Ethernet (100BaseT) data path.
If you want to upgrade from an Entry configuration to a Midrange configuration, you must order the following kits:
Upgrading from a Cisco AccessPath Model 531 system Midrange configuration to a High-End configuration requires the installation of a second Cisco 7206 Router Shelf. The installation of the second Router Shelf enhances the call/data handling capacity of the system.
You must perform the following tasks to upgrade your Cisco AccessPath Model 531 system from a Midrange to a High-End configuration:
Note You can maintain system connectivity while upgrading from Midrange configuration to High-End system configuration.
You will receive the following devices and accessory kits when you upgrade from a Midrange to a High-End configuration:
Note You will have to prepare your site for the installation of the additional Cisco AccessPath cabinet. For site preparation information for your system, see the Cisco AccessPath-TS3 Model 531 Integrated Access System Hardware Installation Guide and quick start guide or the Cisco AccessPath-VS3 Packet Telephony Concentrator Hardware Installation Guide and quick start guide.
The following list shows the required tasks to upgrade from a Cisco AccessPath Model 531 system High-End configuration to a High-End/Extended configuration.
Note There is no difference in switching infrastructure between the High-End and High-End/Extended configurations. You do not have to reconfigure the System Controller, Switch Shelf, or Router Shelves when upgrading from a High-End to a High-End/Extended configuration.
Note You must specify your site power requirements (AC or DC) when ordering your High-End/Extended configuration.
You will receive a second cabinet kit when you upgrade from a High-End to a High-End/Extended configuration. The kit includes:
The first task in upgrading to a High-End/Extended configuration is prepare for and install the secondary cabinet, which allows you to add more Access Server Shelves or VoIP Access Shelves to the system.
Appendix B illustrates and provides specifications for all cables for the Cisco AccessPath Model 531 system.
Perform the following steps to prepare and install the secondary cabinet:
Step 2 Remove the cabinet from the shipping container.
Step 3 Prepare the cabinet to move off the shipping pallet.
Step 4 Move the system from the pallet and down the ramp.
Step 5 Roll the cabinet to the location where your existing Cisco AccessPath Model 531 system High-End configuration is installed and operating.
Step 6 Maneuver the cabinet to a near the first cabinet.
Step 7 Install the anchors.
Step 8 Set the threaded rods into place.
Step 9 Remove the caster assemblies.
Step 10 Tighten the threaded rods into their anchors within each hole.
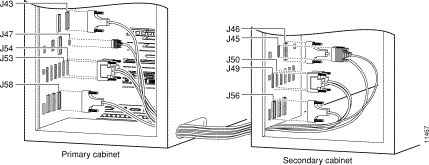
The Cisco AccessPath Model 531 system cabinets are designed to enable direct cabling between the cabinets in a High-End/Extended configuration. Connecting the cable harnesses in the two cabinets establishes full system connectivity between the Access Server Shelves or VoIP Access Shelves in the secondary cabinet and the primary cabinet.
Special exit holes (cutout ovals) are located on the side of each cabinet just above the floor. These holes provide a way to route power cables and cabinet-interconnect cables from one cabinet to the other cabinet. If you place the two cabinets side-by-side, you can easily route the expansion cables from the cable harness in one cabinet through the two cutout gaps and into the cable harness in the second cabinet.
Alternately, you can route the expansion cables through cutout gaps on the external sides of each cabinet, up the sides of each cabinet and into the ceiling. You must order special-length cables from Cisco for this purpose. (Contact Cisco Customer Service.)
Appendix B provides cable specifications for the Cisco AccessPath Model 531 system.
 | TimeSaver You will save time and effort if you route the expansion connections over the default cabinet-to-cabinet route, as shown in Figure 2-1. |
Perform the following steps to connect the expansion cables between the cabinets:
Step 2 Insert the cable to its designated connector in the secondary cabinet.
Step 3 See Figure 2-1, then route the cable through the appropriate cutout in the secondary cabinet. The cable typically runs through the hole on the side of the cabinet adjacent to the primary cabinet.
If you have ordered special-length cables to route via a ceiling harness, route the cable out the far side of the cabinet, up to the ceiling harness, around and down the side of the primary cabinet, then through the cutout gap located there.
Step 4 Feed the other end of the cable through the cutout in the primary cabinet and to that cable harness location. (See Appendix B.)
Step 5 Insert the connector into the designated primary cable harness location.
Step 6 Repeat Step 1 through Step 5 for each remaining cabinet-interconnect cables.
Step 7 When you have installed all the cabinet-interconnect cables, dress them into bundles to minimize the impact of a large number of cables in a limited space.
Step 8 Power ON the system when all cabinet-interconnect cables have been connected.
| TimeSaver The suite of cables already found in the primary cabinet may complicate your expansion cabling tasks. Whenever possible, choose a direct and unobtrusive cabling route that avoids the dense cable area at the bottom of the cabinet. |
![]()
![]()
![]()
![]()
![]()
![]()
![]()
![]()
Posted: Tue Jan 21 00:48:21 PST 2003
All contents are Copyright © 1992--2002 Cisco Systems, Inc. All rights reserved.
Important Notices and Privacy Statement.