|
|

This chapter describes the procedures for adding and replacing devices in the Cisco AccessPath Model 531 system.
The chapter contains the following sections:
Read the following warnings carefully before performing any of the procedures outlined in this chapter:
Perform the following steps to install the two additional patch panels that are required for an 8-PRI equipped system:
Step 2 Swing open the front of the patch panel to access the connectors on the midplane.
Step 3 Connect the two 72-1466-xx patch panel cables to the connectors on the patch panel midplane as specified in Table 3-1.
Table 3-1 Cable Connections between Signal Harness and Patch Panels (Primary Cabinet)
| From Signal Harness | Cable 72-1466-XX Plug | To Patch Panel | Patch Panel Connector |
|---|---|---|---|
Step 4 Route the unconnected ends of the two cables out of the slot on the front of the patch panel.
Step 5 Swing the front panel shut and tighten the securing screw.
Step 6 Slide patch panel number 4 onto the first shelf support in the chassis below the two existing patch panels.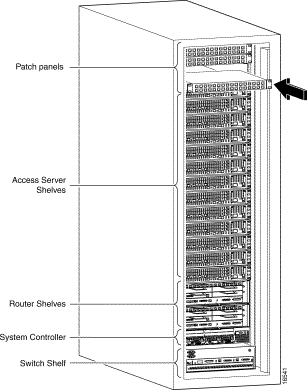
Step 7 Insert and tighten the screws to secure the patch panel to the chassis.
Step 8 Repeat Step 1 to Step 7 for the second patch panel.
Step 9 Slide patch panel number 3 into the chassis above patch panels number 4.
Step 10 Insert and tighten the screws to secure the patch panel to the chassis.
Step 11 Connect the four connectors on the 72-1466-xx patch panel cables to the signal harness connectors (See Table 3-1.)
Appendix B provides specifications for all Cisco AccessPath Model 531 system cables.
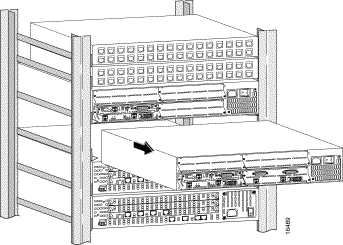
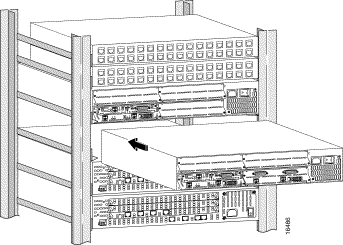
Perform the following steps to remove an Access Server Shelf:
Step 2 Remove the power cable that connects the Access Server Shelf to the AC power strip or DC busbar. Set the power cable aside.
Note If you use DC power, remove the connector to the DC power cable before removing the wires from the terminal block.
Step 3 Remove the two cables that connect the Access Server Shelf to the cable harness. Remove each connector and place the cables with the power cable that you removed.
Step 4 Remove the four screws that fasten the Access Server Shelf to the chassis. (See Figure 3-1.)
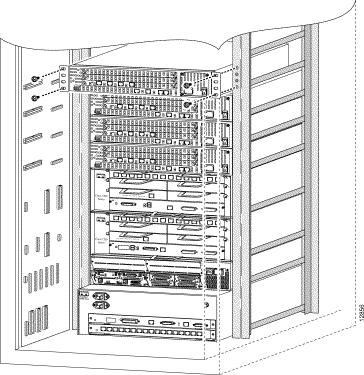
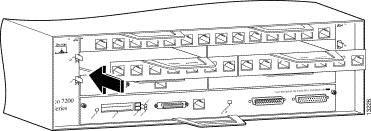
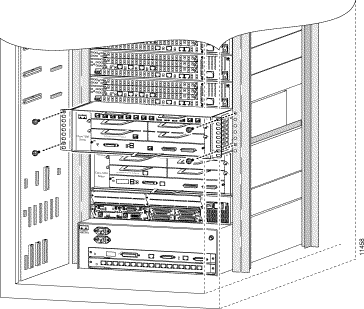
Step 5 Grasp the Access Server Shelf securely with both hands, pull it out towards you, and set it aside. (See Figure 3-2.)
This section explains the procedures for adding or replacing a Cisco AS5300 Access Server Shelf in your system.
Cisco ships each Access Server Shelf that you order in its own kit which contains:
If you order an Access Server Shelf that is configured for DC power, you will receive the standard ground lug cable kit (800-03990-01) with each Access Server Shelf kit. The ground lug cable kit includes:
Appendix B provides specifications for all Cisco AccessPath Model 531 system cables.
Perform the following steps to add an Access Server Shelf to your system:
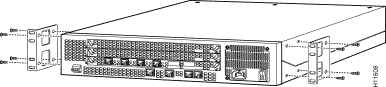
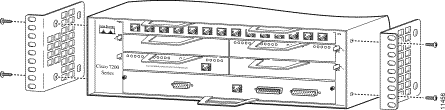
Step 2 Fasten the mounting brackets on the Access Server Shelf. (See Figure 3-3.)
Step 3 If your system is configured for DC power, refer to Figure 3-4, and use the two screws (48-0415-xx) to attach the ground lug cable to the ground lugs on the left of the Access Server Shelf.
Note You may be adding an Access Server Shelf in any of several rack spaces; therefore, the rack space to which you add an Access Server Shelf will not necessarily match the positions shown in the following illustrations.
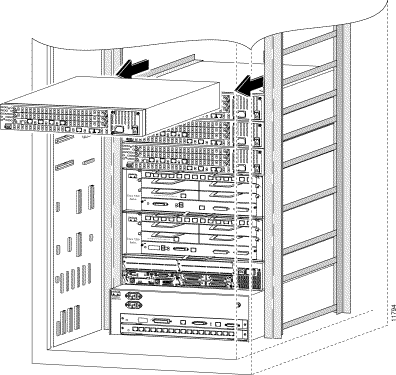
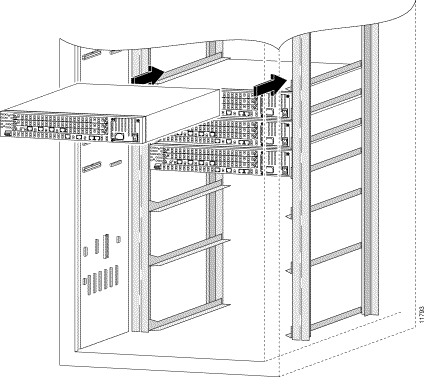
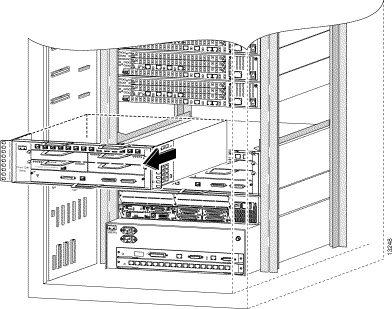
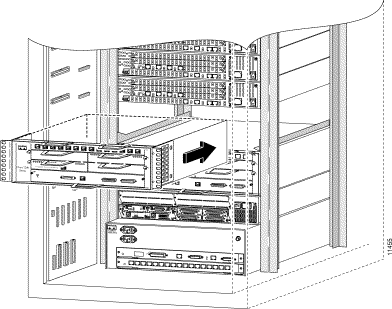
Step 4 Align the Access Server Shelf with the rack space directly above the uppermost installed Access Server Shelf and slide the Access Server Shelf into the rack space until the mounting brackets contact the cabinet mounting rails. Do not attempt to force the Access Server Shelf beyond this point. (See Figure 3-5.)
Step 5 Fasten the Access Server Shelf to the cabinet mounting rails. (See Figure 3-6.)
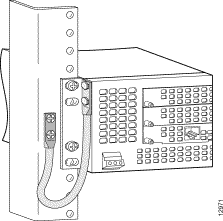
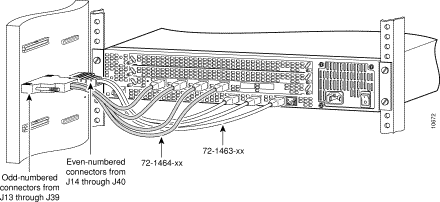
Step 6 Connect the 72-1463-xx console/Ethernet cable (see Figure 3-7):
(a). Connect the DB-25 connector on the cable to the cable harness connector that is closest to the Access Server Shelf.
(b). Connect the three RJ-45 connectors on the cable to the following ports on the Access Server Shelf:
Step 7 (For 4-PRI units only.) Connect the 72-1464-xx 4-PRI cable (see Figure 3-7):
(a). Connect the DB-36 connector on the cable to the cable harness connector that is closest to the Access Server Shelf.
(b). Connect the four RJ-45 connectors on the cable to the Access Server Shelf ports 1 through 4 (AS_PRI 0 through AS_PRI 3).
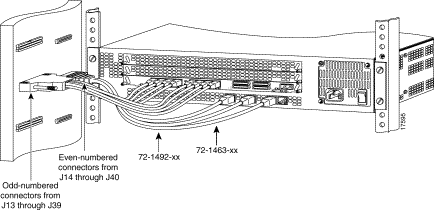
Step 8 (For 8-PRI units only.) Connect the 72-1492-xx 8-PRI cable (see Figure 3-8):
(a). Connect the DB-36 connector on the cable to the cable harness connector that is closest to the Access Server Shelf.
(b). Connect the eight RJ-45 connectors on the cable to the Access Server Shelf ports 1 through 8 (AS_PRI 0 through AS_PRI 7).
Step 9 Regarding power connection: you can leave the fuses installed or the breakers closed (as applies to your system) at this point. If you do so, your system can remain operable through this entire installation.
For the highest degree of safety, Cisco recommends that you:
(a). Turn power OFF on every unit in the power circuit that you will be on. (See Appendix A to determine which units are on a specific power circuit.)
(b). Open the circuit breakers in the power circuit that your Access Server Shelf will be on or remove those fuses with insulated-handle fuse pullers for that size fuse (as applies to your system).
Step 10 If your system is configured for DC power, refer to Figure 3-9, and use the two screws (48-0395-xx) to attach the ground lug cable to the tap angle.
Step 11 Connect the power cable:
(a). Insert the female connector into the three-pronged connector on the lower-right portion of the Access Server Shelf.
(b). Refer to Table A-1 to find the correct connector, then insert the male connector into the AC power strip with that label.
(a). Insert the tinned wires into the terminal blocks on the lower-right portion of the Access Server Shelf. Red must go to positive (+), then black must go to negative (-).
(b). Use a flat-bladed #1 screwdriver to tighten the set-screws that clamp the wire-connectors into the terminal blocks.
(c). Refer to Table A-1 to find the correct connector, then insert the male connector into the DC busbar with that label.
Step 12 Turn the access server power ON.
Step 13 If you performed Step 9:
(a). Close the circuit breakers or insert the fuses that you removed with insulated-handle fuse pullers for that size fuse (as applies to your system).
(b). Turn power ON for every unit in the power circuit. (See Appendix A to determine which units are on a specific power circuit.)
Step 14 Install any additional Access Server Shelves following Step 1 through Step 10.
Note The cable harness connector labels change to reflect the specific location of the Access Server Shelf within the system.
Cisco AccessPath Model 531 systems equipped with 8-PRI-based Access Server Shelves have four patch panels installed in the system cabinet. This allows the system cabinet to contain only 13 Access Server Shelves. The High-End/Extended cabinet in a fully equipped Cisco AccessPath Model 531 systems contains eight Access Server Shelves.
The Access Server Shelves in the High-End/Extended cabinet are installed in their normal configuration (AS15 - AS21, numbered from the bottom up). The twenty-first Access Server Shelf (AS14) is installed at the top of the High-End Extended cabinet.
The twenty-first Access Server Shelf (AS14) installed in the High-End/Extended cabinet must be cabled to connectors J13 and J14 on the signal harness in the primary cabinet. The following two types of extension cables are required to connect Access Server Shelf (AS14) in the High-End/Extended cabinet to the signal harness in the primary cabinet:
Note See "Installing an Access Server Shelf" for additional information on installing an Access Server Shelf.
Perform the following steps to add an Access Server Shelf to your system:
Step 2 Fasten the mounting brackets on the Access Server Shelf.
Step 3 If your system is configured for DC power, use the two screws (48-0415-xx) to attach the ground lug cable to the ground lugs on the left of the Access Server Shelf.
Step 4 Align the Access Server Shelf at the top of the High-End Extended cabinet below the patch panels and slide the Access Server Shelf into the rack-space until the mounting brackets contact the cabinet mounting rails. Do not attempt to force the Access Server Shelf beyond this point.
Step 5 Fasten the Access Server Shelf to the cabinet mounting rails.
Step 6 Connect the 72-1463-xx console/Ethernet cable.
Connect the three RJ-45 connectors on the cable to the following ports on the Access Server Shelf:
Step 7 Connect the 72-1492-xx 8-PRI cable.
Connect the eight RJ-45 connectors on the cable to the Access Server Shelf ports 0 through 7 (AS_PRI 0 through AS_PRI 7).
Step 8 Connect the DB-36 and DB-25 extension cables to cables 72-1492-xx and 72-1463-xx.
Step 9 Route the cables down the cabinet and out through the cable slot at the bottom of the cabinet.
Step 10 Route the cables across and into the cable slot at the bottom of the primary cabinet.
Step 11 Route the cables up to connectors J13 and J14.
Step 12 Connect the DB-36 connector on the extension cable to signal harness connector J13 in the primary cabinet.
Step 13 Connect the DB-25 connector on the extension cable to signal harness connector J14 in the primary cabinet.
Step 14 Regarding power connection: you can leave the fuses installed or the breakers closed (as applies to your system) at this point. If you do so, your system can remain operable through this entire installation.
For the highest degree of safety, Cisco recommends that you:
(a). Turn power OFF on every unit in the power circuit that you will be on. (See Appendix A to determine which units are on a specific power circuit.)
(b). Open the circuit breakers in the power circuit that your Access Server Shelf will be on or remove those fuses with insulated-handle fuse pullers for that size fuse (as applies to your system).
Step 15 If your system is configured for DC power, use the two screws (48-0395-xx) to attach the ground lug cable to the tap angle.
Step 16 Connect the power cable:
(a). Insert the female connector into the three-pronged connector on the lower-right portion of the Access Server Shelf.
(b). Refer to Table A-1 to find the correct connector, then insert the male connector into the AC power strip with that label.
(a). Insert the tinned wires into the terminal blocks on the lower-right portion of the Access Server Shelf. Red must go to positive (+), then black must go to negative (-).
(b). Use a flat-bladed #1 screwdriver to tighten the set-screws that clamp the wire-connectors into the terminal blocks.
(c). Refer to Table A-1 to find the correct connector, then insert the male connector into the DC busbar with that label.
Step 17 Turn the Access Server power ON.
Step 18 If you performed Step 9:
(a). Close the circuit breakers or insert the fuses that you removed with insulated-handle fuse pullers for that size fuse (as applies to your system).
(b). Turn power ON for every unit in the power circuit. (See Appendix A to determine which units are on a specific power circuit.)
Step 19 Install any additional Access Server Shelves following Step 1 through Step 18.
If you are permanently removing the Switch Shelf, the Switch Shelf functionality is replaced by a Cisco PA-12E switch module located in the Router Shelf. You must therefore integrate a Cisco PA-12E switch module with your system according to the procedure in "Installing the Cisco PA-12E/2FE Ethernet Switch Module".
Appendix B describes specifications for all Cisco AccessPath Model 531 system cables.
Perform the following steps to remove the Switch Shelf from your system:
Step 2 Remove the power cables that connect the Switch Shelf to the AC power strip or DC busbar. Set the power cables aside.
Note If you use DC power, remove the connector to the DC power cable before removing the wires from the terminal block.
Step 3 Remove the three cables that connect the Switch Shelf to the cable harness. Remove each connector and place the cables with the power cable that you removed.
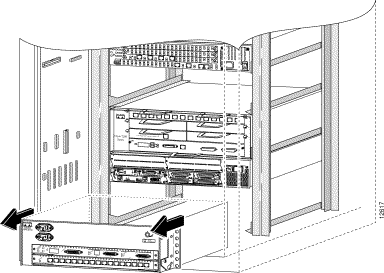
Step 4 Remove the four screws that hold the switch shelf to the chassis. (See Figure 3-10.)
Step 5 Grasping the Switch Shelf securely with both hands, pull it out toward you until it is completely clear of the rack space and set it aside. (See Figure 3-11.)
If you plan to either ship or transplant the Switch Shelf, follow this step:
Step 6 Remove the brackets from the Switch Shelf and store them. (See Figure 3-12.)
This section explains the procedures for adding or replacing a Switch Shelf in your system.
Cisco ships each Switch Shelf that you order in its own kit that contains:
If you order a Switch Shelf shelf that is configured for DC power, you will receive the standard ground lug cable kit (800-03990-01) with each Switch Shelf kit. The ground lug cable kit includes:
Appendix B provides specifications for all Cisco AccessPath Model 531 system cables.
Perform the following steps to install the Switch Shelf in the Cisco AccessPath Model 531 system:
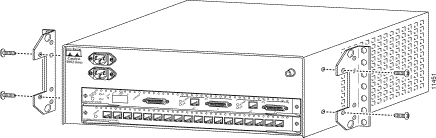
Step 2 Fasten the mounting brackets to the Switch Shelf as shown in Figure 3-13. You may find that the power connectors are located in a different place on your Switch Shelf.
Note The mounting position is set a few inches from the front of the Switch Shelf; this mounting position is unique to the Switch Shelf.
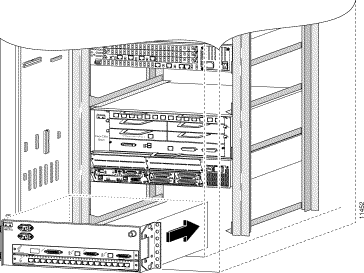
Step 3 Refer to Figure 3-14, then align the Switch Shelf with the bottom shelf within the cabinet.
Step 4 Move any cables that may interfere with the insertion of the Switch Shelf. Pay special attention to the cables that connect to the System Controller; if necessary, have a second person hold these cables out of the Switch Shelf installation path while you slide in the Switch Shelf.
Step 5 Slide the Switch Shelf into the rack space until the mounting bracket contacts the cabinet mounting rails. Do not attempt to force the Switch Shelf beyond this point.
Note The Switch Shelf is deliberately forward-mounted in the Cisco AccessPath Model 531 system for design considerations.
Step 6 Fasten the Switch Shelf to the cabinet mounting rails. (See Figure 3-15.)
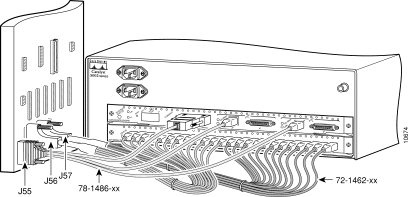
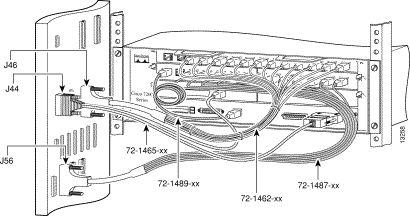
Step 7 Connect the two 72-1462-xx port cables (see Figure 3-16):
(a). Insert the DB-50 connector on the first cable into connector J56 on the signal harness.
(b). Connect the twelve RJ-45 J2 connectors (P1 through 12 in order) into the 12 left-most ports on the Switch Shelf's bottom connector row.
(c). Insert the DB-50 connector on the second cable into connector J57 on the signal harness.
(d). Connect the twelve RJ-45 J2 connectors (P13 through 24 in order) into the 12 right-most ports on the Switch Shelf's bottom connector row.
Step 8 Connect the 72-1486-xx supervisor module cable (see Figure 3-16):
(a). Install the adapter 29-0881-xx that is included in your accessories kit into the console port in the supervisor engine module. This connector is on the left side of the top Switch Shelf connector row.
(b). Insert the DB-25 connector on the cable into connector J55 on the signal harness. Then attach the cable's three RJ-45 connectors to the Switch Shelf's top connector row:
Step 9 You can leave the fuses installed or the breakers closed (as applies to your system) at this point. If you do so, your system can remain operable through this entire installation.
For the highest degree of safety, Cisco recommends that you:
(a). Turn power OFF on every unit in the power circuit that you will be on. (See Appendix A to determine which units are on a specific power circuit.)
(b). Open the circuit breakers in the power circuit that your Switch Shelf will be on or remove those fuses with insulated-handle fuse pullers for that size fuse (as applies to your system).
Step 10 If your system is configured for DC power, refer to Figure 3-17 (there are variations in each shelf), then:
(a). Use the two screws (48-0395-xx) to attach the ground lug cable to the ground lugs on the left of the Switch Shelf.
(b). Use the two screws (48-0395-xx) to attach the ground lug cable to the tap angle.
Step 11 Connect the power cable:
(a). Insert the female connector into the three-pronged connector on the upper-right portion of the Switch Shelf.
(b). Insert the male connector into the AC power strip connector labeled SW PS1.
(c). Repeat Steps (a) and (b), inserting the male connector to the AC power strip connector labeled SW PS2.
(a). Insert the tinned wires into the terminal blocks on the upper-right portion of the Switch Shelf. Red must go to positive (+), then black must go to negative (-).
(b). Use a flat-bladed #1 screwdriver to tighten the set-screws that clamp the wire-connectors into the terminal blocks.
(c). Insert the male connector into the DC busbar connector labeled SW PS1.
(d). Repeat Steps (a) through (c), inserting the male connector to the DC busbar connector labeled SW PS2.
Step 12 Turn the Switch Shelf power ON.
Step 13 If you performed Step 9:
(a). Close the circuit breakers or insert the fuses that you removed with insulated-handle fuse pullers for that size fuse (as applies to your system).
(b). Turn power ON for every unit in the power circuit. (See Appendix A to determine which units are on a specific power circuit.)
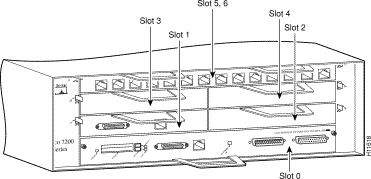
Disconnecting the RJ-45 functionally removes the Fast Ethernet port adapter from the system. You should not remove the port adapter from the slot unless you are transplanting or shipping the port adapter. Router Shelf slot numbering is shown in Figure 3-18.
Appendix B provides specifications for all Cisco AccessPath Model 531 system cables.
Perform the following steps to disconnect (functionally remove) the Fast Ethernet port adapter:
Step 2 Tie this leg of the 72-1465 cable that connects to the port adapter to the second cable leg (this remains in use).
Note You have functionally removed the Fast Ethernet port adapter from the system. You should not remove it from the slot. An empty slot will affect the unit's cooling.
Before you perform the steps in this section, you must perform the steps in the section "Disconnecting the Fast Ethernet Port Adapter (PA-FE-TX) from the Router Shelf" section.
Appendix B provides specifications for all Cisco AccessPath Model 531 system cables.
Perform the following steps to remove the Fast Ethernet port adapter from slots 3 and 4 of the Router Shelf:
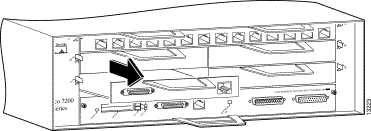
Step 2 Grasp the module by its handle and pull it out towards you. (See Figure 3-20.)
A Fast Ethernet port adapter (PA-FE-TX) is already installed in every Cisco AccessPath Model 531 system Entry-Level configuration. The port adapter installs into slot 1 of the Router Shelf. You only need to install the port adapter if you must replace it.
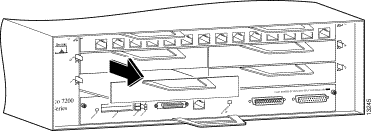
Step 2 Align the port adapter with slots 3 and 4 and slide it into the rack space until it locks into place. (See Figure 3-23.)
Step 3 If you must connect and activate the port adapter to the Cisco AccessPath-TS3 system, see "Connecting the Fast Ethernet Port Adapter (PA-FE-TX)" below.
A Fast Ethernet port adapter (PA-FE-TX) is already installed in every Cisco AccessPath-TS3 system Entry-level configuration. Because it is not connected when the system is shipped, the port adapter is inoperable.
This port adapter has an RJ-45 cable connector that is part of a cable assembly already in use.
Appendix B provides specifications for all Cisco AccessPath Model 531 system cables.
Perform the following steps to connect the Fast Ethernet port adapter:
Step 2 Connect the unused RJ-45 cable leg into the Ethernet port in slot 1 on the Router Shelf.
Note Disconnecting the RJ-45 functionally removes the Fast Ethernet port adapter from the system. You should not remove it from the slot unless you are transplanting or shipping the port adapter.
Appendix B provides specifications for all Cisco AccessPath Model 531 system cables.
Perform Step 1 and Step 2 to disconnect the Ethernet switch module (PA-12E/2FE) in slots 3 and 4 of the Router Shelf (see Figure 3-25 and Figure 3-26):
(a). Remove the twelve RJ-45 connectors from the module ports.
(b). Remove the DB-50 connector from cable harness connector (J56).
Step 2 Remove the top connector of the 72-1489-xx cable from slot 3/0 and insert it into slot 5/0 on the Router Shelf.
Note It is not necessary to physically remove the Ethernet switch module (PA-12E/2FE) from the Router Shelf to functionally remove it from the system.
Before you perform the steps in this section, you must perform the steps in "Disconnecting the Ethernet Switch Module (PA-12E/2FE) from the Router Shelf". The Ethernet switch module in Router Shelf slots 5 and 6 remains connected to provide a failover switching path if the new primary path fails.
Appendix B provides specifications for all Cisco AccessPath Model 531 system cables.
Perform the following steps to remove the Ethernet switch module (PA-12E/2FE) from slots 3 and 4 of the Router Shelf:
Step 2 Grasp the module by its handle and slide it out toward you until it releases as shown in Figure 3-27.
Step 3 Store the module in a clean, dry, and safe place.
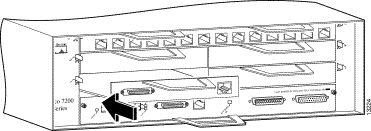
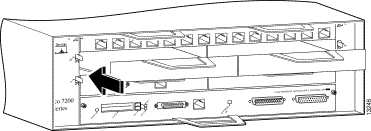
Step 4 Install the faceplates in slots 3 and 4 to protect against dust entering the router. (See Figure 3-28.) Insert the faceplate and tighten the two screws into the holes on each side.
If you have configured the Cisco AccessPath Model 531 system without the second Ethernet switch module (PA-12E/2FE), typically, to run with the Switch Shelf, you must reestablish a switched system infrastructure if you subsequently remove the Switch Shelf. In this case, you must install a second Ethernet switch module in the Router Shelf slots 3 and 4. After you install this module, its ports become the data path within the system.
The Ethernet switch module is available as a spare part from Cisco. You will receive it in a special kit. You must also order the cable (72-1487-xx).
Appendix B provides specifications for all Cisco AccessPath Model 531 system cables.
Perform the following steps to install the Ethernet switch module in the router:
Step 2 Align the port adapter with slots 3 and 4 and slide it into the slot until it locks into place (See Figure 3-30.)
Step 3 Close the clips on each side of the module that lock it into place.
Step 4 Connect the 72-1487-xx cable to the module to the cable harness (see Figure 3-31):
(a). Insert the DB-50 connector into the cable harness connector (J56: SW_FE 1-12) on the cable harness.
(b). Insert 1 of each of the twelve RJ-45s into each of the 12 ports (2-13) in slots 3
and 4.
Appendix B provides specifications for all Cisco AccessPath Model 531 system cables.
Perform the following steps to remove the Router Shelf from your Cisco AccessPath Model 531 system.
Step 2 Remove the two power cables from the Router Shelf:
(a). Disconnect the male connector of both power cables.
(b). Pass the cables under the Switch Shelf to the rear of the cabinet. (See Figure 3-32.)
(c). Walk to the back of the cabinet.
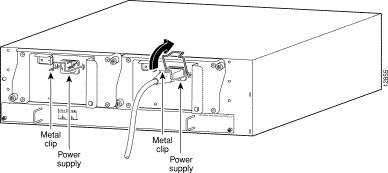
(d). Unlock the pivot clamps and disconnect the cables from the two power connectors. (See Figure 3-33.)
Step 3 Disconnect the cables that connect the Router Shelf to the cable harness and the other router. Remove each connection and set the cables aside.
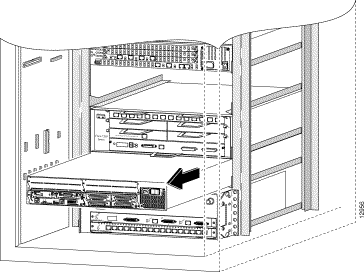
Step 4 Remove the four screws that fasten the Router Shelf mounting brackets to the chassis. (See Figure 3-35.)
Step 5 Firmly grasp the Router Shelf with both hands and pull it out toward you until it is completely clear of the rack space. (See Figure 3-36.)
Step 6 Set the Router Shelf in a clean, safe location.
Cisco ships each Router Shelf that you order in its own kit that contains:
If you order a Router Shelf that is configured for DC power, you will receive the standard ground lug cable kit (800-03990-01) with each Router Shelf kit. The ground lug cable kit includes:
Appendix B provides specifications for all Cisco AccessPath Model 531 system cables.
Perform these steps to install the Router Shelf:
Step 2 Install the brackets. (See Figure 3-37.)
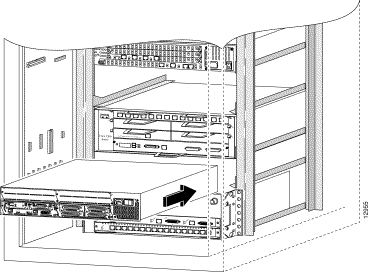
Step 3 Align the Router Shelf with the rack space that you will install it on, and slide the Router Shelf into the rack-space until the mounting brackets contact the cabinet mounting rails. (See Figure 3-38.) Do not attempt to force the Router Shelf beyond this point.
Step 4 Attach the mounting brackets to the cabinet mounting rails. (See Figure 3-39.)
Step 5 Install the adapter (29-0881-xx) into the console port in slot 0. This connector is on the right side of the bottom connector row.
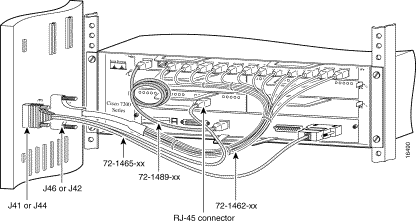
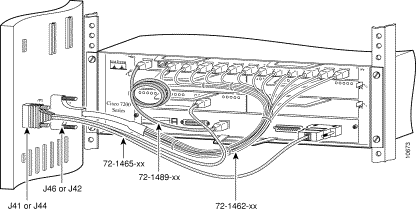
Step 6 Attach the two cables that connect from the router ports to the cable harness (see Figure 3-40):
Connect the 72-1462-xx cable (see Figure 3-40):
(a). Locate the DB-50 connector and insert it into cable harness connector (J42), or (J46) if you are installing the lower Router Shelf.
(b). Insert each of the twelve RJ-45s into each of the ports 2 through 13 in slots 5 and 6.
Connect the 72-1465-xx cable (see Figure 3-40):
(a). Insert the DB-15 connector into cable harness connector (J41), or (J44) if you are installing the lower Router Shelf.
(b). Insert P1 = RS_CON RJ-45 connector into adapter (29-0881-xx) and then connect it to the console port.
(c). Insert P2 = RS-ETH RJ-45 connector into the ethernet port in slot 1.
Step 7 If you have an Entry-Level system, connect the 72-1487-xx cable:
(a). Connect the DB-50 into cable harness connector (J56).
(b). Connect 1 of each of the RJ-45 connectors into each of the ports 2 through 13 in slots 3 and 4.
Step 8 Connect the 72-1489-xx cable:
(a). Connect one RJ-45 connector to port 0/0 near the center of the Router Shelf bottom connection row.
(b). Connect the other RJ-45 connector to port 5/0 at the left side of the Router Shelf top connection row, or into Router Shelf port 3/0 if your system is Entry-Level.
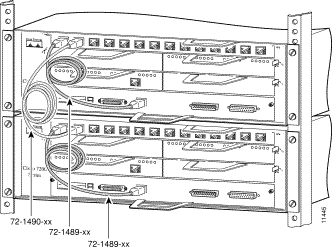
Step 9 If your system has two Router Shelves, connect the 72-1490-xx cable:
(a). Connect one RJ-45 into port_5/1 on the left-hand portion of the top Router Shelf uppermost connection row.
(b). Connect the other RJ-45 into port_5/1 of the bottom Router Shelf uppermost connection row.
You have established the failover path between the two routers.
Step 10 You can leave the fuses installed or the breakers closed (as applies to your system) at this point. If you do so, your system can remain operable through this entire installation.
For the highest degree of safety, Cisco recommends that you:
(a). Turn power OFF on every unit in the power circuit that you will be on. (See Appendix A to determine which units are on a specific power circuit.)
(b). Open the circuit breakers in the power circuit that your Router Shelf will be on or remove those fuses with insulated-handle fuse pullers for that size fuse (as applies to your system).
Step 11 If your system is configured for DC power, refer to Figure 3-42 (there are variations in each shelf), then:
(a). Use the two screws (48-0426-xx) to attach the ground lug cable to the ground lugs on the left of the Router Shelf.
(b). Use the two screws (48-0395-xx) to attach the ground lug cable to the tap angle.
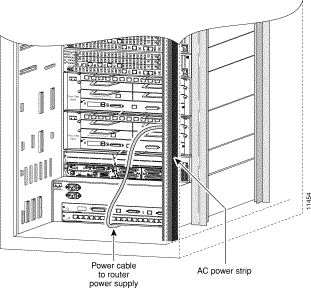
Step 12 Perform the following steps to route and connect the Router Shelf power cables (applies to your system):
For AC power, refer to Figure A-1, then perform the following steps:
(a). Connect the male connector into the correct power strip connector.
(b). Refer to Figure 3-43, then pass the other connector of the power cable completely beneath the Router Shelf to the opposite side of the cabinet.
(c). Walk to the side of the cabinet to which you routed the power.
(d). Connect the female connector into the three-pronged connector on the lower-right portion of the Switch Shelf as shown in Figure 3-44.
(e). Pivot the movable locking clamps into place.
(f). Repeat Steps (a) through (e) with the second power cable, inserting the male connector into the correct AC power strip connector.
For DC power, refer to Figure A-2, then perform the following steps:
(a). Connect one plug into the correct DC busbar connector.
(b). Connect the tinned wires into the terminal blocks on the lower-right portion of the Router Shelf. Red must go to positive (+), then black must go to negative (-).
(c). Use a flat-bladed #1 screwdriver to tighten the set-screws that clamp the wire-ends into the terminal blocks.
(d). Repeat Steps (a) through (c) with the second power cable, connecting it to the correct DC busbar connector.
Step 13 If you performed Step 10:
(a). Close the circuit breakers or insert the fuses that you removed with insulated-handle fuse pullers for that size fuse (as applies to your system).
(b). Turn power ON for every unit in the power circuit. (See Appendix A to determine which units are on a specific power circuit.)
This section explains the procedures for replacing a System Controller in your system.
Perform the following steps to remove the System Controller from your system:
Step 2 Remove the cable (72-1461-xx) and the cable (72-1457-xx). Remove the device connectors and cable harness connectors for each.
Step 3 Remove the System Controller power cables.
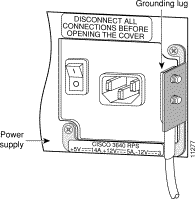
Note If your system runs on DC power, remove the connector of the DC power cable before you remove the wires from the terminal block. Set the cables aside.
Step 4 Remove the four screws that fasten the System Controller to the cabinet mounting rails. (See Figure 3-45.)
Step 5 Firmly grasp the System Controller with both hands and pull it out toward you until it is completely clear of the rack space. (See Figure 3-46.)
If you plan to either ship or transplant the System Controller, follow this step:
Step 6 Refer to Figure 3-45, loosen the screws from the mounting brackets. Remove the screws and store them.
Cisco ships each System Controller that you order in its own kit that contains:
When you unkit your System Controller package, set the cables near the system for easy installation.
If you order a System Controller that is configured for DC power, you will receive the standard ground lug cable kit (800-03990-01) with each System Controller kit. The ground lug cable kit includes:
Appendix B provides specifications for all Cisco AccessPath Model 531 system cables.
Perform the following steps to install the System Controller:
Step 2 Install the mounting brackets. (See Figure 3-48.)
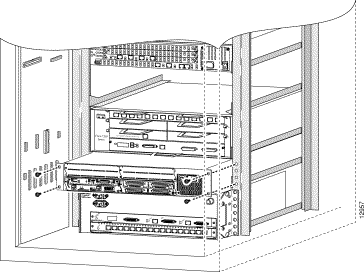
Step 3 Align the System Controller with the rack space that you will install it into. (See Figure 3-49.)
Step 4 Move any cables that might interfere with the insertion of the System Controller. If necessary, have a second person hold these cables out of the installation path while you slide in the System Controller.
Step 5 Slide the System Controller into the rack space until the mounting brackets contact the cabinet mounting rails. (See Figure 3-49.) Do not attempt to force the System Controller beyond this point.
Step 6 Insert the four screws that fasten the System Controller mounting brackets to the cabinet mounting rails. See Figure 3-50.)
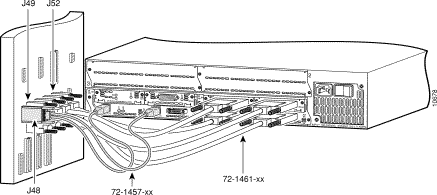
Step 7 Connect the four (72-1461-xx cables) as follows (see Figure 3-51):
(a). System Controller connector Async 0-7 to cable harness connector (J49: SC_ 0-7).
(b). System Controller connector Async 8-15 to cable harness connector (J50: SC_8-15).
(c). System Controller connector Async 16-23 to cable harness connector (J51: SC_16-23).
(d). System Controller connector Async 24-31 to cable harness connector (J52: SC_24-31).
Step 8 Connect the (72-1457-xx) cable as follows (see Figure 3-51):
(a). Insert the DB-9 into the cable harness connector (J48: SC_ETH).
(b). Insert the RJ-45 on the leg labeled (P1: SC_ETH1) into the System Controller connector ETHERNET 1, and the RJ-45 on the leg labeled (P2: SC_ETH0) into the System Controller connector ETHERNET 0.
Step 9 You can leave the fuse installed or the breaker closed (as applies to your system) at this point. If you do so, your system can remain operable through this entire installation.
For the highest degree of safety, Cisco recommends that you:
(a). Turn Power OFF on every unit in the power circuit that you will be on. (See Appendix A to determine which units are on a specific power circuit.)
(b). Open the circuit breakers in the power circuit that your System Controller will be on or remove those fuses with insulated-handle fuse pullers for that size fuse (as applies to your system).
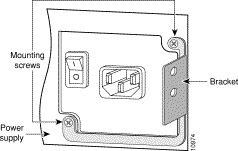
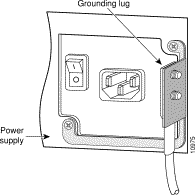
Step 10 If your system is configured for DC power, refer to Figure 3-52, Figure 3-53, and Figure 3-54, then:
(a). Remove the two screws from the power supply on the right side of the System Controller.
(b). Get the ground bracket from the DC kit and attach it over the power supply.
(c). Use the two screws (48-0395-xx) to attach the ground lug cable to the ground lugs on the left of the System Controller.
(d). Use the two screws (48-0395-xx) to attach the ground lug cable to the tap angle.
(e). Attach the ground lug bracket to the chassis.
(f). Place the electrical rating label over the ground lug bracket.
Step 11 Connect the power cable:
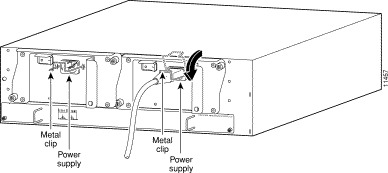
(a). Insert the female connector into the three-pronged connector on the upper-right portion of the System Controller.
(b). Insert the male connector into the AC power strip connector labeled SC.
(a). Insert the tinned wires into the terminal blocks on the upper-right portion of the System Controller. Red must go to positive (+), then black must go to negative (-).
(b). Use a flat-bladed #1 screwdriver to tighten the set-screws that clamp the wire-connectors into the terminal blocks.
(c). Insert the male connector into the DC busbar connector labeled B1.
Step 12 Turn the System Controller power ON.
Step 13 If you performed Step 10:
(a). Close the circuit breakers or insert the fuses that you removed with insulated-handle fuse pullers for that size fuse (as applies to your system).
(b). Turn power ON for every unit in the power circuit. See Appendix A to determine which units are on a specific power circuit.)
This section explains the procedures for replacing a Gatekeeper in your system.
Perform the following steps to remove the Gatekeeper from your system:
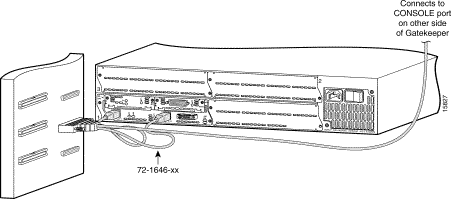
Step 2 Remove the (72-1646-xx) cable.
Step 3 Remove the Gatekeeper power cables.
Note If your system runs on DC Power, remove the connector of the DC Power cable before you remove the wires from the terminal block. Set the cables aside.
Step 4 Remove the four screws that fasten the Gatekeeper to the cabinet mounting rails. (See Figure 3-55.)
Step 5 Firmly grasp the Gatekeeper with both hands and pull it out toward you until it is completely clear of the rack space. (See Figure 3-56.)
If you plan to either ship or transplant the Gatekeeper, follow this step:
Step 6 Loosen the screws from the mounting brackets (see Figure 3-57). Remove the screws and store them.
Cisco ships each Gatekeeper that you order in its own kit which contains:
When you unkit your Gatekeeper package, set the cables near the system for easy installation.
If you order a Gatekeeper that is configured for DC power, you will receive the standard ground lug cable kit (800-03990-01) with each Gatekeeper kit. The ground lug cable kit includes:
Appendix B provides specifications for all Cisco AccessPath Model 531 system cables.
Perform the following steps to install the Gatekeeper:
Step 2 Install the mounting brackets. (See Figure 3-58.)
Step 3 Align the Gatekeeper with the rack space that you will install it into. (See Figure 3-59.)
Step 4 Slide the Gatekeeper into the rack space until the mounting brackets contact the cabinet mounting rails. (See Figure 3-59.) Do not attempt to force the Gatekeeper beyond this point.
Step 5 Insert the four screws that fasten the Gatekeeper mounting brackets to the cabinet mounting rails. (See Figure 3-60.)
Step 6 Connect the (72-1646-xx) cable as follows (see Figure 3-61):
Step 7 You can leave the fuse installed or the breaker closed (as applies to your system) at this point. If you do so, your system can remain operable through this entire installation.
For the highest degree of safety, Cisco recommends that you:
(a). Turn power OFF on every unit in the power circuit that you will be on. (See Appendix A to determine which units are on a specific power circuit.)
(b). Open the circuit breakers in the power circuit that your Gatekeeper will be on or remove those fuses with insulated-handle fuse pullers for that size fuse (as applies to your system).
Step 8 If your system is configured for DC power, refer to Figure 3-62, Figure 3-63, and Figure 3-64, then:
(a). Remove the two screws from the power supply on the right side of the Gatekeeper.
(b). Get the ground bracket from the DC kit and attach it over the power supply.
(c). Use the two screws (48-0395-xx) to attach the ground lug cable to the ground lugs on the left of the Gatekeeper.
(d). Use the two screws (48-0395-xx) to attach the ground lug cable to the tap angle.
(e). Attach the ground lug bracket to the chassis.
(f). Place the electrical rating label over the ground lug bracket.
Step 9 Connect the power cable:
(a). Insert the female connector into the three-pronged connector on the upper-right portion of the Gatekeeper.
(b). Insert the male connector into the AC Power Strip connector labeled SC.
(a). Insert the tinned wires into the terminal blocks on the upper-right portion of the Gatekeeper. Red must go to positive (+), then black must go to negative (-).
(b). Use a flat-bladed #1 screwdriver to tighten the set-screws that clamp the wire-connectors into the terminal blocks.
(c). Insert the male connector into the DC busbar connector labeled B1.
Step 10 Turn the Gatekeeper power ON.
Step 11 If you performed Step 10:
(a). Close the circuit breakers or insert the fuses that you removed with insulated-handle fuse pullers for that size fuse (as applies to your system).
(b). Turn power ON for every unit in the power circuit. (See Appendix A to determine which units are on a specific power circuit.)
![]()
![]()
![]()
![]()
![]()
![]()
![]()
![]()
Posted: Tue Jan 21 01:09:24 PST 2003
All contents are Copyright © 1992--2002 Cisco Systems, Inc. All rights reserved.
Important Notices and Privacy Statement.