|
|

The Cisco DialOut Utility, Release 2.0, starts up automatically when you start Windows. It normally runs a test and then minimizes itself.
When the Cisco DialOut Utility is minimized, an icon appears in the Active Icon tray on the Windows desktop. The icon has two lights that flash red and green as data packets are sent and received. Note that the Cisco DialOut Utility lights and the lights on the Microsoft Dial-Up Networking icon next to it do not flash in unison.
Note If you remove the Cisco DialOut Utility from the Startup group, you will need to start it manually before you start your fax or communications applications. The utility must be running, either maximized or minimized, for the virtual ports to be available. We recommend that you minimize the Cisco DialOut Utility, rather than exit it. If you exit, you will need to restart the Cisco DialOut Utility on the workstation before you can send a fax or use your communications application. If you must exit the Cisco DialOut Utility, click File then Exit.
When Cisco DialOut Utility starts, if the optional user security is enabled, the Secure Login dialog box opens. See Figure 3-1. If user security is not enabled, this dialog box will not open.

Step 2 Enter your NAS password. The Cisco DialOut Utility cannot gain access to your password, so you need to enter it yourself. As you enter your password, asterisks (*) display so that your password is protected, but the data is received by Cisco DialOut Utility correctly.
Step 3 (Optional) You can allow the Cisco DialOut Utility to remember your password so that you do not need to enter it every time you need to access the NAS. To allow this, click the Save Password check box.
Note Allowing the password to be saved results in a less secure system.
Step 4 Click OK when finished. The username and password are sent to the NAS. If the password is entered incorrectly, or if you click Cancel, the Cisco DialOut Utility displays an error message.
If your NAS is not configured for security but you have saved your user information and password, a message displays letting you know that your NAS is not configured for security. This has no effect on the utility. Click OK to acknowledge the message.
To cancel the login, click Cancel. If you cancel, the Cisco DialOut Utility marks the session as a failure.
The Cisco DialOut Utility Front Panel window is designed to look like a modem, with a few additions. Use the front panel to access the following menu items:
To open the Cisco DialOut Utility Front Panel, follow these steps:
Step 2 (Optional) To display the hidden File Help toolbar, click the right mouse button, then select DialOut Menu. This allows you to use Cisco DialOut Utility without a mouse. See Figure 3-2.

To access online help for the Cisco DialOut Utility, click Help.
Note We recommend that you minimize the Cisco DialOut Utility rather than exit it. If you exit, you will need to restart the Cisco DialOut Utility or the workstation before you can send a fax or use your communications application. If you must exit the Cisco DialOut Utility, click File then Exit.
The com port drop-down menu displays and allows you to change the com port that is being monitored by the lights and the status button. To select a different com port, click the down arrow to the right of the field and highlight the com port to monitor.
For instructions on adding or removing com ports, see the section "Add Port" or the section "Remove Port" in this chapter.
These LEDs are similar to those found on a modem. The front-panel LEDs show the status of four common communication parameters:
The colors of each of the four LEDs have the meanings listed below:
Note You might not see the Tx light change from green to red. This is due to the speed at which the transmission to the NAS occurs.
Note You might not see the Rx LED change from green to red. This is due to the speed at which the data in the Cisco DialOut Utility is being read by the communications application.
From the front panel window, click More > to open the More Functions window. See Figure 3-3.

From the More Functions window, you can perform the following tasks:
To add or remove com ports, follow these steps:

To add a com port, follow these steps:
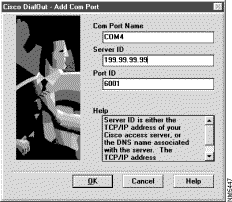
Step 2 Enter the Com Port Name, either COM1, COM2, COM3, or COM4. SETUP.EXE has already automatically selected the name of the next available com port. If necessary, you can change this setting now or after the Cisco DialOut Utility is installed. You can use any name your application allows; however, we recommend you use COM1, COM2, COM3, or COM4.
Step 3 Enter the Server ID, either the TCP/IP address of the Cisco NAS through which you will dial out, or a DNS name associated with the server.
Note Check with your system administrator for the TCP/IP address or DNS name of the NAS on your network.
Step 4 Enter the Port ID—Represents the modem on the NAS. Normally this number will be 6001, 6002, and so on; or 7001, 7002, and so on. See your system administrator for the number to use. To stop the definition of this com port and start again, click Cancel.
Step 5 After all fields have been defined, click OK.
Note After you have finished adding com ports, you must follow the instructions in the sections "Selecting and Configuring the Modem" and "Adding and Configuring Your Applications."
Follow these steps to remove a com port from the Cisco DialOut Utility:
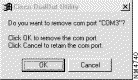
Step 2 Click OK to confirm removal or click Cancel to keep the port.
Step 3 To make the change effective, you will be prompted to reboot the PC at the appropriate time. See the README.DOC file for additional information.
If Save User Information in Memory is enabled, Cisco DialOut Utility asks for a username and password at startup. The initial value (enabled or disabled) is detected when the com port is added. Change this field only if there has been a change in the security configuration on the NAS.
To enable or change the simulated modem sounds, follow these steps:
Note Because the sounds are generated using .wav files, the computer on which you are using the utility must have a multimedia package installed and working correctly, and the sound must be turned on.
Step 2 From the Cisco DialOut Utility Front Panel, click More>.
Step 3 Click Configure Ports.
Step 4 Click Sounds.
Step 5 Enter the name(s) of the wave file(s) you want to change in the applicable dialog box in the Sounds window. The default sound files are:
Step 6 After all fields have been reconfigured, click OK.
To test an individual com port, follow these steps:
During the test, Cisco DialOut Utility displays Testing next to the item being tested. If the tests are successful, the Test Connection window will display Good next to each item. See Figure 3-7.
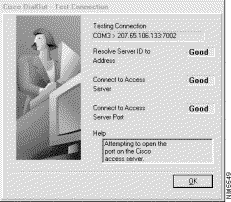
If a test is unsuccessful, Cisco DialOut Utility displays Error next to the item. Check the Help window for information on resolving any problems.
Step 2 When all tests are complete, click OK to return to the More Functions window.
The Cisco DialOut Utility Statistics window displays the statistics of the selected com port. The data presented is a snapshot of information that can be used to monitor the connection with the NAS as well as provide information for troubleshooting.
Step 2 Click Statistics. The Statistics window opens. See Figure 3-8.

Step 3 Click Refresh to refresh the values in the Statistics window. The window is updated to the current values. However, clicking Refresh does not reset the values. You can use the Refresh feature to indicate progress of transmission or download (receiving).
Note The Statistics Window does not dynamically update.
The Statistics window displays the following items:
Step 4 Click OK to return to the front panel.
To test operation of all com ports, follow these steps:
During the test, Cisco DialOut Utility displays Testing next to the item being tested. If the tests are successful, the Test Connection window will display Good next to each item. See Figure 3-9.
If a test is unsuccessful, Cisco DialOut Utility displays Error next to the item. For information on resolving any problems, check the Help window, the README.DOC file, the "Troubleshooting Information" chapter, or the "Information for the System Administrator" appendix.
Step 2 When all tests are complete, click OK to return to the More Functions window.
In the unlikely event your application hangs, you might need to terminate the session. From the More Functions window, click Disconnect Current Session.
![]()
![]()
![]()
![]()
![]()
![]()
![]()
![]()
Posted: Tue Jan 21 04:11:57 PST 2003
All contents are Copyright © 1992--2002 Cisco Systems, Inc. All rights reserved.
Important Notices and Privacy Statement.
