|
|

This chapter provides specific information on installing and preconfiguring the Cisco DialOut Utility, Release 1.5, software. It also provides instructions for uninstalling the software.
This section contains an overview of the general steps to install and configure the Cisco DialOut Utility.
1. Install and configure the network access server (NAS). See the "Sample NAS Configurations for the Cisco DialOut Utility" appendix.
2. Make sure the modem in the NAS is installed and configured properly. See the "Sample NAS Configurations for the Cisco DialOut Utility" appendix, your modem manufacturer's documentation, and the README file.
3. Run the Windows Telnet utility to make sure you can connect to the NAS before you install the Cisco DialOut Utility. See the "Before Installing the Cisco DialOut Utility" section.
4. Run SETUP.EXE. See the "Installing the Cisco DialOut Utility" section.
5. In Windows, configure a modem for the virtual com port that was selected during Cisco DialOut Utility installation. See the "Selecting and Configuring the Modem" section and your Windows documentation.
6. Configure your fax or communications application software to use the virtual com port that was selected during Cisco DialOut Utility installation. See the README.DOC file and your software manufacturer's documentation for more information.
Before you install the Cisco DialOut Utility, run the Windows Telnet utility to make sure you can connect to the NAS. Follow these steps:
Step 1 Make sure the NAS is connected and operating correctly.
Step 2 From the Windows desktop, click Start.
Step 3 Click Run>Telnet>Connect>Remote System.
Step 4 Select or enter the following information:
Step 5 Click Connect. The Telnet window opens.
Step 6 (Optional) If your NAS is configured for security, you are prompted to log in with your regular username and password.
Step 7 Enter at. The server should respond OK.
Step 8 Enter atz. The server should respond OK.
Step 9 Follow the escape commands on the display.
Step 10 From the Connect menu, select Disconnect.
If you are unable to connect, check that the network is operating correctly and try again.
To install the Cisco DialOut Utility, follow these steps:
Step 1 Close any other programs that are running.
Step 2 Download the DOUT353.EXE file from Cisco Connection Online (CCO) into a temporary directory on the workstation's hard drive.
Step 3 From the Windows Explorer, go to the temporary directory and double-click DOUT353.EXE. This is a self-extracting file and will expand into the temporary directory.
Step 4 Double-click SETUP.EXE.
Step 5 Click OK. The Setup window opens. (See Figure 2-1.)
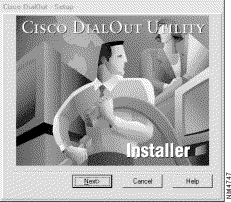
Step 6 Click Next to continue the setup process. Click Cancel to exit SETUP.EXE without installing the software. Click Help at any time for more information on the SETUP.EXE program.
If you clicked Next, the Analyzing Environment window opens and SETUP.EXE analyzes the current Windows environment and the location of a number of needed resources. The display is updated as each action is performed. If the SETUP.EXE program detects an error, a message is displayed and the process stops. See the "Troubleshooting Information" chapter for an explanation of common error messages and their resolutions.
(Optional) If the Cisco DialOut Utility is already installed, the Update Options window opens. (See Figure 2-2.)
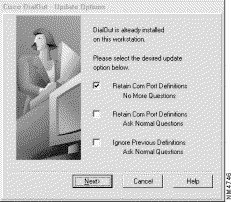
Step 7 (Optional) Click the appropriate box to select one of the following options:
To stop the setup process before any modifications are made to the workstation, click Cancel. To proceed with the setup process, click Next.
The Program Path window opens. (See Figure 2-3.)

Step 8 Enter the full path for the directory in which to place the Cisco DialOut Utility files. The directory does not need to exist; SETUP.EXE creates one if necessary. You can select the default directory or enter one of your own. The default directory depends on the version and language of Windows that you are using and the drive on which Windows is installed.
For the English language version of Windows, the default is one of the following:
If you use a directory name other than the default, you must specify the full path exactly, including the drive letter and any parent directories; for example:
c:\program files\cisco systems\dialout
Step 9 To stop the setup process before any modifications are made to the workstation, click Cancel. To proceed with the setup process, click Next. The Add Com Port window opens. (See Figure 2-4.)
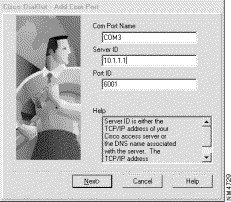
Step 10 Enter the information for three fields:
To stop the definition of this com port and start over, click Cancel.
When you have entered the information for all three fields, click Next. The Cisco DialOut Utility tests the information you entered. (See Figure 2-5.)
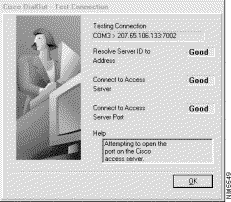
If a test is successful, Cisco DialOut Utility displays Good next to the item. If a test is unsuccessful, Cisco DialOut Utility displays Error next to the item. Check the information in the Help window for information on resolving any problems.
Step 11 If the test was unsuccessful, you can either click Return to Previous Screen to enter the correct information or Go ahead and Copy Files to continue with the installation. If you click Go ahead and Copy Files, you will need to enter the correct information later after the Cisco DialOut Utility is installed. See the "Configure Ports" section in the "Using the Cisco DialOut Utility" chapter. If you have a previous installation of Cisco DialOut Utility, the Uninstall window opens and the previously installed files are deleted.
Step 12 When all tests are complete, click OK. The Use Sounds window opens. (See Figure 2-6.)

Step 13 Click the Use Sounds check box to allow the Cisco DialOut Utility to simulate modem sounds when dialing out or faxing. Because the sounds are generated using .wav files, the computer on which you are using the utility must have a multimedia package installed and working correctly, and the sound must be turned on.
The .wav files will be installed whether or not you select Use Sounds. This allows you to enable sounds later if you change your mind after installation or if you want to change the default sounds. To change the default sounds, copy the .wav files you want to use into the directory in which you installed the Cisco DialOut Utility and enter the name(s) of the wave file(s) you want to change in the applicable dialog box in the Sounds window.
The default sound files are:
Step 14 Click Next. SETUP.EXE copies the Cisco DialOut Utility software files to the hard disk of the workstation. As each file is copied, the filename and destination are displayed in the Copying Files window. After all files have been copied to the hard disk, the Windows Registry is modified. See the "Changes to Windows Files and Registry Entries" appendix for details. You are then asked if you want to view the README.DOC file.
If you click Yes, the README.DOC file will open and remain open until you close the file. The Completed window opens. (See Figure 2-7.)

Step 15 To finish the setup process, click Reboot Now. To exit the setup program without restarting Windows, click Do Not Reboot.
If you selected Reboot Now, the Setup restart window opens. (See Figure 2-8.)
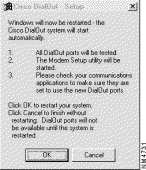
Step 16 Click OK to restart the system or Cancel to exit the setup program without restarting.
After the system reboots, the Test Connection window opens and SETUP.EXE tests the com ports. If a port test is successful, SETUP.EXE displays the following message:
Test of port Comx was successful
where x is the number of the com port.
Click OK.
(Optional) If your NAS is configured for authentication, authorization, and accounting (AAA) security, the Login window opens. (See Figure 2-9.)

Enter your username and password and click OK.
(Optional) You can allow the Cisco DialOut Utility to remember your password so that you do not need to enter it every time you need to access the NAS. To allow this, click the Save Password check box.
If your NAS is not configured for security but you have saved your user information and password, a message displays letting you know that your NAS is not configured for security. This has no effect on the utility. Click OK to acknowledge the message.
You must select a modem for the com port selected during installation. After the system has restarted, the Windows Modem Wizard opens so you can add a new modem definition. Follow these steps:
Step 1 Use the automatic detect facility to identify the type of modem on the port. See your Windows documentation for more information.
Step 2 (Optional) If you are installing Cisco DialOut Utility on a laptop, the Install New Modem window opens. (See Figure 2-10.)

Step 3 Click Other.
Step 4 Click Next. The Modem Selection window opens. (See Figure 2-11.)

Step 5 Let the software automatically detect your modem. The software looks for a modem on all ports. If the automatic detect facility selects standard modem, change it to match the modem that is actually installed on your NAS. Contact your modem manufacturer to make sure you have the most current version of modem software installed. Click Next.
(Optional) If you are using a Cisco AS5xxx access server, click Have Disk, browse to the temporary installation directory, and click the applicable modem for your system. Check with your system administrator if you are unsure which modem to select.
See the README.DOC file for additional information.
Step 6 Enable hardware flow control for the modem:
(a) Click Start>Settings>Control Panel.
(b) Double-click Modems.
(c) Click the Connection tab.
(d) Click Advanced.
(e) Check the Use Flow Control check box and the Hardware (RTS/CTS) button.
(f) Click OK until you return to the Modem Selection window.
Step 7 Click OK. Windows restarts automatically.
After you have finished installing the Cisco DialOut Utility software and selected and configured your modem, click Start>Control Panel>Add/Remove Programs to configure your fax or communication software to use the com port that SETUP.EXE selected during installation. See your software manufacturer's documentation and the README.DOC file for instructions on configuring selected applications.
When you have finished adding and configuring your application, restart Windows.
To add more com ports on which to use the Cisco DialOut Utility, follow the instructions in the "Add Port" section in the "Using the Cisco DialOut Utility" chapter.
The uninstall process removes the Cisco DialOut Utility files and Windows Registry entries. To uninstall the software, follow these steps:
Step 1 From the Windows desktop, click Start>Control Panel>Add/Remove Programs.
Step 2 In the Install/Uninstall tab, click Cisco DialOut Windows xx.
where xx is the version of Windows, either 95, 98, or NT.
Step 3 Click Add/Remove. The Uninstall window opens and welcomes you to the removal process. It also provides you with an opportunity to exit UNINSTAL.EXE if it was started accidentally.
Step 4 If you do not want to remove the Cisco DialOut Utility, click Cancel. To continue the removal process, click Next. A dialog box opens asking for confirmation.
Step 5 Click Yes to proceed with the uninstall process or No to stop the process. The Uninstall window opens and the files are deleted from your workstation's hard disk. As each file is removed, the filename is displayed. After all of the files have been removed, all resource pointers that were added to the workstation are removed from the Windows Registry.
When removal is complete, the Completed window opens.
Step 6 Click Finish. A dialog box opens asking if you want to reboot.
Step 7 Click Yes to reboot or No to exit the removal process without rebooting. If you reboot, Cisco DialOut Utility is removed from the hard disk immediately. If you do not reboot now, Cisco DialOut Utility is removed from the hard disk the next time you reboot.
|
|
