cc/td/doc/product/access/acs_soft/cs_unx
hometocprevnextglossaryfeedbacksearchhelp
PDF

Table Of Contents

ACS and NAS Management

Managing Profiles for TACACS+-Enabled NASes

Adding and Configuring Profiles of TACACS+-Enabled NASes

Deleting TACACS+ NAS Profiles

Adding and Configuring NASes as RADIUS Clients

Managing Profiles of RADIUS-Enabled NASes

Adding a Profile of a RADIUS-Enabled NAS

Changing Profile Information for a RADIUS-Enabled NAS

Deleting a NAS as a RADIUS-Enabled Client

Managing General Settings on the ACS

Managing RADIUS Settings on the ACS

Adding a RADIUS Server Profile for an ACS

Changing RADIUS Profile Information for an ACS

Deleting a RADIUS Profile for an ACS

Managing RADIUS Dictionaries

Adding a RADIUS Dictionary

Adding New Attributes To A Newly Created Dictionary

Changing RADIUS Dictionary Information

Deleting a RADIUS Dictionary

Displaying a System Summary and Expired Passwords

Clearing the Failed Logins Counter

Setting Up Access to a Local or Remote Domain

Deleting Access to a Local or Remote Domain

Logging Off the CiscoSecure Administrator Interface


ACS and NAS Management


This chapter contains the instructions for managing the CiscoSecure Access Control Server (ACS) and its network access server (NAS) clients through the CiscoSecure ACS web-based management interface.

This chapter covers the following topics:

Managing Profiles for TACACS+-Enabled NASes

Adding and Configuring NASes as RADIUS Clients

Managing General Settings on the ACS

Managing RADIUS Settings on the ACS

Managing RADIUS Dictionaries

Displaying a System Summary and Expired Passwords

Clearing the Failed Logins Counter

Setting Up Access to a Local or Remote Domain

Logging Off the CiscoSecure Administrator Interface

Managing Profiles for TACACS+-Enabled NASes

When you installed the CiscoSecure ACS, you either specified a single NAS as a TACACS+-enabled ACS client or you allowed any NAS with a matching secret TACACS+ key to act as an ACS client. The CiscoSecure ACS AAA NAS web page enables you to add, configure, and delete profiles of TACACS+-enabled NASes as ACS clients.

Adding and Configuring Profiles of TACACS+-Enabled NASes


Step 1 In the CiscoSecure ACS web menu bar of the web interface, click AAA and NAS to display the AAA NAS web page.

Figure 6-1 AAA NAS Page

Step 2 When the AAA NAS page appears, specify the name of the NAS client that you want to add or configure.

To add a profile for a new TACACS+-enabled NAS, click New.

To edit the profile of an existing TACACS+-enabled NAS, select the NAS name and click Edit.

The NAS configuration page appears.

Figure 6-2 NAS Configuration Page

Step 3 Fill in or edit the appropriate fields:

NAS Name—The TACACS+ NAS name. This is usually the NAS host name. It can also be the IP address of the NAS. The CiscoSecure Administrator GUI accepts a maximum of 255 characters for NAS name/IP address.


Note If you use their IP addresses to specify your NASes, use either all regular expressions (for example, 10.10.1) or all fully defined IP addresses (for example, 10.10.1.48). Do not define one of your NASes with a regular expression and other NASes with fully defined subsets of that expression.


NAS Secret—The secret TACACS+ key to be used for communication between the TACACS+-enabled NAS and ACS.

NAS Message Catalogue file name—The name of the message catalogue file containing the messages to be displayed from the specified NAS client.

UserName Retries Allowed—The number of username reentries allowed before a login attempt to the specified NAS is terminated.

Password Retries Allowed—The number of password reentries allowed before a login attempt to the specified NAS is terminated.

Step 4 Click Save and then click Re-Initialize at the top right of the page to effect the changes.


Deleting TACACS+ NAS Profiles

To delete an existing profile of a TACACS+-enabled NAS client, do as follows:


Step 1 In the CiscoSecure ACS web menu bar of the web interface, click AAA and NAS to display the AAA NAS web page.

Step 2 In the TACACS+ NAS Configurations list box, select the profile name of the NAS that you want to disable as a CiscoSecure ACS client and click Delete.

Step 3 Click Re-Initialize at the top right of the page to effect the change.


Adding and Configuring NASes as RADIUS Clients

The CiscoSecure Administrator advanced configuration program provides a special tabbed NASes page for adding NASes as RADIUS-enabled clients to the CiscoSecure ACS.

Managing Profiles of RADIUS-Enabled NASes

To display, add, copy, delete, edit, or unlock the NASes configured as RADIUS-enabled clients, follow these steps:


Step 1 Start the Java-based CiscoSecure Administrator advanced configuration program and click the NASes tab.

Step 2 (Optional) To update the list of NASes, click the NASes button at the top of the list of available NASes. The Administrator window will reload from the database and get the current list of available NASes. This is useful when more than one person is making changes to NAS profiles.

Step 3 Click the IP address in the left column to display NAS profile information. (See Figure 6-3.)

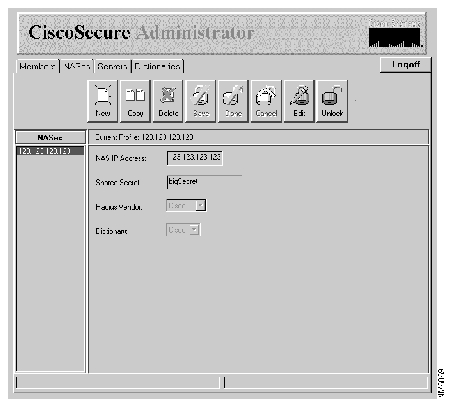
Figure 6-3 CiscoSecure Administrator NASes Tabbed Page

The following information displays:

NAS IP address—IP address of the NAS.

Shared Secret—Password shared between the CiscoSecure ACS and the NAS.

RADIUS Vendor—Vendor classification of the NAS. Currently there are three choices: Cisco, Ascend, and IETF. This classification lets the RADIUS/AAA server know which set of extensions to associate with this NAS.

RADIUS Dictionary—The name of the RADIUS dictionary associated with this NAS. (See the "RADIUS Attribute-Value Pairs and Dictionary Management" chapter for more information on the dictionary.)


Adding a Profile of a RADIUS-Enabled NAS

To add a NAS to the list of CiscoSecure ACS clients:


Step 1 In the NASes page of the CiscoSecure Administrator advanced configuration program, click New. You will be prompted to enter the IP address of the new NAS.

Step 2 Enter the IP address of the new NAS in the NAS IP Address field.

Step 3 If necessary, log in to the NAS and input the appropriate NAS configuration commands as described in the "Changing Profile Information for a RADIUS-Enabled NAS" section.


Timesaver To create a NAS profile with characteristics similar to one already created, just click the IP address of the similar NAS, then click Copy. You can then modify individual characteristics of the new NAS by clicking Edit.


Changing Profile Information for a RADIUS-Enabled NAS

To change the information for a NAS RADIUS-enabled NAS client, follow these steps:


Step 1 In the NASes page of the CiscoSecure Administrator advanced configuration program, click the name of the NAS for which you want to change information.

Step 2 Click Edit.

Step 3 Click the field you want to change. The following information can be changed:

Shared Secret

RADIUS Vendor

RADIUS Dictionary. (See the chapter "RADIUS Attribute-Value Pairs and Dictionary Management" in the CiscoSecure ACS 2.3 for UNIX Reference Guide for more information.)

Step 4 Type or select the new information.

Step 5 When you have finished, click one of the following:

Done—Save the edits you just made and unlock the object

Save—Save the edits you just made and keep the object locked

Cancel—Exit without making changes and unlock the object


Deleting a NAS as a RADIUS-Enabled Client

To delete a NAS as a RADIUS-enabled client:


Step 1 In the NASes page of the CiscoSecure Administrator advanced configuration program, click the name of the NAS you want to delete.

Step 2 Click Delete. The name of the NAS will be removed from the list.


Managing General Settings on the ACS

The CiscoSecure ACS AAA General web page enables you to specify authentication methods, time zone, and logging mode options for the CiscoSecure ACS server.


Step 1 In the CiscoSecure ACS web menu bar of the web interface, click AAA and then click General to display the AAA General configuration page.

Figure 6-4 AAA General Web Page

Step 2 Check off the authentication methods that you want the ACS to support. The choices are:

S/KEY—Enables the ACS to support the one-time password system from Bellcore.

PAP—Password Authentication Protocol. Enables the ACS to support the use of passwords for PAP authentication during PPP negotiation.

CHAP—Challenge Handshake Authentication Protocol. Enables the ACS to support passwords for CHAP authentication during PPP negotiation.

ARAP—AppleTalk Remote Access Protocol. Enables the ACS to support passwords for ARAP authentication during AppleTalk Remote Access (ARA).

CryptoCard—Enables the ACS to support authentication by the CRYPTOCard token card that will be used for generating passwords.

Secure Computing—Enables the ACS to support authentication by the Secure Computing SafeWord authentication server.

Security Dynamics (ACE Server)—Enables the ACS to support authentication by Security Dynamics, Inc. ACE Server.

Step 3 In the Local Timezone field, specify the local time zone in relation to Universal Mean Time (Greenwich Mean Time). For example, Universal Mean Time is 0 (zero); United States Eastern Standard Time is -5; and United States Pacific Standard Time is -8.

Step 4 In the CiscoSecure License Key field, enter the server license key. This is the key code that you received after you accessed the CiscoSecure License web page or filled out the "CiscoSecure Fax Back Form" before installing
CiscoSecure ACS 2.3.

Step 5 In the Max Sessions Enabled field, select the type of max sessions control that you want enabled for this ACS. Max sessions controls enable the administrator to limit the number of sessions that a user, or group of users can open at any one time.


Note For any Max Sessions Enabled selection to take effect, the CiscoSecure ACS must be stopped and restarted, not simply "Re-Initialized." See step 10 of this procedure.


Max Sessions Enabled selections are:

None—Disables all maximum sessions controls.

Non-Distributed AAA

Non-Distributed DBServer

Both "Non-Distributed" selections enable the administrator to use the Java-based CiscoSecure Administrator advanced configuration program to apply the Profile Attributes>server max sessions attributes option to single user profiles or group profiles, limiting the number of concurrent sessions allowed to a single user or setting the default number of concurrent sessions allowed to each user in a group.

The Non-Distributed AAA selection implements a faster max sessions control routine.

The Non-Distributed DBServer selection implements a more reliable max sessions control routine—one that maintains user open session counts even if the ACS is stopped and restarted.

AAA accounting packets must be enabled on the client NASes for either selection to take effect.

Distributed—Enables the full-featured Distributed Session Manager (DSM) maximum session control. This selection enables the administrator to use the CiscoSecure Administrator DSM web pages to limit, track, and reset concurrent sessions on a per user, per group, per VPDN, or PoP specific basis.

This selection is valid only if you have licensed the DSM module on this ACS. AAA accounting packets must be enabled on the client NASes for this selection to take effect.

Step 6 In the Max. Failed Authentications field, specify the maximum number of failed authentication attempts allowed per user. This field specifies the number of failed logins allowed each user before CiscoSecure disables that user's account. This feature minimizes the possibility of successful third party "random password generator" attacks on CiscoSecure user accounts.


Note To enable user accounts that are disabled by this feature, see the "Clearing the Failed Logins Counter" section.


Step 7 In the Token Cache Absolute Timeout field, specify, in seconds, the absolute maximum amount of time that a token password will be cached for users being authenticated through this CiscoSecure ACS. This absolute timeout setting overrides individual group or user profile token caching timeout settings that specify longer time periods. This setting does not override group or user profile token caching timeout settings that specify equal or shorter periods.

Step 8 If necessary, select additional logging options in the Logging Options pane. This specifies the types of system messages that the CiscoSecure ACS will record to a system log file that you specify through the UNIX syslog utility.


Note To implement RADIUS logging options, first open the Java-based CiscoSecure Administrator advanced configuration program, click the Servers tab, select the current server, click Edit, enable the Debugging option and click Done. Then return to the AAA General page and enable the appropriate logging options described below.


Note For details on setting up the UNIX system log file, see "UNIX Syslog Configuration" in the chapter "Troubleshooting Information " in the CiscoSecure ACS 2.3 for UNIX Reference Guide.


Caution Cisco recommends that you leave these logging options unchanged. If necessary these options can be selected for troubleshooting purposes in communication with Cisco Technical Support.

The logging options you can enable are as follows:

LOG_DEBUG—Log debug information

LOG_INFO—Log informational messages

LOG_NOTICE—Log notices

LOG_WARNING—Log warnings

LOG_ERROR—Log error messages

LOG_ALERT—Log alerts

LOG_RADIUS_DEBUG—Log RADIUS-related debug messages

AUTHEN_OK—Log normal authentication information

AUTHEN_FAIL—Log failed authentication information

AUTHEN_ERROR—Log authentication error information

AUTHEN_OUTPUT—Log information sent to the NAS client

AUTHOR_OK—Log normal authorization information

AUTHOR_FAIL_CMD—Log authorization commands failed for bad command lines

AUTHOR_FAIL_ARG—Log authorization commands failed for bad arguments

AUTHOR_FAIL_OTHER—Log authorization commands failed for other reasons

AUTHOR_ERROR—Log authorization errors

AUTHOR_OUTPUT—Log the attributes returned to the NAS on completion of an authorization request

ACCOUNT_OK—Log normal accounting information

ACCOUNT_FAIL—Log failed accounting operations

ACCOUNT_ERROR—Log errors in accounting operations

ERRNO_INFO—Log low-level errors protocol and operating errors that CiscoSecure usually recovers from these errors

SERVICE_INFO—Log major protocol operations

PROTOCOL_ERROR—Log TACACS+ protocol errors

PACKET_INFO—Log TACACS+ protocol packets

Step 9 Click Re-Initialize at the top of the page to implement the changes you have made in the AAA>General page.

Step 10 In addition, if you have made changes to the Max Sessions Enabled selection, you must also stop and restart the CiscoSecure ACS for that selection change to take effect.

a. Log in as [Root] to the SPARCStation where you installed CiscoSecure ACS. To stop the ACS enter:

# /etc/rc0.d/K80CiscoSecure

b. To restart the CiscoSecure ACS, enter:

# /etc/rc2.d/S80CiscoSecure


Caution If accounting information is still being written when the /etc/rc0.d/K80CiscoSecure script is invoked to stop the ACS, the DBServer module of the ACS will not shut down until it finishes writing all accounting information to the RDBMS. This process might take as long as 10 minutes. Do not attempt to shut down the DBServer by other means during this process. Loss of accounting data might result.

Managing RADIUS Settings on the ACS

The Servers tab in the Java-based CiscoSecure Administrator advanced configuration program enables you to carry out simple RADIUS-specific configuration of all CiscoSecure ACSes installed on the network and using the same CiscoSecure database. To configure another ACS on the network, you create a profile for that ACS and edit its parameters.

To display, add, copy, delete, edit, or unlock the available CiscoSecure ACS RADIUS settings profiles:


Step 1 Start Java-based CiscoSecure Administrator advanced configuration program and click the Servers tab.

Step 2 (Optional) To update the list of access control servers, click Servers at the top of the list of available servers. The Administrator window will reload the current list of available access control server profiles from the database. This is useful when more than one person can make changes to the ACS profiles.

Step 3 Click a server's IP address in the left window. The CiscoSecure ACS displays information about the server. (See Figure 6-5.)

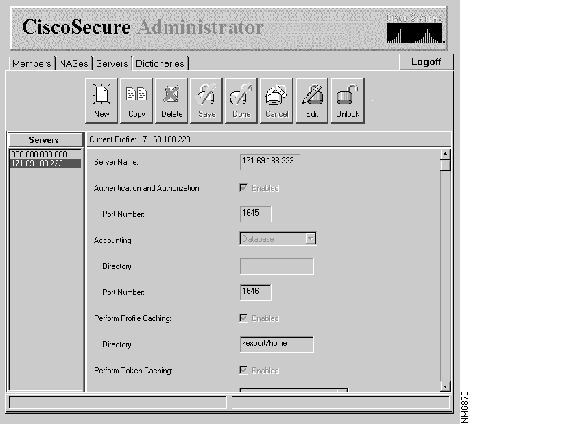
Figure 6-5 CiscoSecure ACS Servers Window


Note You can move between fields by clicking the field with the mouse or pressing the Tab key.


The following fields and information display:

Server Name (IP address)—IP address of the access control server—cannot be changed.

Authentication and Authorization—Toggles authentication and authorization between enabled and disabled for this port.

Port Number—Port on which this server will accept authentication and authorization packets.

Accounting—Accounting method; selections are:

Database—Place accounting information in a database in a modified format.

Database and File—Place accounting information in both a database and a flat file.

Database then File—Place accounting information in the database. If for any reason the CiscoSecure ACS is no longer able to place it in the database, the accounting information will be placed in a flat file.

File—Place accounting information in a flat file (text in RADIUS format).

None—Ignore accounting packets on this server.

Directory—Directory in which to store accounting information, if you have selected the File, Database and File, or Database then File options for Accounting.

Perform Profile Caching—Toggles between enabled and disabled. Disabling this option turns off the profile-caching performance feature for the CiscoSecure ACS.


Note The Perform Profile Caching field applies to both RADIUS and TACACS+ server profiles.


Directory—Directory in which to store cached profile information.

Port Number—Port on which this server will listen for and/or accept accounting packets.

Time to Live—Time interval (in seconds) at which the server checks the database for updated information for the server, NAS, and dictionary profiles. Changes to the Time to Live (TTL) will not take effect until the server's next polling cycle.


Adding a RADIUS Server Profile for an ACS

To add an access control server profile to the list:


Step 1 In the Servers page of the CiscoSecure Administrator advanced configuration program, click New. You will be prompted to enter the IP address of the new server.

Step 2 Enter the IP address for the access server in the Server Name field.

Step 3 If necessary, change the configuration as described in the "Changing RADIUS Profile Information for an ACS" section.


Timesaver To create a server profile with characteristics similar to those of an existing server profile, click the IP address of the existing server profile, then click Copy. You can then modify individual characteristics, if necessary, by clicking Edit.


Changing RADIUS Profile Information for an ACS

To change RADIUS profile information for an ACS server:


Step 1 In the Servers page of the CiscoSecure Administrator advanced configuration program, click Edit.

Step 2 Click the field for the information you want to change for your server.

Step 3 Type or select the new information. Some of the information cannot be changed. The information you can change depends on your system and desired operation of the ACS. For an explanation of the fields on this screen, see the "Managing RADIUS Settings on the ACS" section.


Note The directories mentioned in the following list should already exist.


Step 4 When you have finished, click one of the following:

Done—Save the edits you just made and unlock the server profile

Save—Save the edits you just made and keep the server profile locked

Cancel—Exit without making changes and unlock the server profile


Deleting a RADIUS Profile for an ACS

To delete an access control server profile:


Step 1 In the Servers page of the CiscoSecure Administrator advanced configuration program, click the IP address of the server profile you want to delete.

Step 2 Click Delete. The IP address of the server profile will be removed from the list.


Managing RADIUS Dictionaries

The following RADIUS dictionaries are installed when you select the RADIUS protocol during installation:

Cisco—Optimized for generic Cisco IOS support

Cisco11.1—Optimized to support Cisco IOS Release 11.1

Cisco11.2—Optimized to support Cisco IOS Release 11.2

Cisco11.3—Optimized to support Cisco IOS Release 11.3

Ascend—Optimized to support Ascend

Ascend5—Optimized to support Ascend version 5

IETF—In full compliance with the IETF RADIUS RFC 2138 and RFC 2139 specifications.


Note These dictionaries cannot be changed or deleted; however, you can create copies and change the copies.


Note You do not need to configure dictionary support for the TACACS+ protocol.


To display the RADIUS dictionaries:


Step 1 Start the CiscoSecure Administrator advanced configuration program and click the Dictionaries tab.

Step 2 (Optional) To update the list of dictionaries, click Dictionaries at the top of the list of available dictionaries. The Administrator window will reload from the database and get the current list of available dictionaries. This is useful when more than one person can make changes to the dictionary profiles.

Step 3 Click the name of the dictionary for which you want to display information.

The dictionary attributes display.

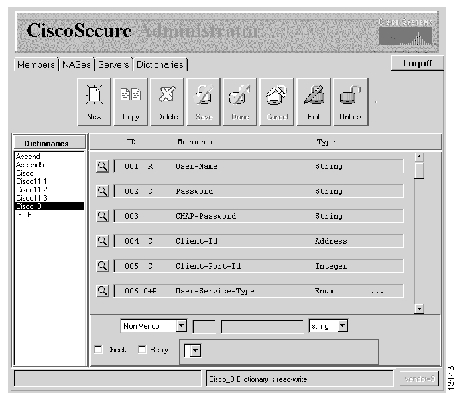
Figure 6-6 RADIUS Dictionary Page View Mode

For each attribute, a summary line is displayed containing the following information:

ID—Number ID of this attribute.

Mnemonic—Attribute name.

Type—Type of data this attribute specifies. Attribute types are listed in Table 6-1.

Table 6-1 Attribute Type Values 

Attribute
Type
Format

string

Displayable ASCII

Length cannot exceed 253 characters

ipaddr

4 octets

Octets must be in network byte order

integer

32 bit value

Big endian order (high byte first)

date

32 bit value

Big endian order; seconds since 00:00:00 GMT, January 1, 1970

abinary

ASCII character set

Length cannot exceed 254 characters

enum

32-bit value

Subset of integers


Step 4 To view the detailed information for a specific attribute, click that attribute's magnifying glass icon.

When you click the attribute's magnifying glass, its detailed information appears in an attribute editor frame at the bottom of the page. The detailed information includes:

Non-Vendor or Vendor specific status—Indicates whether the attribute is a vendor-specific RADIUS attribute.

Attribute ID—Indicates the ID number of the attribute.

Attribute name—Indicates the name of the attribute.

Attribute type—Indicates the type of value in which the attribute is expressed.

Check and/or Reply item—Indicates whether the attribute falls into the category or Check item, Reply item, both, or neither.


Adding a RADIUS Dictionary

To add a dictionary to the list:


Step 1 In the Dictionaries page of the Java-based CiscoSecure Administrator advanced configuration program, click New.

Step 2 Enter the name of the dictionary to add.

Step 3 If necessary, change the configuration as described in the "Changing RADIUS Dictionary Information" section.


Timesaver To create a dictionary with characteristics similar to one already created, just click the name of the similar dictionary, then click Copy. You can then modify individual characteristics of the new dictionary by clicking Edit.


Adding New Attributes To A Newly Created Dictionary


Step 1 Select the new dictionary in the dictionary page and click Edit.

Step 2 Click New. A dialog with the prompt "Create a Dictionary Mnemonic using ID XX, or enter another, unused ID" opens.

Step 3 Enter the appropriate identification and click OK. The new attribute will be created with the ID you entered.


Changing RADIUS Dictionary Information


Caution Use caution when editing dictionaries. Changes to a dictionary will affect all users who are using that dictionary. Only experienced RADIUS system administrators should attempt to edit dictionaries.

Take the following steps to change the information for a dictionary:


Step 1 In the Dictionaries page of the Java-based CiscoSecure Administrator advanced configuration program, click the name of the dictionary for which you want to change information.


Note The Cisco11.1, Cisco11.2, Cisco11.3, Ascend, Ascend5, and IETF dictionaries cannot be changed.


Step 2 Click Edit. The magnifying glass view icons become pencil edit icons. (See Figure 6-7.)

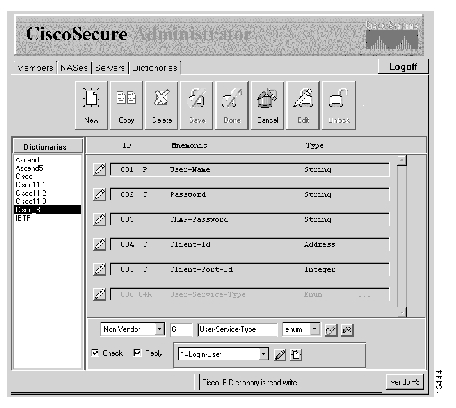
Figure 6-7 RADIUS Dictionary Page Edit Mode

Step 3 If you want to change the vendor ID for the entire dictionary, click vendor= in the lower right corner, enter a new ID number in the Enter Vendor ID dialog box, and click OK.

Step 4 If you want to change the detailed information for a specific attribute, click that attribute's pencil icon.

You can then edit that attribute's detailed information fields in the attribute edit frame at the bottom of the page:

a. Click the pencil icon to edit the values or the paper icon to add a new value.

b. Click the checkmark icon to apply changes, the broken pencil icon to cancel changes, or the X icon to delete a value.

For details on the fields, see the "Managing RADIUS Dictionaries" section.


Note Clicking the checkmark icon applies changes to memory only. Changes are not applied to the database until you click Done or Save.


Step 5 When you have finished, click one of the following:

Done—Save the edits you just made and unlock the object

Save—Save the edits you just made and keep the object locked

Cancel—Exit without making changes and unlock the object


For more information on the Dictionaries window, see the chapter "RADIUS Attribute-Value Pairs and Dictionary Management" in the CiscoSecure ACS 2.3 for UNIX Reference Guide.

Deleting a RADIUS Dictionary

To delete a dictionary:


Step 1 In the Dictionaries page of the CiscoSecure Administrator advanced configuration program, click the name of the dictionary you want to delete.

Step 2 Click Delete. The name of the dictionary will be removed from the list.


Displaying a System Summary and Expired Passwords

To display a summary of the system's statistics, go the Members page of the CiscoSecure advanced configuration program, and click the Display System Summary and Expired Passwords button. You can also click this button to display users with expired passwords by password type.

Figure 6-8 Display System Summary and Expired Passwords Button

The CiscoSecure Properties window opens. To view the system summary, click the Summary Statistics tab. (See Figure 6-9.)

Figure 6-9 CiscoSecure Summary Statistics Window

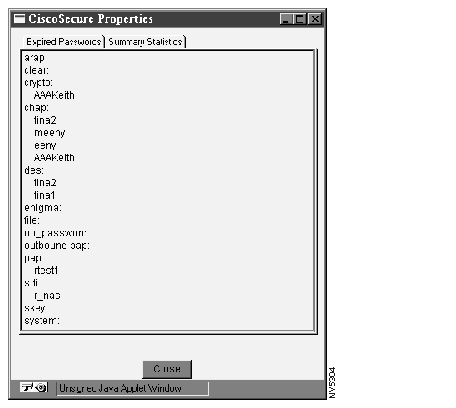
To view expired passwords, click the Expired Passwords tab. (See Figure 6-10.)

Figure 6-10 CiscoSecure Expired Passwords Window

Clearing the Failed Logins Counter

If the number of consecutive failed logins for a given user exceeds the number set in the Max. Failed Authentications field of the CiscoSecure ACS AAA General web page, that user's account is temporarily disabled.

To reenable a user account disabled by too many consecutive failed authentications:


Step 1 In the Members page of the CiscoSecure Administrator advanced configuration program, deselect Browse, find and click the profile of the user whose account was disabled in the Navigator pane, and click Profile in the Profile pane.

Step 2 Reset the failed logins count by locating and selecting the server-current-failed logins icon in the Profile pane. Then, do one of the following:

In the Profile pane, delete the server-current-failed logins attribute and click Apply.

In the Options menu, reset the number of failed logins to zero or to a value below the number specified for Max. Failed Authentications. Then click Apply.

The ACS increments the counter by one for each failed login attempt. If the current count for a user is below the global number and the user logs in successfully, the counter is reset to zero.

Step 3 Reenable the user profile by locating and selecting the profile status icon on the Profile pane. Then do one of the following:

In the Profile pane, delete the profile status icon and click Apply.

On the profile status window, click enabled and click Apply.

Step 4 Click Submit to confirm the user profile's enabled status.


Setting Up Access to a Local or Remote Domain

If you maintain an Internet service accessed by various customers maintaining separate virtual private dial-up networks (VPDNs), the CiscoSecure ACS Domain web page enables you to authenticate VPDN users logging in to access local domains and route VPDN users logging in to access remote domains.

You can configure the CiscoSecure ACS to recognize and authenticate users logging in with specific local domain name strings. You can also configure CiscoSecure ACS to recognize and route users logging in with specific remote domain name strings to the home gateway NAS of those domains.


Note This section provides information only on setting up the CiscoSecure ACS to support login to existing VPDNs. For background information on setting up VPDNs, see the Cisco IOS Release 11.3 Dial Solutions Configuration Guide, Cisco document number 78-4732-01.


To configure the ACS to handle user login strings with domain names:
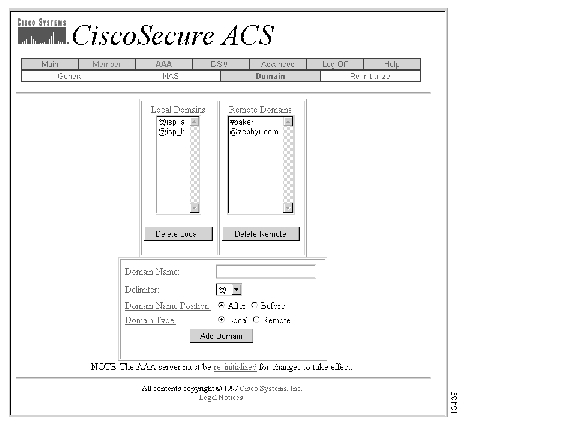

Step 1 In the CiscoSecure ACS web menu bar of the web interface, click AAA and then click Domain to display the AAA Domain configuration page.

Figure 6-11 AAA Domain Web Page

Step 2 In the Domain Name field, enter the name of the remote domain that CiscoSecure users might want to access.

For example, in the login string "sam@zephyr.com," "zephyr.com" is the domain name.

Step 3 In the Delimiter field, select the delimiter character.

This is the character that separates the username from the domain name. For example, for the login string, "sam@zephyr.com," "@" is the delimiter.

Step 4 In the Domain Name Position field, specify the domain name position in relation to the delimiter. Select Before or After.

Step 5 In the Domain Type field, specify whether the domain is local or remote.

A local domain is a domain for which a local NAS (one that is a client of the local ACS) serves as the login host.

A remote domain is a domain for which a remote NAS (one that is not a client of the local ACS) serves as the login host.

Step 6 Click Add Domain.

The domain name string you specified is displayed either in the Local Domains or Remote Domains list box.

Step 7 Click Re-Initialize at the top of the page to effect the changes.


You can enter a local domain name in the CiscoSecure Administrator GUI in the Domain Name\User Name format.

Deleting Access to a Local or Remote Domain

To delete access to a local or remote domain:


Step 1 In the CiscoSecure ACS web menu bar of the web interface, click AAA and then click Domain to display the AAA Domain configuration page.

Step 2 In the Local Domains or Remote Domains list box, select the domain name string you want to disable, then click either Delete Local or Delete Remote, whichever is applicable.

The selected domain name string disappears from the list box.

Step 3 Click Re-Initialize at the top of the page to effect the changes.


Logging Off the CiscoSecure Administrator Interface

To exit the Administrator program, click Logoff.

If you are on any CiscoSecure ACS web page, the Logoff button is in the options bar at the top of the page.

If you are in the Java-based CiscoSecure Administrator advanced configuration program, the Logoff button is located underneath the CiscoSecure Administrator banner.


Note When you log out of the Java-based CiscoSecure Administrator advanced configuration program, the program might require several minutes to shut down.


hometocprevnextglossaryfeedbacksearchhelp

Posted: Wed Feb 16 10:32:04 PST 2005
All contents are Copyright © 1992--2005 Cisco Systems, Inc. All rights reserved.
Important Notices and Privacy Statement.