|
|

This chapter provides preinstallation considerations, which are prerequisites to actual system installation. Use the information in this chapter to ensure that your site is properly prepared, that you have the equipment required for installation, and that you have all the cables and connectors you will need to connect your equipment to the 500-CS. Sections in this chapter provide the following information:
The following guidelines are intended as a refresher to your previous training. You must be trained to work with electrical circuitry before you attempt to upgrade or modify this equipment. Use your training and common sense to avoid damage to the equipment and serious injury to yourself. The following list is not inclusive of all potentially hazardous situations, so be alert!
 | Warning Always replace the chassis cover before plugging in the power cord. When the cover is off, the power supply and dangerous voltages are exposed. |
This section contains the requirements your installation site must meet in order for the new communication server to operate properly. Before you install the server, ensure that the temperature and humidity at your site is suitable, that power is safely accessible and within the operating range, and that all appropriate cabling is in place.
The 500-CS communication server is intended for use in an office environment, which should meet the following specifications:
The 500-CS, which contains an auto-ranging power supply, is suitable for operation with any voltage within the range of 100 to 240 VAC. If the voltage indicated on the label is different from the power outlet voltage, do not plug in the server.
When planning the cabling required for your system, consider distance limitations for signaling, electromagnetic interference, and connector compatibility. Each of these cabling considerations is described in the following sections.
As with all signaling systems, RS-232 signals can travel a limited distance at any given bit rate; generally, the slower the data rate, the greater the distance. Table 2-1 shows the standard relationship between bit rate and distance.
| Data Rate (in bps) | Distance (feet) | Distance (meters) |
|---|---|---|
| 2400 | 200 | 60 |
| 4800 | 100 | 30 |
| 9600 | 50 | 15 |
| 19200 | 25 | 7.6 |
| 38400 | 12 | 3.7 |
RS-423 signals can travel a greater distances than RS-232. Table 2-2 shows the standard relationship between bit rate and distance for RS-423 signals.
| Data Rate (in bps) | Distance (feet) | Distance (meters) |
|---|---|---|
| 2400 | 4100 | 1250 |
| 4800 | 2050 | 625 |
| 9600 | 1025 | 312 |
| 19200 | 513 | 156 |
| 38400 | 256 | 78 |
When wires are run for any significant distance in an electromagnetic field, interference can occur between the field and the signals on the wires. This has two implications for the construction of terminal plant wiring.
If you use twisted-pair cables in your plant wiring with a good distribution of grounding conductors, the plant wiring is unlikely to emit radio interference. When exceeding the distances listed in Table 2-1, use a high quality twisted-pair cable with one ground conductor for each data signal.
To predict and remedy strong electromagnetic interference, you may need to consult experts in radio frequency interference (RFI). If you have wires exceeding the distances in Table 2-1, or if you have wires that pass between buildings, give special consideration to the effect of a lightning strike in your vicinity. The electromagnetic pulse caused by lightning or other high-energy phenomena can easily couple enough energy into unshielded conductors to destroy electronic devices. If you have had this type of problem in the past, you may want to consult experts in electrical surge suppression and shielding.
Most data centers resolve the infrequent but potentially catastrophic problems just described with pulse meters and other special equipment. Take precautions to avoid these problems by providing a properly grounded and shielded environment, with special attention to issues of electrical surge suppression.
To install your 500-CS, you will simply plug in cables. No special tools are required; however, you may need additional equipment to complete the connections to your Ethernet and RS-232/423 devices. Some of the equipment listed below is offered as an option and may be shipped with your 500-CS. To order this optional equipment see the "Service and Support" section in the front of this guide.
The 500-CS uses RJ-45 cables for the RS-232 interfaces. An RJ-45 connector and its pin assignments are shown in Figure 2-1. For devices that do not have an RJ-45 port for the RS-232 interface, you will need a DB-25 adapter to connect the device with the server. Two DB-25 adapters are shown in Figure 2-2: a male (DCE) and a female (DTE). Adapters from Cisco Systems are labeled with the part number on one side, and a designator with the gender (M or F) and mode (DTE or DCE) on the other side, as shown in Figure 2-2. The mode designator refers to the mode of the device you are attaching to the server; for instance, to connect a modem (DCE) that has a female RS-232 port, you would use a male DCE adapter, the designator of which is 29-MDCE-02 (Cisco Part Number 29-0808-01). The designator and Cisco part number for each available cable are as follows:

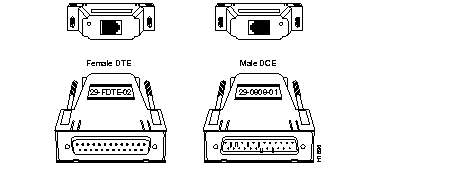
Table 2-3 shows the pin signals for male and female DTE and DCE adapters and the corresponding pin signals on the RJ-45 connector.
| Signal | Direction | RJ-45 Connector | Female DCE | Male DCE | Female DTE | Male DTE |
|---|---|---|---|---|---|---|
| CTS | Input | 1 | 5 | 5 | 4 | 4 |
| DSR | Input | 2 | 6 | 6 | 20 | 20 |
| RxD | Input | 3 | 3 | 3 | 2 | 2 |
| RxC1 | -- | 4 | 7 | 7 | 7 | 7 |
| GND1 | -- | 5 | 7 | 7 | 7 | 7 |
| TxD | Output | 6 | 2 | 2 | 3 | 3 |
| DTR | Output | 7 | 20 | 20 | 6 | 6 |
| RTS | Output | 8 | 4 | 4 | 5 | 5 |
1. Pins 4 and 5 should be connected for RS-232.
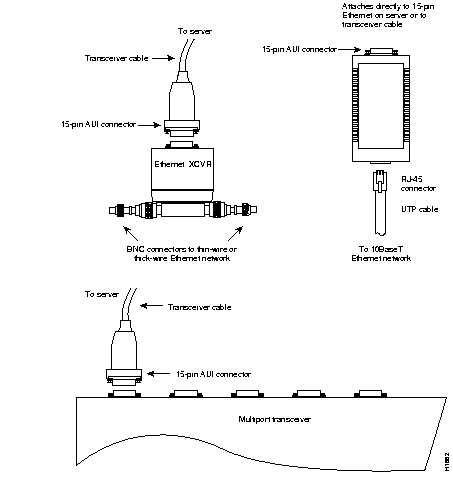
You need an Ethernet transceiver or media attachment unit (MAU) to connect the server to your Ethernet network. Several types of transceivers are available. The type you use depends on the type of cabling your Ethernet network uses: thick wire (or 10Base5), thin wire (10Base2), or unshielded twisted pair (10BaseT).
Some transceivers attach directly to the 15-pin Ethernet port on the server. Others require a transceiver cable between the server and the transceiver. Figure 2-3 shows examples of different types of transceivers.
The following sections provide specific signal requirements for data terminal equipment (DTE) and data communications equipment (DCE) devices. DTE equipment, as the name implies, consists of data terminals. DCE equipment includes modems, printers, and the communication server. Use the signal descriptions and pinouts in this section to plan terminal line connections and to ensure that you have appropriate cables and connectors available before beginning installation. Some software commands are included with the descriptions; however, this publication does not include instructions for configuring software. For software configuration and command descriptions, refer to the Terminal Server Configuration and Reference and Terminal Server Configuration and Reference Addendum for the Cisco 500-CS publications.
In the simplest case of connecting a terminal (a DTE device) to the communication server, you need connect only Gnd, TxD, and RxD signals. Table 2-4 lists the pinouts.
The pinouts for the female DTE cable, Cisco part number 29-0810-01 and mode designator 29-FDTE-01, are shown in Table 2-4.
| Signal | Signal Source | RJ-45 Pin | Female DB-25 (FDTE) Pin | DB-25 Pin Name |
|---|---|---|---|---|
| CTS | Device | Pin 1 | Not connected | |
| DSR | Device | Pin 2 | Not connected | |
| RxD | Device | Pin 3 | Pin 2 | TxD |
| RxC | -- | Pin 4 | Pin 7 | Gnd |
| Gnd | -- | Pin 5 | Pin 7 | Gnd |
| TxD | Server | Pin 6 | Pin 3 | RxD |
| DTR | Server | Pin 7 | Not connected | |
| RTS | Server | Pin 8 | Not connected |
For more line control, connect the DTR (data terminal ready) output (pin 20) of the terminal to the CTS (clear to send) input line of the communication server (see Table 2-5). Then, refer to the Terminal Server Configuration and Reference publication to configure the line with the modem cts-required subcommand of the line configuration command.
To specify CTS required, use a female DTE cable (Cisco Part Number 29-0810-01) and mode designator 29-FDTE-01, with the pinouts shown in Table 2-5.
| Signal | Signal Source | RJ-45 Pin | Female DB-25 (FDTE) Pin | DB-25 Pin Name |
|---|---|---|---|---|
| CTS | Device | Pin 1 | Pin 20 or 41 | DTR or RTS |
| DSR | Device | Pin 2 | Not connected | |
| RxD | Device | Pin 3 | Pin 2 | TxD |
| RxC | -- | Pin 4 | Pin 7 | Gnd |
| Gnd | -- | Pin 5 | Pin 7 | Gnd |
| TxD | Server | Pin 6 | Pin 3 | RxD |
| DTR | Server | Pin 7 | Pin 5 and/or 61 | CTS and/or DSR |
| RTS | Server | Pin 8 | Not connected |
1. Indicates Cisco's implementation, although either pin can be used.
If you want RTS/CTS or hardware flow control on a directly connected line, connect the RTS (Request to Send) output (pin 5) of the terminal to the CTS input of the communication server (see Table 2-6). Then configure the line with the flowcontrol subcommand of the line configuration command. RTS/CTS flow control is not possible on a line using modem control.
To specify hardware flow control on RTS/CTS, use a female DTE cable (Cisco Part Number 29-0810-01) and mode designator 29-FDTE-01, with the pinouts shown in Table 2-6.
| Signal | Signal Source | RJ-45 Pin | Female DB-25 (FDTE) Pin | DB-25 Pin Name |
|---|---|---|---|---|
| CTS | Device | Pin 1 | Pin 4 | RTS |
| DSR | Device | Pin 2 | Not connected | |
| RxD | Device | Pin 3 | Pin 2 | TxD |
| RxC | -- | Pin 4 | Pin 7 | Gnd |
| Gnd | -- | Pin 5 | Pin 7 | Gnd |
| TxD | Server | Pin 6 | Pin 3 | RxD |
| DTR | Server | Pin 7 | Not connected | |
| RTS | Server | Pin 8 | Pin 5 | CTS |
To attach a DCE device with modem control to the communication server, use a male DCE adapter with the pin-out described in Table 2-7 (this pinout configuration is not available from Cisco Systems).
| Signal | Signal Source | RJ-45 Pin | Male DB-25 (MDCE) Pin | DB-25 Pin Name |
|---|---|---|---|---|
| CTS | Device | Pin 1 | Pin 8 | CD |
| DSR | Device | Pin 2 | Pin 22 | RING |
| RxD | Device | Pin 3 | Pin 3 | RxD |
| RxC | -- | Pin 4 | Pin 7 | Gnd |
| Gnd | -- | Pin 5 | Pin 7 | Gnd |
| TxD | Server | Pin 6 | Pin 2 | TxD |
| DTR | Server | Pin 7 | Pin 20 | DTR |
| RTS | Server | Pin 8 | Not connected |
When you attach a dial-in modem (or a terminal switch with modem controls) to the communication server, configure the communication server line with the modem callin subcommand of the line configuration command. An alternative to the modem callin subcommand is the modem ri-is-cd subcommand, which provides hardware flow control for dial modems. The DSR line is called CD in ri-is-cd, and called RING by state tables and debug output. The pinouts for this configuration are shown in Table 2-8.
To specify hardware flow control for a dial modem, use a male DCE cable (Cisco Part Number 29-0808-01) and mode designator 29-MDCE-01, with the pinouts shown in Table 2-8.
| Signal | Signal Source | RJ-45 Pin | Male DB-25 (MDCE) Pin | DB-25 Pin Name |
|---|---|---|---|---|
| CTS | Device | Pin 1 | Pin 5 | CTS |
| DSR | Device | Pin 2 | Pin 61 or 8 | DSR or CD |
| RxD | Device | Pin 3 | Pin 3 | RxD |
| RxC | -- | Pin 4 | Pin 7 | Gnd |
| Gnd | -- | Pin 5 | Pin 7 | Gnd |
| TxD | Server | Pin 6 | Pin 2 | TxD |
| DTR | Server | Pin 7 | Pin 20 | DTR |
| RTS | Server | Pin 8 | Pin 4 | RTS |
1. Indicates Cisco's implementation, although either pin can be used.
If a device with modem control is to be attached to the communication server and accessed by Telnet to that particular serial line on the communication server, configure the line with the modem callout subcommand.
Refer to the Terminal Server Configuration and Reference and the Terminal Server Configuration and Reference Addendum for the Cisco 500-CS publications for further information and guidelines for using these commands.
The site log provides a historical record of all actions relevant to the system. You may want to start such a document and keep it in a common area near the 500-CS where anyone who makes any changes to the server has access to it. This log can be a valuable tool when troubleshooting problems and planning equipment upgrades. Site log entries could include the following:
An example of a site log is shown in Figure 2-4. Make copies of the example log sheet, or create your own site log with fields appropriate for your maintenance procedures.
Site Log
for
| Date | Description of Action Performed or Symptom Observed | Initials |
|---|---|---|
Your 500-CS, cables, documentation, and any optional equipment you ordered might be shipped in more than one container. When you unpack each shipping container, check the packing list to ensure that you received all of the following:
Inspect all items for shipping damage. If anything appears damaged, or if you encounter problems during installation, contact your service representative or the TAC at the number listed in the "Service and Support" section in the front of this publication.
|
|