|
|

This chapter provides a physical description of the 500-CS communication server. It includes power specifications, dimensions, and descriptions of ports, indicators, and the major internal components. Before proceeding, read this chapter to become familiar with your new communication server. In this guide, the name 500-CS and the terms server or communication server are used interchangeably.
Communication servers offer a combination of capabilities that were previously available only with larger, dedicated platforms. The 500-CS combines the following four server capabilities in one unit:
The 500-CS provides bi-directional hardware flow control and modem control. In addition to the flow control, you can set the serial transmit signal voltages to either RS-232 only, or to RS-232/423 to allow for greater cabling distances. The factory default is for RS-232/423.
The 500-CS is a small, light-weight server designed for use where a limited number of connections are required. This server operates in any ambient environment and, because of its quiet operation and compact size, is suitable for any office or desktop location. Table 1-1 lists the dimensions and weight of the 500-CS.
| Dimension | Size |
|---|---|
| Height | 2.45 inches (6.3 cm) |
| Width | 14.5 inches (36.8 cm) |
| Depth | 11 inches (27.9 cm) |
| Weight | 5 pounds (2.27 kg) |
Eight or sixteen RJ-45 ports provide asynchronous terminal connections, and a single Ethernet port provides the local area networking (LAN) connection to your Ethernet network. The RJ-45 ports, which provide RS-232 and RS-423 signalling, allow you to use existing telephone wiring systems. The Ethernet connection is an industry standard 15-pin port to which you attach an Ethernet transceiver cable or an attachment unit interface (AUI). You must install an Ethernet transceiver or AUI between your server and the Ethernet network; these units are described in detail in Chapter 2, "Preinstallation."
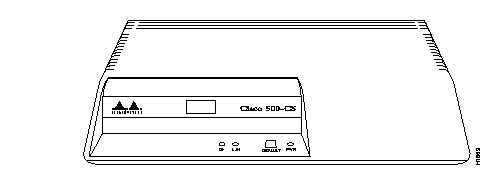
The front of the 500-CS, shown in Figure 1-1, contains three green status indicators and a "return to factory default" switch (labeled "DEFAULT"). The PWR indicator lights whenever power is supplied to the system. Depending upon the amount of operating RAM in your system, the boot cycle will take one to three minutes. Once the system has successfully booted, the OK indicator lights and remains lit to indicate that the system software is functioning properly. The LAN indicator lights when there is activity on the network and will usually flash intermittently or, in heavy traffic, will remain lit.
The DEFAULT reset button on the front of the system is a switch for resetting the system to the defaults. This switch is helpful if you forget the enable password (for entering the EXEC privileged command mode).
To run the setup command facility and overwrite the configuration parameters stored in NVRAM, follow these steps:
Step 1: Turn off the power to the 500-CS.
Step 2: Turn the power back on while holding the default button down.
Step 3: Watch the OK and LAN LEDs. When they blink, release the DEFAULT reset button.
The procedures and software commands for customizing your configuration are described in the Communication Server Configuration and Reference publication.
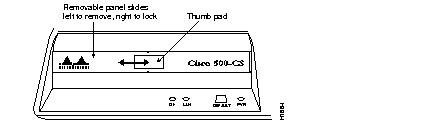
An internal card cage is located behind a removable panel on the front of the server (shown in Figure 1-2). The card cage is not used in the current 500-CS but will support features planned for future releases. The panel contains three alignment tabs: two in the middle and one on the right side. To remove the panel, slide the panel about 1/4 inch to the left. Insert your fingernail or a small flat-blade screwdriver into the opened slot on the right, and pry off the panel. To replace the panel, insert the left edge into the opening first, then align the middle tabs into the alignment notches on the chassis. Slide the panel about 1/4 inch to the right to lock it into place.
The RS-232/423 asynchronous serial lines are provided through 8 or 16 RJ-45 8-pin ports on the 500-CS rear panel, as shown in Figure 1-3. The AC power port and a 15-pin AUI connector for standard Ethernet are also located on the back. The pinouts for these ports are provided in "Signal Descriptions" on page 1-6.
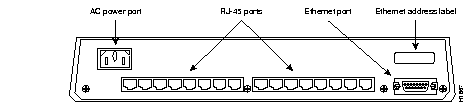
Each 500-CS is assigned a permanent Ethernet address at the factory and stored in nonvolatile random access memory (NVRAM). The address is recorded on two Ethernet address labels. One label is located on the rear panel above the Ethernet connector (see Figure 1-3); the other label is on the bottom of the chassis.
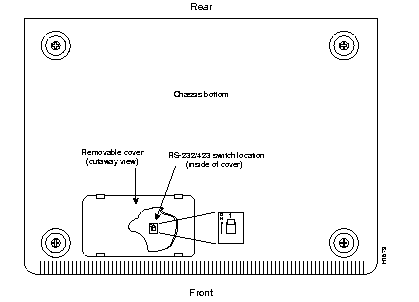
An RS-232/423 switch sets the serial transmit voltages to either RS-232/423 (+/-5V) or RS-232 only (+/- 10V). The switch is located under a removable cover on the underside of the 500-CS (shown in Figure 1-4). The factory default is +/-5V (RS-232/423), which permits you to use longer cables with other devices that use the RS-423 standard. Most RS-423 devices also work with RS-232 levels, so it is seldom necessary to change the switch setting.
Following are descriptions of the primary components of the 500-CS, all of which reside on the single system card. You do not need to access the card for normal operation; however, to upgrade the system operating software or to add operating RAM to your system, a qualified service technician will have to open the chassis and replace or install components on the card. Detailed procedures for replacing these components are provided in Chapter 4, "Maintenance."
Table 1-2 lists the major internal components and the external interfaces of the 500-CS.
| Component | Description |
|---|---|
| LAN Interface | Ethernet Version 2 IEEE 802.3 interface with standard 15-pin (AUI) connector |
| Serial Port Interfaces | 8 or 16 RJ-45 ports (optional at time of order only) |
| Interface Standards | Data: RS-232/423
Modem: RS-232 |
| Modem Signals | RTS, CTS, DTR, DSR |
| Data rates (in bps) | Any user-specified rate between 50 and 38,400 baud |
| Processor | Motorola 68331 @ 16 MHz |
| System memory | 2 MB of RAM (expandable to 4 or 10 MB), 32K of EEPROM |
| Status Indicators | Three front-panel LEDs: PWR, (system) OK, and LAN (activity) |
| Switches | One momentary push-button on the front panel, which restarts system to the defaults (the system ignores the configuration stored in NVRAM)
One slide switch, under a removable cover on the chassis bottom, which sets the serial transmit signal voltages to either RS-232/423 (+/-5 V) or RS-232 only (+/-10 V) |
The 500-CS contains an auto-ranging power supply, which operates on voltages within the range of 100 to 240 VAC. Table 1-3 lists the 500-CS power and environmental requirements.
Following are descriptions of the RJ-45 and Ethernet ports on the 500-CS, including pin signals. Additional information about interfaces and connectors you are likely to use with these ports is provided in Chapter 2, "Preinstallation."
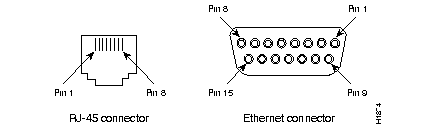
The RJ-45 ports on the 500-CS provide RS-232/423 interfaces. Table 1-4 lists the signal names on the RJ-45 port pins. When viewing an RJ-45 port in the server, pin 1 is on the left, and pin 8 is on the right, as shown in Figure 1-5.
| Pin | Acronym | Signal Name | Direction |
|---|---|---|---|
| 1 | RTS | Ready to send | From server |
| 2 | DTR | Data terminal ready | From server |
| 3 | TxD | Transmit data | From server |
| 4 | GND | Chassis ground | |
| 51 | RxC | Receive common | To server |
| 6 | RxD | Receive data | To server |
| 7 | DSR | Data set ready (or RING) | To server |
| 8 | CTS | Clear to send | To server |
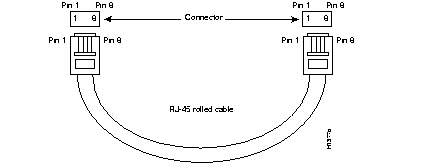
The 500-CS is shipped with one rolled RJ-45 cable and adaptor unless extras are ordered with the system. You can use this cable to directly connect one 500-CS to another 500-CS.
The rolled RJ-45 cable swaps signals, acting as a null-modem cable for a 500-CS. Because a rolled cable swaps signals, the wire that connects to pin 1 on one cable end connects to pin 8 on the other end (see Figure 1-6). Likewise, pin 2 connects to pin 7, pin 3 connects to pin 6, pin 4 connects to pin 5, and so on.
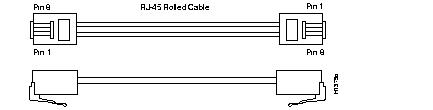
Figure 1-7 shows the rolled RJ-45 connector and cable matchup.
The Ethernet interface on the 500-CS, a standard 15-pin female AUI connector, is located on the rear panel. You must also install an external Ethernet transceiver between the server and the Ethernet network. The transceiver connects to the server with an Ethernet transceiver cable or attachment unit interface (AUI). Transceivers are available from a variety of sources for thick LAN, thin LAN, twisted-pair Ethernet, and other media. Table 1-5 provides the pin signals for the Ethernet port on the 500-CS and the corresponding pin signals on the Ethernet transceiver. When viewing the Ethernet port on the server, the pin locations are as shown in Figure 1-5.
| Pin | Circuit | Description |
|---|---|---|
| 3 | DO-A | Data Out Circuit A |
| 10 | DO-B | Data Out Circuit B |
| 11 | DO-S | Data Out Circuit Shield (n/a) |
| 5 | DI-A | Data In Circuit A |
| 12 | DI-B | Data In Circuit B |
| 4 | DI-S | Data In Circuit Shield |
| 7 | CO-A | Control Out Circuit A (n/a) |
| 15 | CO-B | Control Out Circuit B (n/a) |
| 8 | CO-S | Control Out Circuit Shield (n/a) |
| 2 | CI-A | Control In Circuit A |
| 9 | CI-B | Control In Circuit B |
| 1 | CI-S | Control In Circuit Shield |
| 6 | VC | Voltage Common |
| 13 | VP | Voltage Plus |
| 14 | VS | Voltage Shield (n/a) |
| Shell | PG | Protective Ground |
|
|