|
|

This chapter provides the following instructions for installing the 500-CS:
Use the installation checklist provided to guide you through the procedures. If you have not already set up a site log, you should do so before beginning the installation. Guidelines for establishing this record, and a sample site log, are provided in Chapter 2, "Preinstallation."
Figure 3-1 lists all the preinstallation and installation procedures for the initial installation of your communication server. Use it as a guide while installing the 500-CS. Make a copy of this checklist and mark your entries when each procedure is completed. When installation is complete, insert the checklist as the first entry in your Site Log (see "Site Log" in Chapter 2).
Installation Checklist
for 
| Task | Verified by | Date |
|---|---|---|
| Installation checklist copied | ||
| Communication server received | ||
| Documentation received | ||
| Chassis components verified | ||
| Ethernet address recorded below (from back panel of chassis) | ||
| Server serial number recorded below (from back panel of chassis) | ||
| Site Log established | ||
| Required tools available | ||
| Additional/optional equipment available (e.g., cables, adapters) | ||
| Environmental specifications verified | ||
| Signal distance limits verified | ||
| Terminal server power voltages verified | ||
| Terminal line devices connected | ||
| RS-232 ASCII terminal attached to port J1 | ||
| Startup sequence steps completed | ||
| Initial system operation verified |
Ethernet Address: _________ _______ _____________
(from label on back panel of server)
Communication server name ______________________
Communication server serial number: ___________ _____
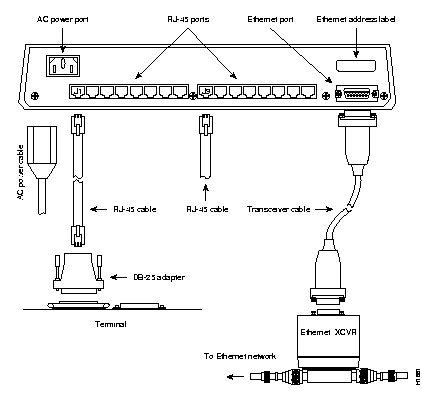
The 500-CS is a fixed-configuration communication server, so installation is relatively simple. You only need to connect the following cables:
Follow these steps to install the 500-CS. Refer to Figure 3-2 for the locations of connectors on the back panel of the chassis.
Step 1: Ensure that your site meets the site preparation requirements described in the previous chapter, "Preinstallation."
Step 2: Attach your network interface (Ethernet) transceiver or transceiver cable to the 15-pin connector port on the 500-CS back panel.
Step 3: Connect the opposite end of the transceiver cable (if any) to the Ethernet transceiver. The transceiver should be connected to your Ethernet network. Ethernet transceivers, also known as MAUs, are described in Chapter 2.
Step 4: Attach the RJ-45 cables to the terminal lines (J1 through J8 or J1 through J16) on the 500-CS back panel.
Step 5: Attach a standard ASCII terminal to port J1; you will use it to configure the system the first time you power up the server. After you configure the system, you can detach the terminal and connect another device to port J1. Set the terminal as follows:
Step 6: Plug the power cord into the AC outlet. The PWR indicator on the front panel should light and remain lit. If it does not light, do the following:
Step 7: Wait for the system to complete the boot process. This takes approximately one minute if your system has 2 MB of RAM, and up to 2 1/2 minutes if it has 10 MB.
Step 8: When the system has booted, verify that the OK indicator lights. If the indicator does not light, try the following:
Step 9: When the OK indicator lights, the terminal connected to J1 displays a banner similar to the following:
CS Software (LCS-L), Version 9.1(1)
Copyright (c) 1986-1991 by cisco Systems, Inc.
Compiled Thu 01-Jun-92 19:04
System Bootstrap, Version 4.5(1)
Step 10: If the terminal does not display a banner, proceed as follows:
Installation is complete. Proceed to the software Configuration and Reference publication for setup and system configuration procedures.
|
|