|
|

This chapter describes the installation and configuration of the AS51 network application card (NAC), and the AS51 network interface card (NIC).
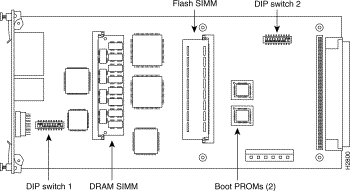
The AS51 NAC is shown in Figure 4-1. The NAC has three LEDs, a console port, an auxiliary port, a 10BaseT port, and a serial port.

There are three LEDs on the AS51 NAC. (See Figure 4-1.) Table 4-1 lists the LEDs and describes their meaning.
| LED | Description |
|---|---|
WAN | When this LED is flashing, data is either being transmitted or received through the AS51 NAC synchronous port. |
UTP | When on, this LED indicates that data is either being transmitted or being received through the AS51 NAC 10BaseT port. |
SYS | When on, this LED indicates that the AS51 NAC is functioning normally. |
The AS51 NAC has two banks of DIP switches as shown in Figure 4-2. These switches specify the NAC clock frequency, various Ethernet settings, the microprocessor cache state, and the NIC asynchronous controller version. These DIP switches are preset at the factory and should not be changed. Table 4-2 and Table 4-3 list the default settings for the switches.
| Switch | Default Setting | Description |
|---|---|---|
1-1 | On | Clock frequency setting. These switches specify the AS51 NIC clock frequency, and should be set as follows: 20 MHz: off, off |
1-3 | Off | This switch is used to enable/disable the cache on the 68030 microprocessor. If SW1-3 is off, the cache is always enabled. If SW1-3 is on, the cache is always disabled. |
1-4 | Off | This switch configures the Ethernet transceiver interface if SW1-6 is on. If SW1-6 is on and SW1-4 is off, the 10BaseT interface is configured. |
1-5 | Off | This switch configures the 10BaseT receiver termination circuitry. It should be configured based on the type of twisted-pair cabling that is in use. If SW1-5 is off, the cable should be 100-ohm unshielded twisted-pair. If SW1-5 is on, the cable should be 150-ohm shielded twisted-pair. |
1-6 | Off | This switch is used to configure the Ethernet port on the Level One transceiver device. If SW1-6 is off, the transceiver automatically senses which port is active. The AS51 NAC only has a 10BaseT interface. |
1-7 | Off | This switch is used to enable/disable the link integrity test. If SW1-7 is off, link integrity testing is enabled. If SW1-7 is on, link integrity testing is disabled. Link integrity testing should only be disabled if the router is connected to prestandard 10BaseT devices that did not implement link integrity. |
1-8 | Off | This switch is used to adjust the 10BaseT receive squelch threshold. If SW1-8 is off, the normal squelch level is used. If SW1-8 is on, the receive squelch threshold is reduced by 4.5 dB allowing the use of longer cables. |
1-9 | On | These two switches are configured by the factory depending on the type of Level One Ethernet transceiver on the NAC. The default configuration uses the LXT901. In this configuration SW1-9 should be on and SW1-10 should be off. If the LXT907 is used, the switch settings are reversed. These switches should not be changed from the factory settings under any circumstances. |
| Switch | Default Setting | Description |
|---|---|---|
2-1 | Off | Reserved |
2-2 | Off | This switch tells the system software that it is running on an AS51 NAC, and should always be set to off. On indicates a Cisco 2500 chassis. |
2-3 | Off | Reserved |
2-4 | Off | Reserved |
2-5 | Off | Reserved |
2-6 | Off | Reserved |
2-7 | Off | Reserved |
2-8 | Off | Reserved |
2-9 | On | These two switches are used to notify the operating software of the version of asynchronous controller used on the AS51 NIC. |
Perform the following steps to install the AS51 NAC:
Step 1 Unscrew and remove the front cover panel from the desired slot. Save the panel and screws.
Step 2 If your system has come from the factory assembled, and you want to change any of the AS51 NAC's switch settings, you must remove the NAC. Loosen the captive screws and push the ejector tabs away from each other. The card pops out slightly. Use the tabs or grasp the front panel to slide the card toward you and remove it from the chassis.
Step 3 Install the AS51 NAC in the upper and lower card guides of the slot. Lift the top ejector tab while sliding the card toward the rear until the card is firmly plugged into the connector on the chassis midplane.
Step 4 Tighten the captive screws to secure the NAC in place.
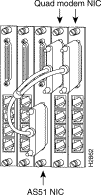
The AS51 NIC provides two 68-pin ports, each connecting to the serial port on a quad modem NIC. Figure 4-3 shows the AS51 NIC.

Perform the following steps to install the AS51 NIC:
Step 1 Remove the safety panel from the selected slot at the rear of the chassis by unscrewing the top and bottom screws of each panel.
Step 2 Slide the NIC into the slot's upper and lower card guides until its rear connector is firmly positioned in the connector on the chassis midplane.
Step 3 Tighten the thumb screws that are attached to the rear panel.
Use one 68-pin-to-DB-50 breakout cable to connect each port on the AS51 NIC to the DB-50 connector on an adjacent quad modem NIC. In Figure 4-4, one AS51 NIC port is connected to the DB-50 connectors on two adjacent quad modem NICs. A second breakout cable connects the other AS51 NIC port to the two quad modem DB-50 ports on the left. An Access Server 5100 chassis supports up to 3 AS51s, and 12 quad modems, for a total of 48 modems. For breakout cable specifications, see the "Cable and Port Specifications" appendix.
After installing the AS51 NAC and NIC in your Access Server 5100 chassis, connect a terminal to the console port on the AS51 NAC. See Figure 4-1 for the location of the console port.
Console port configuration parameters are as follows:
After booting to the monitor prompt ( > ), you can prepare the AS51 NAC for connection to your network. There are three ways to configure the AS51 NAC:
If you have an ASCII configuration file already prepared, you can install the AS51 NAC manually without using the setup routine.
This section describes the following procedures:
You should follow the procedure that best fits the needs of your Access Server 5100 and network configuration.
The AutoInstall process is designed to configure the AS51 NAC automatically after connection to your network. In order for AutoInstall to work properly, a Transmission Control Protocol/Internet Protocol (TCP/IP) host on your network must be preconfigured to provide the required configuration files. This TCP/IP host is typically a UNIX-based system. The TCP/IP host may exist anywhere on the network as long as the following two conditions are maintained:
1. The host must be on the opposite side of the AS51's serial connection to the WAN.
2. User Datagram Protocol (UDP) broadcasts between the AS51 and the TCP/IP host must be enabled.
This functionality is coordinated by your system administrator at the site where the TCP/IP host is located. You should not attempt to use AutoInstall unless the required files have been provided on the TCP/IP host.
Follow these steps to prepare the AS51 NAC for the AutoInstall process:
Step 1 Shut down the Access Server 5100.
Step 2 Place the Access Server 5100 in a location that will allow the serial cable to make a connection between the AS51 NAC and the channel service unit/digital service unit (CSU/DSU) without placing a strain on the cable.
Step 3 Attach the serial cable to the Access Server 5100 and the CSU/DSU.
Step 4 Power the Access Server 5100 back on, load the terminal emulation software, and bring up a console session.
The AS51 NAC will load the operating system image from Flash memory. If the remote end of the network connection is connected and properly configured, the AutoInstall process will begin.
The AS51 NAC will send a Serial Line Reverse Address Resolution Protocol (SLARP) packet over the serial line. When the packet reaches the opposite end of the network connection, the remote host will reply with the IP address of its serial interface. The AS51 NAC will increment the serial interface address by one and assign this address to its own serial interface. This process will take approximately one minute.
After the serial interface on the AS51 NAC has been assigned a valid serial interface IP address, it will resolve its host name. It will send a Trivial File Transfer Protocol (TFTP) request on the serial line for the configuration file called network-confg. If the TCP/IP host responds with this file, AutoInstall will search the file's contents for the host name associated with its IP address.
If the TCP/IP host does not respond with the network-confg file, AutoInstall will broadcast a reverse domain name server (DNS) request containing the IP address for the AS51 NAC serial port that it was assigned over the network. If the DNS services have been set up, AutoInstall will resolve the AS51 NAC's name from this file. After the IP address and host name have been found, AutoInstall will broadcast a TFTP request to the TCP/IP host for the file called hostname-confg. If this file has been set up by the system administrator, it will be downloaded automatically to the AS51 NAC's memory, completing the configuration.
If the AutoInstall feature is not set up, or if your AS51 NAC is unable to locate the appropriate files, you should use the manual configuration with or without the setup utility. (See the following sections "Configuring the AS51 NAC Manually Using the Setup Routine" and "Configuring the AS51 NAC Without Using the Setup Routine.")
If the AutoInstall completed successfully, you still need to write the configuration data to the AS51 NAC's nonvolatile random-access memory (NVRAM) and reset the configuration registers. Perform the following steps to complete these tasks:
Step 1 Enter the enable command to enter enable mode. Configuration changes can only be made in enable mode.
Hostname> enable
Step 2 Enter the enable password that was configured into the AS51 NAC by the AutoInstall process:
Password:*******
Step 3 Enter the write memory command at the Hostname# prompt:
Hostname# write memory
This will save the configuration settings that the AutoInstall process created in the AS51 NAC. If you fail to do this, your configuration will be lost the next time you reload the AS51 NAC.
Step 4 You can check the value of these settings by entering the show version command at the Hostname# prompt:
Hostname# show version

.
.
.
configuration register is 0x0 (will be 0x2102 at next reload)
If you do not plan to use AutoInstall, do not connect the AS51 NAC's serial cable to the CSU/DSU or the AS51 NAC itself. This will prevent the AS51 NAC from attempting to run the AutoInstall process. The AS51 NAC will attempt to run AutoInstall whenever you start it if the serial cable is connected on both ends and the AS51 NAC does not have a configuration stored in NVRAM. It can take several minutes for your AS51 NAC to determine that AutoInstall is not set up on a remote TCP/IP host. Once the AS51 NAC has determined that AutoInstall is not configured, it will default to the setup routine. If the serial cable is not connected, the AS51 NAC will boot from Flash memory and go into the setup routine.
Step 1 When you have booted from Flash memory, the following information will appear after about 30 seconds. When you see this information displayed, you have successfully booted your AS51 NAC:
System Bootstrap, Version 4.14(8), SOFTWARE
Copyright (c) 1986-1995 by cisco Systems
2500 processor with 4096 Kbytes of main memory

Loading master/igs-k-l.102-2 at 0x3000040, size = 4105084 bytes [OK]

F3: 3946068+158984+308596 at 0x3000060

              Restricted Rights Legend

Use, duplication, or disclosure by the Government is
subject to restrictions as set forth in subparagraph
(c) of the Commercial Computer Software - Restricted
Rights clause at FAR sec. 52.227-19 and subparagraph
(c) (1) (ii) of the Rights in Technical Data and Computer
Software clause at DFARS sec. 252.227-7013.

              Cisco Systems, Inc.
              170 West Tasman Drive
              San Jose, California 95134
Cisco Internetwork Operating System Software
IOS (tm) 3000 Software (IGS-K-L), Version 10.2(2), RELEASE SOFTWARE
Copyright (c) 1986-1995 by Cisco Systems, Inc.
Compiled Thu 15-Dec-94 15:00 by kmac
Image text-base: 0x03023478, data-base: 0x00001000

cisco 2500 (68030) processor (revision 0x00) with 4092K/2048K bytes
of memory.
Processor board serial number 00000000
X.25 software, Version 2.0, NET2, BFE and GOSIP compliant.
Bridging software.
SuperLAT software (copyright 1990 by Meridian Technology Corp).
Authorized for Enterprise software set.  (0x0)
1 Ethernet/IEEE 802.3 interface.
2 Serial network interfaces.
16 terminal lines.
32K bytes of non-volatile configuration memory.
4096K bytes of processor board System flash (Read ONLY)

         --- System Configuration Dialog ---

At any point you may enter a question mark '?' for help.
Refer to the 'Getting Started' Guide for additional help.
Use ctrl-c to abort configuration dialog at any prompt.
Default settings are in square brackets '[]'.

Would you like to enter the initial configuration dialog?
[yes]:yes
Step 2 Now you need to configure global parameters. Choose what protocols to support on the Ethernet interface. For IP-only installations, you can accept the default values for most of the questions. A typical configuration follows:
Configuring global parameters:

  Enter host name [Router]: as5100

  Enter enable password: lab

  Enter virtual terminal password: lab

  Configure SNMP Network Management? [yes]: yes

    Community string [public]: public

  Configure DECnet? [no]:
  Configure IP? [yes]:
    Configure IGRP routing? [yes]:
      Your IGRP autonomous system number [1]:
  Configure IPX? [no]:
  Configure XNS? [no]:
  Configure AppleTalk? [no]:
  Configure Apollo? [no]:
  Configure CLNS? [no]:
  Configure Vines? [no]:
  Configure bridging? [no]:
  Configure Async lines? [yes]:
    Async line speed [9600]:
    Configure for HW flow control? [yes]:
    Configure for modems? [yes/no]: yes
      Configure for default chat script? [yes]: no

    Configure for Dial-in IP SLIP/PPP access? [no]: yes

      Configure for Dynamic IP addresses? [yes]: no

      Configure Default IP addresses? [no]: no

      Configure for TCP Header Compression? [yes]:
      Configure for routing updates on async links? [no]: yes
Step 3 To configure the interface parameters, you need to know your Ethernet interface and subnetwork addresses, as well as the address for your serial port. Respond as follows to the setup prompts:
Configuring interface parameters:

Configuring interface Ethernet0:
  Is this interface in use? [yes]:yes

  Configure IP on this interface? [yes]: yes

    IP address for this interface: xxx.xxx.xxx.xxx

    Number of bits in subnet field [0]: 0

    Class B network is 128.1.0.0, 0 subnet bits; mask is 255.255.0.0
Step 4 Once the Ethernet port on your AS51 NAC has been configured, you need to configure the serial ports:
Configuring interface Serial0:
  Is this interface in use? [yes]: yes

  Configure IP on this interface? [yes]: yes

  Configure IP unnumbered on this interface? [no]: no

    IP address for this interface: xxx.xxx.xxx.xxx

    Number of bits in subnet field [0]: 0

    Class B network is 128.1.0.0, 0 subnet bits; mask is 255.255.0.0

Configuring interface Serial1:
  Is this interface in use? [yes]: yes

  Configure IP on this interface? [yes]: yes

  Configure IP unnumbered on this interface? [no]: no

    IP address for this interface: xxx.xxx.xxx.xxx

    Number of bits in subnet field [0]: 0

    Class B network is 128.1.0.0, 0 subnet bits; mask is 255.255.0.0
Configuring interface Async1:
Configuring interface Async2:
Configuring interface Async3:
Configuring interface Async4:
Configuring interface Async5:
Configuring interface Async6:
Configuring interface Async7:
Configuring interface Async8:
Configuring interface Async9:
Configuring interface Async10:
Configuring interface Async11:
Configuring interface Async12:
Configuring interface Async13:
Configuring interface Async14:
Configuring interface Async15:
Configuring interface Async16:
Step 5 At this point, the configuration you have entered is displayed and you are asked if you want to use the displayed configuration. If you answer no, you can begin the configuration again and make any changes you want. If you answer yes, then this configuration will be entered and saved in the configuration database.
Use this configuration? [yes/no]: yes

#####

use the enabled mode 'configure' command to modify this
configuration.
The AS51 NAC and asynchronous serial ports are now configured.
You can check the value of the settings you have entered by using the show version command at the Hostname> or the Hostname# prompt:
as5100# show version

.
.
.
configuration register is 0x0 (will be 0x2102 at next reload)
You can configure your AS51 NAC manually if you prefer not to use the setup routine or AutoInstall. Take the following steps to configure the AS51 NAC manually:
Step 1 When you are asked if you would like to enter the initial dialog, answer no to go into the normal operating mode of the AS51 NAC:
Would you like to enter the initial dialog? [yes]: no
Step 2 After a few seconds you will see the default prompt (Router>). Type enable to enter enable mode. Configuration changes can only be made in enable mode:
as5100> enable
The prompt will change to the enable mode prompt:
as5100(config)#
Step 3 Enter the config terminal command at the enable prompt to enter configuration mode:
as5100(config)# config terminal
You can now make any changes required. Press Ctrl-Z to exit configuration mode.
To see the currently operating configuration, enter the write terminal command at the enable prompt:
as5100(config)# write terminal
To see the configuration in NVRAM, enter the show config command at the enable prompt:
as5100(config)# show config
The results of the show config and write terminal commands will vary if you have made changes to the configuration in enable mode but have not yet written them to NVRAM.
as5100(config)# write memory

********
The AS51 NAC is now configured and will boot with the configuration each time it or the Access Server 5100 is booted.
When the AS51 NAC is configured, and cables connected from the 68-pin asynchronous serial ports on the AS51 NIC, use the AS51 NAC console to telnet to each modem. See the chapter "Quad Modems" for more information.
For more information on configuring the AS51 NAC software, refer to the following publications:
Configuration Builder Getting Started Guide
Router Products Getting Started Guide
Router Products Configuration Guide
Router Products Command Reference
Troubleshooting Internetworking Systems (as needed)
To order UniverCD, Cisco's online library of product information, or paper documentation, refer to Ordering Cisco Documentation, which is in the warranty pack that accompanied your Cisco Access Server 5100.
The remainder of this chapter provides additional information about the AS51 NAC, including the virtual configuration register, the bootstrap program, troubleshooting, upgrading the boot PROM and Flash memory, and replacing AS51 NAC single in-line memory modules.
For cable specifications, see the appendix "Cable and Port Specifications."
The AS51 NAC has a 16-bit virtual configuration register written into NVRAM. You might need to change the virtual configuration register settings for several reasons:
The following information is included in this section:
Table 4-4 lists the meaning of each of the virtual configuration register bits and Table 4-5 describes the boot field names.
 | Caution Remember that valid configuration register settings might be combinations of settings and not just the individual settings listed in Table 4-4. For example, the factory default value of 0x2102 is a combination of settings. |
| Bit No.1 | Hexadecimal | Meaning |
|---|---|---|
00 to 03 | 0x0000 to 0x000F | Boot field (see Table 4-5) |
06 | 0x0040 | Causes the system software to ignore NVRAM contents |
07 | 0x0080 | OEM bit is enabled |
08 | 0x0100 | Break is disabled |
10 | 0x0400 | IP broadcast with all zeros |
11 to 12 | 0x0800 to 0x1000 | Console line speed |
13 | 0x2000 | Boot from default ROM software if the network boot fails |
14 | 0x4000 | IP broadcasts do not have net numbers |
15 | 0x8000 | Enable diagnostic messages and ignore the contents of NVRAM |
| 1The factory default value for the configuration register is 0x2102. This value is a combination of the following: bit 13 = 0x2000, bit 8 = 0x0100, and bits 00 through 03 (see Table 4-5) = 0x0002. |
| Boot Field | Meaning |
|---|---|
00 | Stays at the system bootstrap prompt |
01 | Boots the system image in system ROM |
02 to 0F | Specifies a default network boot filename. Enables boot system commands that override the default network boot filename |
You might need to modify the value of the virtual configuration register for several reasons:
The server creates a default boot filename as part of the automatic configuration processes. To form the boot filename, the server starts with cisco and links the octal equivalent of the boot field number, a dash, and the processor-type name. Table 4-6 lists the default boot filenames or actions for the processor.
| Action/File Name | Bit 3 | Bit 2 | Bit 1 | Bit 0 |
|---|---|---|---|---|
Bootstrap mode | 0 | 0 | 0 | 0 |
ROM software | 0 | 0 | 0 | 1 |
cisco2-igs | 0 | 0 | 1 | 0 |
cisco3-igs | 0 | 0 | 1 | 1 |
cisco4-igs | 0 | 1 | 0 | 0 |
cisco5-igs | 0 | 1 | 0 | 1 |
cisco6-igs | 0 | 1 | 1 | 0 |
cisco7-igs | 0 | 1 | 1 | 1 |
cisco10-igs | 1 | 0 | 0 | 0 |
cisco11-igs | 1 | 0 | 0 | 1 |
cisco12-igs | 1 | 0 | 1 | 0 |
cisco13-igs | 1 | 0 | 1 | 1 |
cisco14-igs | 1 | 1 | 0 | 0 |
cisco15-igs | 1 | 1 | 0 | 1 |
cisco16-igs | 1 | 1 | 1 | 0 |
cisco17-igs | 1 | 1 | 1 | 1 |
To change the configuration register while running the system software, follow these steps:
Step 1 Enter the enable command and your password to enter the privileged level, as follows:
router> enable

Password:
router#
Step 2 At the privileged-level system prompt (router #), enter the configure terminal command. You will be prompted as follows:
router# conf term

Enter configuration commands, one per line.
Edit with DELETE, CTRL/W, and CTRL/U; end with CTRL/Z
Step 3 To set the contents of the configuration register, enter the config-register value command where value is a hexadecimal number preceded by 0x
(see Table 4-4), as follows:
config-register 0xvalue
(The virtual configuration register is stored in NVRAM.)
Step 4 Exit configuration mode by pressing Ctrl-Z. The new value settings will be saved to memory; however, the new settings do not take effect until the system software is reloaded by rebooting the AS51 NAC.
Step 5 To display the configuration register value currently in effect and the value that will be used at the next reload, enter the show version command. The value will be displayed on the last line of the screen display as in the following example:
Configuration register is 0x142 (will be 0x102 at next reload)
Step 6 Reboot the AS51 NAC. The new value takes effect. Configuration register changes take effect only when the server restarts, which occurs when you switch the power off and on or when you issue a reload command from the console.
The lowest four bits of the virtual configuration register (bits 3, 2, 1, and 0) form the boot field. (See Table 4-5.) The boot field specifies a number in binary. If you set the boot field value to 0, you must boot the operating system manually by entering the b command at the bootstrap prompt as follows:
> b [tftp] flash filename
See the section "Available Bootstrap Commands" later in this chapter for b command options, or refer to the Router Products Configuration Guide. This publication is available on UniverCD or a printed copy can be ordered separately.
If you set the boot field value to 0x2 through 0xF, and a valid system boot command is stored in the configuration file, then the AS51 NAC boots the system software as directed by that value. If you set the boot field to any other bit pattern, the AS51 NAC uses the resulting number to form a default boot filename for netbooting. (See Table 4-6.)
In the following example, the virtual configuration register is set to boot the AS51 NAC from Flash memory and to ignore break at the next reboot of the AS51 NAC:
router# conf term

Enter configuration commands, one per line.
Edit with DELETE, CTRL/W, and CTRL/U; end with CTRL/Z
config-register 0x102

boot system flash [filename]

^Z

router#
Bit 8 controls the console break key. Setting bit 8 (the factory default) causes the processor to ignore the console break key. Clearing bit 8 causes the processor to interpret the break key as a command to force the system into the bootstrap monitor, thereby halting normal operation. A break can be sent in the first 60 seconds while the system reboots, regardless of the configuration settings.
Bit 10 controls the host portion of the IP broadcast address. Setting bit 10 causes the processor to use all zeros; clearing bit 10 (the factory default) causes the processor to use all ones. Bit 10 interacts with bit 14, which controls the network and subnet portions of the broadcast address. Table 4-7 shows the combined effect of bits 10 and 14.
| Bit 14 | Bit 10 | Net Address | Host Address |
|---|---|---|---|
Off | Off | Ones | Ones |
Off | On | Zeros | Zeros |
On | On | Net | Zeros |
On | Off | Net | Ones |
Bits 11 and 12 in the configuration register determine the baud rate of the console terminal.
Table 4-8 shows the bit settings for the four available baud rates. (The factory-set default baud rate is 9600 bps.)
| Baud | Bit 12 | Bit 11 |
|---|---|---|
9600 | 0 | 0 |
4800 | 0 | 1 |
2400 | 1 | 0 |
1200 | 1 | 1 |
Bit 13 determines the server response to a bootload failure. Setting bit 13 causes the server to load operating software from ROM after five unsuccessful attempts to load a boot file from the network. Clearing bit 13 causes the server to continue attempting to load a boot file from the network indefinitely. By factory default, bit 13 is cleared to 0.
To enable booting from Flash memory, set configuration register bits 3, 2, 1, and 0 to a value between 2 and 15 in conjunction with the boot system flash [filename] configuration command.
To enter configuration mode while you are in the system software image, specify a Flash memory filename from which to boot. Then enter the configure terminal command at the enable prompt, as in the following example:
router# configure terminal

Enter configuration commands, one per line.
Edit with DELETE, CTRL/W, and CTRL/U; end with CTRL/Z
boot system flash [filename]
To disable break and enable the boot system flash command, enter the config-register command with the value shown in the following example:
router# config term

Enter configuration commands, one per line.
Edit with DELETE, CTRL/W, and CTRL/U; end with CTRL/Z
config-reg 0x2102

^Z

router#
You will need to copy a new image to Flash memory whenever a new image or maintenance release becomes available. To copy a new image into Flash memory, you must first reboot from ROM and then copy the new image into Flash memory. You cannot copy a new image into Flash memory while the system is running from Flash memory. Use the copy tftp flash command for the copy procedure.
Following is an example display of reloading the AS51 NAC and then copying a file called NEWFILE to Flash memory from a TFTP server called server1:
router# configure terminal

Enter configuration commands, one per line.
	Edit with DELETE, CTRL/W, and CTRL/U; end with CTRL/Z
config-reg 0x2101

^Z
The configuration register setting 0x2101 tells the AS51 NAC to boot from ROM, but does not reset the break disable or check for a default netboot filename.
router# reload

...
router(boot)# copy tftp flash

IP address or name of remote host [255.255.255.255]? server1

Name of tftp filename to copy into flash []? NEWFILE

copy NEWFILE from 131.131.101.101 into flash memory? [confirm]
<Return>

Access Server 5100Access Server 5100 bytes available for writing without
erasure.
erase flash before writing? [confirm] <Return>

Clearing and initializing flash memory (please wait)####...
Loading from 101.2.13.110: !!!!!!!!!!!!!!!!!!!!!!!!!!!!!!!!!!!!
!!!!!!!!!!!!!... [OK - 324572/524212 bytes]
Verifying checksum...
VVVVVVVVVVVVVVVVVVVVVVVVVVVVVVVVVVVVVVVVVVVVVVVVVVVVVVVVVVVVVVVVVVVVVVVV
VVVVVVV...
Flash verification successful. Length = 1204637, checksum = 0x95D9

router(boot)# config term

Enter configuration commands, one per line.
	Edit with DELETE, CTRL/W, and CTRL/U; end with CTRL/Z
config-reg 0x2102

^Z
The configuration register setting 0x2102 tells the system to boot from ROM if netboot fails, disable break, and check for a default netboot filename.
router(boot)# reload

...
The system is now ready to be configured to boot from the new image you copied to Flash memory. For more information on the copy tftp flash command and other related commands, refer to the Router Products Configuration Guide.
The bootstrap program can help you to isolate or eliminate hardware problems encountered when installing your AS51 NAC. A summary of the bootstrap diagnostic tests and command options is provided in the section "Available Bootstrap Commands" later in this chapter.
The bootstrap diagnostics help initialize the processor hardware and boot the main operating system software. If you set the software configuration register boot field (bits 3, 2, 1, and 0) to zero, you can start the AS51 NAC in standalone bootstrap mode. The bootstrap mode prompt is an angle bracket (>).
To enable the break key, and to default to booting in bootstrap mode, at the bootstrap prompt (>) set the configuration register to 0x0 by entering the following command:
o/r 0x0
See Table 4-9 for an explanation of the o/r command.
| Monitor Command | Function |
|---|---|
o | Displays the virtual configuration register currently in effect with a description of the bits |
o/r | Resets the virtual configuration register as follows:
|
o/r 0xvalue | Sets the virtual configuration register to the (hexadecimal) value, value |
While running the system software, you can reset the configuration register to 0x0 by entering configuration mode and then entering the config-register command:
config-register 0x0
The new configuration register value, 0x0, takes effect after the AS51 NAC is rebooted. If you set the configuration to 0x0, you must manually boot the system each time you reboot the AS51 NAC.
 | TimeSaver Break (system interrupt) is always enabled for 60 seconds after you reboot the system, regardless of whether the break is configured to be off by setting the configuration register. In that 60 seconds, you can break to the bootstrap program prompt. |
When you are in bootstrap mode, enter ? at the > prompt to display a list of available commands and options, as follows:
$ Toggle cache state
B [filename] [TFTP Server IP address | TFTP Server Name]
Load and execute system image from ROM or from TFTP server
C [address] Continue [optional address]
D /S M L V Deposit value V of size S into location L with modifier M
E /S M L Examine location L with size S with modifier M
G [address] Begin execution
H Help for commands
I Initialize
K Displays Stack trace
L [filename] [TFTP Server IP address | TFTP Server Name]
Load system image from ROM or from TFTP server, but do not
begin execution
O Show software configuration register option settings
P Set break point
S Single step next instruction
T function Test device (? for help)
Deposit and Examine sizes may be B (byte), L (long) or S (short).
Modifiers may be R (register) or S (byte swap).
Register names are: D0-D7, A0-A7, SS, US, SR, and PC.
The following system bootstrap commands are especially useful:
| Caution To avoid losing your configuration, save the configuration in a file on a host in your network before testing it. |
Follow these steps to run the bootstrap diagnostic tests:
Step 1 Turn off the Access Server 5100.
Step 2 Restart the Access Server 5100.
Step 3 Within 60 seconds, press the break key on the console terminal to force the AS51 NAC into the bootstrap program. Wait for the AS51 NAC to print the two-line banner message and for the angle bracket (>) prompt to appear.
The Access Server 5100 was extensively tested before being shipped from the factory. However, if your AS51 NAC appears to have problems starting up, read this section to help identify the problem.
If you need to contact a customer service representative for information on how to proceed, have the following information ready before you call:
The key to problem solving AS51 NAC problems is to try to isolate the problem to a specific subsystem. By comparing what the system is doing to what it should be doing, the task of isolating a problem is greatly simplified.
When problem solving, consider the following subsystems of the AS51 NAC:
How to troubleshoot these systems is described in the following subsections.
Check for the following symptoms to help isolate the problem:
Note the activity of the LEDs to judge the activity of the interfaces to which they correspond. If an LED is not on when the interface is active and the interface is correctly connected, a problem might be indicated. If an interface is extremely busy, its LED will always be on. The SYS LED will be on after the system initializes correctly. For LED locations, see Figure 4-1.
To replace the NAC's boot PROM software with a new software image, the existing boot PROMs must be replaced. Figure 4-5 shows the location of the boot PROMs on the AS51 NAC.
The following tools and equipment are required to replace the boot PROMs:
Take the following steps to replace the boot PROMs:
Step 1 Remove the AS51 NAC from the chassis.
Step 2 Locate the boot PROMs FW1 and FW2 (see Figure 4-5).
Step 3 Using an EPROM extraction tool or a small flat-blade screwdriver, gently remove the boot PROMs and set them aside (on a nonconductive surface).
Step 4 Insert the new boot PROMs in their respective sockets in the orientation show in Figure 4-5, being careful not to bend or crush any of the bottom pins. If you inadvertently bend a pin, use needle-nose pliers to straighten it. Align the notch in the new PROM with the notch in the PROM socket, ignoring the orientation of the label.
| Caution The correct placement of the boot PROMs is crucial. If the PROMs are installed in the wrong sockets they could be damaged when the system is powered on. To prevent damage to the PROMs from electrostatic discharge (ESD) when handling the system and its components, follow the ESD procedures described in the chapter "Preparing for Installation." Also, be careful not to damage or scratch the printed circuit card under the PROMs. |
Step 5 Replace the AS51 NAC in the chassis.
The AS51 NAC contains primary and shared (or packet) memory. Primary memory size, in kilobytes, is displayed in the system banner on the console screen. Primary and shared memory are 1 MB each of the dynamic random-access memory (DRAM) on the AS51 NAC.
After booting up, your system will indicate in the system banner the amount of primary memory it has. The following example shows a system with 4 MB (4096 KB) of primary memory. (The system does not display shared memory.)
System Bootstrap, Version (2.1), SOFTWARE
Copyright (c) 1986-1995 by cisco Systems
AS51 processor with 4096 Kbytes of main memory
>
If you use very large routing tables or many protocols, you might need to expand primary memory. This expansion might be necessary with configurations in which the Access Server 5100 is used as a connection device between large external networks and your internal network.
The following tools and equipment are required to install DRAM modules:
Take the following steps to install the DRAM SIMM:
Step 1 Turn OFF power but, to channel ESD voltages to ground, do not unplug the power cord.
Step 2 Attach an ESD-preventive wrist strap.
Step 3 Remove the AS51 NAC.
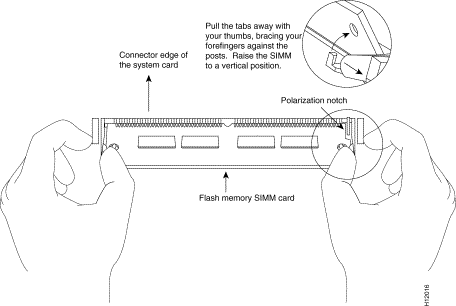
Step 4 Remove the existing DRAM SIMM by pulling outward on the connectors to unlatch them, as shown in Figure 4-6. Be careful not to break the holders on the SIMM connector.

| Caution To prevent damage, do not push on the center of the SIMMs. Handle each SIMM carefully. |
Step 5 Position the new DRAM SIMM so that the polarization notch is located at the right end of the SIMM socket.
Step 6 Insert the new DRAM SIMM by sliding the end with the metal fingers into the SIMM connector socket at approximately a 45-degree angle to the NAC. Gently rock the SIMM back into place until the latch on either side snaps into place. Do not use excessive force because the connector could break.
Step 7 Replace the AS51 NAC in the chassis.
Step 8 Connect a console terminal to the AS51 NAC console port.
Step 9 Turn on the power to the chassis. If error messages relating to memory are displayed, repeat Steps 1 through 7, taking care to firmly seat the SIMM in its socket.
The system code (software) is stored on one Flash memory or PROM SIMM. The 80-pin SIMM must be purchased from Cisco Systems. Contact a customer service representative for more information.
The following tools and equipment are required to replace a system code SIMM:
Following is the procedure for upgrading the system-code Flash memory or PROM SIMM:
Step 1 Turn OFF power but, to channel ESD voltages to ground, do not unplug the power cord.
Step 2 Attach an ESD-preventive wrist strap.
Step 3 Remove the AS51 NAC from the chassis.
Step 4 Locate the system-code SIMM on the NAC.
Step 5 Remove the existing system-code SIMM by pulling outward on the connectors to unlatch them. The connector holds the SIMM tightly, so be careful not to break the holders on the SIMM connector. See Figure 4-7.
| Caution To prevent damage, do not push on the center of the SIMMs. Handle each SIMM carefully. |
Step 6 Position the new SIMM so that the polarization notch is located at the right end of the SIMM socket.
Step 7 Insert the new SIMM by sliding the end with the metal fingers into the SIMM connector socket at approximately a 45-degree angle to the system card. Gently rock the SIMM back into place until the latch on either side snaps into place. Do not use excessive force because the connector could break.
Step 8 Replace the AS51 NAC in the chassis.
Step 9 Connect a console terminal to the AS51 NAC console port.
Step 10 Turn on the power to the chassis.
If error messages relating to memory display, repeat Steps 1 through 8, taking care to firmly seat the SIMM in the socket.
![]()
![]()
![]()
![]()
![]()
![]()
![]()
![]()
Posted: Tue Oct 1 03:59:19 PDT 2002
All contents are Copyright © 1992--2002 Cisco Systems, Inc. All rights reserved.
Important Notices and Privacy Statement.