|
|

This chapter describes the tasks you need to perform to install the router. Sections of this chapter follow:
The router can be mounted on a desktop, on a wall, or in a rack. When wall mounted, the router can save space in small wiring closets or in areas with limited rack space. The rack-mount kit includes slides, which allow access to the chassis rear panel without having to disconnect cables or remove the unit from the rack. The rack-mount kit is designed for use in standard 19-inch racks.
Follow the instructions in this publication to mount the router on a wall or in an equipment rack with the rack-mount or wall-mount and slide assembly kit.
The following tools are required for the rack-mount and wall-mount procedure:
The following additional tools are required for the wall-mount procedure:
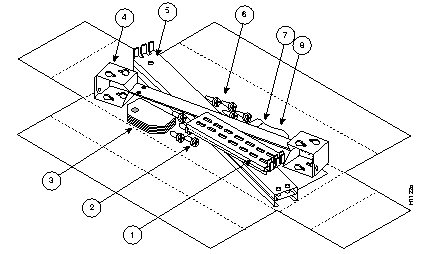
Before beginning the rack-mounting or wall-mounting procedure, verify that you have all of the parts shown in Figure 3-1.
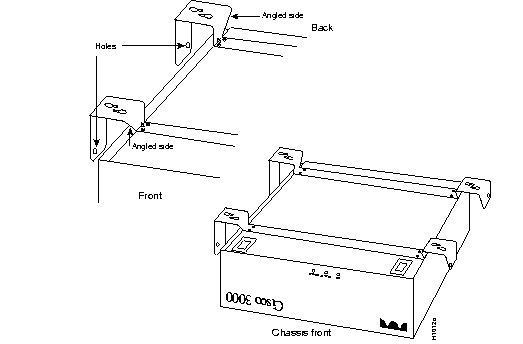
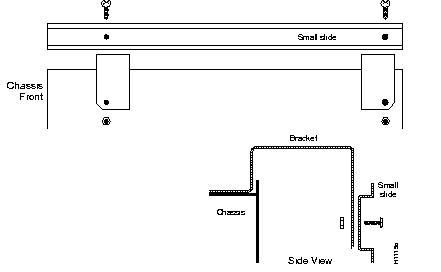
For both wall and rack mounting, a mounting bracket must be installed onto the bottom of the chassis. Refer to Figures 3-3 through 3-8 while performing the following steps.
 | Warning To ensure your safety, turn OFF power to the chassis and unplug the power cable from the power source before disconnecting any cables. |
To install a mounting bracket on the bottom of the chassis, proceed as follows:
Step 1 Turn OFF the power switch and remove all cables from the back of the chassis, including the power cable.
Step 2 Turn the chassis upside down and place it on a sturdy, level working surface.
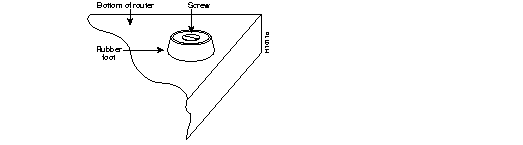
Step 3 Remove the rubber feet by removing the screw in the center of each rubber foot (see
Figure 3-2); then pull the feet out. Discard the screws and the rubber feet.
Step 4 Place the brackets across the chassis in the orientation shown in Figure 3-3, and secure them with eight 4-40 x 1/4" screws. Do not install spacers at this time.
Step 5 Proceed to the appropriate section: "Installing on a Wall" or "Installing in a Rack."
When choosing the wall on which to mount the chassis, consider cable lengths and limitations and wall structure. To install the system on a wall, proceed as follows.
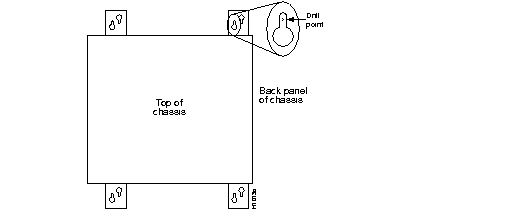
Step 1 Position the chassis against the board, as shown in Figure 3-4. Use the lower of each pair of keyhole cutouts on the mounting bracket to mark the drilling points.
.
Step 2 Drill into the four marked points.
Step 3 Nail the board to the wall.
Step 4 Install four No. 10 x 1" wood screws into the board, leaving a 1/8" gap between the board and the bottom of the screw head.
Step 5 Place the chassis mounting bracket over the screws and slide it down 1/4".
Step 6 Tighten the screws.
Step 7 The chassis is now ready for you to install the power cord and cables. Proceed to the section "Making External Connections to the Router."
The rack-mount kit includes slides, which allow you to remove the chassis cover and access the system card for memory or erasable programmable read-only memory (EPROM) upgrades. To install the system in a rack, proceed as follows:
Step 1 Remove the smallest, innermost slide from both slide assemblies.
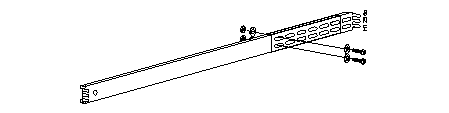
Step 2 Use two 10-32 x 0.38" binding-head mounting screws and two hex nuts to secure the small slides to each of the brackets. (See Figure 3-5.)
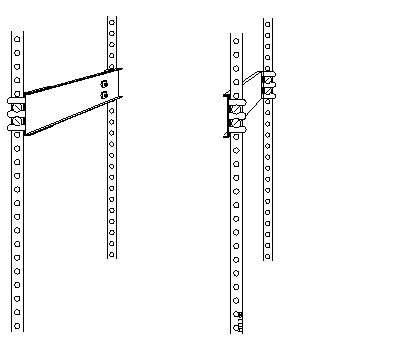
Step 3 Slide the extenders over the flat ends of the slide assemblies and adjust the length to the approximate rack depth. (See Figure 3-6.) Secure each extender with two 10-32 x 0.38" binding-head mounting screws and two hex nuts.
Step 4 Place the slide assemblies inside the equipment rack as shown in Figure 3-7. Adjust the length at the extender if necessary.
Step 5 Using eight 10-32 x 0.5" oval head screws and eight steel cup washers, secure the slide assemblies to the mounting strips (four each slide assembly, two each front and back). (See Figure 3-7.)
Step 6 Slide the chassis slides into the slide assemblies in the rack. Slowly and firmly push the chassis all the way into the rack. You will hear the slides click into place. If the chassis slides do not fit in the rack slides, do not force them.
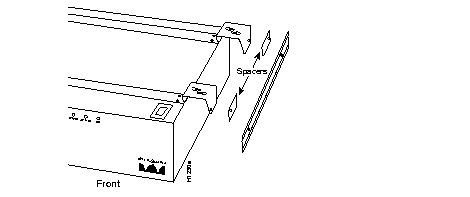
Slight variations in rack width and hardware sometimes can cause the actual rack width to be slightly greater than 19 inches. If the spacing between the slides attached to the chassis is narrower than the spacing of the slides in the rack, you can install the spacers provided in the kit to widen the space between the two chassis slides.
Step 7 If spacers are necessary, install them between the brackets and small slides, as shown in Figure 3-8. Up to eight spacers (four per side) can be installed.
Proceed to the section "Making External Connections to the Router."
| Warning Never operate the router unless the unit is completely closed. This ensures both adequate cooling and your safety. |
To prepare for initial startup and configuration, you must attach an RS-232 cable from an ASCII terminal to the system console port, and you must attach the power cable. The console port and auxiliary ports have jackscrews to accommodate cables with thumbscrews. If your cable connection requires it, the jackscrews can be removed.
Follow these steps to connect the system's console port to a terminal:
Step 1 Ensure that the site meets the site preparation requirements described in "Preparing for Installation."
Step 2 If you have not already done so, unpack the system referring to the section "Inspecting the System" in Chapter 2.
Step 3 Attach the terminal to the RS-232-C console port with a console cable.
Make the network connections by attaching the network interface cables (Token Ring, Ethernet, serial, or BRI) to the appropriate connector on the router.
To make Token Ring connections, proceed as follows:
Step 1 Attach the 9-pin D-type connector of the Token Ring cable to the router connector labeled Token Ring. (See Figure 3-9.)
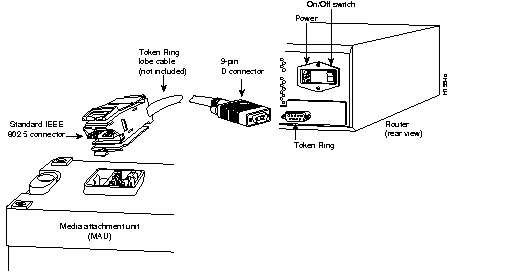
Step 2 Attach the IEEE 802.5 connector to the media attachment unit (MAU). (See Figure 3-9.)
Step 3 When all your network connections are completed, proceed to the section "Making Final Connections."
To make Ethernet connections, proceed as follows:
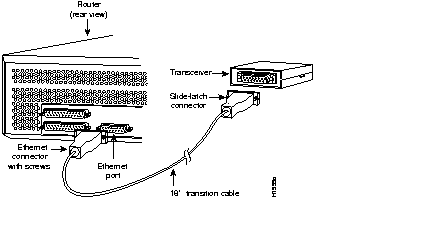
Step 1 Attach the Ethernet AUI transition cable(s) to the 15-pin D-type connector(s) on the router. (See Figure 3-10.)
Step 2 Attach the slide-latch connector of the same cable(s) to the transceiver or hub.
Step 3 When all your network connections are completed, proceed to the section "Making Final Connections."
To make serial connections, proceed as follows:
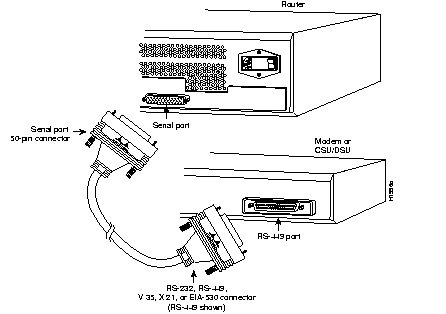
The connector on the router is the same regardless of the type of serial interface (RS-232, RS-449, V.35, X.21, or EIA-530) on the modem or CSU/DSU . Use the specific serial transition cable for the modem or CSU/DSU connector type.
Step 1 Attach the 50-pin end(s) of the serial transition cable(s) to the synchronous serial port(s) of the router. (See Figure 3-11.)
Step 2 Attach the RS-232, RS-449, V.35, X.21, or EIA-530 end of the cable(s) to the channel service unit/data service unit (CSU/DSU) or modem.
Step 3 When all your network connections are complete, proceed to the section "Making Final Connections."
To make BRI connections, proceed as follows:
Step 1 Attach the RJ-48 cable to the RJ-45 connector on the router.
Step 2 Connect the router directly to a the Integrated Services Digital Network (ISDN) through the NT1. (The common carrier will provide the NT1 connection worldwide, except in North America.)
Step 3 When all your network connections are complete, proceed to the section "Making Final Connections."
| Warning Network hazardous voltages are accessible in the BRI cable. If you detach the BRI cable, detach the end away from the router first to avoid possible electric shock. Network hazardous voltages are accessible on the system card in the area of the BRI port (see Figure 3-12) even when the power is turned off. |

Step 1 Plug the router power cord into a 3-terminal, single-phase power source that provides power within the range of 90 through 264 volts alternating current (VAC) at 50 through 60 Hz.
Step 2 Turn ON the router power switch.
Step 3 Check the OK light, the far left LED on the router front panel, to confirm that it is on after a few seconds delay. Another indication that the unit is powered on is the sound of the fan running.
Step 4 For initial configuration, refer to the Router Products Getting Started Guide for instructions on using the setup command facility.
|
|