
8.3. Floated Elements
As we saw in the previous chapter, CSS allows any element to be floated, from images to paragraphs to lists. This is not without a price: floated elements introduce their own set of strangeness. As was discussed, floated elements have an unusual place in determining the flow of the document. For example, the boxes generated by other elements are drawn as though floated elements don't exist, but the content of those elements is rendered while taking the float's presence into account. This in turn influences the generation of element boxes, which means that floats indirectly do affect these boxes.
Some particulars can help explain some of this behavior. An element that has been floated becomes a block-level element, regardless of its previous status. Thus, if an image (which is ordinarily treated as an inline element) is floated, it becomes a block-level element. This block-level status helps explain why when an element is floated, other content flows around it.
Remember that if you float a text element, its width will tend toward zero. This is exactly the opposite of the normal horizontal rules, where width is increased until the seven properties equal the parent's width. A floated element's width will default to auto, which then defaults to zero, which is then increased to the browser's minimum allowed width. Thus, a floated paragraph could literally be one character wide -- assuming that to be the browser's minimum value for width. In practice, it's more likely that the browser will make the floated element as narrow as the longest word in the element, as shown in Figure 8-29.
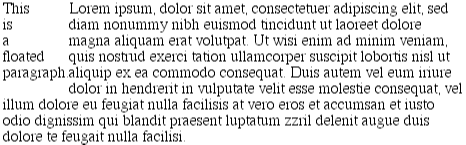
Figure 8-29. Floated elements tend toward a width of zero
8.3.1. Floating: The Details
A series of specific rules govern the placement of a floated element. They are vaguely similar to those that govern the evaluation of margins and widths and have the same initial appearance of common sense. They are as follows:
1. The left (or right) outer edge of a floated element may not be to the left (or right) of the inner edge of its parent element.
Straightforward enough. The furthest to the left the outer left edge of a left-floated element may go is the inner left edge of its parent element; similarly, the furthest right a right-floated element may go is its parent's inner right edge, as shown in Figure 8-30. (In this and subsequent figures, the circled numbers show the position where the markup element actually appears in relation to the source, and the numbered box shows the position and size of the floated visible element.)
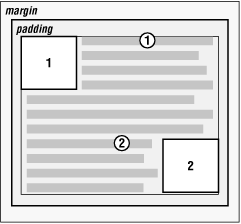
Figure 8-30. Floating to the left (1) or right (2)
2. The left (or right) outer edge of a floated element must be to the right (or left) of the right (left) outer edge of a left-floating (or right-floating) element that occurs earlier in the document's source, unless the top of the latter element is below the bottom of the former.
This rule prevents floated elements from overwriting each other. If an element is floated to the left, and there is already a floated element there due to its earlier position in the document source, then the latter element is placed against the outer right edge of the previously floated element. If, however, a floated element's top is below the bottom of all earlier floated images, then it can float all the way to the inner left edge of the parent. Some examples of this are shown in Figure 8-31.
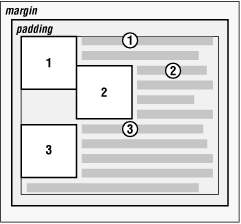
Figure 8-31. Keeping floats from overlapping
The advantage of this rule is that, since you don't have to worry about one floated element obscuring another, you can be assured that all of your floated content will be visible. This makes floating a fairly safe thing to do. The situation is markedly different when using positioning, where it is very easy to cause elements to overwrite one another.
3. The right outer edge of a left-floating element may not be to the right of the left outer edge of any right-floating element to its right. The left outer edge of a right-floating element may not be to the left of the right outer edge of any left-floating element to its left.
This rule also prevents floated elements from overlapping each other. Let's say you have a BODY that is 500 pixels wide, and its sole content is two images that are 300 pixels wide. The first is floated to the left, and the second to the right. This rule prevents the second image from overlapping the first by 100 pixels. Instead, the second image is forced down until its top is below the bottom of the left-floated image, as depicted in Figure 8-32.
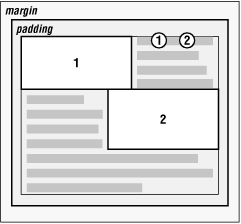
Figure 8-32. More overlap prevention
4. A floating element's top may not be higher than the inner top of its parent.
Another simple rule. This one keeps floating elements from floating all the way to the top of the document. The correct behavior is illustrated in Figure 8-33.

Figure 8-33. Unlike balloons, floated elements can't float upward
5. A floating element's top may not be higher than the top of any earlier floating or block-level element.
Similar to rule 4, this keeps a floated element from floating all the way to the top of its parent element. Thus, if a DIV 's first child element is a paragraph, followed by a floated image and then another paragraph, the top of the floated image can't be any higher than the top of the paragraph that precedes it. It is also impossible for a floated element's top to be any higher than the top of a floated element that occurs earlier. Figure 8-34 is an example of this.
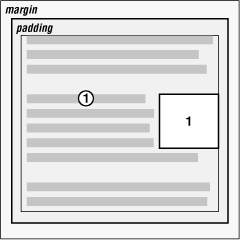
Figure 8-34. Keeping floats below their predecessors
6. A floating element's top may not be higher than the top of any line box with content that precedes the floating element.
Similar to rules 4 and 5, this further limits the upward floating of an element by preventing it from being above the top of a line containing content that precedes the floated element. Let's say that, right in the middle of a paragraph, there is a floated image. The highest the top of that image may be placed is the top of the line box from which the image originates. As you can see in Figure 8-35, this keeps images from floating too far upward.
Figure 8-35. Keeping floats level with their context
7. A left (or right) floating element that has another floating element to its left (or right) may not have its right outer edge to the right (or left) of its containing block's right (or left) edge.
In other words, a floating element cannot stick out beyond the edge of its containing element, unless it's too wide to fit on its own. This prevents a situation where a succession of floated elements could appear in a horizontal line and far exceed the edges of the containing block. Instead, if a float would stick out of its containing block by appearing next to another one, it is floated down to a point below any previous floats, as illustrated by Figure 8-36 (where the floats start on the next line in order to more clearly illustrate the principle at work here). This rule first appeared in CSS2, to correct its omission in CSS1.
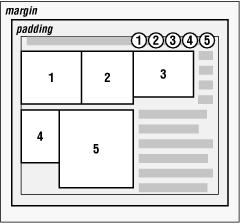
Figure 8-36. If there isn't room, floats get pushed to a new line
8. A floating element must be placed as high as possible.
Subject to the restrictions introduced by the previous seven rules, of course. Historically, browsers aligned the top of a floated element with the top of the line box after the one in which the image's tag appears. Rule 8, however, implies that its top should be even with the top of the same line box as that in which its tag appears, assuming there is room to do so. The theoretically correct behaviors are shown in Figure 8-37.
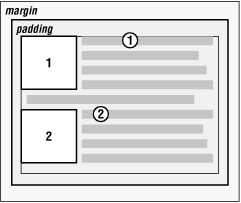
Figure 8-37. Given the other constraints, go as high as possible
WARNING
Unfortunately, since there is no precise definition meaning for "as high as possible" (which could be, and in fact has been, argued to mean "as high as conveniently possible"), you cannot rely on consistent behavior even among browsers that are considered CSS1-compliant. Most browsers will follow historical practice and float the image down into the next line, but a few -- Opera 3.6, for one -- will float the image into the current line if it has room to do so.
9. A left-floating element must be put as far to the left as possible, a right-floating element as far to the right as possible. A higher position is preferred to one that is further to the right or left.
Again, this rule is subject to restrictions introduced in the preceding rules. There are similar caveats here as in Rule 8, although they are not quite so fuzzy. As you can see from Figure 8-38, it is pretty easy to tell when an element has gone as far as possible to the right or left.
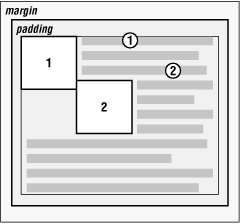
Figure 8-38. Get as far to the left (or right) as possible
8.3.2. Applied Behavior
There are a number of interesting consequences of the above rules, both because of what they say and what they don't say. The first thing to discuss is what happens when the floated element is taller than its parent element.
This happens quite often, as a matter of fact, and was discussed in the previous chapter. Take the example of a short document, composed of no more than a few paragraphs and H3 elements, where the first paragraph contains a floated image. Further, this floated image has a right margin of 5 pixels (5px ). You would expect the document to be rendered very much as shown in Figure 8-39.
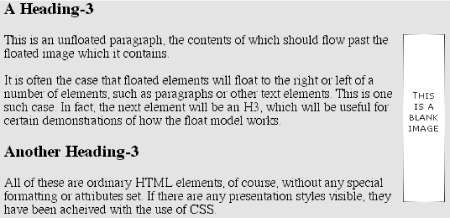
Figure 8-39. Expected floating behavior
Nothing unusual there, of course, but Figure 8-40 shows what happens when we set the first paragraph to have a background.
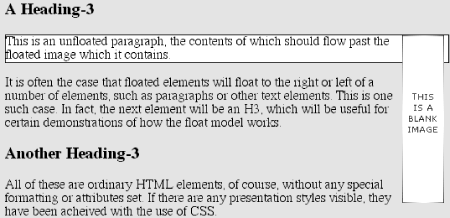
Figure 8-40. Backgrounds and floated elements
There is nothing different about the second example, except for the visible background. As you can see, the floated image sticks out of the bottom of its parent element. Of course, it did so in the first example, but it was less obvious there, because we couldn't see the background. There is nothing forbidden about this behavior. The floating rules we discussed earlier only address the left, right, and top edges of floats and their parents. The deliberate omission of bottom edges permits the behavior in Figure 8-40.
WARNING
In practice, some browsers do not do this correctly. Instead, they will increase the height of a parent element so that the floated element is contained within it, even though this results in a great deal of extra blank space within the parent element.
A related topic is the subject of backgrounds and their relationship to floated elements that occur earlier in the document, which was also discussed in the previous chapter, as has been illustrated in Figure 8-41.
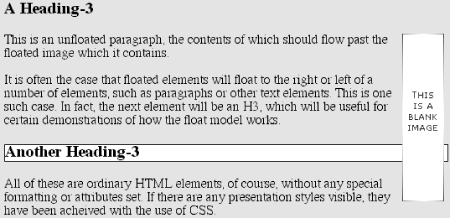
Figure 8-41. Backgrounds "slide under" floated elements
Because the floated element is both within and without the flow, this sort of thing is bound to happen. What's going on? Well, the content of the paragraphs is being "displaced" by the floated element. However, each paragraph's element width is still as wide as its parent element. Therefore, its content area spans the width of the parent, and so does the background. The actual content doesn't flow all the way across its own content area in order to avoid being obscured behind the floating element.
8.3.2.1. Negative margins
As was discussed in the previous chapter, negative margins can cause floated elements to move outside of their parent elements. This seems to be in direct contradiction to the rules explained earlier, but it isn't. In the same way that elements can appear to be wider than their parents through negative margins, floated elements can appear to protrude out of their parents.
Let's consider once again a floated image which is floated to the left, and which has left and top margins of -15px . This image is placed inside a DIV which has no padding, borders, or margins. The result will be as shown in Figure 8-42.
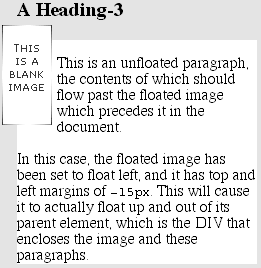
Figure 8-42. Floating with negative margins
Contrary to appearances, this does not technically violate the restrictions on floated elements being placed outside their parent elements. Here's the technicality that permits this behavior: a close reading of the rules listed earlier will show that the outer edges of a floating element must be within the element's parent. However, negative margins can place the floated element's content such that it effectively overlaps its own outer edge, as detailed in Figure 8-43.
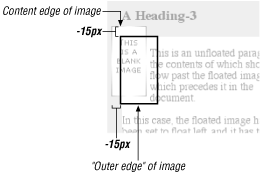
Figure 8-43. The details of floating up and left with negative margins
The math in this situation works out something like this: assume the top inner edge of the DIV is at the pixel position 100. The browser, in order to figure out where the top inner edge of the floated element should be will do this: 100px + (-15px) margin + 0 padding = 85px . Thus the top inner edge of the floated element should be at pixel position 85; even though this is higher than the top inner edge of the float's parent element, the math works out such that the specification isn't violated. A similar line of reasoning explains how the left inner edge of the floated element can be placed to the left of the left inner edge of its parent.
Many of you may have an overwhelming desire to cry "Foul!" right about now. Personally, I don't blame you. It seems completely wrong to allow the top inner edge to be higher than the top outer edge, for example, but with a negative top margin, that's exactly what you get -- just as negative margins on normal, nonfloated elements can make them wider than their parents. The same is true on all four sides of a floated element's box: set the margins to be negative, and the content can overrun the outer edge without technically violating the specification.
There is one important question here, which is this: what happens to the document display when an element is floated out of its parent element by using negative margins? For example, an image could be floated so far up that it intrudes into a paragraph that has already been displayed by the user agent. In this case, it's up to the user agent to decide whether or not the document should be reflowed. The CSS specifications explicitly state that user agents are not required to reflow previous content to accommodate things which happen later in the document. In other words, if an image is floated up into a previous paragraph, it may simply overwrite whatever was already there. On the other hand, the user agent may handle the situation by flowing content around the float, even though doing so isn't required behavior. Either way, it's probably a bad idea to count on a particular behavior, which makes the utility of negative margins on floats somewhat limited. Hanging floats are probably fairly safe, but trying to push an element upward on the page is a generally bad idea.
There is one other way for a floated element to exceed its parent's inner left and right edges, and that's when the floated element is wider than its parent. In that case, the floated element will simply overrun the right or left inner edge -- depending on which way the element is floated -- in its best attempt to display itself correctly. This will lead to a result like that shown in Figure 8-44.
Figure 8-44. Floating an element that is wider than its parent
 |  |  |
| 8.2. Block-Level Elements |  | 8.4. Inline Elements |

Copyright © 2002 O'Reilly & Associates. All rights reserved.