|
|

This chapter describes how to install the Cisco DVB CAR100. It includes the following sections:
The following section describe the cable modem installation procedure that the subscriber typically performs. This information is included to give a comprehensive picture of the installation of the
Cisco DVB CAR100 at the subscriber's premises, and the configuration program for the
Cisco DVB CAR100 at the cable service provider's premises.
The Cisco DVB CAR100 package includes:
The minimum installation requirements are different for the Cisco DVB CAR100-PC and the Cisco DVB CAR100-LAN.
Cisco DVB CAR100-PC
The minimum requirements for installing the Cisco DVB CAR100-PC are a:
 |
Note It is the subscriber's responsibility to ensure that the PC is equipped with an Ethernet network adapter. |
|
Note The Cisco DVB CAR100 is designed for 10 Mbps and 10/100 Mbps Ethernet NICs. It does not work with 100 Mbps only (pure Fast Ethernet) NICs. |
Cisco DVB CAR100-LAN
The minimum requirements for installing the Cisco DVB CAR100-LAN are:
|
Note Before upgrading the Cisco DVB CAR100-PC to the Cisco DVB CAR100-LAN, make sure you have a Cisco DVB CAR100-LAN license for each cable modem being upgraded. |
|
Note In addition to ensuring the PCs have Ethernet connectivity, it is the subscriber's responsibility to ensure the hub is correctly connected. |
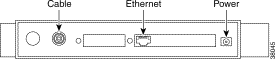
Figure 2-1 shows where to connect cables to the rear panel of the Cisco DVB CAR100.
Each Cisco DVB CAR100 chassis is fully assembled at the factory, and no further assembly is required. However, the following tools and equipment are needed to install the Cisco DVB CAR100:
For the Cisco DVB CAR100-PC—Ethernet crossover cable with RJ-45 connectors (to connect the Cisco DVB CAR100 to a single computer).
For the Cisco DVB CAR100-LAN—Ethernet straight-through cable with RJ-45 connectors (to connect the Cisco DVB CAR100 to a hub).

On a straight-through cable, the colored wires are in the same sequence at both ends of the cable.
On a crossover cable, the first (far left) colored wire at one end of the cable is the third colored wire at the other end of the cable.
When installing the Cisco DVB CAR100, make sure you attach the cables in the same order described in this guide.
 |
Warning Read the installation instructions before you connect the system to its power source. To see translations of the warnings that appear in this publication, refer to the Regulatory Compliance and Safety Information document that accompanied this device. |
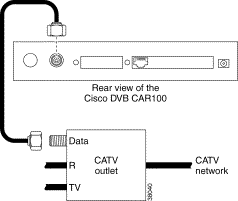
Connect the HFC wall outlet to the Cisco DVB CAR100 using a shielded coaxial cable.
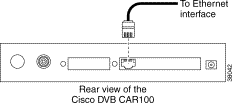
Connect the Cisco DVB CAR100-PC to the single computer, using a crossover Ethernet cable (Class 5, shielded, RJ-45).
 |
Tips The Ethernet port is located on the back of the computer if an internal Ethernet card is installed. On a laptop computer, the Ethernet port is usually located on an adapter cable connected to a PCMCIA (PC) card installed in the computer's PCMCIA slot. If you need additional information to locate the Ethernet port on the computer, consult the user documentation for the computer. |
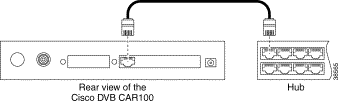
Connect the Cisco DVB CAR100-LAN to multiple computers, using a straight-through Ethernet cable (Class 5, shielded, RJ-45) and an Ethernet hub.
Connect the computers using straight-through cabling to the Ethernet hub according to the hub manufacturer's instructions. Consult the user documentation supplied with your Ethernet hub to install and configure it correctly.
|
Warning Read the installation instructions before you connect the system to its power source. To see translations of the warnings that appear in this publication, refer to the Regulatory Compliance and Safety Information document that accompanied this device. |
After connecting the HFC coaxial cable and the Ethernet cable to the Cisco DVB CAR100, connect the power supply:

This completes the installation of the Cisco DVB CAR100 cable access router.
The Cisco DVB CAR100 comes preconfigured for full end-user operation. However, the connected computers need to be configured to communicate with the HFC network.
After the Cisco DVB CAR100 is installed, it is the subscriber's responsibility to configure the TCP/IP protocol and set the IP address, subnet mask, and gateway in the connected PCs, based on information supplied by the cable service provider.
You can change the default private IP address and local subnet for the Cisco DVB CAR100's Ethernet interface prior to installation.
Basic instructions for Windows 95 and Windows 98 are included in the "Cisco DVB CAR100 Cable Access Router Hardware Installation Guide".
The Cisco DVB CAR100-LAN may be connected to a hub. For information on how to do this, Cisco advises subscribers to refer to the documentation supplied with that device.
It is the responsibility of the cable service provider to allocate an IP address and subnet mask on the HFC cable interface to every Cisco DVB CAR100. These communication parameters are used for all data traffic toward the HFC network.
Other specific settings, such as port-level Network Address Translation (NAPT) status and public IP addresses for a host computer, are allocated by the cable service provider. When the unit performs NAPT, all IP addresses on the connected computers are local, and cannot be seen by the outside world.
 |
Caution If you change the software upgrade password from the factory default (that is, default) and then lose or forget the new password, there is no backdoor solution. You will have effectively rendered the Cisco DVB CAR100 unconfigurable. |
The following sections detail automatic network configuration in Windows 95/98 and Windows NT. If subscribers are using another operating system, advise them to consult their operating system user documentation to ensure that their computers are configured to obtain an IP address automatically from a DHCP server.
Step 2 Select the Configuration tab.
Step 3 Select TCP/IP>[your Ethernet adapter]>Properties>IP Address tab.
Step 4 Click Obtain an IP address from a DHCP Server.
Step 5 Click OK and reboot the PC, if necessary.
|
Note If you have the Cisco DVB CAR100-LAN version, repeat Steps 1 to 5 for each connected PC. |
Step 2 Select TCP/IP Protocols>Properties>IP Address tab.
Step 3 Click Obtain an IP address from a DHCP Server.
Step 4 Click Apply.
Step 5 Click OK and reboot the PC, if necessary
|
Note If you have the Cisco DVB CAR100-LAN version, repeat Steps 1 to 5 for each connected PC. |
|
Note All operating systems: Provide subscribers with valid TCP/IP settings. If no other data is provided, subscribers are advised to use the values listed in Table 2-1 below, and to consult the operating system documentation for TCP/IP configuration procedures. |
| IP Address | ||
|---|---|---|
Cisco DVB CAR100-PC | Single computer | 192.168.128.10 |
Cisco DVB CAR100-LAN | Computer 1 | 192.168.128.10 |
Computer 2 | 192.168.128.11 | |
Computer 3 | 192.168.128.12 | |
Computer 4 to ... | 192.168.128.13 to ... | |
| ||
All versions of the | Subnet Mask | Default Gateway |
255.255.255.0 | 192.168.128.2 | |
|
Note To use the manual network configuration the subscriber will need to enter a valid IP address and DNS server information. |
Step 2 Select the Configuration tab.
Step 3 Select TCP/IP>[your Ethernet adapter]>Properties>IP Address tab.
Step 4 Click Specify an IP address and enter values for IP address and subnet mask from Table 2-1 above to configure the TCP/IP settings of your PC.
Step 5 Click the Gateway tab and enter values for the default gateway from Table 2-1.
Step 6 Select DNS Configuration, Enable DNS and enter the DNS server information supplied by cable service provider.
Step 7 Click OK and reboot the PC, if necessary.
|
Note If you have the Cisco DVB CAR100-LAN version, repeat Steps 1 to 7 for each connected PC. |
|
Note To use the manual network configuration the subscriber will need to enter a valid IP address and DNS server information. |
Step 2 Select TCP/IP Protocols>Properties>IP Address tab.
Step 3 Click Specify an IP Address. If no other configuration data is provided, enter the values from Table 2-1 to configure the TCP/IP settings of the PC.
Step 4 Click Apply.
Step 5 Select the DNS tab and enter the DNS server information (supplied by cable service provider).
Step 6 Click OK and reboot the PC, if necessary.
|
Note If you have the Cisco DVB CAR100-LAN version, repeat Steps 1 to 6 for each connected PC. |
Having configured the computers attached to the Cisco DVB CAR100, the Cisco DVB CAR100 can be started. If it is running in the default DHCP Server mode:
Step 2 Then turn on the PC.
The Cisco DVB CAR100 will connect to the HFC network, and be able to access the Internet. This procedure is described in the next section.
|
Note Cisco advises subscribers to leave the Cisco DVB CAR100 switched on at all times to enable automatic software updates to be performed. |
When you have connected and powered up the Cisco DVB CAR100 according to the instructions above, it will automatically initiate the sign-on procedure. After it has successfully signed on, it will stay on-line until the power supply is turned off.
Here is an overview of the startup sequence initiated when the Cisco DVB CAR100 connects to the HFC network.
Step 2 The Cisco DVB CAR100 signs on to the headend using its factory built-in Ethernet MAC address to identify itself. This sign on establishes a two-way (MAC layer) connection between the DVB CAR100 and the headend.
Step 3 The Cisco DVB CAR100 HFC cable interface is IP-configured dynamically using BOOTP, via a BOOTP server on the cable side internet. The IP configuration includes an IP address, an IP subnet mask and eventually a DNS server name to be applied for the Cisco DVB CAR100's built-in DHCP server.
|
Note For testing purposes the Cisco DVB CAR100 HFC interface may also be statically configured (i.e. without BOOTP). In certain configurations, the Cisco DVB CAR100 Ethernet interface may also be dynamically BOOTP configured. |
Step 4 The Cisco DVB CAR100 internal time is then aligned with an SNTP (Simple Network Time Protocol) server. This is not the default configuration and therefore an SNTP server address needs to be entered. See the rcm SNTPServer MIB in the "System" section.
Step 5 The Cisco DVB CAR100 is now ready, and the main LED should light constant green.
These are the default settings when the Cisco DVB CAR100 first starts up:
The default settings for the startup sequence can be changed using SNMP and a MIB browser. For more information, see "Changing Cisco DVB CAR100 Settings" section.
|
Note The Cisco DVB CAR100 uses the last saved settings each time it powers up—it does not revert to the factory defaults. This means that if NAPT was turned off last time the cable modem was shut down, it will still be off the next time the device signs on. |
|
Tips To verify if the sign-on has been successful, check if the Master LED on top of the Cisco DVB CAR100 has turned green. If the LED on top of the cable modem does not turn green, check that the coaxial cable is correctly connected to the wall outlet. If the Master LED still does not turn green, refer to the "LED Patterns" section. Cisco also offers a free application designed to monitor the performance and status of the Cisco DVB CAR100. It can be found at http://www.cisco.com/cgi-bin/tablebuild.pl/car100. For more information, see "Useful Support Applications" section. |
![]()
![]()
![]()
![]()
![]()
![]()
![]()
![]()
Posted: Fri Feb 16 06:35:21 PST 2001
All contents are Copyright © 1992--2001 Cisco Systems, Inc. All rights reserved.
Important Notices and Privacy Statement.