|
|

This quick start card describes how to configure a wireless modem card in a Cisco broadband fixed wireless point-to-point system. The components of the system are shown in Figure 1.

 |
Note  Use a straight-through cable between the power feed panel and the wireless modem card. |
Before configuring the wireless modem card, have available the following information:
|
Note  See Table 1 for U-NII band 6-MHz and 12-MHz center frequencies. See Table 2 for available band plans and frequency ranges. |
|
Note  The orientation of the installed duplexer determines its transmit and receive frequency. The orientation of one end of the link must be opposite to that of the other end. Also, the choice of Tx Hi or Rx Hi must match the frequencies configured for the wireless modem card. |
|
Note  See Table 3 for an example of estimated cable, connector, and equipment loss for a typical installation. |
| 6 MHz Bandwidth | 12 MHz Bandwidth |
|---|---|
5730.00 | 5733.00 |
5736.00 | 5745.00 |
5742.00 | 5757.00 |
5748.00 | 5769.00 |
5754.00 | 5781.00 |
5760.00 | 5793.00 |
5766.00 | 5805.00 |
5772.00 | 5817.00 |
5778.00 | — |
5784.00 | — |
5790.00 | — |
5796.00 | — |
5802.00 | — |
5808.00 | — |
5814.00 | — |
5820.00 | — |
| Band Plan | Frequency |
|---|---|
Band Plan 1A | 5727-5751 MHz |
Band Plan 1B | 5775-5799 MHz |
Band Plan 2A | 5751-5775 MHz |
Band Plan 2B | 5799-5823 MHz |
Use the following commands in radio interface mode.
|
Note  For a complete description of these commands, refer to the Cisco uBR7200 Series Universal Broadband Router Wireless Modem Card and Subsystem Installation and Configuration document. |
UBR01(config-if)# ip address ipaddress subnet
 mask
UBR01(config-if)# radio master

UBR01(config-if)# radio receive-antennas
 {1|2}

UBR01(config-if)# radio operating-band tx
 frequency in MHz rx frequency in MHz
UBR01(config-if)# radio channel-setup
 bandwidth {6|12} throughput {high | medium |
 low}

UBR01(config-if)# radio cable-loss {1|2}
 cable loss in dB
UBR01(config-if)# radio transmit-power
 transmit power in dBm
Configure the slave end of the link in the same way as the master site, except omit the radio master command and reverse the transmit and receive frequencies in the radio operating-band command.
Verifying the radio interface connection can be done in stages to ensure that each component is cabled correctly and that the hardware is operating properly. The stages include:
IF loopback confirms that the hardware is seated properly in the chassis and that the wireless modem card is functioning as expected. Use the following command in radio interface mode to perform and IF loopback:
UBR01(config-if)# loopback local if

 [main | diversity]
A successful loopback normally causes the green Carrier LED and the yellow Out of Service LED to
come on.
RF loopback confirms that the wiring to the transverter is correct, that communication has been established, and that the transverter appears to be operating correctly. Each transverter connection must be tested separately.
|
Note  This operation does not test the duplexer, which is the final stage before the signal is sent to the antenna. |
Use the following command in radio interface mode to perform an RF loopback:
UBR01(config-if)# loopback local rf

 [main | diversity]
A successful loopback normally causes the green Carrier LED and the yellow Out of Service LED to
come on.
Once both sites pass the RF loopbacks, assuming that the antennas are already aligned, you can calculate the Received Signal Power for each antenna by running the following histogram in radio interface mode:
UBR01(config-if)# radio histogram totalGain
 antenna {1|2} 0 8 50 collectionInterval 60
 periodic 10 sum true tone average
To calculate the Average Received Power, use the average totalGain value from the histogram in the following equation:
Average Received Signal Power = -96 + (average totalGain) / 2 (measured in dBm)
The accuracy of the signal strength measured in this way is only about +/- 6dB.
This histogram collects data for 60 seconds and prints it to the screen after every 10 seconds.
To determine the Signal to Interference plus Noise Ratio (SINR), use the following histogram in radio interface mode:
UBR01(config-if)# radio histogram
 constVariance 0 8 50 collectionInterval 60
 periodic 10 sum true tone average
To convert constellation variance to SINR, use the average value from the histogram in the following equation:
Average SINR = 10 * log10 (86016/(average constVar))
This histogram collects data for 60 seconds and prints it to the screen after every 10 seconds.
|
Note  These histograms can be customized to run for longer periods of time. Refer to the Cisco uBR7200 Series Universal Broadband Router Wireless Modem Card and Subsystem Installation and Configuration document. |
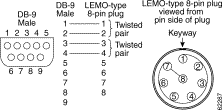
For the power-feed-panel-to-wireless-transverter connection, use a shielded DB-9 male and a LEMO-type connector. See Figure 2 for pin designations.
|
Note  The cable shield must be grounded to the connector housing on both the DB-9 (back shell) and the LEMO-type connector. |
![]()
![]()
![]()
![]()
![]()
![]()
![]()
![]()
Posted: Thu Jul 11 13:03:53 PDT 2002
All contents are Copyright © 1992--2002 Cisco Systems, Inc. All rights reserved.
Important Notices and Privacy Statement.