cc/td/doc/product/wireless/airo1130
hometocprevnextglossaryfeedbacksearchhelp
PDF

Table Of Contents

Configuring the Access Point for the First Time

Before You Start

Resetting the Access Point to Default Settings

Obtaining and Assigning an IP Address

Connecting to the Access Point Locally

Assigning Basic Settings

Default Settings on the Express Setup Page

Enabling the Radio Interfaces

Configuring Basic Security Settings

Understanding Express Security Settings

Finding the IP Address Using the CLI

Assigning an IP Address Using the CLI

Using a Terminal Emulator to Access the CLI

Using a Telnet Session to Access the CLI


Configuring the Access Point for the First Time


This chapter describes how to configure basic settings on your access point for the first time. The contents of this chapter are similar to the instructions in the quick start guide that shipped with your access point. You can configure all the settings described in this chapter using the CLI, but it might be simplest to browse to the access point's web-browser interface to complete the initial configuration and then use the CLI to enter additional settings for a more detailed configuration.

This chapter contains these sections:

Before You Start

Obtaining and Assigning an IP Address

Connecting to the Access Point Locally

Assigning Basic Settings

Configuring Basic Security Settings

Finding the IP Address Using the CLI

Assigning an IP Address Using the CLI

Using a Terminal Emulator to Access the CLI

Using a Telnet Session to Access the CLI

Before You Start

Before you install the access point, make sure you are using a computer connected to the same network as the access point, and obtain the following information from your network administrator:

A system name for the access point

The case-sensitive wireless service set identifiers (SSIDs) for your 802.11g and 02.11a radio networks

If not connected to a DHCP server, a unique IP address for your access point (such as 172.17.255.115)

If the access point is not on the same subnet as your PC, a default gateway address and subnet mask

A Simple Network Management Protocol (SNMP) community name and the SNMP file attribute (if SNMP is in use)

If you use Cisco IP Setup Utility (IPSU) to find or assign the access point IP address, the MAC address from the label on the bottom of the access point (such as 00164625854c)

Resetting the Access Point to Default Settings

Using the Mode Button

If you need to start over during the initial setup process, follow these steps to reset the access point to factory default settings using the access point MODE button:


Step 1 Open the access point cover (refer to the "Opening the Access Point Cover" section on page 2-9).

Step 2 Disconnect power (the power jack for external power or the Ethernet cable for in-line power) from the access point.

Step 3 Press and hold the MODE button while you reconnect power to the access point until the Ethernet LED turns an amber color, approximately 2 to 3 seconds, and release the button. All access point settings return to factory defaults.


Using the Web-Browser Interface

Prior to using the web-browser interface, you must have the access point IP address (see the "Obtaining and Assigning an IP Address" section).

Follow these steps to return to default settings using the web-browser interface:


Step 1 Open your Internet browser.


Note The access point web-browser interface is fully compatible with Microsoft Internet Explorer version 6.0 on Windows 98 and 2000 platforms and with Netscape version 7.0 on Windows 98, Windows 2000, and Solaris platforms.


Note When using the access point browser interface, you should disable your browser pop-up blocker.


Step 2 Enter the access point's IP address in the browser address line and press Enter. An Enter Network Password window appears.

Step 3 Enter your username in the User Name field. The default username is Cisco.

Step 4 Enter the access point password in the Password field and press Enter. The default password is Cisco. The Summary Status page appears.

Step 5 Click System Software and the System Software screen appears.

Step 6 Click System Configuration and the System Configuration screen appears.

Step 7 To return to factory default settings, click Reset to Defaults.

Step 8 To retain the IP address and return all other settings to factory default values, click
Reset to Defaults (Except IP).


Default IP Address Behavior

When you connect an 1130AG access point running Cisco IOS Release 12.3(2)JA or later software with a default configuration to your LAN, the access point requests an IP address from your DHCP server and, if it does not receive an IP address, continues to send requests indefinitely.

Default SSID and Radio Behavior

In Cisco IOS Relese 12.3(2)JA2 and earlier, the access point radios are enabled by default and the default SSIDs are tsunami.

In Cisco IOS Release 12.3(4)JA, the access point radios are disabled by default, and there are no default SSIDs. You must create an SSID and enable the radio before the access point will allow wireless associations from other devices. These changes to the default configuration improve the security of newly installed access points. Refer to the "Configuring Basic Security Settings" section for instructions on configuring the SSID and the "Enabling the Radio Interfaces" section for instructions on enabling the radio interfaces.

Obtaining and Assigning an IP Address

To browse to the access point's Express Setup page, you must either obtain or assign the access point's IP address using one of the following methods:

To assign a static IP address to the access point, connect to the access point console port (see the "Connecting to the Access Point Locally" section) and follow the steps in the "Assigning an IP Address Using the CLI" section.

Use a DHCP server (if available) to automatically assign an IP address. You can find out the DHCP-assigned IP address using one of the following methods:

Connect to the access point console port and use a Cisco IOS CLI command to display the IP address, such as show interface bvi1. Follow the steps in the "Connecting to the Access Point Locally" section to connect to the console port.

Provide your organization's network administrator with your access point's Media Access Control (MAC) address. Your network administrator will query the DHCP server using the MAC address to identify the IP address. The access point's MAC address is on label attached to the bottom of the access point.

Use the CLI to identify the IP address assigned to your access point (refer to the Finding the IP Address Using the CLI).

Connecting to the Access Point Locally

If you need to configure the access point locally (without connecting the access point to a wired LAN), you can connect a PC to its console port using a DB-9 to RJ-45 serial cable.


Caution Be careful when handling the access point, the bottom plate might be hot.


Note The Cisco part number for the DB-9 to RJ-45 serial cable is AIR-CONCAB1200. Browse to http://www.cisco.com/en/US/ordering/index.shtml to order a serial cable.


Note After completing your configuration changes, you must remove the serial cable from the access point.


Follow these steps to open the CLI by connecting to the access point console port:


Step 1 Open the access point cover (refer to "Opening the Access Point Cover" section on page 2-9).

Step 2 Connect a nine-pin, female DB-9 to RJ-45 serial cable to the RJ-45 console port on the access point and to the COM port on a computer. To connect to the access point console port, you should loop the cable as shown in Figure 2-15.

Figure 3-1 shows the console port location.

Figure 3-1 Console Port Location

1

Console port


Step 3 Set up a terminal emulator on your PC to communicate with the access point. Use the following settings for the terminal emulator connection: 9600 baud, 8 data bits, no parity, 1 stop bit, and no flow control.


Assigning Basic Settings

After you determine or assign the access point's IP address, you can browse to the access point's Express Setup page and perform an initial configuration:


Step 1 Open your Internet browser.


Note The access point web-browser interface is fully compatible with Microsoft Internet Explorer version 6.0 on Windows 98 and 2000 platforms, and with Netscape version 7.0 on Windows 98, Windows 2000, and Solaris platforms.


Note When using the access point browser interface, you should disable your browser pop-up blocker.


Step 2 Enter the access point's IP address in the browser address line and press Enter. An Enter Network Password screen appears.

Step 3 Enter Cisco in the username field and advance to the Password field.

Step 4 Enter the case-sensitive password Cisco and press Enter. The Summary Status page appears.

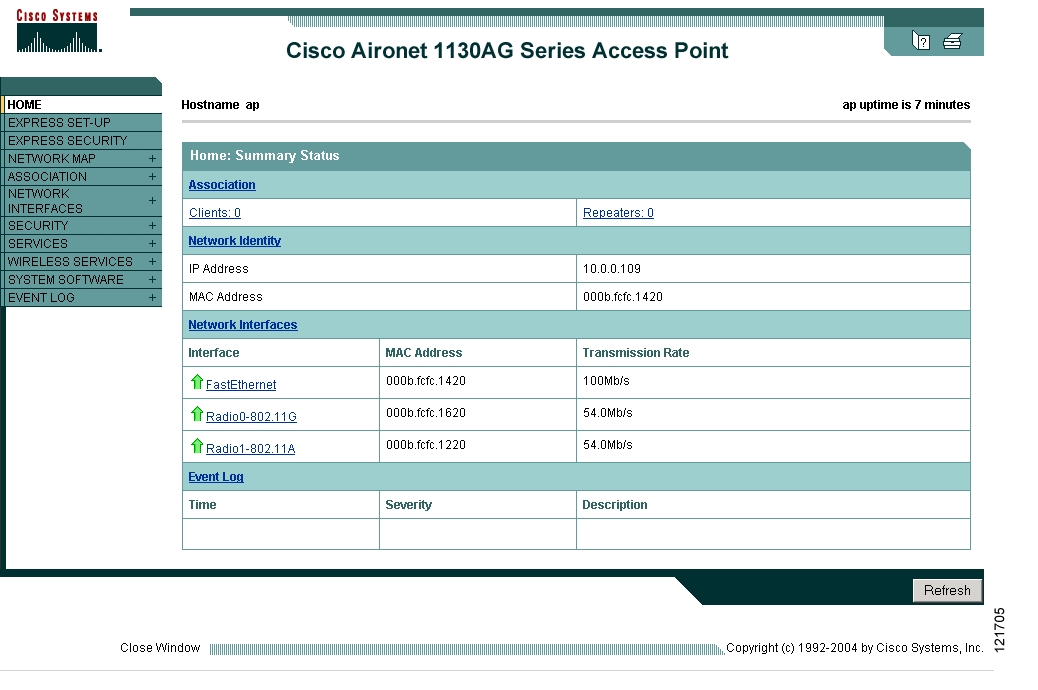
Figure 3-2 shows the Summary Status page.

Figure 3-2 Summary Status Page

Step 5 Click Express Setup. The Express Setup screen appears. Figure 3-3 shows the Express Setup page.

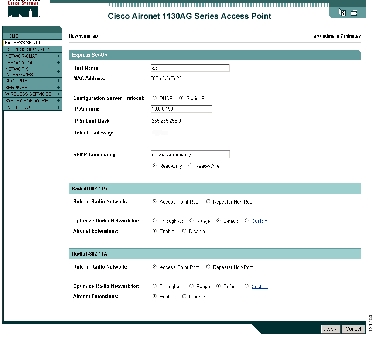
Figure 3-3 Express Setup Page

Step 6 Enter the configuration settings you obtained from your system administrator. The configurable settings include:

System Name— The system name, while not an essential setting, helps identify the access point on your network. The system name appears in the titles of the management system pages.

Configuration Server Protocol—Click on the button that matches the network's method of IP address assignment.

DHCP—IP addresses are automatically assigned by your network's DHCP server.

Static IP—The access point uses a static IP address that you enter in the IP address field.

IP Address—Use this setting to assign or change the access point's IP address. If DHCP is enabled for your network, leave this field blank.


Note If the access point's IP address changes while you are configuring the access point using the web-browser interface or a Telnet session over the wired LAN, you lose your connection to the access point. If you lose your connection, reconnect to the access point using its new IP address. Follow the steps in the "Resetting the Access Point to Default Settings" section if you need to start over.


IP Subnet Mask—Enter the IP subnet mask provided by your network administrator so the IP address can be recognized on the LAN. If DHCP is enabled, leave this field blank.

Default Gateway—Enter the default gateway IP address provided by your network administrator. If DHCP is enabled, leave this field blank.

Web Server—Choose the type of HTTP protocol used by your web browser to access the access point.

Standard (HTTP)—Uses encrypted traffic to transfer data.

Secure (HTTPS)—Uses Secure Socket Layer (SSL) encrypted traffic to transfer data.

SNMP Community—If your network is using SNMP, enter the SNMP Community name provided by your network administrator and select the attributes of the SNMP data (also provided by your network administrator).

Role in Radio Network—Click on the button that describes the role of the access point on your network. Select Access Point (Root) if your access point is connected to the wired LAN. Select Repeater (Non-Root) if it is not connected to the wired LAN.

Optimize Radio Network for—Use this setting to select either preconcerted settings for the access point radio or customized settings for the access point radio.

Throughput—Maximizes the data volume handled by the access point but might reduce its range.

Range—Maximizes the access point's range but might reduce throughput.

Custom—The access point uses settings you enter on the Network Interfaces: Radio-802.11b Settings page. Clicking Custom takes you to the Network Interfaces: Radio-802.11b Settings page.

Aironet Extensions—Enable this setting if there are only Cisco Aironet devices on your wireless LAN.

Step 7 Click Apply to save your settings. If you changed the IP address, you lose your connection to the access point. Browse to the new IP address to reconnect to the access point.

Your access point is now running but probably requires additional configuring to conform to your network's operational and security requirements. Consult the chapters in this manual for the information you need to complete the configuration.


Note You can restore the access point to its factory defaults by unplugging the power jack and plugging it back in while holding the Mode button down until the Ethernet LED turns an amber color (approximately 2 to 3 seconds).


Default Settings on the Express Setup Page

Table 3-1 lists the default settings for the settings on the Express Setup page.

Table 3-1 Default Settings on the Express Setup Page 

Setting
Default

System Name or Host Name

ap

Configuration Server Protocol

DHCP

IP Address

Assigned by DHCP1

IP Subnet Mask

Assigned by DHCP

Default Gateway

Assigned by DHCP

Role in Radio Network

Access point (root)

Web Server

Standard (HTTP)

SNMP Community

defaultCommunity

Optimize Radio Network for

Throughput

Aironet Extensions

Enable

1 When you connect a 1130AG series access point running Cisco IOS Release 12.3(2)JA or later with a default configuration to your LAN, the access point requests an IP address from your DHCP server and, if it does not receive an address, continues to send requests indefinitely.


Enabling the Radio Interfaces

In Cisco IOS Release 12.3(4)JA, the access point radios are disabled by default, and there is no default SSID. You must create an SSID and enable the radios before the access point will allow wireless associations from other devices. These changes to the default configuration improve the security of newly installed access points. Refer to the "Configuring Basic Security Settings" section for instructions on configuring the SSID.

To enable the radio interfaces, follow these instructions:


Step 1 Use your internet browser to access your access point.

Step 2 When the Summary Status page displays, click Network Interfaces > Radio0-802.11g and the radio status page displays.

Step 3 Click Settings and the radio settings page displays.

Step 4 Click Enable in the Enable Radio field.

Step 5 Click Apply.

Step 6 Click Radio1-802.11A and the radio status page displays.

Step 7 Repeat Steps 3 to 5.

Step 8 Close your internet browser.


Configuring Basic Security Settings

After you assign basic settings to your access point, you must configure security settings to prevent unauthorized access to your network. Because it is a radio device, the access point can communicate beyond the physical boundaries of your building.

Just as you use the Express Setup page to assign basic settings, you can use the Express Security Set-Up page to create unique SSIDs and assign one of four security types to them. For detailed security information, refer to the Cisco IOS Software Configuration Guide for Cisco Aironet Access Points.

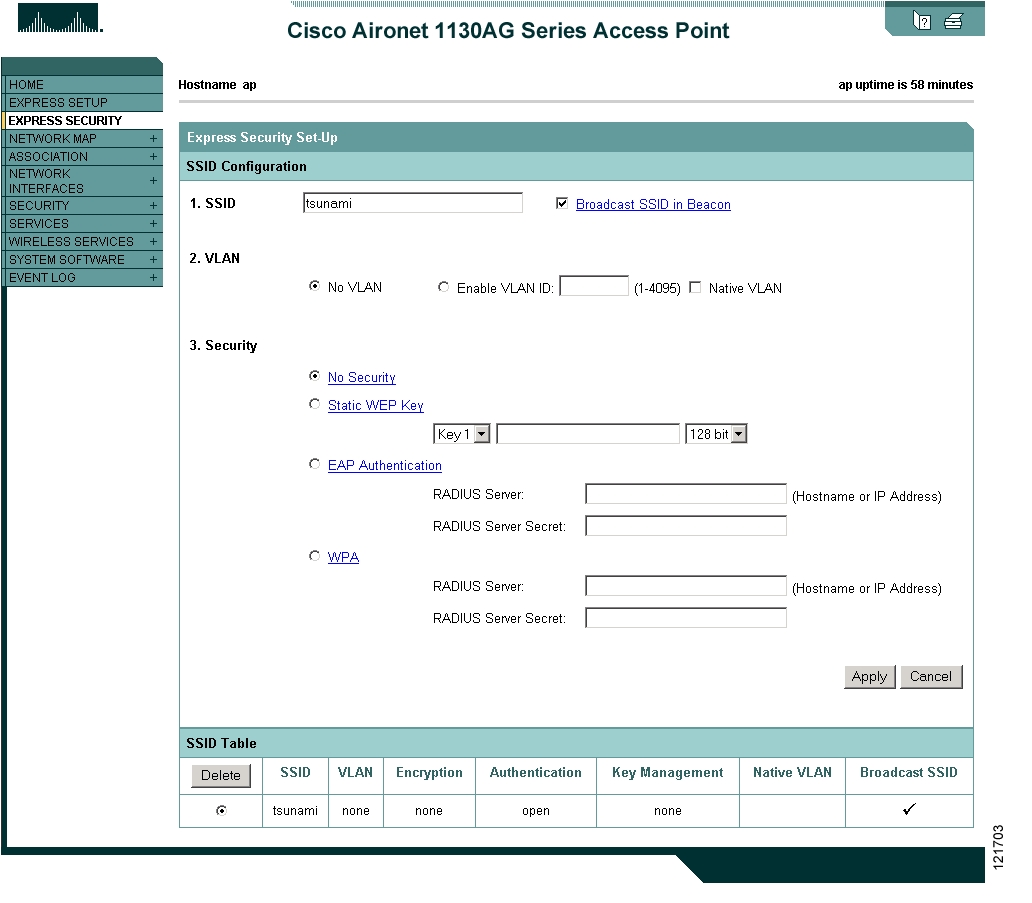
Figure 3-4 shows the Express Security Set-Up page.

Figure 3-4 Express Security Set-Up Page

Understanding Express Security Settings

When the access point configuration is at factory defaults, the first SSID that you create by using the Express Security page overwrites the default SSID (tsunami), which has no security settings. The SSIDs that you create appear in the SSID table at the bottom of the page. You can create up to 16 SSIDs on the access point.


Note In Cisco IOS Release 12.3(4)JA and later, there is no default SSID. You must configure an SSID before client devices can associate to the access point.


Using VLANs

If you use VLANs on your wireless LAN and assign SSIDs to VLANs, you can create multiple SSIDs by using any of the four security settings on the Express Security page. However, if you do not use VLANs on your wireless LAN, the security options that you can assign to SSIDs are limited because on the Express Security page encryption settings and authentication types are linked. Without VLANs, encryption settings (WEP and ciphers) apply to an interface, such as the radio, and you cannot use more than one encryption setting on an interface. For example, when you create an SSID with static WEP with VLANs disabled, you cannot create additional SSIDs with WPA authentication because they use different encryption settings. If you find that the security setting for an SSID conflicts with another SSID, you can delete one or more SSIDs to eliminate the conflict.

If any VLANs are defined on the access point, the trunk port on the switch must be limited to allow only the VLANs defined on the access point.

Express Security Types

Table 3-2 describes the four security types that you can assign to an SSID.

Table 3-2 Security Types on Express Security Setup Page 

Security Type
Description
Security Features Enabled

No Security

This is the least secure option. You should use this option only for SSIDs used in a public space and assign it to a VLAN that restricts access to your network.

None.

Static WEP Key

This option is more secure than no security. However, static WEP keys are vulnerable to attack. If you configure this setting, you should consider limiting association to the bridge based on MAC address (refer to the Cisco IOS Software Configuration Guide for Cisco Aironet Access Points).

Mandatory WEP. Client devices cannot associate using this SSID without a WEP key that matches the bridge key.

EAP Authentication

This option enables 802.1x authentication (such as LEAP, PEAP, EAP-TLS, EAP-GTC, EAP-SIM, and others) and requires you to enter the IP address and shared secret for an authentication server on your network (server authentication port 1645). Because 802.1x authentication provides dynamic encryption keys, you do not need to enter a WEP key.

Mandatory 802.1x authentication. Client devices that associate using this SSID must perform 802.1x authentication.

WPA

Wi-Fi Protected Access (WPA) permits wireless access to users authenticated against a database through the services of an authentication server, then encrypts their IP traffic with stronger algorithms than those used in WEP. As with EAP authentication, you must enter the IP address and shared secret for an authentication server on your network (server authentication port 1645).

Mandatory WPA authentication. Client devices that associate using this SSID must be WPA-capable.


28

Express Security Limitations

Because the Express Security page is designed for simple configuration of basic security, the options available are a subset of the bridge security capabilities. Keep these limitations in mind when using the Express Security page:

If the No VLAN option is selected, the static WEP key can be configured once. If you select Enable VLAN, the static WEP key should be disabled.

You cannot edit SSIDs. However, you can delete SSIDs and re-create them.

You cannot assign SSIDs to specific radio interfaces. The SSIDs that you create are enabled on all radio interfaces. To assign SSIDs to specific radio interfaces, use the Security SSID Manager page.

You cannot configure multiple authentication servers. To configure multiple authentication servers, use the Security Server Manager page.

You cannot configure multiple WEP keys. To configure multiple WEP keys, use the Security Encryption Manager page.

You cannot assign an SSID to a VLAN that is already configured on the bridge. To assign an SSID to an existing VLAN, use the Security SSID Manager page.

You cannot configure combinations of authentication types on the same SSID (for example, MAC address authentication and EAP authentication). To configure combinations of authentication types, use the Security SSID Manager page.


Note For detailed information about security and security settings, refer to the Cisco IOS Software Configuration Guide for Cisco Aironet Access Points.


Using the Express Security Page

Follow these steps to create an SSID using the Express Security page:


Step 1 Type the SSID in the SSID entry field. The SSID can contain up to 32 alphanumeric characters.

Step 2 To broadcast the SSID in the bridge beacon, check the Broadcast SSID in Beacon check box. When you broadcast the SSID, devices that do not specify an SSID can associate to the bridge. This is a useful option for an SSID used by guests or by client devices in a public space. If you do not broadcast the SSID, client devices cannot associate to the bridge unless their SSID matches this SSID. Only one SSID can be included in the bridge beacon.

Step 3 (Optional) Check the Enable VLAN ID check box and enter a VLAN number (1 through 4095) to assign the SSID to a VLAN. You cannot assign an SSID to an existing VLAN.

Step 4 (Optional) Check the Native VLAN check box to mark the VLAN as the native VLAN.

Step 5 Select the security setting for the SSID. The settings are listed in order of robustness, from No Security to WPA, which is the most secure setting.

If you select Static WEP Key, choose the key number and encryption key size and enter the encryption key (10 hexidecimal characters for 40-bit keys or 26 hexidecimal characters for 128-bit keys).

If you select EAP Authentication or WPA, enter the IP address and shared secret for the authentication server on your network.


Note If you do not use VLANs on your wireless LAN, the security options that you can assign to multiple SSIDs are limited. Refer to the Cisco IOS Software Configuration Guide for Cisco Aironet Access Points for VLAN details.


Step 6 Click Apply. The SSID appears in the SSID table at the bottom of the page.


Finding the IP Address Using the CLI

When you connect the access point to the wired LAN, the access point links to the network using a bridge virtual interface (BVI) that it creates automatically. Instead of tracking separate IP addresses for the access point's Ethernet and radio ports, the network uses the BVI.

To find the IP address of your access point using the console port, you can use the Cisco IOS CLI show ip interface brief bvi1 from the privileged EXEC mode. For additional information on the CLI, refer to the "Using the Command-Line Interface" section.

Assigning an IP Address Using the CLI

When you assign an IP address to the access point using the CLI, you must assign the address to the BVI. Beginning in privileged EXEC mode, follow these steps to assign an IP address to the access point's BVI:

 
Command
Purpose

Step 1 

configure terminal

Enter global configuration mode.

Step 2 

interface bvi1

Enter interface configuration mode for the BVI.

Step 3 

ip address address
mask

Assign an IP address and address mask to the BVI.

Note If you are connected to the access point using a Telnet session, you lose your connection to the access point when you assign a new IP address to the BVI. If you need to continue configuring the access point using Telnet, use the new IP address to open another Telnet session to the access point.

Using a Terminal Emulator to Access the CLI

Follow these steps to access the CLI using a terminal emulator program from the serial port. These steps are for a PC running Microsoft Windows with the Hyper Terminal application. Check your PC operating instructions for detailed instructions for your operating system.


Step 1 Connect a DB-9 to RJ-45 serial cable from your PCs serial port connector (COM3 or COM2) to the access point serial console port.

Step 2 Select Start > Programs > Accessories > Communications > Hyper Terminal.

Step 3 When the Hyper Terminal Connection Description window displays, enter a connection name in the Name field and click OK.

Step 4 When the Connect To window displays, click the drop-down arrow in the Connect using field and choose COM3 or COM2 for your PC serial port. Click OK.

Step 5 When the COM3 or COM2 Properties window displays, enter this information into the respective fields and then click OK:

Bits per second: 9600

Data bits: 8

Parity: None

Stop bits: 1

Flow control: None

Step 6 Click Enter and the access point CLI page displays.


Using a Telnet Session to Access the CLI

Follow these steps to browse to access the CLI using a Telnet session. These steps are for a PC running Microsoft Windows with a Telnet terminal application. Check your PC operating instructions for detailed instructions for your operating system.


Step 1 Choose Start > Programs > Accessories > Telnet.

If Telnet is not listed in your Accessories menu, choose Start > Run, type Telnet in the entry field, and press Enter.

Step 2 When the Telnet window appears, click Connect and choose Remote System.


Note In Windows 2000, the Telnet window does not contain drop-down menus. To start the Telnet session in Windows 2000, type open followed by the access point's IP address.


Step 3 In the Host Name field, type the access point's IP address and click Connect.


hometocprevnextglossaryfeedbacksearchhelp

Posted: Fri May 6 14:26:38 PDT 2005
All contents are Copyright © 1992--2005 Cisco Systems, Inc. All rights reserved.
Important Notices and Privacy Statement.