These release notes are for use with Cisco Cache Engine User Guide, Version 2.0.0 publication and contain information that was not available for inclusion in that manual. These notes discuss the following topics:
This feature allows user-configurable list of domains for which the Cache Engine will not use any upstream proxy and will contact the end server directly. This feature should be used for enterprise branch office caches that should not use the corporate proxy server when accessing intranet content. This feature is supported in transparent and proxy mode.
The user-configurable list of no-proxy domains or IP addresses is delimited by carriage-returns. List size is unlimited. For example, if domain "xyz.com" is listed by default, this means do not proxy for all domains that end in "xyz.com." But if the domain entry is "^xyz.abc," this means do not proxy for all domains that begin with "xyz.abc." The IP address syntax is different. The full IP address should be specified and any of the four fields can be wild carded. For example, if the IP address entry is "161.102.*.*" then do not proxy for all IP addresses that begin with "161.102."
Note In Version 2.0.2, the Cache Engine can only filter out one local domain, such as "cisco.com," it cannot filter out proxy for sub-local domains, such as "web1.cisco.com" or "web2.cisco.com."
The transparent cache server has the flexibility of selecting the upstream proxy port number. In Version 2.0.1, both the transparent cache server and proxy cache server use the same upstream proxy port. With the addition of the new custom transparent cache server, the three cache servers will all tie up the same upstream proxy port. The Netscape browser provides a way of using the proxy server with an exception of certain domains (e.g. your local domain). To provide a similar functionality, a special flag in the proxy mode configuration is checked if you want to use the outgoing proxy port. The transparent cache server (either default or custom) will then use the default HTTP port 80 instead of the outgoing proxy port.
On the Cache Engine Management Interface GUI, CACHING menu, HTTP Proxy option, a Do not use Outgoing HTTP Proxy for Local Domain check box has been added. Check this box if you want the HTTP cache server not to use the outgoing proxy port for outbound HTTP connections and use the standard HTTP port 80.
The global configuration command no-local-domain option has been added to the http global configuration command. Use this option if you want the HTTP cache server not to use the outgoing proxy port for outbound HTTP connections and use the standard HTTP port 80.
http proxy outgoing {hostname | ip-address} port [no-local-domain]
For a complete description on the updated http command, refer to the section "Related Documentation" for CCO location for the updated appendix A, "Command Reference" in the Cisco Cache Engine User Guide, Version 2.0.0 publication.
In Version 2.0.1, the transparent mode web caching is hard-coded on HTTP standard port number 80. The server is always listening to this port number, and it is not configurable through any other means. In Version 2.0.2, this feature provides support for transparent interception on HTTP traffic on any configurable port (1 to 1,600). It is now possible to transparently intercept HTTP traffic on any port. This feature efficiently performs transparent caching at branch offices when enterprises run some of their HTTP traffic on non-port 80 ports.
It provides support for a user-configurable port of interception. The maximum number of simultaneous hashes should be four.
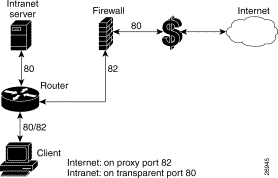
Figure 1 shows a special customer's network topology using transparent web caching.
Figure 1: Network Topology Using Transparent Web Caching
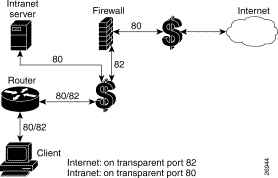
Figure 2 shows a network topology using the custom transparent cache server.
Figure 2: Network Topology Using Custom Transparent Cache Server
On the Cache Engine Management Interface GUI, the Custom Web Cache option has been added under the WCCP menu. This GUI option allows you to configure the Cache Engine to cache custom web traffic (custom configured outgoing port HTTP requests). This service requires you to use WCCP Version 2. Click HELP for information on configuring custom HTTP caching services.
The global configuration command wccp custom-web-cache and no wccp custom-web-cache has been added. This command allows you to configure the Cache Engine to cache custom web traffic (custom configured outgoing port HTTP requests). To use this command, you must be using WCCP Version 2.
Refer to the section "Related Documentation" for CCO location for the updated appendix A, "Command Reference" in the Cisco Cache Engine User Guide, Version 2.0.0 publication.
In Version 2.0.1, error conditions are not handled transparently by the Cache Engine. When an error occurs, either during the processing of the request from the client or during the processing of the response from the server, the Cache Engine sends back a HTML page to the client which contains the error description. The end users ends up seeing this Cache Engine generated page instead of the familiar browser pop-up error window or alert box; therefore, the claim of transparency is affected.
The transparent error reporting feature allows the end users to continue to see browser-generated messages for errors that the Cache Engine encounters while processing the request or response.
Based on how the Cache Engine reports errors to the client, there are three possibilities:
Cache Engine Running WCCP Version 2
In order to make the error messages transparent to the user, the client/server pair is added to the bypass list and an HTTP redirect message is sent to the client requesting it to redirect the request to the same URL as before. The client on receiving the redirect message sends back the request once again. This time the request gets bypassed by the cache because the client/server pair is in the bypass list. The request now goes to the server directly. Since the connection was not accepted by the cache, any time-out error or failure to connect to the server or mangled response from the server will be handled by the browser. Thus the error messages will be transparent. Currently all entries in the bypass list will be kept for a configurable period of time (e.g. few minutes).
When there is an internal failure in the cache while processing a request, a reset is sent back to the client and closes the connection. This is because memory is needed to add the client/server pair to the bypass list. When a browser receives a connection reset, it pops up a "Connection Reset By Peer" alert box.
Cache Engine Running WCCP Version 1
For all error conditions, the Cache Engine sends back a reset and closes the connection. It does not send back any error pages. All errors seen by the clients are in the familiar browser error format.
Cache Engine Acting as an Incoming Proxy Server
In this case, the Cache Engine sends back error pages as in Version 2.0.1. When clients are using the Cache Engine as an incoming proxy server, they will continue to see the HTML error pages generated by the clients.
The global configuration command error-handling and no error-handling has been added. This command allows you to customize how the Cache Engine should handle errors. To use the transparent option, you must be using WCCP Version 2.
Refer to the section "Related Documentation" for CCO location for the updated appendix A, "Command Reference" in the Cisco Cache Engine User Guide, Version 2.0.0 publication.
In Version 2.0.1, WCCP currently redirects all packets for certain traffic to be intercepted (e.g. HTTP) to the Cache Engines as they come online. The drawbacks is that existing TCP connections to the web server are broken. The same thing happens when WCCP goes down; then the TCP connections established by the Clients to the Cache Engine are broken. This problem is worse when there is a cluster of Cache Engines. As new Cache Engines are added and existing ones removed, the TCP connections end up being redirected to the wrong Cache Engine and the clients get a TCP RESET, which breaks the connection. In Version 2.0.2, the flow protection feature is designed to keep the TCP flow intact as well as not overwhelm the Cache Engines when they come up or are reassigned new traffic. This feature also has a slow start mechanism whereby the Cache Engines try to take load appropriate for their capacity.
The global configuration command wccp flow-redirect and no wccp flow-redirect has been added. This command allows you to enable flow redirection. To use this command, you must be using WCCP Version 2.
wccp flow-redirect enable
Refer to the section "Related Documentation" for CCO location for the updated appendix A, "Command Reference" in the Cisco Cache Engine User Guide, Version 2.0.0 publication.
The bypass feature has been enhanced as described in the following two subsections. There are two kinds of bypass (load based and authentication based).
In V2.01, the method of doing load bypass was to bypass all new connections for a short period of time (2 to 4 seconds) and then start accepting the connections again. The new method in V2.02, is to do bypass only a bucket at a time but for longer periods of time (10 minutes by default). If the load is still high more buckets are bypassed until the load becomes such that the CE can handle it. Once the Cache Engine has bypassed enough buckets to be able to handle the load, it will start accepting bypassed buckets, one at a time and based on the bucket return configuration, until all buckets are serviced again.
The Cache Engine Management Interface GUI, WCCP menu, BYPASS Proxy option, has been moved to the CACHING menu, BYPASS option. You now are able to:
Enable load bypass. If a Cache becomes overwhelmed with traffic, it can use the Load Bypass feature to re-route overload traffic back out to the Internet.
Set the time interval between bypassing buckets in seconds. Once the Cache Engine becomes overwhelmed with traffic, it will bypass one bucket at a time until it is no longer over-loaded. The amount of time between the bypassing of one bucket and the next is the time interval between bypassing buckets. Default is 4 seconds. Range is 4 to 600 seconds.
Note A bucket is defined as a certain sub-section of the allotted hash assigned to each Cache Engine in a caching cluster. If only one cache exists in the environment, then it will have 256 buckets assigned to it.
Set the time that a bucket is bypassed in minutes. Once a bucket (or numerous buckets) has been bypassed, and the Cache Engine is in bypass mode, it will not attempt to pick up the bypassed load for this set number of minutes. Default is 10 minutes. Range is 1 to 1440 minutes.
Set the time interval between buckets coming back in seconds. Once the time interval allotted to bypass mode has been surpassed, the Cache Engine will begin to pick up bypassed traffic one bucket at a time. The time between the return, or pick-up, of each bucket is measured in seconds. Default is 60 seconds. Range is 4 to 600 seconds.
Set the bypass entry expiration time in minutes. The number of minutes an idle client-server pair will remain on the Bypass access list. Default value is 10 minutes. Range is 1 to 1440 minutes.
Click HELP for information on configuring the bypass feature.
The Authentication bypass feature is also located in this new GUI location. Some web sites, due to IP authentication, may not allow the Cache Engine to connect directly on behalf of the client. In order to avoid a disruption of service, the Cache can use Authentication Bypass to generate a dynamic access-list for these client-server pairs. Authentication Bypass triggers are also propagated upstream and downstream in the case of hierarchical caching. To enable Authentication Bypass on the Cache Engine, select the On radio button. To disable Authentication Bypass without losing your settings, select the Off radio button. Default value is Off.
The packets could be bypassed by authentication bypass even if load bypass is not enabled. Once a client-server pair goes into authentication bypass, it is bypassed for a configurable amount of time (10 minutes by default).
The tunnel bypass option is no longer available. This option was for debugging purposes to force all WCCP-redirected traffic to bypass the Cache Engine.
To configure the bypass feature using the CLI, use the bypass global configuration command. To disable the bypass feature, use the no form of this command.
Note The bypass feature is only available when WCCP Version 2 is enabled. The Cache Engine can only bypass WCCP-redirected traffic, not proxy-style requests.
To display authentication bypass and load bypass statistics, use the show bypass command.
show bypass statistics {auth-traffic | load}
The global configuration command wccp tunnel-bypass, wccp auth-bypass, and wccp load-bypass are no longer available.
Note The auth-bypass option is now called auth-traffic option. Bypass options are now configured through the bypass global command rather than the wccp global command.
For more information on these commands, refer to the section "Related Documentation" for CCO location for the updated appendix A, "Command Reference" in the Cisco Cache Engine User Guide, Version 2.0.0 publication.
Implementation of enhancements to the TCP stack that improve network responsiveness, particularly in high-latency networks (e.g. satellite). Satellite providers need these improvements to fully utilize their satellite links. They want to distribute content to many distributed caches.
The global configuration command tcp has been updated to include TCP client and server maximum segment size (client-mss and server-mss) and TCP satellite (client-satellite and server-satellite) options. This command allows you to configure TCP parameters. To disable TCP parameters, use the no form of this command.
The show tcp command TCP configuration output has been updated to show the new TCP setting options:
Console# show tcp

==TCP Configuration==
TCP keepalive timeout 300 sec
TCP keepalive probe count 4
TCP keepalive probe interval 75 sec
TCP client max segment size 1460
TCP server max segment size 1460
TCP client satellite (RFC1323) disable
TCP server satellite (RFC1323) disable
TCP server R/W timeout 120 sec
TCP client R/W timeout 120 sec
TCP server send buffer 8 k
TCP server receive buffer 32 k
TCP client send buffer 32 k
TCP client receive buffer 8 k
TCP Listen Queue 200
TCP init ssthresh 65536
TCP cwnd base 2
For more information on these commands, refer to the section "Related Documentation" for CCO location for the updated appendix A, "Command Reference" in the Cisco Cache Engine User Guide, Version 2.0.0 publication.
This feature allows you to customize the blocked message that is sent back to a user when a request from the client matches a blocked URL. This flexibility is provided by allowing you to create your own HTML page called block.html and place it in the /local/etc/ directory. If you want to embed graphics into the HTML page, place the corresponding graphics gif/jpeg file in the /local/lib/gui/pub directory.
An example of the block.html file is:
<HTML>
<HEAD>
<TITLE>
URL Blocked
</TITLE>
</HEAD>
<BODY>
The site you are trying to view is blocked. Please contact your system administrator if
you need to unblock this site <IMG_SRC = /local/lib/gui/pub/stop.gif width=492
height=94 border=0>
</BODY>
</HTML>
Once you have created your customized block.html page, you can turn on this feature from the CLI or GUI.
On the Cache Engine Management Interface GUI, CACHING menu, URL Filtering option, a Display customized URL blocking message (/local/etc/block.html) check box has been added. Check this box to turn on or off the customized URL block message.
The global configuration command url-filter has been updated to support this feature. This command allows you to enable URL blocking.
To turn on the customized URL blocking message, enter:
url-filter bad-sites-allow [custom-message]
url-filter good-sites-allow [custom-message]
To turn off the customized URL blocking message, enter:
url-filter bad-sites-allow
url-filter good-sites-allow
To disable URL blocking, use the no form of this command.
Refer to the section "Related Documentation" for CCO location for the updated appendix A, "Command Reference" in the Cisco Cache Engine User Guide, Version 2.0.0 publication.
Refer to the section "Related Documentation" for CCO location for the updated chapter 2, "Installing the Cache Engine" in the Cisco Cache Engine User Guide, Version 2.0.0 publication. The following changes are described in the updated chapter:
Section "Enabling Cache Support on the Router" starting on page 2-10.
Ensure that the router is running a release of the Cisco IOS software that includes WCCP. You must upgrade the Cisco IOS software if it does not have this support before you can continue.
IOS versions before 12.0(3)T support only WCCP Version 1. IOS versions between 12.0(3)T and 12.0(5)T support only WCCP Version 2. IOS version 12.0(5)T or later support both WCCP Version 1 and Version 2. In IOS version 12.0(5)T or later, the default WCCP version is Version 2. You can override the WCCP default, by using the global configuration command ip wccp version 1.
If you have WCCP Version 1 configured and attempt to configure any WCCP Version 2 specific features, you will receive a configuration error.
To enable cache support on the router for WCCP Version 1, enter:
ip wccp enable
To have the interface redirect packets for port 80 to the Cache Engine, enter the following command for each interface:
ip web-cache redirect
To enable cache support on the router for WCCP Version 2, enter:
ip wccp {web-cache | services}


where services is the number of predefined services (0 to 99)
To have the interface redirect packets for port 80 to the Cache Engine, enter the following command for each interface:
The SCSI-LVD only port, located on the front of the Cache Engine, is reserved for future use and is not supported in Version 2.0.1. It is recommended that you do not plug anything into this port.
The Ethernet 1 port, located on the front of the Cache Engine, is reserved for future use and is not supported in Version 2.0.1
Problems with URL filtering of badurl/goodurl list. URL blocking can now detect duplicate entrees when using bad site blocking. URLs will only be considered a duplicate if there is already an URL in the list that would block the new URL (e.g., www.primenet.com/~jahred will not be added to a list that already contains www.primenet.com since it would be blocked by the already existing URL. Whereas www.primenet.com will be added to a list that already contains www.primenet.com/~jahred). The online help was fixed to reflect correct good url list format. [CSCdm54309]
If the Cache Engine is booted without either hard disk installed, you must power off the Cache Engine, reinsert the disks, and reboot the Cache Engine. If the console connection is lost following the initial boot up display, telnet directly to the Cache Engine and repair the dos file system. See the chapter "Maintaining the Cache Engine" in the Cisco Engine User Guide, Version 2.0.0 for instructions. [CSCdm27685]
When a Cache Engine Ethernet interface speed or duplex function is set using the halfduplex, fullduplex, or bandwidth commands, the corresponding Ethernet switch port autosense function should be turned off, and the duplex function and speed should be set manually. Conversely, if the Ethernet switch port autosense function is turned off, the Cache Engine Ethernet interface duplex function and speed has to be set manually to match the Ethernet switch port settings. The Cache Engine Ethernet interface autosense command will only erase manually set configurations. You must reboot the Cache Engine to start autosensing.
Cisco routers Ethernet interfaces do not negotiate duplex settings. If the Cache Engine is connected to a router directly with a crossover cable, the Cache Engine Ethernet interface has to be manually set to match the router's interface settings. [CSCdm41464]
When using the Cache Engine as a proxy server in conjunction with Internet Explorer, you must enable the Cache Engine to act as a proxy server only for HTTP-related traffic. Currently, setting a proxy server in Internet Explorer defaults to all protocols. To set this manually, go to the Advanced page associated with the proxy server configurations of your Internet Explorer browser. Fix: Non HTTP traffic gets bypassed in case the error-handling is set to "transparent", in which case it works fine; otherwise the connection just gets reset. [CSCdm43044 & CSCdm34611]
If you use the user interface WCCP Web-Cache page to enable the password or weight functionality with WCCP Version 2, these options cannot be disabled once a value or string has been added. These options can only be modified to a non-null value. To remove the use of a password or weight value with the Web-Cache service, you must use the CLI. Use the wccp web-cache command without the password and weight keywords to disable these services. To update the view on the user interface without reinstating the use of a password or weight, use the Refresh button on your browser rather than the Update button on the Web-Cache page. [CSCdm37307]
When creating URL lists for use with the URL filtering feature on the Cache Engine, you must include a final carriage return after the last entry in the list. If no carriage return is entered after the final entry, the Cache Engine will not recognize that entry as a valid site for URL filtering. [CSCdm 21722]
If services other than TCP/IP services are enabled arbitrarily from the CLI with more than 24 characters, the Cache Engine reports an error and reboots. [CSCdm29527]
The TCP client-receive buffer setting is incorrect for windows larger than 64 K. If the TCP client receive buffer is set above 64 K, subsequent segments are constantly set at 32 K. Tested the window scaling and analyzed packets, all indicate it works. [CSCdm40274]
When not using persistent connections, a browser is able to retrieve an entire object even if the Content-Length field of an object specified is less that the actual size of the object. The Cache Engine abides by the number of bytes indicated by the Content-Length field, thus interfering with the browser or server service of a misconfigured Content-Length field. [CSCdm44040]
It is possible for a heavy traffic load to disable transaction logging. If this occurs, it may be necessary to reenable transaction logging manually. [CSCdm32593]
Original Problem: When the network link to the Cache Engine is down (for example, a network cable is unplugged), a ping attempt (using the ping {hostname}command) will cycle until it times out after approximately two minutes. This attempt cannot be stopped using Ctrl-C. Fix:If none of the name-servers are reachable (e.g. the ethernet cable is not attached, or the ip routes are misconfigured), an error message is generated to the user without continuing on to DNS queries. This removes the long wait-time associated with the failed DNS queries. The timeout for an unsuccessful ping is 5 seconds. Compared to 75 seconds for an unsuccessful DNS query, you will receive CLI feedback much quicker. [CSCdm27092 & CSCdm31406]
The maximum values for the HTTP performance statistics suddenly become large after the Cache Engine runs for a long period of time. The end time for the transaction is sooner than the start time resulting in a negative number for the length of the transaction, which results in a large maximum value. With these large values, the averages are also incorrect. [CSCdm44059]
Updated help files. [CSCdm37264]
HTTP stat req counters were not resetting after a clear stat all state.[CSCdm36266]
Maximum socket buffer size changed to 1 MB for TCP satellite connection. Implemented a dynamic socket buffer setting scheme. [CSCdm40437]
A S-scsiLib_ABORTED state occurred while booting because it the SCSI Manager timed out. The SCSI thread was not current and connected. [CSCdm44132]
Bugs in UseProxyPortOut() call. [CSCdm51329]
Originally the bypass feature was only used for Authentication bypass. Now it is used for Error bypass and Non-Http request bypass as well. The non-http and error bypass are consolidated in the same command.[CSCdm53732]
Added flow protection to WCCP. See Section "New and Changed Features" for "Flow Protection" description. [CSCdm43085]
A stack trace happens occasionally when writing to flash. [CSCdm57560]
In the case of custom cache, the CE will intercept port 82 (or other) requests and will send them to port 80. If the CE s bypassed all requests will go to the port 82 on the server and there will be no service listening on that port. All the sites that will use custom web cache has a daemon intercept the specific port, so if error bypass happens, that daemon will handle the non port 80 http request. [CSCdm57593]
WCCP command inconsistency. The global wccp router-list-num number command was missing the -num parameter to be consistent with global wccp web-cache router-list-num number[CSCdm58045]
The Cache Engine supports the use of host names when using command-line interface (CLI) commands that require an external IP address entry. [CSCdm03221]
The CLI for bypass settings has changed. The GUI does reflect these changes (e.g. bypass-timer and error-bypass. [CSCdm57956]
When using the browser in proxy mode and trying to access the GUI of the same Cache Engine using the 10.x.x.x address there seems to be an out of order arrival of packets or a mess up in the parser calculation. [CSCdm67588]
Flash/NVRAM corruption causes crashing loop. If the flash is only corrupted and that you can re-format the flash by copying another image to flash after booting from the net. [CSCdm71407]
A site with a Cache Engine will not return pages to the customer. Cache Engine returns "site unreachable error" to customers. This is a routing problem in firewall. [CSCdm62926]
tNetTask vanishes. [CSCdm47579]
The Cache Engine went to panic state on an assert in zbufSockCloseAsync() [CSCdm61179]
Error messages from router occurred because numerous Cron tasks running were taking up 100% of the CPU when nothing else was running. This could be result in the WCCP messages not getting through. Reboot the Cache Engine. [CSCdm61910]
Normal web-GUI access for clients seemed to be fine. When a second simultaneous user tried accessing the GUI, the Cache Engine crashed. [CSCdm63347]
Cache Engine crashes when DNS server is rebooted. If the default gateway reboots, the Cache Engine crashes. This problem is fixed. [CSCdm71220 & CSCdm81931]
Assert in CE build. On running the stress tests, it got into a watchdog loop and removed itself from the network. [CSCdm75775]
Errors on writing to syslog on two Cache Engines. Since syslog was almost always occupying the first available cluster, a corruption on that cluster would have corrupted the syslog.txt file as well. The problem is reproducible, though, if I put an older image.[CSCdm75190 & CSCdm80616]
Clearing the cache under heavy load led to a stack trace and subsequent reboot. [CSCdm78725]
It is not possible to configure an IP default gateway if an IP address has not been configured on the Cache Engine. You must configure the IP address and subnet on the interface prior to configuring the IP default gateway. Configuration of the default-gateway fails only when no interface exists. The interface (fei0) exists only after an ip address is configured for that interface for the first time. After the interface has been attached, subsequent changes in the default-gateway are allowed regardless of the existence of an ip address.[CSCdk92729]
Software Exception under high load. [CSCdm82190]
Eighty percent of requests to Cache Engine CE550 respond with the error Cache Error. [CSCdm85273]
If an invalid server address is used when configuring NTP servers from the CLI, an NTP request to the server may cause the console connection to the Cache Engine to freeze. To unlock the console connection, you must telnet directly to the Cache Engine and delete the invalid server from the configuration. [CSCdm21303]
If the IP address of a Cache Engine is changed following the initial boot-up configuration, the Web Cache Communication Protocol (WCCP) communication with any routers is lost. The Cache Engine continues to use the initial IP address in its WCCP communication with the routers. You must reboot the Cache Engine after an IP address change to ensure proper WCCP communication. [CSCdm24895]
Currently, it is possible to configure an SNMP community string of up to 255 characters on the Cache Engine. However, if a string of more than 64 characters is used, an error occurs when an SNMP manager sends a request to the Cache Engine using this long community string. This causes the Cache Engine to reboot. [CSCdm45858]
The Cache Engine allows idle persistent connections to outlive the specified max-idle parameter set in the CLI or the user interface. [CSCdm39593]
Full HTTP/1.1 compliance. When a client tries to send more than three requests at one time, the connection is closed by the Cache Engine, which may result in lost requests. [CSCdm49890 & CSCdm39594]
If the A (address) and PTR (IP map to host name) records (DNS forward and reverse entries) are inconsistent, the remote host may send a connection request back to the Cache Engine, which ends connectivity to that site. [CSCdk91038]
When receiving POST requests without a Content-Length field, the Cache Engine does not pass the query itself (the body of the request) to the server. Servers usually read the POST body even if no Content-Length field is present. This is a Netscape browser bug on the VAX/VMS platform. Netscape has stopped upgrading the VMS browser. [CSCdm44058]
Objects with a Last-Modified date more recent than the Date (either the Date field in the header or the current date if there is no Date field) should not be cached. However, the Cache Engine caches them, and these objects then expire immediately. [CSCdm39583]
The Cache Engine management user interface provides a hard-coded link to the Java Monitor applet. If the Cache Engine is placed behind a firewall, the Java Monitor will not work in the user interface unless you are working from the same subnet behind the firewall. [CSCdk83173 & CSCdm24071]
Some HTTP stats error counters are not updated. All counters are 0. [CSCdm54304]
Cache Engine crashes due to possible disk failure. [CSCdm94083]
IP Routes fail to save running configuration with 200+ routes to NVRAM. [CSCdp00278]
Cannot remove ip route 0.0.0.0 0.0.0.0. [CSCdp04758]
The custom-web-cache option doesn't allow for full flexibility. [CSCdp04440]
Need to include the client ip in the HTTP headers we send out to the severs.[CSCdm62083 & CSCdp02042]
Transaction log does not say ICP hit/misses. [CSCdm88919]
The URL blocking not according to intent. Bad URL list does simple pattern matching that contradicts the intent of blocking. It needs to be able to block the domain part of an URL, but not the file part or subset of an URL. [CSCdp01923]
The custom-web-cache option only allows ports 1 to 16000.
The Cisco Cache Engine User Guide, Version 2.0.0 publication that ships with the Cache Engine is available on Cisco Connection Online (CCO) at the following URL:
The updated Chapter 2 "Installing the Cache Engine" in the Cisco Cache Engine User Guide, Version 2.0.0 publication is available on Cisco Connection Online (CCO) at the following URL:
The updated Appendix A "Command Reference" in the Cisco Cache Engine User Guide, Version 2.0.0 publication is available on Cisco Connection Online (CCO) at the following URL:
The updated Appendix C "Web Cache Communication Protocol Version 2" of the Cisco Cache Engine User Guide, Version 2.0.0 publication is available on Cisco Connection Online (CCO) at the following URL:
Cisco Connection Online (CCO) is Cisco Systems' primary, real-time support channel. Maintenance customers and partners can self-register on CCO to obtain additional information and services.
Available 24 hours a day, 7 days a week, CCO provides a wealth of standard and value-added services to Cisco's customers and business partners. CCO services include product information,productdocumentation, software updates, release notes, technical tips, the Bug Navigator, configuration notes, brochures, descriptions of service offerings, and download access to public and authorized files.
Note Always check the following URLs for the latest software updates and documentation updates to ensure that you have the latest version of software and related documentation.
CCO serves a wide variety of users through two interfaces that are updated and enhanced simultaneously: a character-based version and a multimedia version that resides on the World Wide Web (WWW). The character-based CCO supports Zmodem, Kermit, Xmodem, FTP, and Internet e-mail, and it is excellent for quick access to information over lower bandwidths. The WWW version of CCO provides richly formatted documents with photographs, figures, graphics, and video, as well as hyperlinks to related information.
Modem: From North America, 408 526-8070; from Europe, 33 1 64 46 40 82. Use the following terminal settings: VT100 emulation; databits: 8; parity: none; stop bits: 1; and connection rates up to 28.8 kbps.
For a copy of CCO's Frequently Asked Questions (FAQ), contact cco-help@cisco.com. For additional information, contact cco-team@cisco.com.
Note If you are a network administrator and need personal technical assistance with a Cisco product that is under warranty or covered by a maintenance contract, contact Cisco's Technical Assistance Center (TAC) at 800 553-2447, 408 526-7209, or tac@cisco.com. To obtain general information about Cisco Systems, Cisco products, or upgrades, contact 800 553-6387, 408 526-7208, or cs-rep@cisco.com.
Cisco documentation and additional literature are available in a CD-ROM package, which ships with your product. The Documentation CD-ROM, a member of the Cisco Connection Family, is updated monthly. Therefore, it might be more current than printed documentation. To order additional copies of the Documentation CD-ROM, contact your local sales representative or call customer service. The CD-ROM package is available as a single package or as an annual subscription. You can also access Cisco documentation on the World Wide Web at http://www.cisco.com, http://www-china.cisco.com, or http://www-europe.cisco.com.
If you are reading Cisco product documentation on the World Wide Web, you can submit comments electronically. Click Feedback in the toolbar and select Documentation. After you complete the form, click Submit to send it to Cisco. We appreciate your comments.