|
|

The following sections include information to help you understand Design Studio basics:
These sections explain the basic concepts you will encounter as you learn how to use Design Studio:
Transformation rules are instructions that the CTE uses to transform the original content of an application or web page into the content that you want delivered to a device. Design Studio converts the rules into XSL. The CTE uses XSLT to transform web pages according to the rules specified in XSL.
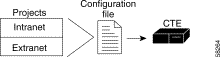
You use Design Studio to create transformation rules and to customize ScreenTop. You save your work in a configuration file. A configuration file has the following characteristics:
 |
Note A configuration file provided with Design Studio, extensions.tcf, is required if you use CTE XHTML extensions. For more information, see the "Managing Configuration Files When Using CTE XHTML Extensions" section. |
A configuration file includes one or more projects. A project has the following characteristics:
Although you can achieve simple transformations in Design Studio without understanding the hierarchical structure of the XHTML code, you need to understand some basic concepts to achieve more complex transformations.
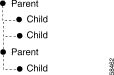
XHTML is structured as a parental hierarchy. Each element (shown as a node on the tree) is either a parent or a child element (see Figure 3-2).
Child elements are nested inside of a parent element. The nesting in XHTML can extend to many levels, where child elements are also parents of other child elements. In Figure 3-3, the body element is a parent to the form element; the form element is a parent to the img element and so on.
Each element has a particular depth and position in the hierarchy. For elements that are nested, each level is considered a different depth in the hierarchy. The first instance of an element at a given depth is considered the first position of that element. As shown in Figure 3-4, the a element appears at the same depth four times.
|
Note Depth refers to the nesting that is represented along the x-axis. Position refers to the repetition of like elements along the y-axis. |
As you work with Design Studio, you will see how you can use these concepts of parent/child elements, depth, and position to create a single transformation rule that affects not just one element, but many elements. By efficiently creating rules, you not only save development time in Design Studio, you also reduce the CTE workload.
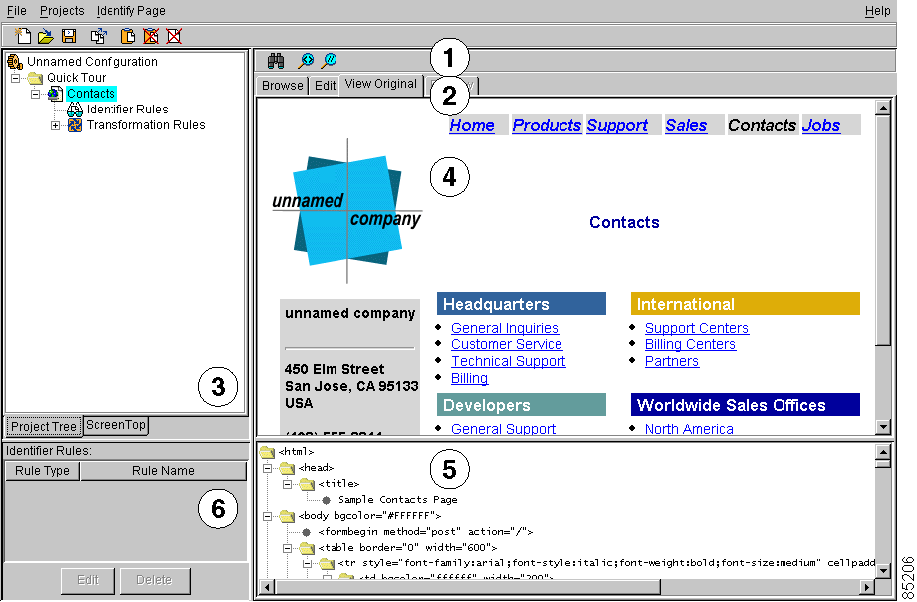
You can use the Design Studio window to track and organize the web pages that you want to transform. The Design Studio window contains the major areas shown in Figure 3-5. The name of the current configuration file appears in the title bar of the Design Studio window. An * in the title bar indicates an unsaved file.
|
Note The numbers in Figure 3-5 refer to the following list. |
The following sections provide more information about the Design Studio window:
By default, the Project Tree tab lists for a configuration file each project and its added pages (see Figure 3-6). Click the ScreenTop tab to display the ScreenTop editor, described in the "Customizing ScreenTop" section.
To work with the project tree, use these techniques:
The lower-left pane of the Design Studio window provides either page or rule information, based on the selection in the project tree. When you select a page in the project tree, the lower-left pane displays information about the page selected in the project tree (see Figure 3-7).
When you select Identifier Rules or a device type in the project tree, the lower-left pane displays rule information (see Figure 3-8).
To work with rules, use these techniques:
Click a view tab to see different views of a web page or an imported XSL style sheet, as explained in Table 3-1.
Design Studio commands are available from the menu bar, tool bars, and shortcut menus.
Use these techniques to locate a command:
Design Studio provides a quick way for you to find a text string in the XHTML source view. This feature is particularly useful when you are trying to locate a particular attribute value or element type.
To find text in the XHTML source view, perform these steps:
Step 2 Click the Find icon ( ).
).
Step 3 In the Find dialog box, enter the text that you want to locate and click Find.
Design Studio highlights the text in the XHTML source view.
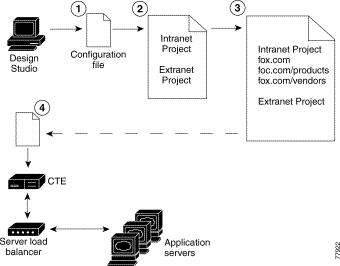
Figure 3-9 summarizes the workflow for creating transformation rules in Design Studio and publishing them to the CTE.
|
Note The numbers in Figure 3-9 refer to the following process. |
The Design Studio workflow is as follows:
Step 2 You add a project to the configuration file.
Step 3 You add a web page to the project and create identifier and transformation rules for the page.
Step 4 When you finish adding pages and creating transformation rules, you save the configuration and then publish it to a CTE. You can test the transformations using simulators and devices.
For general information on configuration files and projects, see the "Configuration and Project Files" section. These sections describe how to work with configuration files and projects:
When you start Design Studio, the Design Studio window lists the ten most recently opened configuration files. You begin work by creating a new configuration file or opening a configuration file that is on your computer or on the CTE.
To create a configuration file, perform these steps:
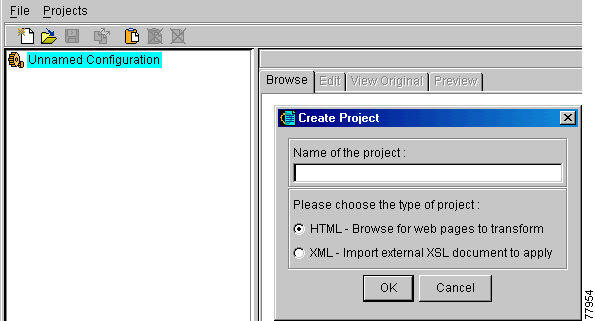
Design Studio creates a configuration file named "Unnamed Configuration" and displays the Create Project dialog box.
A configuration file can contain one or more projects, which you use to group related web pages. For more information on projects, see the "Configuration and Project Files" section.
Step 2 Enter a name to identify the project.
For example, you might identify a project by its general content, such as "Customer Support Pages."
Step 3 Click the HTML radio button.
For information on creating XML projects, see "Working with JavaScript, XML, and XSL."
Step 4 Click OK.
After you create an HTML project, add web pages to it as described in the "Adding a Page to an HTML Project" section.
To open a configuration file that resides on your computer, perform this step:
If a configuration file is already open, Design Studio closes it after prompting you to save changes.
 |
Tip To view the path to a configuration file, point to its filename. |
To open the configuration file currently loaded on a CTE, perform these steps:
Step 2 In the Design Studio window, click Get Configuration From CTE.
If a configuration file is already open, Design Studio closes it after prompting you to save changes. Design Studio then opens the published configuration.
To save a configuration file, perform these steps:
Step 2 If prompted, enter a filename and click Save.
Design Studio saves the configuration file on your computer using the name that you provide. The configuration file contains your transformation rules, as well as any changes made to the default ScreenTop.
To upload a configuration file to the CTE, you must publish it as described in the "Publishing a Configuration File to a CTE" section.
If a file you save already exists, Design Studio saves the old version to a backup file named filename~.
When planning how to divide your work into projects, consider that you can apply a rule to all HTML pages in a project.
|
Note You can also work with XML projects in Design Studio as described in "Working with JavaScript, XML, and XSL." |
To create an HTML project, perform these steps:
The name of the current configuration file appears in the title bar of the Design Studio window.
Step 2 From the Projects menu, choose Create Project.
The Create Project dialog box appears.
Step 3 Enter a name to identify the project.
For example, you might identify a project by its general content, such as "Customer Support Pages."
Step 4 Click the HTML radio button.
Step 5 Click OK.
After you create an HTML project, add web pages to it as described in the "Adding a Page to an HTML Project" section.
To delete a project, perform these steps:
Step 2 Choose Remove Project from the shortcut menu.
Step 3 Click Yes to confirm the deletion.
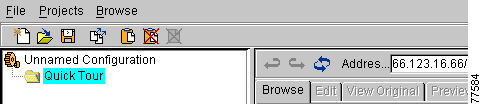
To add a page to an HTML project, perform these steps:
Step 2 Type the web page URL in the Address field and press Enter.
Design Studio opens the requested page in the Browse tab.
If the requested page does not appear, the CTE server or the server for the web page may not be running.
If the page information pane (lower-left portion of window) includes the message "Passes Identifier Rules," see the "Using an Identifier Rule for Multiple Pages" section.
If a Redirection message displays, see the "Handling Page Redirects" section.
Step 3 In the lower-left pane, click Add to Configuration.
The Add Page to Project dialog box displays.
Step 4 Select a project name from the Project drop-down menu.
Step 5 (Optional) Enter a name for the page.
The page URL displays as the page name unless you enter a name. You might want to enter a name to help you identify the page contents.
Step 6 Click OK.
Design Studio adds the page to the project and displays it in the View Original tab.
To continue working with the page, create identifier rules for it as described in the "Identifying a Page" section.
When a web page includes a redirect request (a meta element containing http-equiv="refresh"), Design Studio displays a Redirection message and allows you to choose between the following options:
Follow the redirect if there is no or unneeded content on the page that redirects.
Do not follow the redirect if the page is redirected to itself. If the page containing the redirect has content you want to keep, add the page and modify the redirect tags to another link.
|
Note Redirects from HTTP to HTTPS are not secure in Design Studio. |
To follow the redirect, perform these steps:
Step 2 Add the page that displays to your project, if you want.
When a user requests the page that contains the redirect, the page you added displays.
If the Redirection message displays after you add the page, the redirect link points to the same page. Do not follow the link, or modify the link to another destination.
To add the page that contains the redirect, perform these steps:
Step 2 Add the page.
When a user requests the page that contains the redirect, the page containing the redirect displays. The page request is not redirected.
By default, the name displayed for a page in the project tree is the page URL unless you enter a name when you add the page. You might find that changing a page name to something descriptive will help you more easily locate the page later.
To rename a page, perform these steps:
Step 2 Choose Rename Page from the shortcut menu.
Step 3 In the Change Name dialog box, type a page name and click OK.
The new page name appears in the project tree.
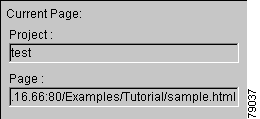
To look up the URL of a page after you change the page name, perform these steps:
Step 2 Right-click the browser view or the XHTML source view.
Step 3 Choose URL from the shortcut menu.
The URL of the page displays in the Identify by URL dialog box.
To display the owner and creation date of a page, perform these steps:
Step 2 Choose Page Info from the shortcut menu.
Information about the page displays in a dialog box.
Step 3 Click OK.
To delete a page from a project, perform these steps:
Step 2 Choose Remove Page from Project from the shortcut menu.
Step 3 Click Yes to confirm the deletion.
![]()
![]()
![]()
![]()
![]()
![]()
![]()
![]()
Posted: Mon Aug 18 15:24:10 PDT 2003
All contents are Copyright © 1992--2003 Cisco Systems, Inc. All rights reserved.
Important Notices and Privacy Statement.