|
|

The Design Studio application is provided with the CTE. The Design Studio CD-ROM also includes the Java 2 Runtime Environment (JRE).
Additional third-party components, not included on the Design Studio CD-ROM, can be used to view the results of your transformations in PC-based simulators.
The following sections describe how to install Design Studio and the companion third-party applications and how to start Design Studio:
The Design Studio application requires the following:
The network connection can be through a proxy server, which you specify when logging in to Design Studio.
The Design Studio software is provided on a CD-ROM and is also available for downloading from the CTE.
To install Design Studio from the CD-ROM, perform these steps:
If auto-start is enabled on your PC, the installer starts.
If auto-start is not enabled on your PC, double-click the drive icon for your CD-ROM and double-click CiscoCTEDesignStudio.exe.
Step 2 Follow the instructions in the installer.
You may be asked to restart your PC during the installation. After you restart your PC, the Design Studio installation wizard continues the installation.
By default, Design Studio is installed in C:\Program Files\Cisco\CTE\Design Studio\version.
The version of Design Studio that corresponds to the CTE is available for download from the CTE.
To upgrade Design Studio from the CTE, perform these steps:
where ipAddress and adminPort are the CTE IP address and administration port (usually 9001). If you do not know what to enter, contact your CTE administrator.
Step 2 If a Security Alert appears, click Yes.
Step 3 In the Administration page, click Download Design Studio.
Step 4 Specify where you want to save the installer and click Open.
A self-extracting ZIP file is downloaded to your PC.
Step 5 (Optional) In the Administration page, click Download Documentation to download all CTE and Design Studio documentation.
Step 6 On your desktop, double-click CiscoCTEDesignStudio.exe
Step 7 Follow the instructions in the installer.
You may be asked to restart your PC during the installation. After you restart your PC, the Design Studio installation wizard continues the installation.
By default, Design Studio is installed in C:\Program Files\Cisco\CTE\Design Studio\version.
To upgrade Design Studio from Cisco.com, refer to the Release Notes for Cisco CTE Series and Design Studio.
To start Design Studio, you need the following login information from the administrator who set up the CTE:
 |
Note Design Studio is intended for use by one user at a time. Do not attempt to use multiple instances of Design Studio from one installation. |
To start Design Studio, perform these steps:
The Log in dialog box appears.
Step 2 Enter your username and password.
Step 3 Enter the IP address of the CTE.
Step 4 If necessary, change the upload port number.
The default upload port is 9001. You might need to change the port number if your firewall redirects ports. Contact your CTE administrator if you do not know which port to use.
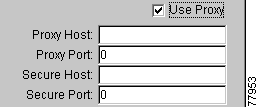
Step 5 If you install Design Studio on a computer that is connected to the CTE through a proxy server, click Use Proxy and enter the host and port for HTTP and HTTPS connections.
Step 6 Click OK.
If you cannot connect to a CTE, verify that your computer has a network connection to a running CTE. Contact your CTE administrator for help.
You can change your password for Design Studio if you know your current password. If you forget your password, contact your CTE administrator.
To change your password for Design Studio, perform these steps:
Step 2 Enter your current password.
Step 3 Enter the new password twice.
Step 4 Click OK.
When you log in to Design Studio, you connect to a specified CTE. You can later connect to a different CTE without leaving Design Studio. For example, you might need to switch between two CTEs used for testing.
To connect to a CTE, perform these steps:
Step 2 Complete the Log In dialog box as described in the "Starting Design Studio" section.
If authentication fails, contact your CTE administrator. The problem might be that either your username and password are not set in the CTE or you are not using the username and password set in the CTE.
The Openwave Mobile Browser Simulator enables you to view on your PC how your transformed web pages will appear on many wireless phones.
To download and install the Openwave Simulator, perform these steps:
Step 2 Navigate to the Openwave Software Development Kit (SDK) downloads area.
Step 3 Download the SDK version that you want to use to your PC.
Step 4 After the download completes, double-click the .exe file that you downloaded.
Step 5 Follow the instructions in the installation wizard.
Step 6 Click Finish.
You will be asked to restart your computer to complete the installation.
We recommend that you put a shortcut to the Openwave Simulator on your desktop for convenient access when you are using Design Studio.
To create a shortcut to the simulator application file, perform these steps:
By default, that directory is C:\Program Files\Openwave\SDK version.
Step 2 Right-click the OWHost.exe file.
Step 3 From the menu, choose Create Shortcut.
Windows creates a shortcut named "Shortcut to OWHost.exe."
Step 4 Drag the shortcut to your desktop.
To configure the Openwave Simulator, perform these steps:
Step 2 In the Openwave SDK window, choose Device Settings from the Simulator menu.
Step 3 Click Proxy 1: Auto provisioned gateway.
Step 4 Click OK.
For information on using the simulator to preview transformations, see the "Using the Openwave Mobile Browser Simulator" section.
The Go.Web Simulator enables you to view on your PC how your transformed web pages will appear on RIM devices.
To download and install the Go.Web Simulator, perform these steps:
Step 2 Click the link to the Developer Zone.
Step 3 Complete the sign-in information.
Step 4 Download the Go.Web Simulator.
Step 5 After the download completes, double-click the .exe file that you downloaded.
Step 6 Follow the instructions in the installation wizard.
The last page of the installation wizard gives you the option of starting the Go.Web Simulator.
Step 7 Click the option to start the Go.Web Simulator and click Finish.
The Go.Web Simulator is ready for use with Design Studio. We recommend that you put a shortcut to the Go.Web Simulator on your desktop for convenient access when you are using Design Studio.
To create a shortcut to the simulator application file, perform these steps:
By default, that directory is C:\Program Files\GoAmerica\GoWebSimulator version.
Step 2 Right-click the SimGoWeb.exe file.
Step 3 From the menu, choose Create Shortcut.
Windows creates a shortcut named "Shortcut to SimGoWeb.exe."
Step 4 Drag the shortcut to your desktop.
For information on using the simulator to preview transformations, see the "Using the Go.Web Simulator" section.
The CTE determines how to transcode a site for a particular device based on settings in a Device Definition File (DDF). For example, the CTE uses the specifications in a DDF to determine how to handle the images it sends to a device. You can use Design Studio to tune those specifications.
Design Studio also enables you to import a DDF and either replace the current DDF or merge changes into it.
A DDF specifies device information such as the following:
Table 2-1 describes the main keys and values contained in the DDF files. For more information, see the information provided in the Edit DDF window.
Table 2-1 Keys and Values in Device Definition Files
|
|
1 You cannot edit or delete any of the keys listed in this column. 2 The value of the filteragent key is the only value that you can delete. You can edit all values. |
Table 2-2 Output Encoding Formats
The following sections describe how to work with a DDF file:
You ordinarily will not need to change a DDF unless you want to make changes such as the following:
To change a device definition, perform these steps:
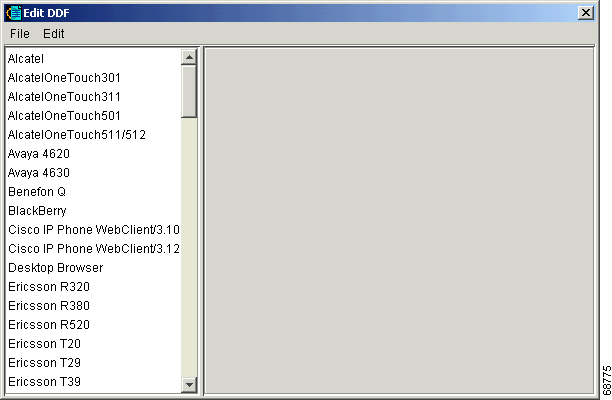
The Edit DDF window opens. Your product license determines the device list.
Step 2 In the left pane of the Edit DDF window, click the device type that you want to change.
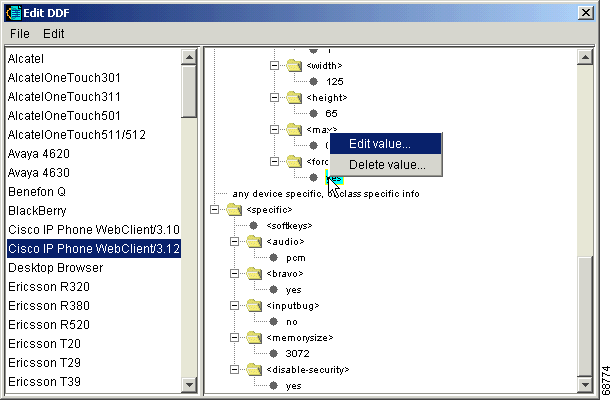
Step 3 In the right pane of the Edit DDF window, scroll to the value that you want to change and right-click it.
Step 4 Choose Edit Value from the shortcut menu.
For information on keys and values, see Table 2-1.
Step 5 In the Edit Value dialog box, type the new value and click OK.
Step 6 To save the DDF on your computer, choose Save DDF Locally from the File menu.
Step 7 To publish the DDF to the CTE, choose Upload from the File menu.
Step 8 To return to Design Studio, choose Return to Studio from the File menu.
You add a device definition to support a new device that is not included in the DDF or to uniquely define a device that is already listed in the useragent element for a device type. For example, the useragent element for WAP devices lists several types of devices. You could remove "Ericsson" from that list and create a device definition just for Ericsson.
To add a device definition, perform these steps:
Step 2 From the Edit menu in the Edit DDF window, choose an option:
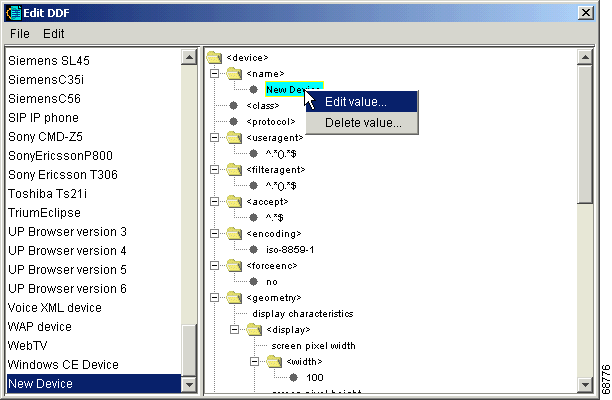
The new device displays at the end of the device list in the left pane.
Step 3 In the right pane of the Edit DDF window, right-click the value New Device or the new device name.
Step 4 Choose Edit Value from the shortcut menu.
Step 5 In the Edit Value dialog box, type the name of the device and click OK.
Step 6 Scroll to a value you want to change, right-click it, and choose Edit Value from the shortcut menu.
Step 7 In the Edit Value dialog box, type the new value and click OK.
For information on keys and values, see Table 2-1.
Step 8 Repeat Step 6 and Step 7 for each value you want to change.
Step 9 If you are defining a device that is already listed in the useragent element of another device type, select that device type in the left pane of the Edit DDF window and remove the device from the useragent element.
Step 10 To save the DDF on your computer, choose Save DDF Locally from the File menu.
Step 11 To publish the DDF to the CTE, choose Upload from the File menu.
Step 12 To return to Design Studio, choose Return to Studio from the File menu.
You will need to import device definitions in the following situations:
To import device definitions, perform these steps:
Step 2 In the Import DDF dialog box, choose the type of import:
Step 3 In the Open dialog box, navigate to the file that you want to import and click Open.
Step 4 To make the new definitions available to the CTE, choose Upload from the File menu.
![]()
![]()
![]()
![]()
![]()
![]()
![]()
![]()
Posted: Mon Aug 18 15:24:00 PDT 2003
All contents are Copyright © 1992--2003 Cisco Systems, Inc. All rights reserved.
Important Notices and Privacy Statement.