|
|

The CTE includes ScreenTop Menu, a hierarchical services menu that provides phone users with quick access to popular destinations such as news, sports, and travel information. ScreenTop Menu displays on any device when the device connects to the CTE IP address. You can make ScreenTop Menu always available to IP phone users by using the soft switch to set a phone or phone group's idle URL to the CTE IP address.
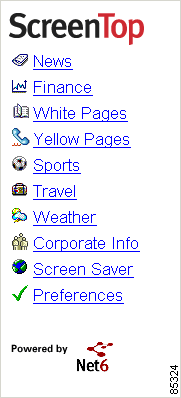
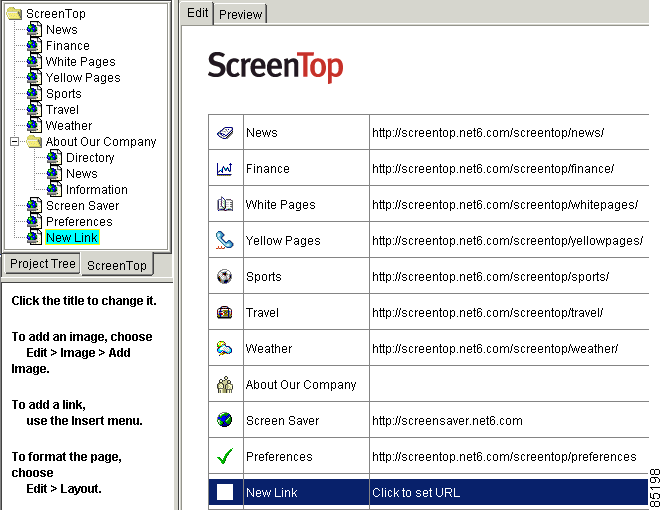
Figure 8-1 shows a sample ScreenTop Menu.
 |
Note The default ScreenTop Menu is enabled for all devices types supported by your CTE. Be sure to specify link URLs for the "Corporate Directory" and "Corporate News & Info" links. |
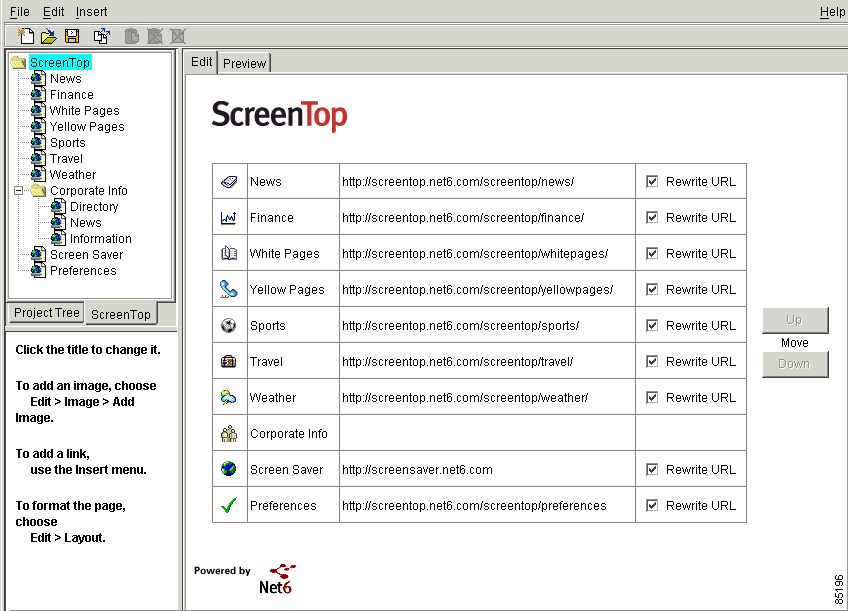
You use Design Studio to change or add links and to add portal pages. Pages that you create through the ScreenTop Menu editor can include a title, links, and an image. The ScreenTop Menu editor enables you to select the order in which those items appear.
Use the ScreenTop Menu preview to check your work without having to connect to a phone.
The following sections describe how to customize ScreenTop Menu:
To customize ScreenTop Menu, follow the general steps that are outlined in Table 8-1
| General Steps | References |
|---|---|
| 1. Start Design Studio, create or open the configuration file where you want to save ScreenTop Menu, and click the ScreenTop tab. | |
| 2. Edit ScreenTop Menu as follows: | "Changing a ScreenTop Menu Page Title" section "Adding Links to a ScreenTop Menu Page" section |
| 3. To add a page, choose New Page from the Insert menu. | |
| 4. To check your work, click the Preview tab. | |
| 5. To save your work, choose Save Configuration from the File menu. To publish your work, choose Publish Configuration from the File menu. |
.
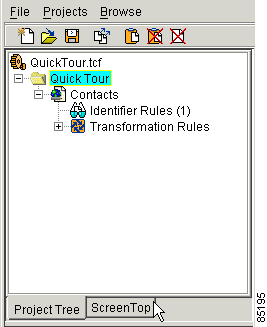
The ScreenTop Menu editor is included with Design Studio. To access the ScreenTop Menu editor, click the ScreenTop tab.
To open the ScreenTop Menu editor, perform these steps:
Step 2 Create or open the configuration file where you want to save your changes to ScreenTop Menu. For information, see the "Opening and Saving a Configuration File" section.
|
Note When you create a new configuration file, the default ScreenTop menu is loaded. If you want to work on a ScreenTop menu that has already been published, choose Get Configuration from the File menu to open the published ScreenTop Menu in Design Studio. |
Step 3 Click the ScreenTop tab.
The ScreenTop Menu editor appears. Use the Edit tab to work on ScreenTop Menu pages and use the Preview tab to check your work.
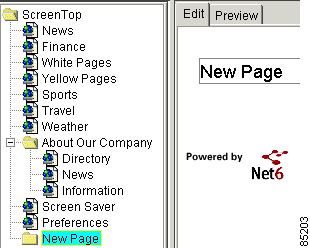
The default title for the home ScreenTop Menu page is "ScreenTop" and for other ScreenTop Menu pages that you add is "New Page." You can change or hide a title.
To change a page title, perform these steps:
The page appears in the Edit tab.
Step 2 In the Edit tab, select the page title and type a new title.
Your changes also appear in the ScreenTop Menu tree.
You can add links from ScreenTop Menu to applications and pages that you have transformed through Design Studio or that are already formatted for display on a phone. If you add more links than will fit on a particular phone screen, the CTE paginates the page and adds navigation buttons that are appropriate for a device type.
To add a link, perform these steps:
Step 2 From the Insert menu, choose New Link.
|
Note Alternatively, right-click the page in the ScreenTop Menu tree and choose the command from the shortcut menu. |
The new link appears in the ScreenTop Menu tree and in the Edit tab at the bottom of the list of links.
Step 3 To include an icon with the link, click the left-most cell of the added link and select an icon from the scroll list.
Step 4 Select the link text and type the text that you want to be displayed for the link on a phone.
Step 5 Select the URL text and enter the link destination. Include either http:// or https:// with the URL.
Step 6 By default, the CTE prepends its IP address to any URL so that the URL request is directed to the CTE for transformation. You might need to change that behavior, by clearing the Rewrite URL check box in the following cases:
If the page that corresponds to the URL needs to be transformed by the CTE, leave the Rewrite URL check box selected.
Step 7 Repeat Step 2 through Step 6 for each link that you want to add.
Step 8 To rearrange the links, select a link and click the Up or Down buttons.
A ScreenTop Menu page can include an image such as a logo. If the image is too large for display on a microbrowser screen, the CTE scales it according to the geometry key settings in the DDF as described in the "Configuring Device Definitions" section.
|
Note Each ScreenTop Menu page includes "Powered by Net6" at the bottom. This image cannot be moved or deleted. |
To add an image, perform these steps:
Step 2 From the Edit menu, chose Image and then Add Image.
Step 3 In the Open Image dialog box, enter a URL. Alternatively, click Browse, navigate to the image location, and click Open.
Step 4 Click OK.
The image appears in the ScreenTop Menu display.
Step 5 To change the location of the image on the page, see the "Changing a ScreenTop Menu Page Layout" section.
To remove the image from the page, perform these steps:
Step 2 From the Edit menu, choose Image and then Remove Image.
The image is removed from the ScreenTop Menu display.
You can specify whether an image that you add to a ScreenTop Menu page appears at the top or bottom of the page or between the title and links. You can also choose to hide the title from a ScreenTop Menu page. When you hide the title, the title text is used only to identify the page in the ScreenTop Menu tree.
To change the page layout, perform these steps:
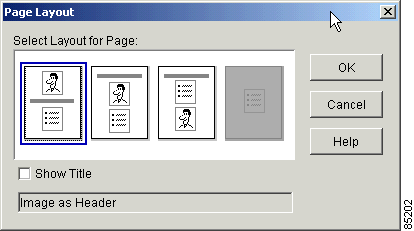
Step 2 From the Edit menu, choose Layout.
The Page Layout dialog box appears.
Step 3 To change the location of an image, click a layout icon in the Page Layout dialog box.
A description of the layout appears in the dialog box.
Step 4 To hide the title text, clear the Show Title checkbox.
Step 5 Click OK.
The page layout changes in the ScreenTop Menu display.
You can add links from ScreenTop Menu to any of the following destinations:
When designing a ScreenTop Menu, note that the usability of a menu declines with the number of clicks that are required for a user to access an application or site.
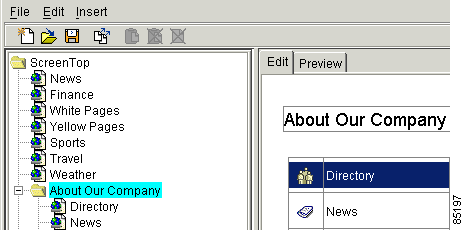
You can use the ScreenTop Menu editor to create a ScreenTop Menu page, or you can add an existing page from the Design Studio project tree.
The following sections describe how to add and delete ScreenTop Menu pages:
When you create a ScreenTop Menu page, the ScreenTop Menu editor adds a link to the new page. The link appears on the ScreenTop Menu page that was selected when you added the page.
To create a ScreenTop Menu page in the ScreenTop Menu editor, perform these steps:
Step 2 From the Insert menu, choose New Page.
A page named "New Page" appears in the ScreenTop Menu tree. The new page appears in the Edit tab.
Step 3 Optionally, add an image to the new page as described in the "Adding and Removing a ScreenTop Menu Image" section.
Step 4 Add links to the new page as described in the "Adding Links to a ScreenTop Menu Page" section.
Step 5 In the ScreenTop Menu tree, click the page that contains the link to the new page.
Step 6 Edit the link to the new page as follows:
You cannot enter a link to a page that you create; Design Studio manages those links.
You can add to a ScreenTop Menu pages that already exist and are included in the same Design Studio configuration file as the ScreenTop Menu.
To add an existing page to a ScreenTop Menu, perform these steps:
 |
Tip If the ScreenTop Menu editor is visible, click the Project Tree tab to exit the editor. |
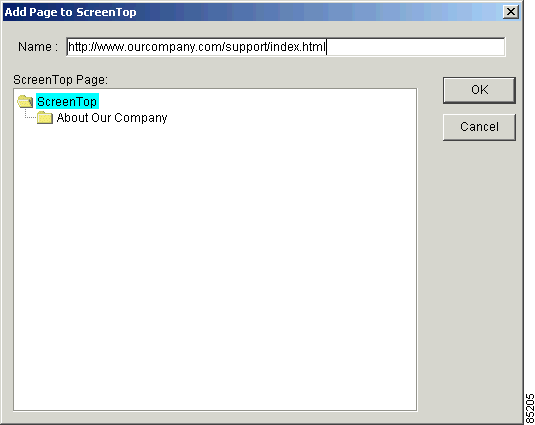
Step 2 Right-click the page name in the project tree and choose Add to ScreenTop from the shortcut menu.
The Add Page to ScreenTop dialog box appears.
Step 3 In the Name text box, change the page name to the text that will be used for the link to the added page. You can also change the link text later in the ScreenTop Menu editor.
Step 4 In the ScreenTop Menu Page tree, select the page where you want to locate the link to the added page.
Step 5 Click OK.
Step 6 Click the ScreenTop tab to view the added link. You can add an icon to the link, change the link text, or disable URL rewriting for the link as described in the "Adding Links to a ScreenTop Menu Page" section.
To delete a ScreenTop Menu page, perform these steps:
Step 2 From the Edit menu, choose Delete.
You can view the general appearance of a ScreenTop Menu in the ScreenTop Menu Preview tab. To view how a ScreenTop Menu is paginated and to test navigation, you must view the ScreenTop Menu on an actual phone.
To preview a ScreenTop Menu page, perform these steps:
Step 2 Click the Preview tab.
The links in the preview are not active. To test the links, publish the configuration file and then access the ScreenTop Menu through a phone. For more information, see the "Saving and Publishing ScreenTop Menu" section.
The CTE includes a default ScreenTop Menu. After you customize the ScreenTop Menu, save the configuration file and publish it to the CTE to replace the default menu. When you publish a ScreenTop menu, it always overwrites the ScreenTop Menu on the CTE. You cannot merge ScreenTop Menus.
To save a ScreenTop Menu, perform these steps:
Step 2 If prompted, enter a filename and click Save.
Design Studio saves the configuration file on your computer using the name that you provide. If a file you save already exists, Design Studio saves the old version to a backup file named filename~.
To publish a ScreenTop Menu, perform these steps:
Step 2 In the File Publish dialog box, select the Upload ScreenTop Pages check box and then click Overwrite (if you want to overwrite the transformation rules) or Merge (if you want to merge the transformation rules).
The ScreenTop Menu on the CTE is updated with your changes.
|
Note The CTE treats a ScreenTop Menu as the default URL. When a device user
contacts the CTE, it sends the ScreenTop Menu to any supported device. The CTE Administrative Console includes Default URL settings that take precedence over a ScreenTop Menu. If the ScreenTop Menu does not display on a device after you have published the configuration file and connected to a CTE using the device, contact your CTE administrator and verify that a Default URL is not specified in the Administrative Console. |
![]()
![]()
![]()
![]()
![]()
![]()
![]()
![]()
Posted: Tue Jan 14 11:40:45 PST 2003
All contents are Copyright © 1992--2002 Cisco Systems, Inc. All rights reserved.
Important Notices and Privacy Statement.