|
|

This chapter presents a short introduction to basic SSL components and a description of how the components are used in configuring the Secure Content Accelerator. Instructions for generating keys and certificates using the CLI are included in Chapter 4. Instructions for using the GUI are in Chapter 5.
This chapter contains the following sections:
Certificates are similar to digital ID cards. They prove the identity of the server to clients. Certificates are issued by Certificate Authorities (CAs) such as VeriSign® or Thawte. Each certificate includes the name of the authority that issued it, the name of the entity to which the certificate was issued, the entity's public key, and time stamps that indicate the certificate's expiration date.
Public and private keys are the ciphers used to encrypt and decrypt information. While the public key is shared quite freely, the private key is never given out. Each public-private key pair works together: data encrypted with the public key can only be decrypted with the private key.
You can configure the Cisco Secure Content Accelerator using either the GUI or CLI, or through the QuickStart wizard (available through both the CLI and GUI). The CLI is available through remote, telnet, or serial connections.
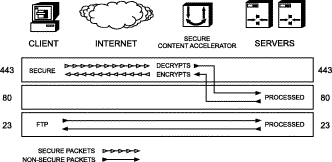
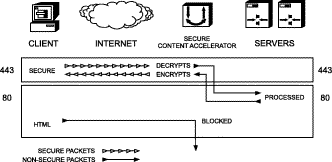
The clear text TCP service port used for data transfer between the SSL appliance and the Web server cannot be used for any other data. The SSL appliance blocks access to the clear text port, protecting your secure data from direct clear test access.
One result of this port blocking strategy is that you cannot use the same clear text TCP service port between the SSL appliance and the server for both non-secure (http:) and decrypted secure data (https:) transfer. Network port traffic received on the clear text TCP service port is dropped. See the figures below.


For example, if the server is used for both secure and non-secure services, you cannot use TCP service port 80 for both basic HTTP connections and for transfer of decrypted secure data between the devices and the server. Below are some alternatives for this scenario.
All data sent on any other port is passed through transparently in both directions.
Before configuring the SSL appliance you must have a certificate and keys for the server. You can use the files you received from the Certificate Authority, copy the keys and certificate from an existing secure server, use default keys and certificates preloaded in the device, or generate your own keys and certificates.
Additionally, be aware that you must make several changes to your Web pages. The nature of the changes depends upon whether you are securing a previously unsecured site, or adding the SSL appliance to an already secure server installation. These changes are described in section "Web Site Changes" in Appendix B.
The key and certificate locations are listed in the $APACHEROOT/conf/httpd.conf file. The default key is $APACHEROOT/conf/ssl.key/*.key. The default certificate is $APACHEROOT/conf/ssl.crt/*.crt. Note the name and location of these elements.
The key and certificate locations are listed in the $APACHESSLROOT/conf/httpd.conf file. The default key is $APACHEROOT/certs/*.key. The default certificate is $APACHEROOT/certs/*.crt. Note the name and location of these elements.
The certificate file is in the directory specified when the certificate was downloaded.
1. Double-click the certificate file to open the viewer.
2. Click the Details tab.
3. Click Copy to file. The Certificate Manager Export Wizard opens. Click Next.
4. Select the DER-encoded binary X.509 radio button. Click Next.
5. Specify a file name and location. Click Next.
6. Click Finish.
7. Click OK when you see the successful completion notice.
8. Exit the Certificate Manager Export Wizard.
9. Close the certificate viewer.
The keys are located within the Key Ring—the key manager program. Follow these instructions to export a key.
1. Click the Start button, point to Programs>Windows NT 4.0 Option Pack>Microsoft Internet Information Server, and click Internet Service Manager. The Microsoft Management Console opens.
2. Navigate to the Web site using the object list.
3. Right-click the Web site object and click Properties in the shortcut menu.
4. Click the Directory Security tab.
5. Click Edit in the Secure Communication panel.
6. Click Key Manager.
7. Click the key to export.
8. On the Key menu, point to Export Key, and click Backup File.
9. Read the security warning and click OK.
10. Select a file location and enter a file name.
11. Click Save.
12. Exit the Internet Service Manager.
Follow these steps to export a certificate and key.
1. Click the Start button, point to Programs>Administrative Tools, and click Internet Service Manager. Alternatively, open the Internet Service Manager in the Administrative Tools folder in the Control Panel.
2. Right-click the Web site object and click Properties in the shortcut menu.
3. Click the Directory Security tab.
4. Click View Certificate in the Secure Communications panel. The Certificate Viewer appears.
5. Click the Details tab.
6. Click Copy to File. The Certificate Export Wizard appears.
7. Click Next. The Export Private Key screen appears.
8. Select the Yes, export the private key option. Click Next. The Export File Format panel appears.
9. Select the Personal Information Exchange—PKCS#12 (pfx) option and any optional choices desired. Click Next. The Password panel appears.
10. Type the password in the Password and Confirm Password text boxes. Click Next. The File to Export panel appears.
11. Type the path and file name in the File name text box or click Browse to select a location manually. Click Next.
12. The Completing the Certificate Export Wizard panel appears. Click Finish.
 |
Note The key and certificate file exported from IIS 5 are in PKCS#12 format. Use the import pkcs12 command in the configuration manager to load a key and certificate in this format. |
Cisco Secure Content Accelerator devices allow easy, flexible configuration without compromising the security of your network or their own configuration.
SSL devices are shipped without passwords. Setting passwords is important because the device can be administered over a network. For more information about passwords, see the commands password access and password enable in Appendix C.
Access lists control which computers can attach to a specific device. No access lists exist when you first install the Secure Content Accelerator. You can restrict the computers allowed to manage the appliance by adding their IP addresses to one or more access lists for each device. For more information about configuring access lists, see the commands show access-list, access-list, snmp access-list, remote-management access-list, telnet access-list, and web-mgmt access-list in Appendix C.
To further protect the configuration security, you can specify that remote (non-serial and non-telnet) configuration sessions be encrypted using AES, DES, or ARC4. See remote-management encryption in Appendix C.
 |
Caution All configuration is lost when using the factory default reset password. |
Each SSL server is associated with a specific IP address and TCP port. The address and TCP port are unique and may not be used for more than one SSL server on a single SSL device.
 |
Note You must specify that your certificate will work with both Microsoft and Netscape browsers when requesting it from the CA. Otherwise, the server cannot support both browsers. |
The certificate created locally is loaded into the device as a regular certificate; the locally created public/private key pair is loaded into the device as a key. The intermediary CA certificate signed by a trusted CA and any other intermediary certificates are loaded as individual certificate objects that are combined into a certificate group. An example of configuring a chained certificate via the configuration manager is presented in Chapter 5. See Chapter 6 for information about creating and enabling chained certificates using the GUI.
| Cryptographic Scheme | Encryption | Message Authentication | Key Exchange | Security Policy Assignments |
|---|---|---|---|---|
ARC4-MD5 | ARC41 (128) | MD5 | RSA (1024) | strong, default, all |
ARC4-SHA | ARC41 (128) | SHA1 | RSA (1024) | strong, default, all |
DES-CBC3-MD5 | 3DES (168) | MD5 | RSA (1024) | strong, all |
DES-CBC3-SHA | 3DES (168) | SHA1 | RSA (1024) | strong, fips, all |
DES-CBC-MD5 | DES (56) | MD5 | RSA (1024) | strong, all |
DES-CBC-SHA | DES (56) | SHA1 | RSA (1024) | strong, fips, all |
EXP-ARC2-MD5 | ARC22 (40) | MD5 | RSA (512) | weak, all |
EXP-ARC4-MD5 | ARC41 (40) | MD5 | RSA (512) | weak, default, all |
EXP-ARC4-SHA | ARC41 (40) | SHA1 | RSA (512) | weak, default, all |
EXP-DES-CBC-SHA | DES (40) | SHA1 | RSA (512) | weak, all |
EXP1024-ARC2-CBC-MD5 | ARC22 (40) | MD5 | RSA (1024) | weak, default, all |
EXP1024-ARC4-MD5 | ARC41 (40) | MD5 | RSA (1024) | weak, default, all |
EXP1024-ARC4-SHA | ARC41 (40) | SHA1 | RSA (1024) | weak, default, all |
EXP1024-DES-CBC-SHA | DES (40) | SHA1 | RSA (1024) | weak, all |
NULL-MD5 | None | MD5 | None | weak, default, all |
NULL-SHA | None | SHA1 | None | weak, default, all |
You can configure the Cisco Secure Content Accelerator using one of four methods, three of which use the CLI configuration manager.
Additionally, the behaviors of some commands vary depending upon the management method. The configuration information for the commands ip name-server, rdate-server, and ip domain-name can be set remotely, but the configuration information is used only through a serial or telnet connection. The results of the ping and traceroute commands also are dependent upon the management method. When used with the remote management application, these commands are executed and results returned based upon the configuring computer's hardware information. When used with serial or telnet management, the results are based upon the SSL appliance's hardware information.
File name formats differ depending on the management method. When using remote management, you can specify the file name as it appears in the configuring computer's file system. A path must be included, if necessary. When using serial or telnet management, the file name must be entered in any of the following formats:
[<http:// | ftp:// | https:// | tftp:// >] URL
In situations where a file is written, anonymous write access must be configured on the system with these caveats:
Additionally, we provide a guided QuickStart wizard configuration method, available from both the configuration manager and GUI. To use this method for configuration, see Chapter 3. Brief instructions are also included for initiating a management session using the configuration manager.
For instructions on using any of the CLI configuration managers, see Chapter 4; for instructions on using the GUI, see Chapter 5. To use the Secure Content Accelerator in FIPS-compliant operation mode, see Chapter 6.
![]()
![]()
![]()
![]()
![]()
![]()
![]()
![]()
Posted: Wed Aug 21 01:52:27 PDT 2002
All contents are Copyright © 1992--2002 Cisco Systems, Inc. All rights reserved.
Important Notices and Privacy Statement.