|
|

This chapter explains how to install a Content Router in an equipment rack. It also provides general instructions for installing a Content Router on a table or workbench. This chapter contains the following sections:
Before you begin the installation, read the Regulatory Compliance and Safety Information for the Cisco Content Router document and the Site Preparation and Safety Guide that shipped with your chassis.
 |
Warning Read the installation instructions before you connect the system to its power source. |
A rack-mount and cable-management kit is included in your shipping container accessory box. The rack-mount brackets in the kit are suitable for mounting Content Router 4400 units in 19-inch (48.26-cm) or 23-inch (58.42-cm) four-post or two-post telco equipment racks.
You need the following parts and tools to install a Content Router in a rack:
Place the unit in the desired location. You can mount it in a rack for your convenience, or place it on a solid, stable surface. If you do not plan to install the Content Router in an equipment rack, proceed to the "Installing the Chassis on a Tabletop" section.
|
Warning To prevent bodily injury when mounting or servicing this unit in a rack, you must take special precautions to ensure that the system remains stable. The following guidelines are provided to ensure your safety: |
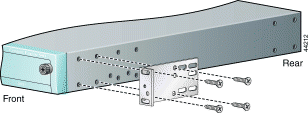
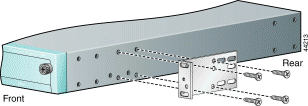
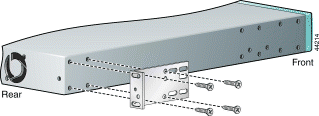
The chassis mounts to two rack posts with brackets that attach to either the front, mid, or rear sides of the chassis. The brackets for 19-inch (48.26-cm) and 23-inch (58.42-cm) racks are the same; however, they are mounted differently on the chassis. (See Figure 3-1.) Brackets for a 19-inch (48.26-cm) equipment rack require four rack screws in each bracket, and brackets for a 23-inch (58.42-cm) equipment rack require two screws in each bracket.

Figure 3-2, Figure 3-3, and Figure 3-4 show the three bracket mounting positions on the chassis. The brackets are oriented for a 19-inch (48.26-cm) equipment rack.
 |
Note For a rear mount, the rear of the chassis is turned to face the front of the rack. |
Figure 3-5 shows the bracket orientation for a front mount in a 23-inch (58.42-cm) equipment rack.

After you secure the brackets to the chassis, rack-mount the chassis by securing the brackets to two posts or mounting strips in the rack. (See Figure 3-6.) You need two people to install the chassis in the rack—one person to hold the chassis and one person to secure it to the rack.

The inlet and exhaust ports for cooling air are located in the front and rear of the chassis, respectively; therefore, multiple Content Routers can be stacked with little or no vertical clearance.
When you install a Content Router on a workbench or tabletop, ensure that the surface is clean and in a safe location, and consider the following:
Follow these steps to install the Content Router on a workbench or tabletop:
Step 2 Attach the rubber feet to the bottom of the chassis. The rubber feet have an adhesive backing. Peel the protective tape off the adhesive and stick the feet to the bottom of a clean chassis surface. Place one foot in each corner.
Step 3 Place the chassis on the tabletop or workbench.
Step 4 Ensure that no exhaust air from other equipment will be drawn into the chassis. Also, ensure that there is adequate clearance at the front and rear of the chassis.
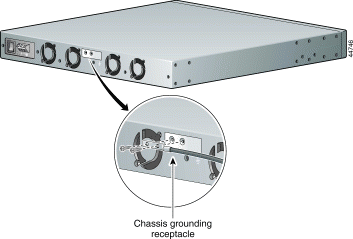
Before you connect power or turn on power to your Content Router, we strongly recommend that you provide an adequate chassis ground (earth) connection for your chassis. Grounding receptacles are provided on each chassis.
|
Warning When installing the unit, the ground connection must always be made first and disconnected last. |
To ensure the chassis grounding connection that you provide is adequate, you will need the following parts and tools:
To attach the grounding lug to the chassis grounding receptacles on your Content Router, use the following procedure:
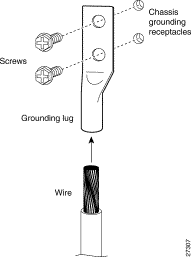
Step 2 Insert the 6-AWG wire into the wire receptacle on the grounding lug. (See Figure 3-7.)
Step 3 Use the crimping tool to carefully crimp the wire receptacle around the wire; this step is required to ensure a proper mechanical connection.
Step 4 Insert the two screws through the holes in the grounding lug. (See Figure 3-7.) Ensure that the grounding lug does not interfere with other Content Router hardware.
Step 5 Locate the chassis grounding receptacles on your Content Router chassis. (See Figure 3-8.)
Step 6 Use the flat-blade screwdriver to carefully tighten the screws until the grounding lug is held firmly to the chassis. Do not overtighten the screws.
Step 7 Connect the opposite end of the grounding wire to the appropriate grounding point at your site to ensure an adequate chassis ground.
Follow these steps to connect the network and console cables to your Content Router.
|
Note The Ethernet 1 port is not currently supported.s |
Step 2 Connect the other end of the network cable to a hub or switch.
Step 3 For console connections, plug the Cisco-supplied serial cable into the console port on the Content Router front panel. (See Figure 3-9.)
Step 4 Connect the other end of the console cable to a console or a console server.

Follow these steps to connect power to your system.
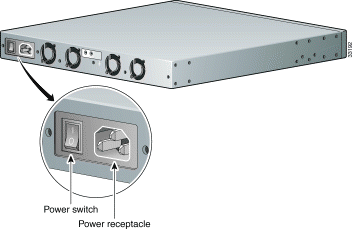
Step 2 Connect the other end of the power cord to your site power source.
Step 3 To power on the Content Router, press the power switch. This switch toggles between on and off, even though the switch always returns to its initial position after you press it. A power light on the front panel, when lit, indicates that the power is on.
The Content Router should begin booting. Once the operating system boots, you are ready to initialize the basic software configuration.
When the Content Router is up and running, observe the front panel status LEDs (see Figure 1-4 and Table 1-3) to verify that your system is operating properly. Table 3-1 describes the LED sequence for normal operation.
| 0 1 2 3 LEDs | Appearance | Meaning |
|---|---|---|
o o o o1 | Steady | Normal operation |
o * * *2 | Steady | An exception has occurred (software or hardware failure) |
* * * * | Steady | A panic has occurred (software failure) |
- - - - 3 | Rolling | Reboot has begun |
| 1o = LED is off. 2* = LED is on. 3- - - = rolling display. |
|
Warning Before working on a system that has an On/Off switch, turn OFF the power and unplug the power cord. |
|
Warning Ultimate disposal of this product should be handled according to all national laws and regulations. |
To remove a Content Router from your network, power off the Content Router, disconnect the power cords and network cables, and physically remove the chassis from the rack.
The Content Router is in constant communication with the router on your network; thus, when the router notices that the Content Router is no longer responding to it, the router stops sending requests to the Content Router. This is transparent to users. If other Content Routers are attached to the router, the router continues sending requests to the other Content Routers.
When you remove a Content Router, the pages that were cached on the Content Router are no longer available to the router or other Content Routers. Thus, you might see an increase in outgoing Web traffic that might have otherwise been fulfilled by the Content Router you are removing. However, after a time, the router and other Content Routers redistribute the load of Web traffic.
If you remove the last Content Router from your network, you can also disable cache support on the router. However, this is not necessary; having cache support enabled when there are no Content Routers attached has no effect on router performance.
To replace a Content Router, remove the old Content Router from the network. Then, install the new Content Router and configure it using the same configuration parameters (IP address, and so forth) that you used for the removed Content Router.
![]()
![]()
![]()
![]()
![]()
![]()
![]()
![]()
Posted: Fri Dec 29 10:15:59 PST 2000
Copyright 1989-2000©Cisco Systems Inc.