|
|

This chapter describes how to connect the interface cables, power the system, and check the status LEDs on circuit cards to make sure you have installed everything properly.
Cisco MGX 8260 configurations will require some type of cable management plan for the WAN cabling. This may include the installation of vertical and horizontal cable raceways that bolt to the racks.
The MGX 8260 uses the following cable types:
For more information on cables, see "Cable and Connector Reference".
 |
Caution Use shielded cables with shielded connector hoods for all connections except DC power and ground. |
Table 5-1 lists custom adapter and extension cables offered by Cisco for the MGX 8260.
| Cisco Part Number | Description |
|---|---|
CAB-5698-6 | T3/E3 SMB Female to SMB Female, 6 feet (75 ohm) |
CAB-T3E3-PL-AD | T3/E3 SMB Female to BNC Female, 6 feet (75 ohm) |
BNCM-BNCM-25 | T3/E3 BNC Male to BNC Male, 25 feet (75 ohm)1 |
CAB-T3E3-PL-Y | T3/E3 SMB Female to 'Y' BNC Female, 1 Ft. Redundancy Cable1 |
| 1Used for BSC and DMC redundancy. |
A wiring diagram for a BITS cable is provided in "Cable and Connector Reference." To connect the BITS cable, follow these steps:
Step 1 If your system uses a Building Integrated Timing Source (BITS) timing source (Stratum 3 clock), connect a BITS cable to the RJ-45 connector on the SCC back card in slot 9. (See Figure 5-1.)

Step 2 Connect the other end of the cable to the Stratum timing standard in your facility.
Step 3 If your system has a redundant SCC, repeat Step 1 and Step 2 for the adjacent SCC.
 |
Note Do not daisychain the BITS connection to the secondary SCC. Daisychaining BITS causes unnecessary wander buildup in the clock network. Instead of daisy-chaining, use a Timing Signal Generator (TSG) at the facility to create multiple copies of the Stratum 3 BITS clock, then run the copies to each SCC separately. |
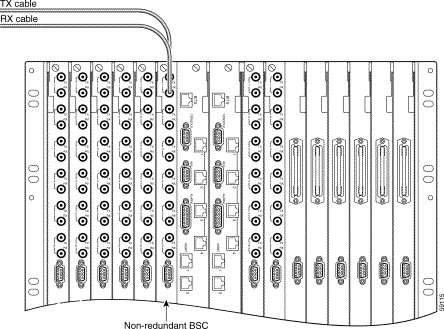
Each DS3 trunk requires two coaxial cable connections—one for transmit and one for receive. "Cable and Connector Reference," specifies cable requirements for DS3 lines. To connect DS3 coaxial cables to nonredundant BSCs or DMCs, follow these steps.
|
Note Mark each cable with identifying information suitable for tracking in the MGX 8260 configuration database. |
Step 1 Connect a transmit DS3 line (coaxial cable terminated with a female SMB connector) to the TX connector on the T3E3BC-6DSX back card. (See Figure 5-2.)
Step 2 Connect the receive DS3 line associated with the TX line in Step 1 to the RX connector associated with the TX connector in Step 1. (See Figure 5-2.)
Step 3 Repeat Step 1 and Step 2 for all DS3 lines.
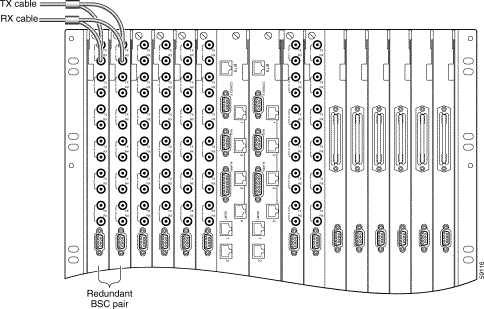
To connect DS3 cables to redundant BSCs, follow these steps.
|
Note Label each cable with identifying information suitable for tracking in the MGX 8260 configuration database. |
Step 1 Using a DS3 Y-Adapter cable, connect one of the cable's SMB plugs to a TX connector on the DS3 back card. (See Figure 5-3.)
Step 2 Connect the other SMB plug to the corresponding numbered TX connector on an adjacent DS3 back card.
Step 3 Connect the adapter cable's BNC connector to a TX DS3 line in your facility.
Step 4 Using another DS3 Y-Adapter cable, connect an SMB plug to the RX connector on the DS3 back card associated with the TX connector in Step 1.
Step 5 Connect the other SMB plug to the corresponding numbered RX connector on the adjacent DS3 back card associated with the TX connector in Step 2.
Step 6 Connect the adapter cable's BNC connector to the RX DS3 line in your facility associated with the TX DS3 line in Step 3.
Step 7 Repeat Step 1 through Step 6 for all DS3 trunks on redundant BSCs.
DS1 trunks consist of two pairs of tip and ring wires—one pair for transmit signals and one pair for receive signals. Prefabricated 25-pair STP cables terminated with 50-pin connectors on each end are used to link a DSX patch panel to the matching connectors on the NSC back card. A cable wiring diagram is provied in "Cable and Connector Reference."
To connect the T1 cables to an NSC back card equipped with 50-pin RJ-21 connectors, follow these steps.
|
Note Label each cable with identifying information suitable for tracking in the MGX 8260 configuration database. |
Step 1 Connect the transmit T1 cable to the 50-pin connector at the top of the NSC rear card. (See Figure 5-4.)
Step 2 Tighten the screws at the top and bottom of the 50-pin connector.
Step 3 Secure both cables near the rack to keep weight off the connector.
Step 4 Connect the receive T1 cable to the 50-pin connector at the bottom of the NSC back card.
Step 5 Tighten the screws at the top and bottom of the receive 50-pin connector.
Step 6 Repeat Step 1 through Step 5 for other NSC back cards.
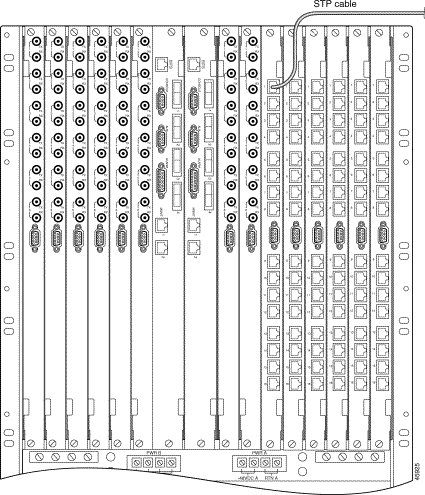
Each E1 trunk consists of two pairs of tip and ring wires—one pair for transmit and one pair for receive. A 4-wire cable terminated with RJ-48 connectors connects the trunks to the NSC back card. A cable wiring diagram is provided in "Cable and Connector Reference."
To connect E1 cables to the 120-ohm RJ-48 connectors on the NSC back card, follow these steps.
|
Note Label each cable with identifying information suitable for tracking in the MGX 8260 configuration database. |
Step 1 Snap the first STP cable into a receptacle on an RJ-48 back card. (See Figure 5-5.)
Step 2 Connect the other end of the RJ-48 cable to a patch panel or other compatible communication equipment.
Step 3 Repeat Step 1 and Step 2 for other E1 lines.
This procedure applies to systems that use Fast Ethernet interfaces on the SCC back card for VoIP applications. Refer to "Cable and Connector Reference," for a cable wiring diagram. If your system uses OC-3 interfaces, skip this procedure.
To connect 100BASE-TX Fast Ethernet cables, follow these steps:
Step 1 Connect the first network cable to an RJ-45 receptacle on the SCC back card in slot 9 (see Figure 5-6).
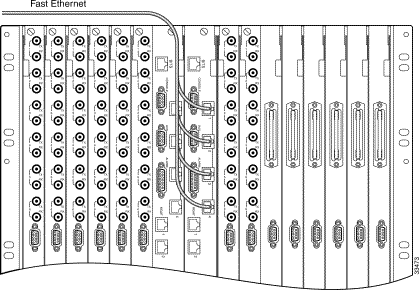
Step 2 Connect the other end of the cable to the appropriate network device.
|
Note Fast Ethernet redundancy is achieved through the use of appropriately configured network devices. |
Step 3 Repeat Step 1 and Step 2 for other Fast Ethernet cables.
Step 4 If your system has a redundant SCC, repeat Step 1 through Step 3 for the adjacent SCC.
|
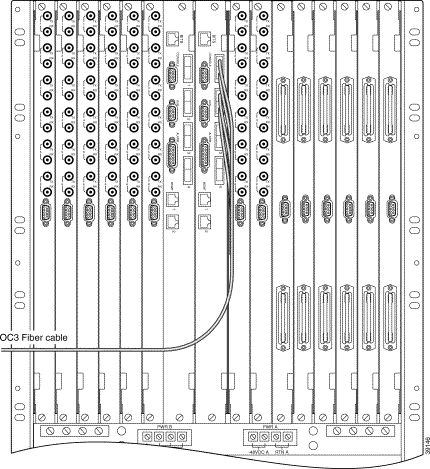
Note This procedure applies to MGX 8260 nodes configured with SCC OC-3 back cards for fiber interface to Cisco MGX 8850 ATM switches. If your MGX 8260 node uses SCCs with Fast Ethernet back cards, skip this section. |
Each fiber interface consists of two fiber-optic cables—one for transmit signals and one for receive signals. If the SCC is equipped with the single mode OC-3 back card, the fiber cables must be terminated with LC type connectors at the MGX 8260. If the SCC is equipped with the multimode OC-3 back card, the fiber cables must be terminated with MT-RJ type connectors at the MGX 8260.
|
Note The transmit and receive fiber cables must be reversed at each device. The receive fiber cable from the MGX 8260 goes to the transmit port at the other end, and vice versa. |
|
Caution When handling optical cables, observe the manufacturer's bend radius limits. |
To connect the OC-3 fiber-optic cables, follow these steps:
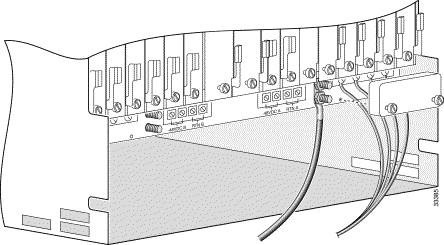
Step 1 Connect the first optical cable to the top receptacle of the SCC back card in slot 9 or 10 (See Figure 5-7.)
Step 2 Route the optical cable down and to the side of the chassis, observing the minimum bend radius for the cable.
Step 3 Connect the other end of the cable into the appropriate communication equipment.
Step 4 Repeat Step 1 through Step 3 for other optical cables.
Step 5 If your system has a redundant SCC, repeat Step 1 through Step 4 for the adjacent SCC.
To connect management console cables:
Step 1 Connect an EIA/TIA-232 serial cable with a DB-9 connector to the SCC console connector. (See Figure 5-8.) Use a cable with null modem wiring, rather than a crossover cable, to the terminal device. Refer to "Cable and Connector Reference," for a cable wiring diagram.

Step 2 Route the other end of the cable to the front of the chassis for later use.
Step 3 Optionally, connect an EIA/TIA-232 serial cable with a DB-9 connector between the AUX connector and a modem. A modem supports remote management via a dialup connection. Use a cable with straight-through wiring.
An SCC back card includes two Ethernet ports for remote management. Each port is assigned its own IP address. To connect a 10BASE-T cable for MGX 8260 node management over a LAN:
Step 1 Connect an Ethernet cable to one of the RJ-45 management ports on the SCC back card. (See Figure 5-8.)
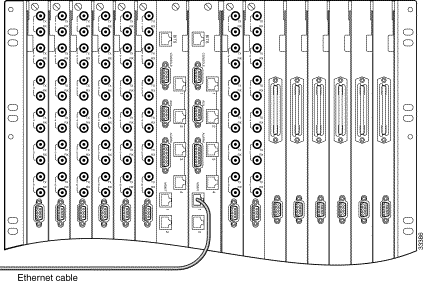
Step 2 Connect the other end of the Ethernet cable to the designated network device.
Step 3 Repeat Step 1 and Step 2 if a second LAN connection will be made to the SCC back card.
Step 4 If your system has a redundant SCC, repeat Step 1 through Step 3 for the adjacent SCC.
To connect alarm relay contacts, follow these steps:
Step 1 Prepare a custom, multiple-conductor alarm cable for visual or audio alarms in your facility. Terminate this cable in a DB-15 connector using the pinouts shown in "Cable and Connector Reference."
Step 2 Connect the DB-15 cable to the alarm connector on the SCC back card.
Step 3 Connect the other end of the cable to a centralized alarm management system (CAMS).
 |
Warning Carefully read all instructions in the "Electrical Safety Warnings" section before continuing with the instructions in this section. |
This procedure explains how to connect and apply DC power to the MGX 8260.
Observe the recommended wire gauge and number of power cables. This procedure specifies two 12 AWG conductors for the Supply (-48V) and two 12 AWG conductors for the Return (RTN) wires from the power source to the appropriate terminal blocks on the MGX 8260. The length of each wire should be kept as short as possible and the same length. This specification provides the proper conductor capacity for the MGX 8260's maximum power requirements (1800 watts).
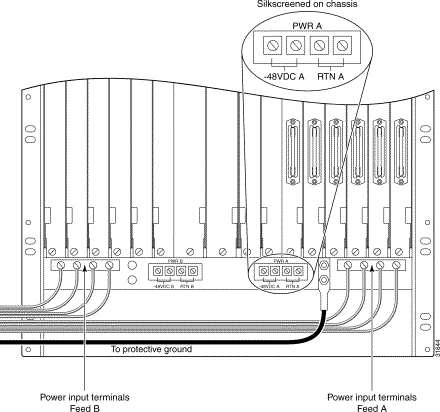
The supply wires to the input terminals on the MGX 8260 should be protected by a double-pole, 20-amp-per-pole circuit breaker for each circuit. This configuration is shown in Figure 5-10. Note that each circuit (A and B) is connected to a separate power source and circuit breaker.
|
Caution Make the connections as shown in Figure 5-10. |
To connect DC power as shown in Figure 5-10 and Figure 5-11, follow these steps:
Step 1 Disable DC power from the source by switching circuit breakers to the OFF position or removing fuses, depending on your configuration. Circuit breaker switches should also be taped in the OFF position.
|
Caution Make sure that you disable the power source for both power circuits, A and B. |
Step 2 Prepare four power cables for each input feed—two for -48V supply and two for RTN. Use 12 AWG ST, UL 1015 wire with #8 spade lugs for 12 AWG (MOLEX BB-8716-08) for each cable.
Step 3 Verify that the ground lead is already connected as indicated in Step 5 of the "Installing the Chassis" section.
Step 4 Remove the MGX 8260 power terminal cover from the feed A power terminals and set it aside. (See Figure 5-12.) To remove the cover, use a small bladed screwdriver to loosen the two captive screws and lift the cover off.
Step 5 Connect two return cables, one to each MGX 8260 RTN terminal for power circuit A. Connect the other ends to the RTN terminals at power source A.
Step 6 Connect two supply cables, one to each -48V terminal for power circuit A. Connect the other ends through -48V circuit breaker terminals for power circuit A.
|
Warning All four power terminals must have cables. A single supply and return cable pair will not support a fully loaded MGX 8260 chassis. |
Step 7 Install the power circuit cover. Slide the tab at the top of the cover into the chassis, and then lower the body over the terminals, making sure the power cables exit through separate slots in the bottom of the cover. (See Figure 5-12.)
|
Caution Make sure the power terminal cover is correctly seated and that the power cables pass freely through the openings at the bottom. Exposed power terminals or damaged insulation pose a safety risk to personnel. |
Step 8 Secure the cover with the two captive screws.
Step 9 To install redundant power circuit protection, repeat Step 3 through Step 8 for power circuit B, connecting the MGX 8260 power cables to power source B.
Step 10 A logical view of MGX 8260 power connections is shown in Figure 5-10. A rear view of the MGX 8260 with power connections installed is shown in Figure 5-11. Verify that your power connections have been made as shown in these figures.
|
Caution The MGX 8260 is not equipped with an internal disconnect device. To power down the node, you must turn off the devices protecting the power feeds. If the MGX 8260 is powered from redundant feeds, both devices must be turned off. |
Step 11 Apply DC power by switching the circuit breaker on.

Immediately after power up, perform the following steps:
Step 1 Verify that the PWR A indicator on each SCC is illuminated. (See Figure 5-13.)
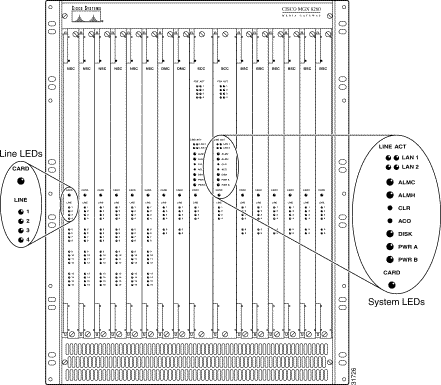
Step 2 If the chassis has been wired for power redundancy, verify that the PWR B LED is illuminated.
Step 3 After a startup period, the CARD LED on each circuit card should change to yellow or green. In a system configured with redundant cards, the CARD LED changes to green on the active card and yellow on the standby cards. If the CARD LED of any card is red or off, troubleshoot the problem before proceeding.
![]()
![]()
![]()
![]()
![]()
![]()
![]()
![]()
Posted: Sat Sep 28 22:18:41 PDT 2002
All contents are Copyright © 1992--2002 Cisco Systems, Inc. All rights reserved.
Important Notices and Privacy Statement.