|
|

The MGX 8260 Media Gateway includes diagnostic features that facilitate fault location, such as loopback and bit error rate tests. See the following sections for information on how to locate and clear trouble conditions.
Loopback tests are powerful troubleshooting tools that help maintenance personnel locate faults along the transmission path. DS1/E1 and DS3 lines provide both local and line loopbacks.
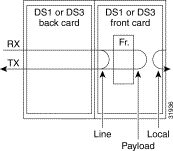
The local loopback option loops the DS1 signal back towards the backplane and helps isolate problems on the MGX 8260 side of the signal path. The line loopback option loops the signal back towards the DS1 or DS3 line and helps identify problems in the signal path between the MGX 8260 Media Gateway and other network equipment. A third option, payload loopback, is similar to line loopback, except that the RX signal loops through the card's DS1 or DS3 framer logic before being returned on the TX line. Payload loopback helps determine whether the card itself is functioning properly.
 |
Warning Loopback testing interrupts service. Perform during in a pre-arranged maintenance window or when the line is down. |
To perform a DS1/E1 loopback test, follow these steps:
Step 1 Activate the loopback using the chds1ln. Specify the first and last parameters—the slot and line number, delimited by a period, of the DS1 line and the type of loopback test. Refer to the following table for loopback types:
| Value | Name |
|---|---|
1 | dsx1NoLoop |
2 | dsx1PayloadLoop |
3 | dsx1LineLoop |
4 | dsx1OtherLoop (local) |
For example, the following command loops line 2 on slot 3:
chds1ln 3.2 # # # # 2
The system activates the loopback and changes the corresponding line LED to blinking yellow.
Step 2 Perform DS1/E1 signal tests, such as the BERT test. For more information, see the "Performing BERT Tests" section.
Step 3 Release the loopback by entering the chds1ln command again, but specify the dsx1NoLoop parameter. For example, to release the loopback on slot 3, line 2, enter the command as follows:
chds1ln 3.2 # # # # 1
The system releases the loopback, changes the line LED to green, and returns the line to normal operation.
Step 4 Verify that the loopback is clear using the lsds1ln command.
To perform a DS3 loopback test, follow these steps:
Step 1 Activate the loopback using the chds3ln command. Specify the first and last parameters—the slot and line number, delimited by a period, of the DS1 line and the type of loopback test. Refer to the following table:
| Value | Name |
|---|---|
1 | dsx3NoLoop |
2 | dsx3PayloadLoop |
3 | dsx3LineLoop |
4 | dsx3OtherLoop |
 |
Note Local loopback for DS3 lines is not supported. |
For example, the following command loops line 2 on slot 7:
chds1ln 7.2 # # # # 2
The system activates the loopback and changes the corresponding line LED to blinking yellow.
Step 2 Perform DS3 signal tests, as appropriate.
Step 3 Release the loopback by reentering the chds3ln command, but specify the dsx3NoLoop parameter. For example, to release the loopback on slot 7, line 2, enter the command as follows:
chds3ln 7.2 # # # # 1
The system releases the loopback, changes the line LED to green, and returns the line to normal operation.
Step 4 Verify that the loopback is clear using the lsds3ln command.
To perform a SONET loopback test, follow these steps:
Step 1 Activate the loopback using the chsonetln command, specifying the slot, line, and loopback type. Refer to the following table for the loopback type:
| Value | Name |
|---|---|
1 | No loop |
2 | Line loop |
3 | Serial loop |
4 | Parallel loop |
|
Note Serial and parallel loops are both local loopback states. |
For example, the following command loops line 2 on slot 9:
chsonetln 9.2 # # # 2
The system activates the loopback and changes the corresponding line LED to blinking yellow.
Step 2 Perform SONET signal tests, as appropriate.
Step 3 Release the loopback by reentering the chds3ln command, but specify the dsx3NoLoop parameter. For example, to release the loopback on slot 7, line 2, enter the command as follows:
chsonetln 7.2 # # # # 1
The system releases the loopback, changes the line LED to green, and returns the line to normal operation.
Step 4 Verify that the loopback is clear using the lssonetln command.
Bit Error Rate Tests (BERT) check the error performance of DS1/E1 lines. Often used in conjunction with loopback tests, this test helps isolate equipment or line segments with degraded performance. Typically, you activate loopback on one end of the communications link and activate the BERT test on the other. Do not activate loopback and BERT together on the same equipment.
|
Warning BERT tests interrupt service. Perform in a pre-arranged maintenance window or when the line is down. |
To use the DS1/E1 BERT test, follow these steps:
Step 1 Activate the test signal using the onbertds1 command as described in the "onbertds1" section. For example, the following command activates the bert test on channel 1 of line 1 in slot 11 using a rand9Bit pattern with no error injection.
onbertds1 11.1 1 1 1
Step 2 Check the test results using the lsbertds1 command, specifying the slot and line number, delimited by a period, of the DS1 line.
The system displays the BERT status:
=======================================================================
              DS1 Bert Status (lsbertds1)
=======================================================================
DS1 Line               :      11.1
Bert Status            :      inSync
Received Bit Pattern   :      4050854036
Receive Count          :      9345256
Receive Error Count    :      0
| Displayed Information | Description |
|---|---|
DS1 Line | The line for the test results. |
Bert Status | The status of the test, as follows: 1: idle 2: in-sync 3: out-of-sync 4: failed |
Received Bit Pattern | The bit pattern the receiver synchronized on. |
Receive Count | The number of bits received during the BERT test. Use this parameter with the Receive Error Count to calculate the Bit Error Rate (BER). |
Receive Error Count | The number of error bits received during the BERT test. Use this parameter with the Receive Count to calculate the Bit Error Rate (BER). |
Step 3 Stop the test using the offbertds1 command, specifying the slot and line number. For example:
offbertds1 11.1
The system stops the bert test and resumes transport of normal traffic.
The MGX 8260 Media Gateway has the following alarm categories:
If you know the alarm source, proceed to the corresponding section of this chapter. Otherwise, start at the shelf level and work toward the cause.
Chassis alarms report the state of chassis environmental sensors, fan speed, card state, and 48 supply status.
To view chassis alarms, follow these steps:
Step 1 Enter the lsalms command.
The system displays a summary of environmental, card, and software alarms.
Step 2 Use the information to identify the most severe alarm.
Step 3 Clear the most severe alarm.
Step 4 If the system alarm identifies a card, follow instructions in "Clearing Card Alarms".
Card alarms pertain to functions that affect general card operation. To view card alarms, enter the lscd command, specifying the card number.
The system displays information about the card, including alarm and failure details. Using the integrated alarm field described in the following table, find the description that matches your problem, and follow the instructions:
| Displayed Information | Description |
|---|---|
Integrated line alarm | One of the lines raised an alarm. Follow the instructions in section of this chapter that describes the type of line. |
Line performance alarm | One of the lines raised a performance alarm. Follow the instructions in section of this chapter that describes the type of line. |
Integrated port alarm | One of the ports raised an alarm. Check the port configuration and make necessary changes. |
EMM temperature alarm | A temperature sensor raised an environmental alarm. Follow instructions in the "Clearing Environmental Alarms" section. |
EMM voltage alarm | A voltage sensor raised an environmental alarm. Follow instructions in the "Clearing Environmental Alarms" section. |
Component failure alarm | A hardware component of the card failed. Try the following possible remedies:
|
The MGX 8260 Media Gateway supports DS1 and DS3 physical layer alarm signalling. To view current DS1 alarm conditions, enter the lsds1lns command. To view current DS3 alarms, enter the lsds3lns command.
The system lists a summary of line type, code, status, and signal code for each line. Use the Line Status field and the following guidelines to clear an alarm.
| Displayed Information | Possible Cause and Corrective Action |
|---|---|
LOF | A Loss of Frame alarm occurs when the MGX 8260 cannot synchronize on frames. Try the following possible remedies:
|
LOS | A Loss of Signal alarm occurs when the MGX 8260 cannot detect a signal at the line. Try the following possible remedies:
|
AIS | An Alarm Indication Signal (0/1 pattern) occurs when the receive link encounters problems for a set number of frames. |
RDI | A Remote Defect Indication occurs when the remote equipment encounters problems for a set number of frames at that layer. |
LOMF (E1 only) | Check for framing format misconfiguration Check for CRC bits errors in the frame Check for line coding misconfiguration |
LOSMF (E1 only) |
|
Yellow (RAI) |
|
RMAI (E1 only) |
|
Red Alarm | See LOS of LOF above. |
Yellow Alarm | See RAI or RMAI above. |
Use the following guidelines to solve general DS1/E1 configuration problems.
| Problem | Possible Cause |
|---|---|
Failure to configure CAS |
|
Failure to change framing type |
|
Failure to delete a line |
|
Failure to change system line interface mode |
|
The MGX 8260 Media Gateway monitors the Fast Ethernet trunks for conditions that can cause service interruption. To view Fast Ethernet line state, enter the lsethlns command.
The system displays a summary of the trunk status, including the Operational Status for each line. Respond to alarms depending on the displayed alarm indication as shown in the following table:
| Displayed Information | Possible Cause and Corrective Action |
|---|---|
Failed | The Fast Ethernet failed. Make sure the SCC is in the standby mode and replace the card. |
Link down in active state | The Fast Ethernet carrier is down. Try the following possible remedies:
|
Link down in inactive state | The Fast Ethernet carrier is down, but the link is inactive. Try the following possible remedies:
|
The MGX 8260 Media Gateway continuously monitors lines for defect conditions and integrates alarm events over time. An alarm is declared when the defect persists for 2 seconds, and is cleared when the alarm is absent for 10 seconds. Alarm changes generate traps that notify managers of the state change.
To view alarms, use the lssonetstat command.
Respond to major alarms according to the guidelines in the following table:
| Major Alarm | Corrective Action |
|---|---|
LOS |
|
OOF |
|
LOP-P |
|
Respond to minor alarms according to the guidelines in the following table:
| Minor Alarm | Corrective Action1 |
|---|---|
AIS-L | The problem originated from an upstream node; investigate nodes in upstream direction |
RFI-L |
|
AIS-P | The problem originated from an upstream node; investigate nodes in upstream direction |
RFI-P |
|
TIM-P |
|
UNEQ-P |
|
PLM-P |
|
RFI-P server |
|
RFI-P connectivity |
|
RFI-P payload |
|
| 1Applicable only if ERDI-P is enabled |
Respond to other card and line alarms according to the guidelines in the following table:
| Symptom | Corrective Action |
|---|---|
SCC in mismatch state |
|
OC3 line in major alarm after SCC switch over |
|
SCC fails initialization |
|
SCC back card type not properly programmed |
|
The MGX 8260 Media Gateway monitors temperature and voltage at several points in the shelf and on the cards. To view environmental alarms, enter the lsemms command.
The system displays a summary of sensor types, status, and readings. Use the sensor type field described in the following table, find the description that matches your problem, and follow the instructions.
| Displayed Information | Description |
|---|---|
Temperature | The sensor temperature exceeds the maximum threshold value. Try the following possible remedies:
|
Voltage | The voltage is over or under the threshold value. Try the following possible remedies:
|
Fan speed | A fan has failed or is running too slow. Try the following possible remedies:
|
![]()
![]()
![]()
![]()
![]()
![]()
![]()
![]()
Posted: Sat Sep 28 14:21:29 PDT 2002
All contents are Copyright © 1992--2002 Cisco Systems, Inc. All rights reserved.
Important Notices and Privacy Statement.