|
|

Service providers may be obligated under law to protect sensitive information contained within management systems. Cisco MGM and Cisco WebViewer enforce security with user names and passwords. Both applications manage user accounts individually and in groups. Access groups simplify the process of assigning privileges to individual users, because they define a set of privileges for each type of user. This chapter explains security in the following topics:
Cisco EMF enforces security with the following types of accounts.
| Access Level | Account Type | Number of Users | Access Type | Command Groups |
|---|---|---|---|---|
1 | Administrator | 1 | Read/Write | All categories |
2 | User defined | As many as needed | Read/Write | User can only invoke the categories of service defined by the access spec of its user group |
Cisco EMF user accounts can be grouped by an administrator. These user groups can be used to model user roles; for example, administrators typically set up a user group for administrative users and system operators. These features are available from the Access application, launched from the Cisco EMF Launchpad (see Figure 4-1).
To add, change, or delete user accounts or groups, refer to the Cisco Element Management Framework User Guide.
All users can change your own password; administrators can change any password.
To make administrative password changes, follow these steps:
Step 2 From the Edit menu, select Change Password. For instance, to change the Admin Password, select Change Admin Password.
 |
Note The Change Admin Password option is available only to system administrators. |
The Change User Password window opens.
Step 3 Enter the existing password in the Old Password box.
Step 4 Enter a new password in the New Password box, and re-enter the new password to verify your choice.
Step 5 Click Apply.
Step 6 If an invalid password is entered or the new password is not verified correctly, an error message is displayed. Click OK to try again.
The Cisco MGX 8260 Media Gateway enforces security with user accounts and access levels. Users must log onto the Cisco MGX 8260 Media Gateway before performing any task, and authenticated users can perform only those tasks permitted by their access level. The Cisco MGX 8260 Media Gateway supports up to 20 user accounts, each with access privileges ranging from full control to guest.
| Access Level | Account type | Privileges |
|---|---|---|
1 | SuperUser | Access all features |
2 | Administrator | Configure and view all features except user profiles and community strings |
3 | Provisioning | Configure and view system, port, lines, end points, and connections |
4 | Maintenance | Access selected level 3 commands |
5 | Operator | View system, port, lines, end points, and connections |
6 | Guest | View system, common lines and ports |
A new system has a default SuperUser account. To prohibit unauthorized access to the equipment, replace the default account with a unique one and create new accounts for other personnel.
You control access by configuring accounts and monitoring usage. The following information pertains to access control:
You manage user accounts from the Cisco WebViewer user profile screen (see Table 4-2).

The following table summarizes the Cisco WebViewer support for system parameter configuration.
| Configuration Task | Navigation Tree Selection | Screen | Screen Link |
|---|---|---|---|
User account management | Node>User Profile | User Profile | + to add |
Change password | Node>User Profile>Change Password | New Password Setting | none |
View active logins | Node>User Profile>Login Session | User Session | none |
When Cisco MGM communicates with Cisco MGX 8260 Media Gateways, security is enforced with password-like community strings. SNMP communities group workstations and servers (or gateways) that can manage the Cisco MGX 8260 Media Gateway according to their access privileges.
Cisco MGM uses the default public community string to read Cisco MGX 8260 Media Gateway information during automatic discovery and subchassis synchronization processes. For Cisco MGM to configure Cisco MGX 8260 Media Gateways, both must agree on a community string. Community string configuration is a multistep process, starting with each Cisco MGX 8260 Media Gateway and ending with the Cisco MGM that manages them.
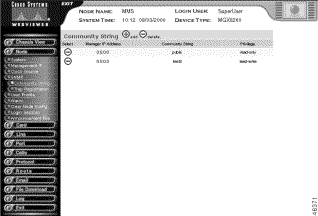
You can configure up to 15 community strings for the Cisco MGX 8260 Media Gateway. Community strings define the IP address, string, and privilege.
You configure community strings from the Cisco WebViewer community string screen (see Table 4-3).

The following table summarizes the Cisco WebViewer support for community string configuration.
| Configuration Task | Navigation Tree Selection | Screen | Screen Link |
|---|---|---|---|
Configure community strings | Node>SNMP>Community String | Community string | + to add |
Register traps | Node>SNMP>Trap Registration | Trap registration | + to add |
When configuring community strings for Cisco MGM, consider the following points:
To configure Cisco MGM community strings, follow these steps:
Step 2 On the Cisco EMF Launchpad, click Viewer. The Cisco EMF MapViewer opens.
Step 3 Expand the object tree and right-click on the desired site or object; then click Open SNMP Community String Configuration Dialog.
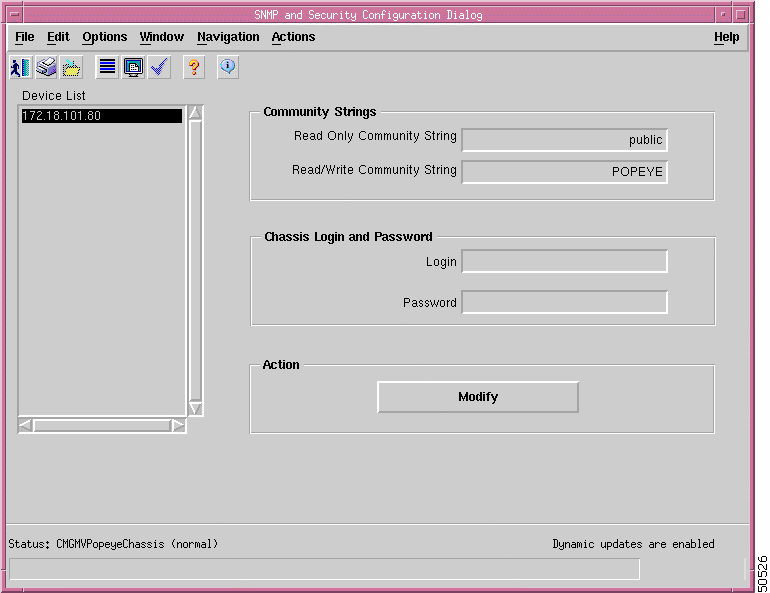
The SNMP Community String Config dialog box opens (see Figure 4-4).

 |
Note For security reasons, the form does not display the current community string values. |
Step 4 Select one or more IP addresses from the list, using the Shift key to select multiple addresses.
Step 5 Type a read-only community string in the Read Only Community String field.
Step 6 Type a read-write community string in the Read Write Community String field.
Step 7 Click Modify Community Strings.
 |
Note Cisco EMF 3.1 scrambles the community strings, so you can not view them later. |
A confirmation screen opens that reports the successful and unsuccessful configuration attempts (see Figure 4-5).

Step 8 Click Close.
![]()
![]()
![]()
![]()
![]()
![]()
![]()
![]()
Posted: Thu Jul 18 00:52:14 PDT 2002
All contents are Copyright © 1992--2002 Cisco Systems, Inc. All rights reserved.
Important Notices and Privacy Statement.