|
|

This chapter describes the steps to take and the considerations you should keep in mind prior to installing the modules in an open rack. It also contains information that applies to an MGX 8250 installation in a Cisco closed rack. If the switch arrives in a Cisco closed rack, your initial concerns would be the cabinet grounding, power connections, and optional seismic stability plate. For specifications on the enclosure and power system, see "System Specifications."
The topics and section names in this chapter are:
Before proceeding with the installation, verify that all the ordered parts are present and in good condition. Store a record of the parts and serial numbers. If any parts are missing or damaged, contact your sales representative.
The reserved slots are 7 and 8 for the primary and redundant Processor Switching Modules (PXMs) and 15, 16, 31, and 32 for the Service Resource Modules (SRMs). These slot reservations reflect a fully redundant configuration for these cards. The maximum number of slots remaining for service modules is 24—less when the unit contains one or more double-height cards such as the Route Processor Module (RPM). Also, although not reserved, slots 9 and 10 should be the first choices for the location of one or more RPMs due to backplane wiring.
If you are considering any future card changes in which you replace a single-height card with a double-height card, place the single-height replacement candidates as far left in the card cage as possible. The reason is that single to double-height slot conversions must begin at the left and proceed to the right.
The slots on the top half of the card cage are suitable for the T3/E3 and OC-3 cards because the higher speed cell buses reside in the upper portion of the backplane. Place the service modules that operate at T1 or E1 rates in the lower half of the switch.
In addition to the power and grounding requirements detailed in subsequent sections, the site must satisfy requirements in the following categories:
 |
Caution If you move a Cisco-supplied cabinet, do not push it at its sides. Push at the front or back. |
To secure a Cisco-supplied cabinet, holes in the upper and lower corners accommodate 3/8" or 1/2" bolts. Also, an optional stability plate can be purchased with the Cisco cabinet. The stability plate is bolted to the floor, then the Cisco cabinet is bolted to the stability plate. Instructions for installing the stability plate appear in the section "Seismic Anchoring for a Cisco Rack."
This section describes the requirements for electrical power and grounding at the switch and the site. These requirements apply to Central Office (CO) and Private Enterprise (PE) sites.
For a 110 VAC-powered system, verify that power comes from dedicated AC branch circuits. The circuits must be protected by a dedicated, 15 Amp minimum circuit breaker. Cisco Systems recommends that the site have a 15 Amp AC circuit breaker for each 110 VAC outlet.
DC-powered switches use a 60-Amp, 1-pole circuit breaker with a short trip delay on each -48-V input.
The MGX 8250 AC power requirement are 220 VAC with a worst-case range of 180-240 VAC or 110 VAC with a worst case range 100-240 VAC. See also "System Specifications." The AC power source must be within 6 feet (1.8 m) of the system and easily accessible. Before turning on the power, verify that the power supplied to the switch comes from a dedicated branch circuit.
 |
Note A 220V N+1 system filled with 5 or less full-height cards requires a minimum of two AC
power supply modules both for dual and single AC line cords. For systems with more than 5 full height cards but less than ten, the system requires a minimum of four AC power supplies for dual AC line cord (two on each line cord) or a minimum of three AC power supplies for a single cord system. For systems with more than 10 full-height cards, the system requires all six power supplies for a dual AC line cord system and four power supplies for a single AC line cord system. |
The 110 VAC power supply has a maximum output power of 1200W per power supply module. However, because of safety limitation imposed on the line cord, the 110 VAC power supply output power is shown in Table 3-1.
|
Note For a 110V powered system, the options are 1 power supply module for a non-redundant system or two power supply modules for a redundant (2N) system. The maximum card count supported is 10 full-height cards. |
| Input voltage (Volts AC) | Power output (Watts) |
|---|---|
100 | 900 |
110 | 1000 |
120 | 1100 |
130 - 264 | 1200 |
|
Note If the power requirement of installed cards exceed the power capability of the system, an error message is generated. |
|
Caution Consult Cisco engineering if the plans for MGX 8250 AC power include a portable, uninterruptible power source (UPS). Cisco recommends a UPS with a low output impedance and the capacity to provide the necessary fault current to trip the protection devices. Do not use a UPS or any power source with a Ferro-Resonant transformer. |
The power receptacles to which the switch connects must be of the grounding type. The grounding conductors that connect to the receptacles should connect to protective earth at the service equipment. For reference, Figure 3-1 shows the electrical relationship in the three-wire wall plug.
Cisco can provide 220 VAC power cords with the following plugs:

Either Cisco Systems or the customer can provide the power cord for a 110 VAC powered system. See Table 3-2 for the power cords that Cisco can supply. In addition, you can special-order AC cables with other plugs or different lengths. If you want to construct the power cord, it must mate with an IEC320 (C-14) 10/15A male receptacle on the back of the AC power module.
| Cable Parameter | Description |
|---|---|
Cable | Provided with 8 feet (2.3 m) of 3-conductor wire with plug. |
Plug (customer end) | 20 A NEMA L620, 3-prong plug (domestic U.S.) |
This section describes the safety and standards-body compliance issues for DC-powered systems. For the bonding and grounding issues related to electrical noise, see the "Bonding and Grounding" section below.
The DC-powered model of the MGX 8250 switch uses one or two Power Entry Modules (PEMs) to accept DC current. The DC PEMs should connect to a source capable of supplying 60 Amps of current. Each branch circuit at the source should have a 60-Amp circuit breaker, and the wires connecting the PEMs to the sources should be capable of carrying 60 Amps. A 6 AWG (10 square millimeters) copper wire is adequate. Also, consult the local or national codes for conductor sizing for DC supply connections if necessary. Conductors must be suitable for 60 Amps.
Be sure to connect the grounding wire conduit to a solid earth ground. Cisco recommends a closed loop to terminate the ground conductor at the ground stud. (See also "Bonding and Grounding" section below.)
In summary, note the following for DC systems:
|
Caution This equipment has a connection between the earth conductor of the DC power supply circuit and the earthing conductor. |
This equipment shall be connected directly to the DC supply system earthing electrode conductor or to a bonding jumper from an earthing terminal bar or bus to which the DC supply system earthing electrode is connected.
This equipment shall be located in the same immediate area (such as adjacent cabinets) as any other equipment that has a connection between the earthed conductor to the same DC supply circuit and the earthing connector and also the point of earthing of the DC system. The DC system shall not be earthed elsewhere.
The DC supply source is to be located within the same premises as this equipment. Switching or disconnecting devices shall not be in the earthed circuit conductor between the DC source and the point of the connection of the earthing electrode conductor.
Additional guidelines are
A DC-powered MGX 8250 switch should be installed in a restricted access location. In the United States, restricted access is defined in Articles 10-116, 10-117, and 10-118 of the National Electrical Code ANSI/NFPA 70.
To maintain the full EMI and EMC integrity of this equipment, it must be bonded to an integrated ground plane or a non-isolated ground plane network. The purpose is to mitigate the damaging effects of electrostatic discharge or lightning. Refer to the latest edition of ITU-T Recommendation K.27 or Bellcore GR-1089-CORE to ensure that the correct bonding and grounding procedures are followed. As recommended in these documents, a frame bonding connection is provided on the Cisco cabinet for rack-mounted systems. To see how to make a connection, see "Making the Frame Bonding (Ground) Connection" later in this chapter.
Except for the AC power supply modules, every module in a rack-mount system uses the rack for grounding. Therefore, the rack must connect to protective earth ground and the equipment must be secured to the rack so as to ensure good bonding.
A DC-powered switch must have grounding conductors that connect at two separate locations:
For DC-powered systems, the Cisco MSSBU has designed the MGX 8250 switch and other WAN switches to connect to a non-isolated ground system. In contrast, routers and other LAN equipment often use an isolated grounding scheme. If properly wired together through an equalization connection as described in ITU-T recommendation K.27, the isolated and non-isolated ground systems can form a mixed grounding system. The potential between any points in the ground system —whether or not the ground system is mixed—must not exceed 2% of the referenced voltage (2% of 48 volts is 960 millivolts).
A mixed ground system appears in Figure 3-2. This figure shows safety and earth grounds and the primary and redundant DC sources Battery A and Battery B. Individual ground conductors are labeled Z1, Z2, ..., Z5. The Z represents the impedance of the ground conductor between a chassis, for example, and a connection to the building's ground system. The numbers 1, ..., 4 represent building ground points and indicate that an impedance can exist between different points in the ground system of the building. Each of these symbols indicate that a voltage drop may result (but must not exceed 2% of the referenced voltage). See Table 3-3 for a definition of each Z1-Z5.

| Connection | Description |
|---|---|
Z1 | -48 VDC return. |
Z2 | Protective earth or safety ground (green/yellow). |
Z3 | Equipment ground for non-isolated equipment. |
Z4 | Equipment ground for isolated equipment. |
Z5 | Equalizing frame ground. This ground creates low-impedance equalization between frames. |
B | Battery ground. |
1, 2, 3, 4 | Connection points to the building's ground system: a potential can exist between these points within the ground system. |
T | Common-mode EMI filters. |
As Figure 3-2 shows, the non-isolated system has a 48 VDC return that internally connects to the backplane. (This design calls for a hard-wired return and so does not allow for an optional or alternate ground connection.) The internal connection provides a low-impedance connection between 48 VDC return and frame ground. This grounding scheme protects the signals on the backplane from corruption by transients that can result from lightning or electrostatic discharge.
To improve protection against transients, the loop area (and resultant loop impedance) should be made as small as possible by locating the -48 VDC supply, 48 VDC return, and protective earth conductors as close to each other as possible.
As recommended in ITU-T K.27, the multi-point grounding in a mesh bonding network provides the best protection for equipment by providing the lowest impedance in the ground system. For more detailed information, refer to the recommendation itself.
To prevent signal degradation, a conductor must be large enough to prevent its impedance from creating a voltage drop equal to 2 percent of the reference voltage. Also, the protective earth conductor must be large enough to carry all the current if the 48 VDC return fails. This latter requirement is for safety. Full fault redundancy is achieved by having equal size conductors for the protective earth ground and the 48 VDC return of the switch.
For wire gauges that prevent unacceptable voltage drops over different lengths of copper wire, see Table 3-4. For the resistance of 1000 feet of copper wire for each gauge of wire, see Table 3-5. These references are for planning purposes and may be further subject to local laws and practices.
| DC Current | Distance in Feet | ||||||
|---|---|---|---|---|---|---|---|
| 25 feet | 50 feet | 75 feet | 100 feet | 150 feet | 200 feet | 400 feet |
5 Amps | 18 | 14 | 14 | 12 | 10 | 8 | 6 |
10 Amps | 14 | 12 | 10 | 8 | 8 | 6 | 2 |
15 Amps | 14 | 10 | 8 | 8 | 6 | 4 | 2 |
20 Amps | 12 | 8 | 8 | 6 | 4 | 2 | 0 |
25 Amps | 12 | 8 | 6 | 4 | 4 | 2 | 0 |
30 Amps | 10 | 8 | 6 | 4 | 2 | 2 | 00 |
35 Amps | 10 | 6 | 4 | 2 | 2 | 1 | 000 |
40 Amps | 8 | 6 | 2 | 2 | 2 | 0 | 000 |
45 Amps | 8 | 6 | 4 | 2 | 1 | 0 | 0000 |
50 Amps | 8 | 4 | 4 | 2 | 1 | 00 | ______ |
55 Amps | 8 | 4 | 2 | 2 | 0 | 00 | ______ |
60 Amps | 8 | 4 | 2 | 2 | 0 | 00 | ______ |
65 Amps | 6 | 4 | 2 | 1 | 0 | 000 | ______ |
70 Amps | 6 | 4 | 2 | 1 | 00 | 000 | ______ |
75 Amps | 6 | 4 | 2 | 1 | 00 | 000 | ______ |
100 Amps | 4 | 2 | 1 | 00 | 000 | ______ | ______ |
| Gauge | Ohms per 1000 Feet | Gauge | Ohms per 1000 Feet | ||
|---|---|---|---|---|---|
0000 | 0.0489 |
| 10 | 0.9968 |
|
000 | 0,0617 |
| 11 | 1.257 |
|
00 | 0.0778 |
| 12 | 1.5849 |
|
0 | 0.098 |
| 13 | 1.9987 |
|
1 | 0.1237 |
| 14 | 2.5206 |
|
2 | 0.156 |
| 15 | 3.1778 |
|
3 | 0.1967 |
| 16 | 4.0075 |
|
4 | 0.248 |
| 17 | 5.0526 |
|
5 | 0.3128 |
| 18 | 6.3728 |
|
6 | 0.3944 |
| 19 | 8.0351 |
|
7 | 0.4971 |
| 20 | 10.1327 |
|
8 | 0.6268 |
| 21 | 12.7782 |
|
9 | 0.7908 |
| 22 | 16.1059 |
|
This section describes how to install the Cisco cabinet with the optional stability plate for seismic anchoring. If you have no stability plate, go to "Enclosure and Card Installation."
To set up the Cisco cabinet with the stability plate, perform the following:
Step 1 Use the dimensions in Figure 3-3 to drill the holes for installing the stability plate.
Step 2 Remove the stability plate from the base of the Cisco cabinet. Save these nuts and bolts.
Step 3 With the user-provided anchoring bolts, attach the stability plate to the floor.
Step 4 Roll the Cisco cabinet over the stability plate as Figure 3-4 illustrates.
Step 5 Use the nuts and bolts from the shipping setup to secure the cabinet to the stability plate.


This section describes the steps for making ground connections that comply with the Cisco MSSBU grounding policies. The descriptions cover optional ground connections from each switch to the ground connector of the rack as well as the equalization connections between racks that are part of the earth grounding network.
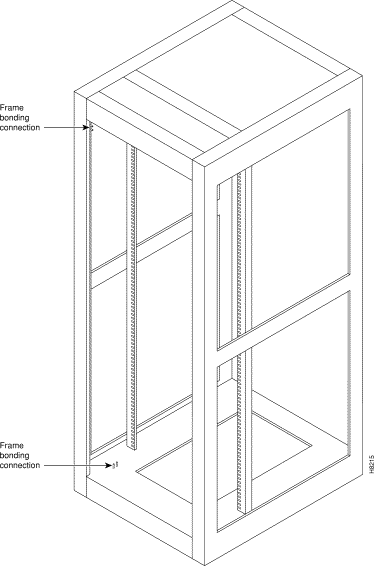
The Cisco-supplied cabinet has two pairs of grounding studs and the hardware for securing a ground conductor to the studs at the top and bottom of the cabinet. The studs measure 1/4" by 20 threads per inch. The studs can accept the two-holed grounding connector designed to prevent rotation and possible loosening of the connector. Figure 3-5 shows the Cisco cabinet with the ground attachment studs in the upper and lower parts of the cabinet. A ground symbol on the Cisco rack indicates the points of attachment.
Cisco recommends the following steps for attaching a ground conductor to the frame of a Cisco rack:
Step 1 Place an external, toothed star washer onto the stud.
Step 2 Place the connector terminating the grounding conductor closed-loop ring or two-hole compression fitting onto the stud.
Step 3 Place another external, toothed star washer or lock washer onto the stud.
Step 4 Screw a nut onto the threaded stud.
The MGX 8250 switch ships with a wrist strap for grounding the user and protecting the electronic components from electrostatic shock. The wrist strap kit consists of a strap, a coiled cord, and a clip for holding the strap.
Cisco recommends you install the base of the wrist strap cable on the left front flange of one of the units at a convenient height. Use a front mounting screw to secure the ring lug to the flange and front rail. The other end of the cord connects to the strap with a snap connector. Peel the back off the clip to expose the adhesive surface and attach to the front of the unit above the ring lug. Mount the clip sideways to allow the strap to be held in a position that will not interfere with the removal of the number card. Use the clip to store the strap.
Different Cisco products can reside in the same rack. If a multi-system rack configuration includes an MGX 8600 series switch, it should reside as the bottom unit.
![]()
![]()
![]()
![]()
![]()
![]()
![]()
![]()
Posted: Tue Oct 1 08:18:01 PDT 2002
All contents are Copyright © 1992--2002 Cisco Systems, Inc. All rights reserved.
Important Notices and Privacy Statement.