|
|

Table Of Contents
Enrolling and Managing Certificates
Enrolling Through a File Request
Managing Personal and CA/RA Certificates
Changing the Password on a Personal Certificate
Viewing the Enrollment Request
Deleting an Enrollment Request
Changing the Password on an Enrollment Request
Completing an Enrollment Request
Enrolling and Managing Certificates
This chapter explains how to enroll and manage personal certificates using the Certificate Manager application. Specifically, it describes how to perform the following tasks:
•
Obtain personal certificates through enrollment with a Certificate Authority (CA), which is an organization that issues digital certificates that verify that you are who you say you are.
You can enroll for a certificate in two ways:
–
–
•
•
–
–
–
–
•
This chapter covers the following topics:
•
•
•
•
Starting Certificate Manager
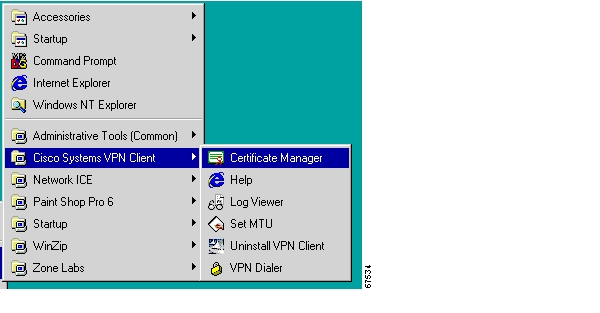
To get started with certificates, go to the Cisco Systems VPN Client menu (the same menu that you use to start the client, shown in Figure 6-1).
Choose Start> Programs> Cisco Systems VPN Client> Certificate Manager.
Figure 6-1 Choosing Certificate Manager
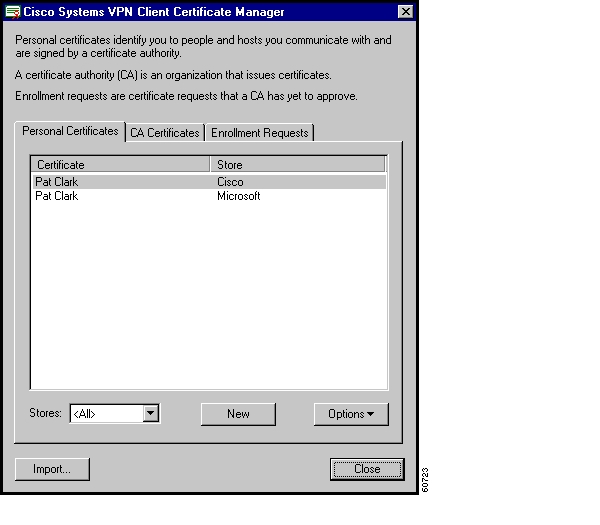
The Certificate Manager window opens. (See Figure 6-2.)
Figure 6-2 Certificate Manager Main Window
What are Certificate Stores?
The Certificate Manager uses the notion of store to convey a location in your local file system for storing personal certificates. The major store for the VPN Client is the Cisco store. The Cisco store contains certificates you have enrolled for through the Simple Certificate Enrollment Protocol (SCEP). This application supports several standard enrollment protocols. Your system also includes a Microsoft certificate store that may contain certificates that your organization provides or that you have installed previously. You can manage them just like the certificates in your Cisco store, or you can import them to your Cisco store. New certificates obtained through enrollment or importing go into the Cisco store.
There are two types of Microsoft certificates: certificates for individuals to use and also a Microsoft certificate for your local PC itself. So if several people are using the same PC, each person can have a certificate, and there can also be a certificate for the local system on Windows 2000 and Windows XP. On a Windows 9x system, you can only use it with Internet Explorer version 5.1 SP2.
Microsoft certificates with non-exportable private keys are also available.
Enrolling for a Certificate
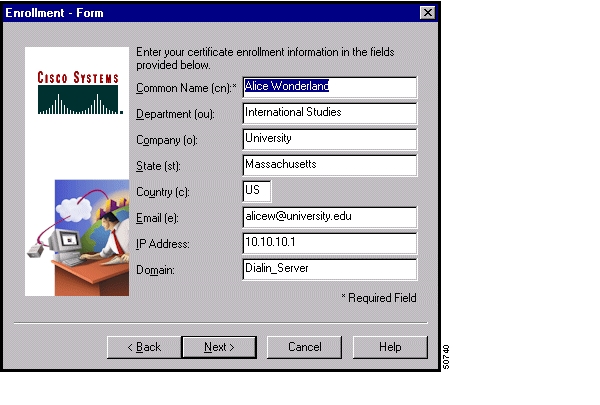
Your system administrator may have already set up your VPN Client with digital certificates. If not, or if you want to add certificates, you can obtain a certificate by enrolling with a Certificate Authority (CA) over the network or by creating a file request. In both cases, you complete the same form (shown in Figure 6-3.)
Enrollment Form
This section describes the information required for filling out the certificate enrollment form. Make sure you have all of the following information before you start.
Figure 6-3 Enrollment Form
•
•
•
•
•
•
•
•
Dialin_Server.Together, all these fields except IP address and domain comprise your distinguished name (DN).
When you enroll a personal certificate, either you go through a CA from which your system already has a root certificate or you obtain a root certificate from the CA as part of the enrollment process. The CA Certificates tab displays the current list of CA certificates. (See Figure 6-2.)
Starting Enrollment
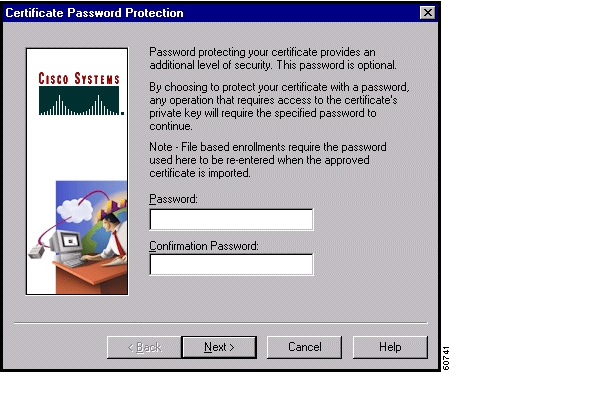
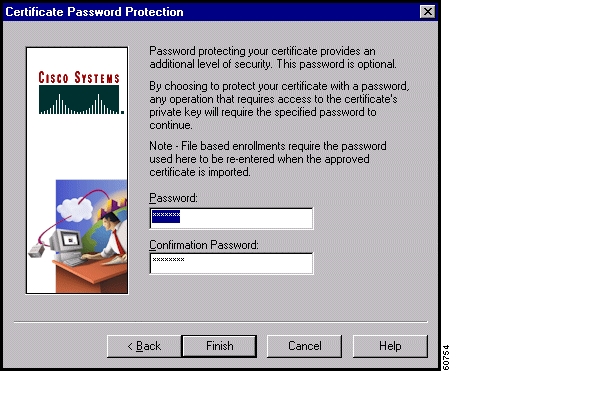
To begin, click New on the Certificate Manager's main screen under the Personal Certificates tab. (See Figure 6-2.) The Certificate Manager prompts you to enter a password for the certificate you are enrolling. (See Figure 6-4.) The password is optional, but we recommend that you use one to protect your private key more effectively. The password can be up to 32 characters in length. Passwords are case sensitive. For example, sKate8 and Skate8 are different passwords. This password is called the personal certificate password.
Figure 6-4 Protecting a Certificate with a Password
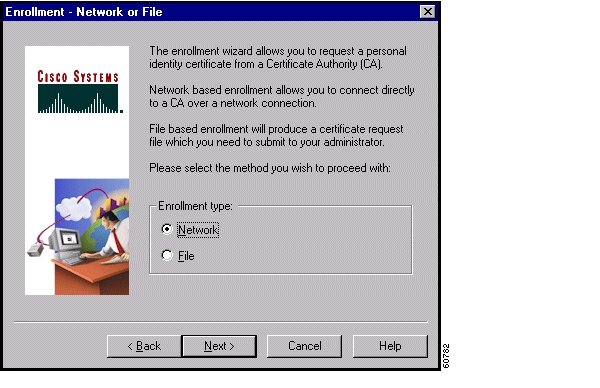
After entering a password, click Next to continue. The Certificate Manager lets you choose between enrolling via the network or by creating a file. (See Figure 6-5.) Enrolling via the network is also called online enrollment.
Figure 6-5 Choosing Enrollment Method
Enrolling Through the Network
To enroll through the network, retrieve a certificate from a CA, and place it in the Cisco store, using the following procedure:
Step 1
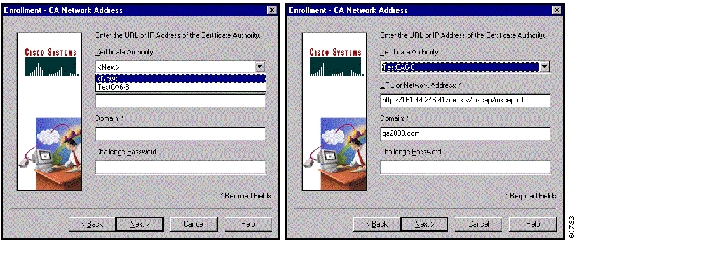
The Certificate Manager asks you to enter the network address of the issuing CA. (See Figure 6-6.)
Figure 6-6 Entering Network Address
Step 2
•
–
–
•
–
–
Step 3
The Certificate Manager displays the enrollment form for you to complete. (See Figure 6-3.)
Step 4
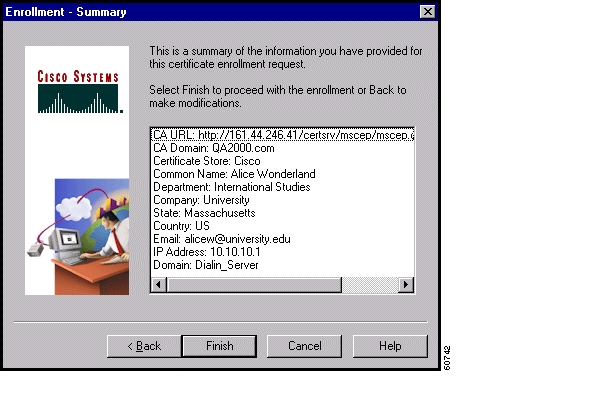
After you enter the form, the Certificate Manager displays a summary that looks something like the one in Figure 6-7.
Figure 6-7 Enrollment Summary
Step 5
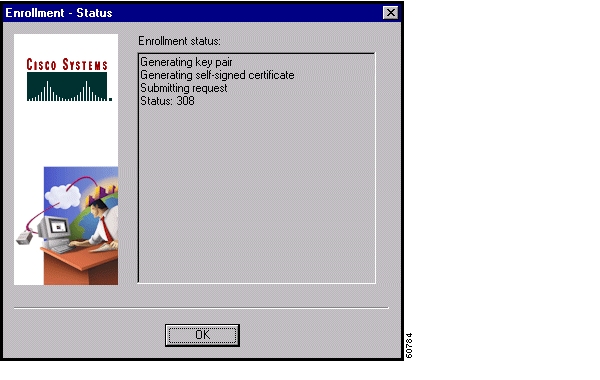
The Certificate Manager displays a status window (shown in Figure 6-8) that lets you monitor the progress of the certificate retrieval. If the enrollment failed, the status window indicates the cause so you can fix the problem and try again.
Figure 6-8 Certificate Status Messages
Step 6
•
–
•
–
–
–
Figure 6-9 Resuming Enrollment Request
–
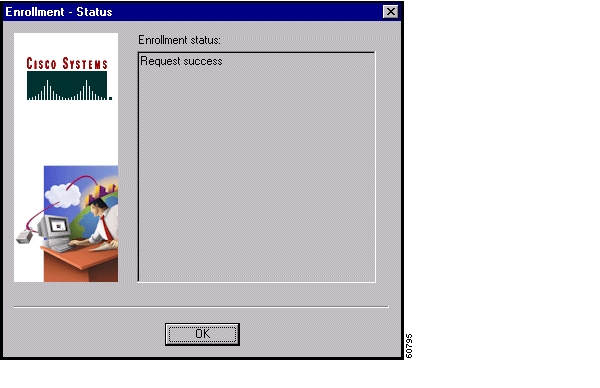
(See Figure 6-10.) After viewing the screen, click OK.Figure 6-10 Receiving Status Update
Enrolling Through a File Request
Alternatively, you can enroll by creating a file using the same form as network enrollment. (See Figure 6-3.) Once you have created a request file, you can either e-mail it to the CA and receive a certificate back or you can access the CA's website and cut and paste the enrollment request in the area that the CA provides.
To enroll through a file request, use the following procedure:
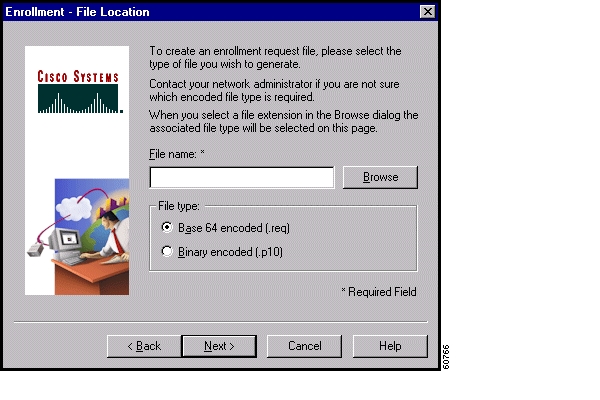
Step 1
The Certificate Manager prompts you to choose a file type for your file request and to specify a file name. (See Figure 6-11.)
Figure 6-11 Choosing file type and location
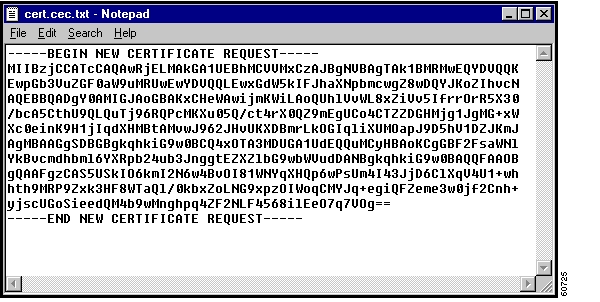
Step 2
•
•
Figure 6-12 A PKCS10 Certificate Request
Step 3
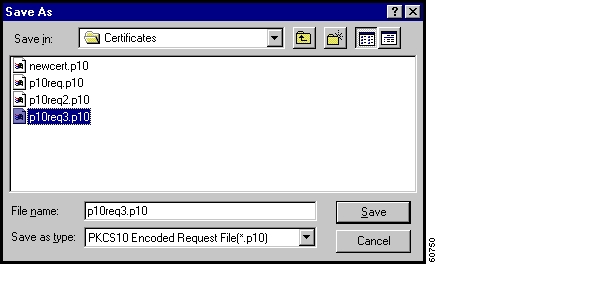
When you browse for an appropriate directory for placing the file request, the Certificate Manager shows only the files of the chosen file type. (See Figure 6-13.) You can save your file enrollment requests in the Certificates directory, which is a subdirectory of the directory where the VPN Client is installed.
Figure 6-13 Specifying a Filename
In this example, the complete pathname is C:\Program Files\Cisco Systems\VPN Client\Certificates\p10req3.p10
.Step 4
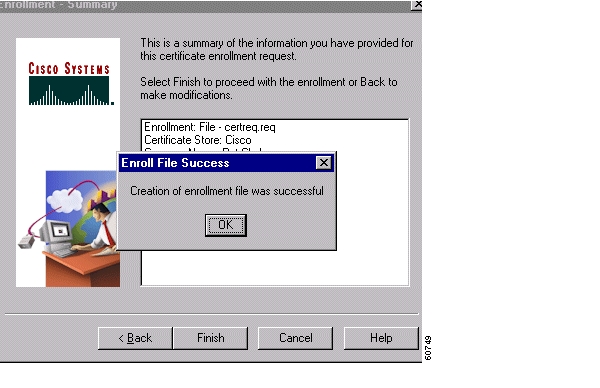
The Certificate Manager displays the summary screen and a message to let you know that your request succeeded. (See Figure 6-14.)
Figure 6-14 Enroll File Success Message
Step 5
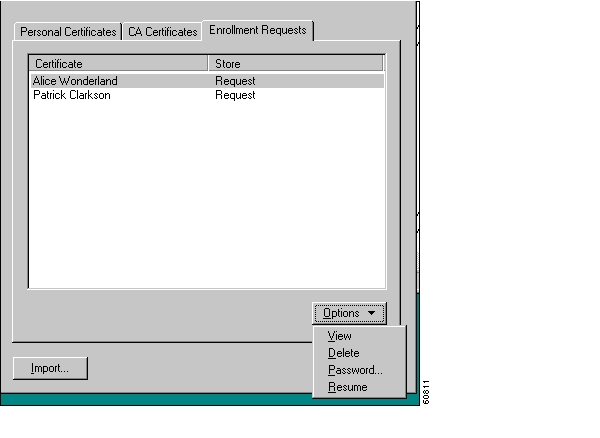
You can view the file request under the Enrollment Requests tab. (See Figure 6-15.)
Figure 6-15 File Enrollment Requests
Importing a Certificate File
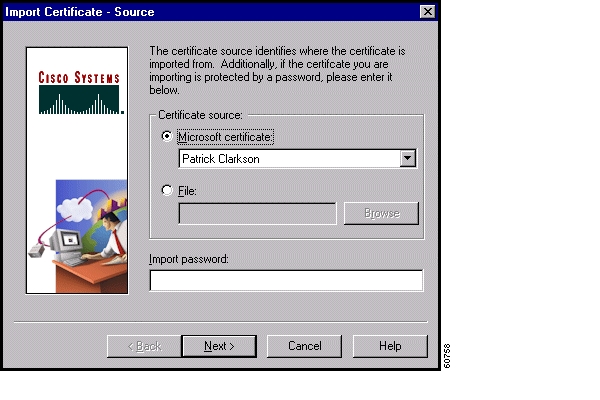
You can import a certificate into the Cisco store from the Microsoft store or from a file. To import a certificate, use the following procedure:
Step 1
The Certificate Manager displays the Import Certificate - Source dialog box. (See Figure 6-16.)
Figure 6-16 Importing a Certificate
Step 2
•
•
Step 3
This is the password assigned to protect the certificate's private key.
•
•
Step 4
The Certificate Manager prompts for a password to be stored with the certificate. (See Figure 6-17.)
Figure 6-17 Destination Password for Importing Certificate
Step 5
This password must exactly match the password given during enrollment (online) or given when exported (if a file), including upper and lower case letters. For example, sKate8 is not exactly the same as Skate8. In online enrollment, this password is kept with the certificate; in file enrollment, this password is not retained.
Managing Personal and CA/RA Certificates
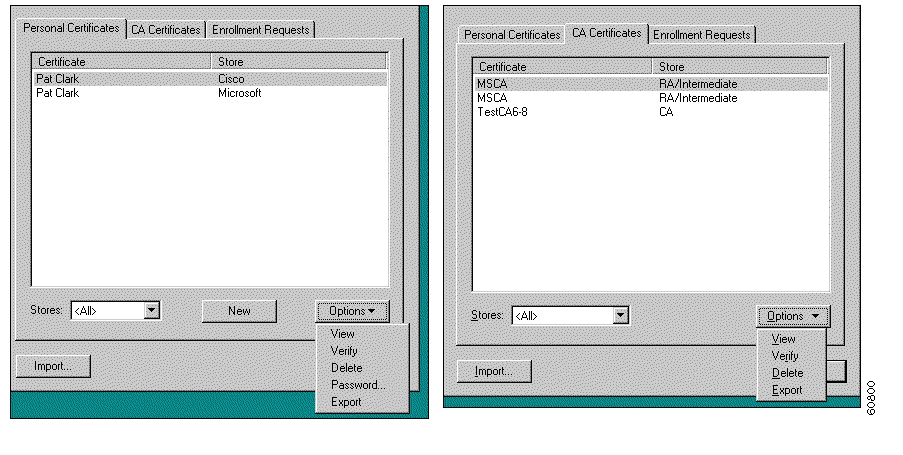
Using the Certificate Manager, you can view a certificate, verify that the certificate is still valid (within the dates assigned to it and has not been revoked), delete a certificate, and export the certificate to a file that you can e-mail. For personal certificates only, you can also change the certificate password. To perform any of these actions, use the Options menu on the main window. (See Figure 6-18.)
Figure 6-18 Certificate Manager Options Menu
Viewing a Certificate
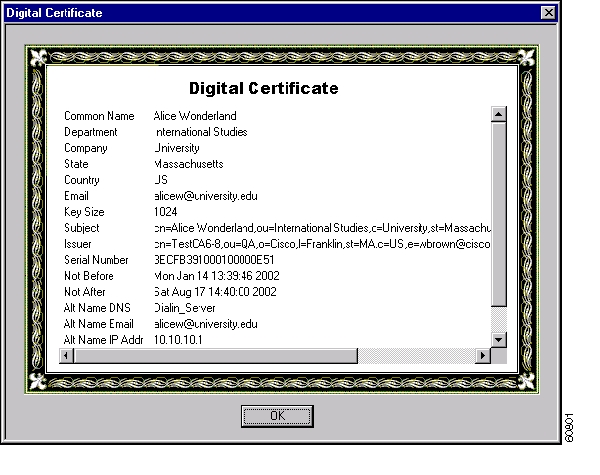
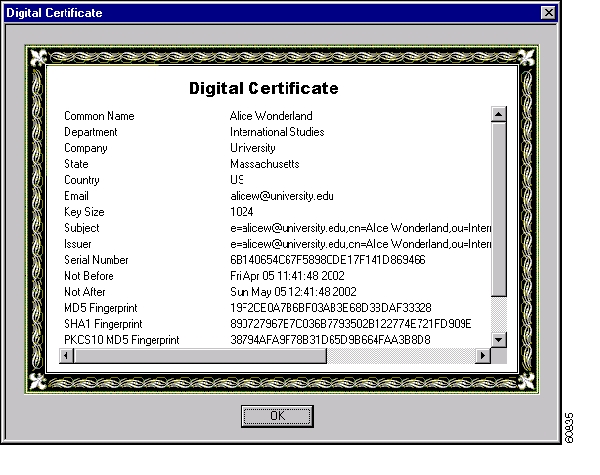
To display a certificate, choose it in the certificate store, open the Options pull-down menu and choose View. Or, you can double-click on the certificate to display it.
Figure 6-19 shows a sample certificate from a Microsoft certificate service provider. This is only an example. Not all certificates are guaranteed to look like this one.
Figure 6-19 Displaying a Certificate
A typical certificate shown in Figure 6-19 contains the following information.
•
•
•
•
•
•
•
•
–
–
–
–
–
–
–
•
•
•
•
The next three fields may be used during a connection attempt as part of validation, for example, to make sure that the Subject Alternative IP Address matches the IP Address of the VPN Concentrator.
•
•
•
After you have finished viewing the certificate, click OK to close it.
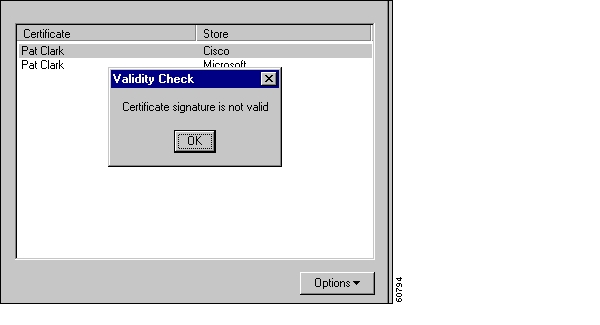
Verifying a Certificate
The Certificate Manager provides a quick way for you to check the validity of a certificate; for example, to see if it is within the valid beginning and ending date range. To see if the certificate is valid, choose it in the certificate store, display the Options pull-down menu, and choose Verify.
The Certificate Manager displays a message such as the one in Figure 6-20 indicating whether the certificate is still valid.
Figure 6-20 Verifying a Certificate's Validity
The following table shows the messages you might see when you check the validity of your certificate
.
Deleting a Certificate
To delete a certificate, follow this procedure:
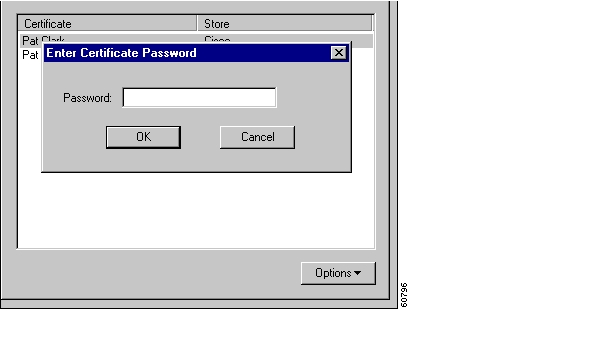
Step 1
If the certificate has a password, the Certificate Manager prompts you to enter it. (See Figure 6-21.)
Figure 6-21 Entering Password for Deleting a Certificate
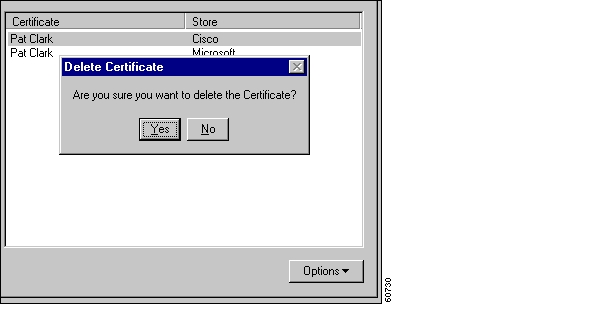
Step 2
Next, the Certificate Manager asks you to confirm. (See Figure 6-22.)
Figure 6-22 Confirming Deletion
Step 3
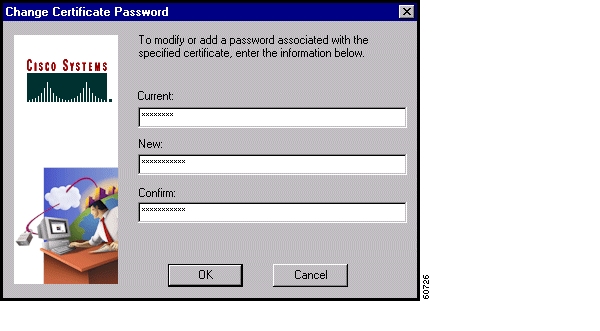
Changing the Password on a Personal Certificate
To change the password on a personal certificate, use this procedure:
Step 1
The Certificate Manager displays the Change Certificate Password dialog box. (See Figure 6-23.)
Figure 6-23 Changing a Certificate Password
Step 2
Step 3
Step 4
Step 5
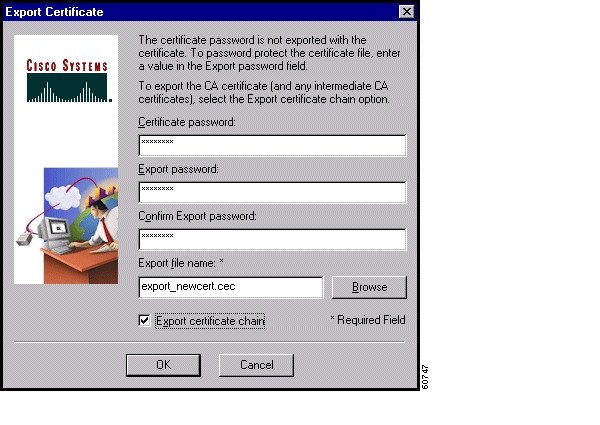
Exporting a Certificate
You may want to export a certificate, primarily for backing up your certificate and private key or moving them to another system. When you export a certificate, you are making a copy of it.
To export a certificate, follow these steps:
Step 1
The Certificate Manager displays the Export Certificate dialog box. (See Figure 6-24.)
Figure 6-24 Exporting a Certificate
Step 2
The Certificate password protects the certificate in the certificate store (so an unauthorized individual can not use it). This is the password you optionally entered when you enrolled for the certificate.
Step 3
Step 4
Step 5
Step 6
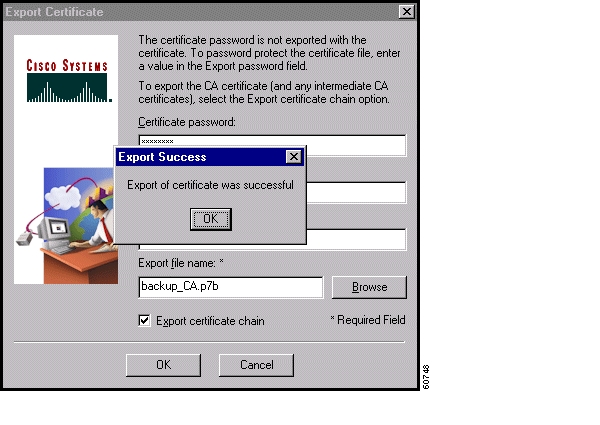
The Certificate Manager displays a message indicating whether your certificate export was successful. (See Figure 6-25.)
Figure 6-25 Export Message
Step 7
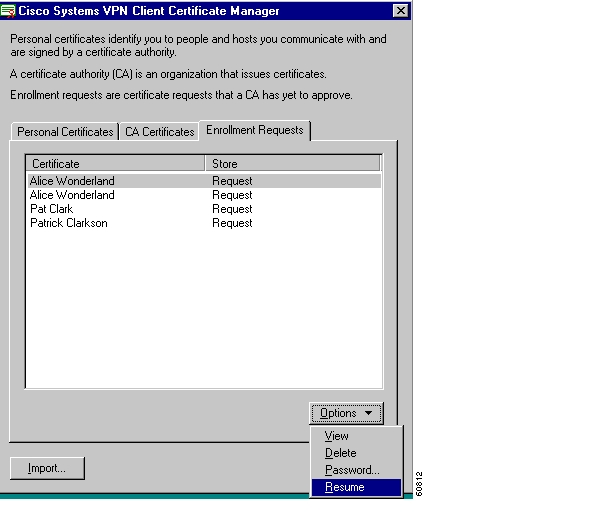
Managing Enrollment Requests
While a request is pending approval by the CA administration, the Certificate Manager places the enrollment request under the Enrollment Requests tab. You can view, delete, or change the password on any request in the list; or you can resume a network enrollment request. To perform any of these actions, choose the Enrollment Requests tab and click on the Options pull-down menu. (See Figure 6-26.)
Figure 6-26 Managing Enrollment Requests
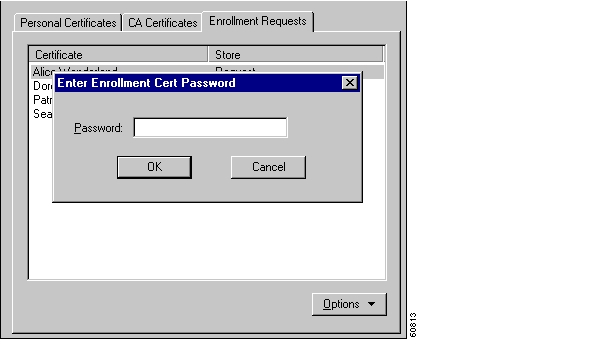
Viewing the Enrollment Request
To display the enrollment request, click on its name in the list and choose View from the Options pull-down menu. The Certificate Manager displays the pending request. (See Figure 6-27.)
Figure 6-27 Viewing an Enrollment Request
Note that the Issuer field shows the subject name and not the name of the CA, since the CA has not yet issued the certificate.
Deleting an Enrollment Request
To delete an enrollment request, follow these steps:
Step 1
The Certificate manager prompts you for a password.
Step 2
The Certificate Manager verifies the password. If the password is correct, the Certificate Manager asks you to confirm that you really want to delete the enrollment request.
Step 3
Changing the Password on an Enrollment Request
To change the certificate password on an enrollment request, use this procedure:
Step 1
The Certificate Manager displays the Change Certificate Password dialog box. (See Figure 6-28.)
Figure 6-28 Changing a Certificate Password
Step 2
Step 3
Step 4
Step 5
Completing an Enrollment Request
To complete a pending enrollment request, choose the request under the Enrollment Requests tab, and choose Resume from the Options pull-down menu.
The Certificate Manager prompts you to enter a password. (See Figure 6-29.) This password must match the password you are using to protect the certificate's private key, if any.
Figure 6-29 Entering Password to Resume Online Enrollment
Enter the password and click OK to resume enrollment.
![]()
![]()
![]()
![]()
![]()
![]()
![]()
![]()
Posted: Mon Apr 18 08:04:14 PDT 2005
All contents are Copyright © 1992--2005 Cisco Systems, Inc. All rights reserved.
Important Notices and Privacy Statement.