|
|

Table Of Contents
Managing VPN Client Connection Entries
Importing a VPN Client Configuration File
Erasing a Saved Password for a Connection Entry
Creating a Shortcut for a Connection Entry
Enabling Stateful Firewall (Always On)
Managing Windows NT Logon Properties
Starting a Connection Before Logging on to a Windows NT Platform
Permission to Launch an Application Before Log On
Disconnecting When Logging Off of a Windows NT Platform
Viewing and Managing the VPN Client Event Log
Displaying the Version of the Software
Receiving Notifications From a VPN Device
Upgrading the VPN Client Software (InstallShield)
Upgrading the VPN Client Software (MSI)
Uninstalling the VPN Client with the Uninstall Application
Removing the VPN Client Software MSI Installation
Managing the VPN Client
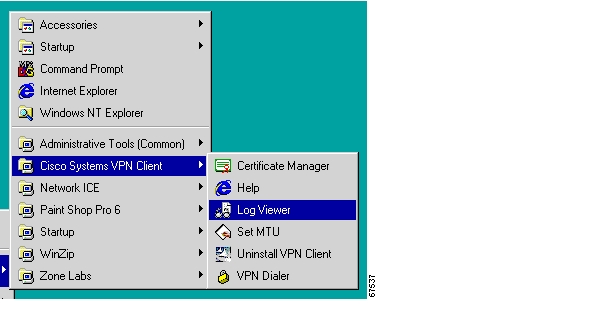
This chapter explains the tasks you can perform to manage connection entries, view and manage event reporting, and upgrade or uninstall the VPN Client software. The management features are available from the Cisco Systems VPN Client applications menu. (See Figure 5-1.)
Figure 5-1 Cisco Systems VPN Client Menu of Applications
Note
If you installed the VPN Client via the Microsoft Windows Installer, the Cisco Systems VPN Client menu does not include the Uninstall VPN Client option.
This chapter includes the following sections:
•
•
•
•
•
•
•
To configure properties of connection entries, see " Configuring the VPN Client."
Note
Managing VPN Client Connection Entries
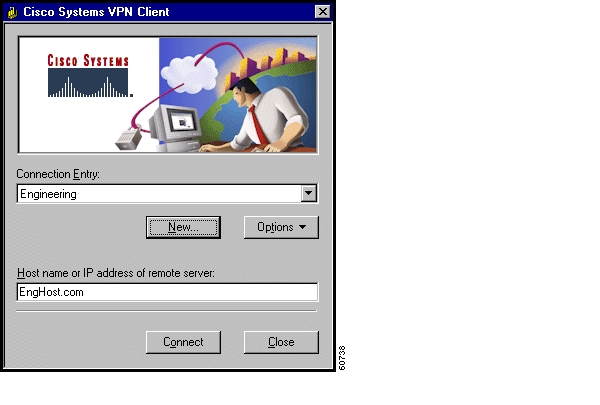
To manage a connection entry, start the Cisco VPN Client and choose VPN Dialer from the menu of applications.
The VPN Client main dialog box appears. (See Figure 5-2.)
Figure 5-2 VPN Client Main Dialog Box (VPN Dialer)
Click the Connection Entry drop-down menu arrow and choose an entry.
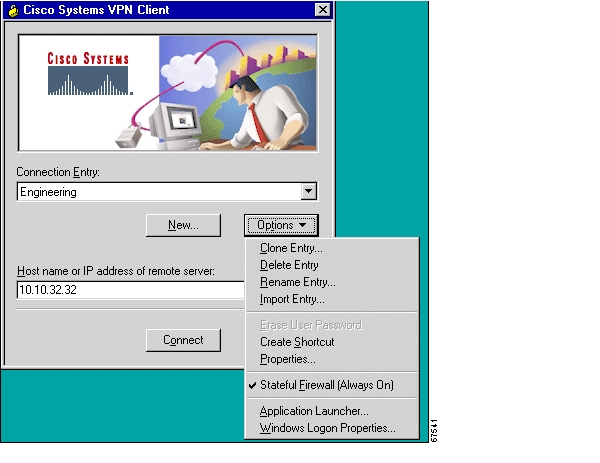
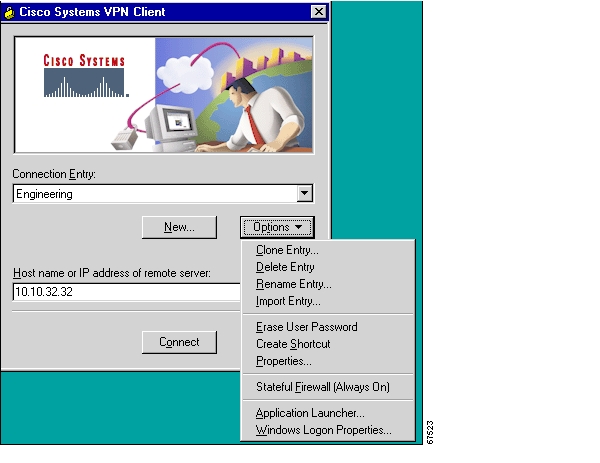
Click Options to display the menu.
Figure 5-3 VPN Client Options Menu
Note
Cloning a Connection Entry
To clone a connection entry with all its properties and use it as the basis for creating a new entry, follow these steps:
Step 1
Step 2
The Clone Connection Entry dialog box appears. (See Figure 5-4.)
Figure 5-4 Clone Connection Entry Dialog Box
Step 3
Step 4
Step 5
Deleting a Connection Entry
To delete a configured connection entry, follow these steps:
Step 1
Step 2
A confirmation dialog box appears. (See Figure 5-5.)
Figure 5-5 Confirming Deletion of a Connection Entry
Step 3
•
•
The VPN Client returns to its main dialog box.
Renaming a Connection Entry
You can rename a connection entry and retain all its properties. Each connection entry name must be unique. Since these names are not case-sensitive, be sure the new name differs in content, not just case.
Step 1
Step 2
The Rename Connection Entry dialog box appears. (See Figure 5-6.)
Figure 5-6 Entering a New Name for a Connection Entry
Step 3
The dialog box closes. The new name appears in the Connection Entry list in the VPN Client main dialog box.
Importing a VPN Client Configuration File
You can automatically configure your VPN Client with new settings by importing a new configuration file (a file with a
.pcf extension, called a profile) that your system administrator supplies.To automatically configure a VPN Client, perform the following steps:
Step 1
.pcf) file from your system administrator.Step 2
Step 3
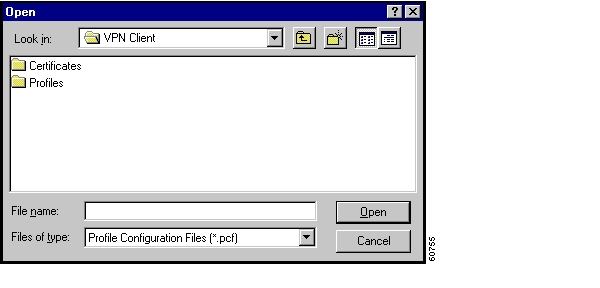
The VPN Client opens a window for you to choose the profile file. (See Figure 5-7.)
Figure 5-7 Choosing a File to Import
Step 4
(See Figure 5-8.)Figure 5-8 Importing the Profile File
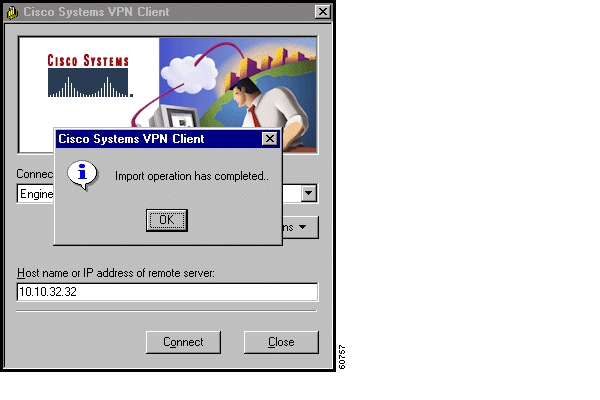
The VPN Client displays a message informing you that your file import was successful. (See Figure 5-9.) If the profile already exists, you receive a message asking if you want to overwrite it.
Figure 5-9 Import Successful
Step 5
Alternatively, you can copy the .pcf file into the Profiles directory and restart the VPN Dialer application.
Your VPN Client is now configured with the connection entries and parameters specified by this new profile file. You can examine or modify the connection entries by clicking the Connection Entry drop-down menu on the main dialog box, choosing an entry, and clicking Options > Properties.
Erasing a Saved Password for a Connection Entry
You or your administrator may have configured an entry to save the authentication password on your PC so you do not have to enter a password when you are connecting to the VPN device. Normally we recommend that you not use this feature, because storing the password on the PC can compromise security, and requiring a password to authenticate you every time you attempt to connect to the VPN device is fundamental to maintaining security on the private network. However, there may be reasons for temporarily bypassing the authentication dialog box, for example, when you want to create a batch file for your PC to log in to a VPN device to accomplish some task that requires using the private network behind the VPN device.
If there is a password saved on your system, and authentication fails, your password might be invalid.
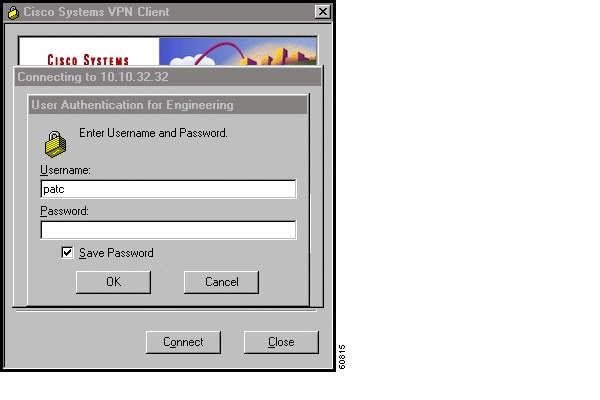
To eliminate a saved password, use the Erase User Password feature on the Options menu. Erase User Password is available only when you have previously checked Save Password on the User Authentication dialog box. (See Figure 5-10.)
Figure 5-10 Saving Password During Authentication
When the VPN device allows saving passwords on the remote site and Save Password is in effect, then Erase User Password is available on the Options menu. (See Figure 5-11.)
Note
Figure 5-11 Erase User Password Available
Note
To enable this feature, click Erase User Password.
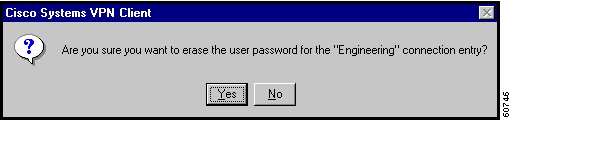
The VPN Client prompts you to confirm (See Figure 5-12.)
Figure 5-12 Verifying Erase User Password
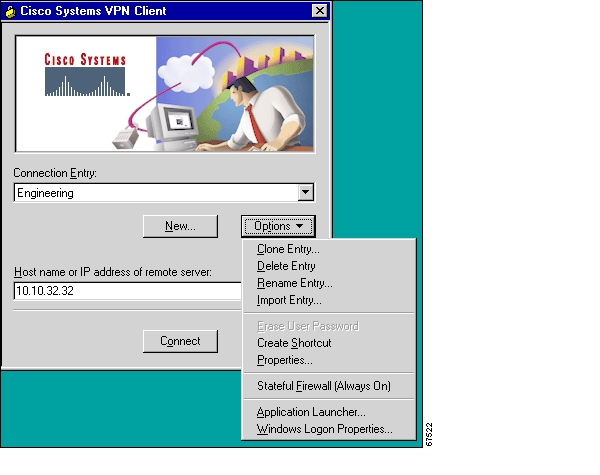
With Erase User Password in effect, the next time you connect, the authentication dialog box prompts you to enter your password: on the Options menu, the Erase User Password feature is no longer available. (See Figure 5-13.)
Figure 5-13 Erase User Password Unavailable
Note
Creating a Shortcut for a Connection Entry
You can create a shortcut on your desktop to quickly and directly launch a VPN Client connection entry that you use frequently.
Step 1
Step 2
The shortcut appears on your desktop, as in this example. (See Figure 5-14.)
Figure 5-14 Connection Entry Shortcut
The VPN Client main dialog box remains open.
Enabling Stateful Firewall (Always On)
The VPN Client includes an integrated stateful firewall that provides protection when split tunneling is in effect and protects the VPN Client PC from Internet attacks while the VPN Client is connected to a VPN Concentrator through an IPSec tunnel. This integrated firewall includes a feature called Stateful Firewall (Always On).
Stateful Firewall (Always On) provides even tighter security. When enabled, this feature allows no inbound sessions from all networks, whether or not a VPN connection is in effect. Also, the firewall is active for both encrypted and non encrypted traffic. There are two exceptions to this rule. The first is DHCP, which sends requests to the DHCP server out one port but receives responses from DHCP through a different port. For DHCP, the stateful firewall allows inbound traffic. The second is ESP. The stateful firewall allows ESP traffic from the secure gateway, because ESP rules are packet filters and not session-based filters. For the latest information on other exceptions, if any, refer to Release Notes for Cisco VPN Client for Windows.
To enable the stateful firewall, click Stateful Firewall (Always on) on the Options menu. When Stateful Firewall (Always On) is enabled, you see a check in front of the option. This feature is disabled by default. You can enable or disable this feature from the VPN Client Options menu. During a VPN connection, you can view the status of this feature by right-clicking the lock icon in the system tray. You can also enable or disable this feature from the same menu.
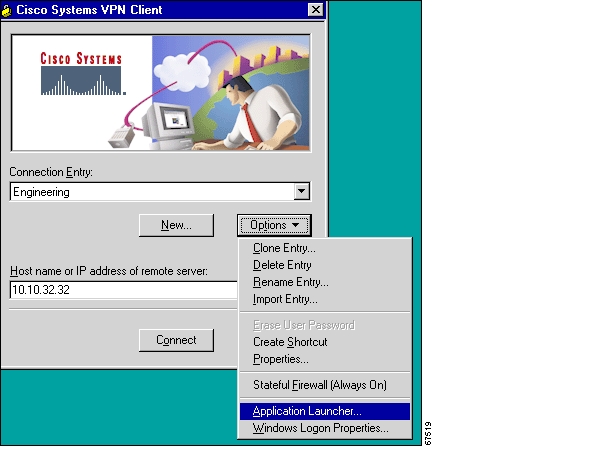
Launching an Application
You can configure the dialer to automatically launch an application before establishing a connection. Some examples of why you would want to use this feature follow:
•
•
(See Figure 5-15 to Figure 5-17.)To configure the VPN Dialer to launch an application from the logon desktop, use the Application Launcher.
The Application Launcher starts the specified application once per session. To launch an application again, you must exit from the VPN Dialer, restart the VPN Dialer, and launch the application.
To activate Application Launcher, follow these steps:
Step 1
Figure 5-15 Application Launcher Option
Note
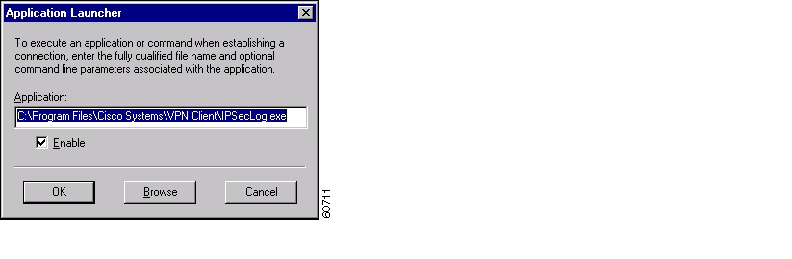
The VPN Dialer displays a dialog box prompting for the name of the application. (See Figure 5-16.)
Figure 5-16 Entering the Name of the Application
Step 2
The application name appears in the Application Launcher dialog box. In this example, the VPN Dialer is configured to launch the Log Viewer before a connection.
Figure 5-17 Choosing an Application
Step 3
Turning Off Application Launcher
To disable Application Launcher, follow these steps:
Step 1
Step 2
Managing Windows NT Logon Properties
This section describes special logon features for the Windows NT platform, which includes Windows NT 4.0, Windows 2000, and Windows XP. These features include:
•
•
•
To access the Windows logon properties, open the VPN Client Options pull-down menu (shown in Figure 5-3) and choose Windows Logon Properties. The VPN Client displays a dialog box containing three parameters. (See Figure 5-18.)
Note
Figure 5-18 Windows Logon Properties
Starting a Connection Before Logging on to a Windows NT Platform
On a Windows NT platform, you can connect to the private network before you log on to your system. This feature is called start before logon and its purpose is primarily to let you log in to the domain and run login scripts.
Your administrator may have set this up for you. Once you establish a VPN connection, your credentials are sent to a domain controller for logging in to your system. If you need to launch an application before you log on, see the section " Launching an Application" for information.
When you have established a successful VPN connection, the VPN Dialer window closes, and your logon window displays. If the connection is not successful, the VPN Dialer window continues to display. Your administrator may have set up a banner that lets you know when you have a successful connection.
To activate this feature, follow these steps:
Step 1
Step 2
What Happens When You Use Start Before Logon
When start before logon is active, the following events occur when your system starts:
•
•
•
•
Note
For information on enrolling certificates and importing certificates into your Cisco store, see " Enrolling and Managing Certificates."
For information about using start before logon with the Entrust SignOn feature, see " Connecting with an Entrust Certificate."Turning Off Start Before Logon
To turn this feature off, open the Options pull-down menu on the VPN Dialer connection dialog box and uncheck Enable start before logon. The next time you log on to your system, the VPN Dialer connection dialog box does not automatically display on your logon desktop.
Permission to Launch an Application Before Log On
Your system administrator determines whether you can launch applications and third-party dialers before you log on to a Windows NT platform. To protect system and network security, your system administrator might have disabled this feature. If this feature is greyed out, you cannot launch applications and third-party dialers before logging on to a Windows NT platform. You must have system administrator privileges to change this parameter.
Disconnecting When Logging Off of a Windows NT Platform
This parameter controls whether your VPN Client connection automatically disconnects when you log off your Windows NT system.
To always automatically terminate your connection when you log off, check this parameter. This parameter is checked by default.
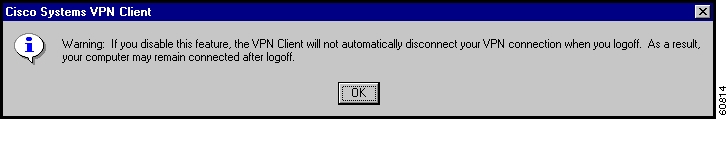
To disable auto-disconnect while logging off, remove the check from this parameter. When you remove the check, the VPN Client displays the warning message shown in Figure 5-19.
Figure 5-19 Auto-disconnect Warning Message
Disabling this parameter allows your connection to remain up during and after log off, which allows profiles or folders to be synchronized during log off. You would disable this parameter when using the Windows roaming profiles feature.
Note
Managing Auto Initiation
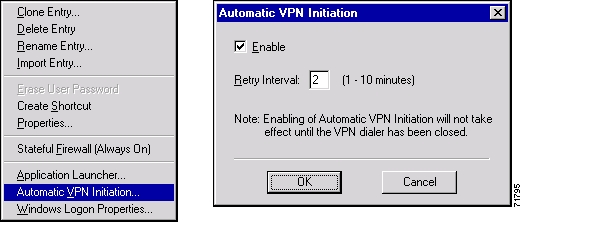
When your network administrator has configured your VPN Client for auto initiation (by including it in the vpnclient.ini file), the Options menu includes the option Automatic VPN Initiation. (See Figure 5-20.) When you select this option, the VPN Dialer displays a dialog box that lets you enable/disable auto initiation and change the setting of the retry interval. Disabling auto initiation in this way does not remove it from your configuration. If you need to enable auto initiation after you have disabled it, you can return to this dialog box and enable it again. The only way you can remove auto initiation from your configuration is through editing the vpnclient.ini file.
For complete information on auto initiation, see "Using Automatic VPN Initiation".
Figure 5-20 Automatic VPN Initiation Option
To disable or enable auto initiation, follow these steps:
Step 1
Step 2
Or to enable auto initiation after it has been disabled, click Enable to check it.
Step 3
Step 4
To change the setting of the retry interval, enter the new value (1 to 10) in the Retry Interval box and click OK.
Viewing and Managing the VPN Client Event Log
Examining the event log can often help a network administrator diagnose problems with an IPSec connection between a VPN Client and a peer device. The log viewer application collects event messages from all processes that contribute to the client-peer connection. This section shows how to use the Log Viewer to retrieve and manage this information.
Starting the Log Viewer
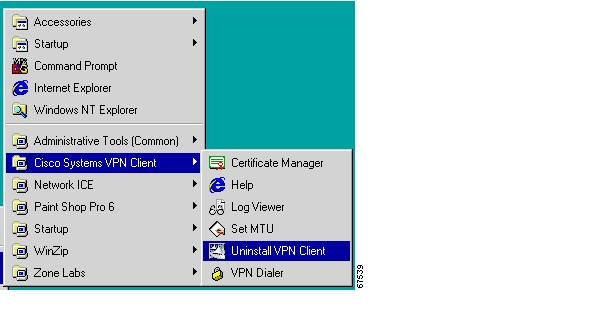
To start the Log Viewer, use the following path from the Start menu:
Start > Programs > Cisco Systems VPN Client > Log Viewer. (See Figure 5-21.)Figure 5-21 Starting the Log Viewer
The Log Viewer starts, displaying its main window. (See Figure 5-22.) By default, the filter is set to low, so you may not see any events displayed in this window (see the section " Filtering Events").
For help on this window, press F1.
Figure 5-22 Log Viewer Main Window
Displaying the Version of the Software
To display a brief help message that gives you the version number of the software, choose Help from the main menu or click the Help icon.
Collecting Events
To start collecting event messages into the log file, choose Options > Capture. When a check mark appears in front of the Capture option, Log Viewer is collecting events. This option is off by default. Alternatively, you can click the Capture icon.
Each message in the log file comprises at least two lines containing the following fields:
Event# Time Date Severity/type/level EventClass/MessageIDMessage textTable 5-1 describes the fields in an event message. Table 5-2 describes Event types and severity levels.
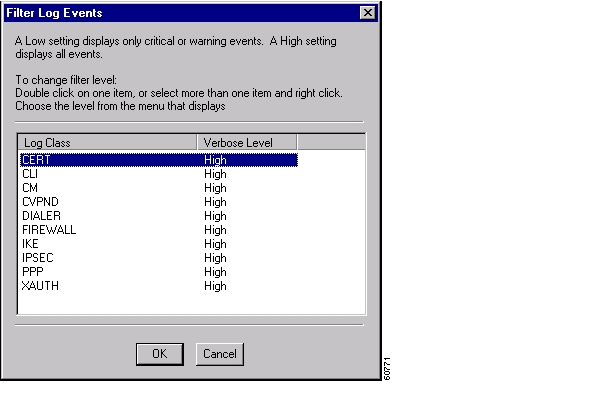
Filtering Events
To control the amount of information to view with the Log Viewer, choose Options > Filter. Alternatively, you can click the Filter icon.
The Log Viewer displays the Log Viewer Filter message to let you choose the amount of information you want to capture. (See Figure 5-23.)
Figure 5-23 Log Viewer Filter Message
To change the filter level, do the following:
Step 1
Step 2
Disable—Inhibits event reporting for the chosen class.
Low—Provides the least amount of information. This choice includes severity levels 1 through 3 (all faults and warnings). Low is the default for all classes.
Medium—Includes severity levels 1 through 4; all in Low plus the first level informational events, which provide general information about the connection. Note that a first level informational event is level 4 and appears in the event display as Info/4.
High—Includes severity levels 1 through 6, thus adding two levels of informational events (Info/5 and
Info/6). This setting can lower the performance of all applications on your system, so use it only when your network administrator or a support engineer suggests that you do so.Table 5-3 defines the classes (modules) that generate events.
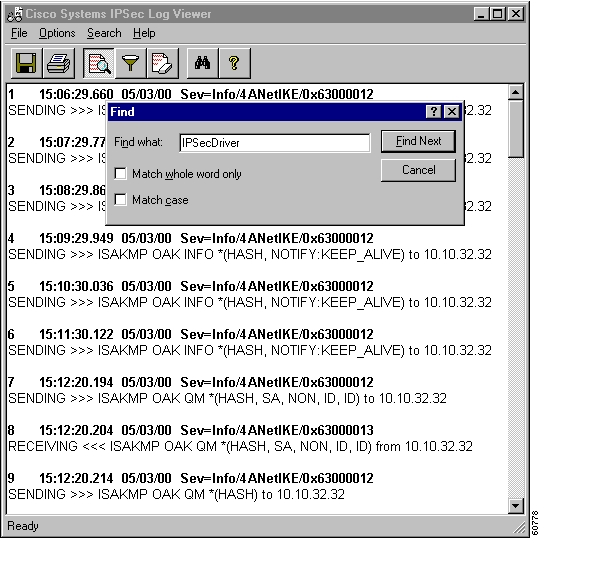
Searching the Log File
To locate specific events or event types in the window, choose Search from the main menu. Alternatively, you can click on the Search icon.
The Log Viewer displays the Find message. (See Figure 5-24.) Enter a string to find and click Find Next. You can match on whole words and on case.
Figure 5-24 Searching the Log Display
Printing the Log File
To print the events displayed in the current window, choose File > Print from the main menu. Alternatively, you can click the Printer icon.
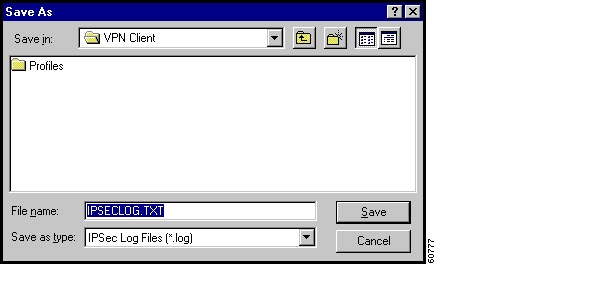
Saving the Log File
To save the currently displayed events in the
ipseclogfile on your hard drive, choose File > Save as from the main menu. Alternatively, click the Disk icon.
The ipseclog file is a text (.txt) file in DOS format. The Log Viewer saves the information to the Client install directory, which by default is the pathname Program Files\Cisco Systems VPN Client\VPN Client\IPSECLOG.TXT. You can specify any directory and name. (See Figure 5-25.)
Figure 5-25 Saving a Log File
Clearing the Events Display
To eliminate all the events currently displayed in the Log Viewer main window, choose Options > ClearLog Display from the main menu. Alternatively, you can click the Erase All icon.
If you want to store the event messages, be sure you save them before you clear the display. Clearing the display does not reset event numbering, nor does it clear the log file itself.
Receiving Notifications From a VPN Device
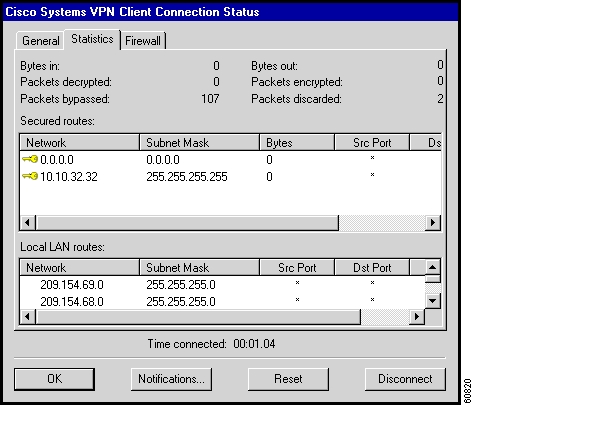
The VPN device (secure gateway) through which you connect to the private network at your organization can send you notifications. Currently you can receive a notification from your network administrator when it is time to update the VPN Client software or when the VPN device that requires a specific firewall be running on the VPN Client PC detects that the firewall is not running. A notification typically shows up when you start your dialer connection. You can also display notifications while you are connected by clicking Notifications on the Connection Status dialog box. (See Figure 5-26.)
Figure 5-26 Displaying Notifications
Upgrade Notifications
The notification shown in Figure 5-27 informs a remote user that it is time to upgrade the VPN Client software. The notification includes the location where the remote user can obtain the upgrade. When you receive an upgrade notification that includes a URL, click Launch to go to the site and retrieve the upgrade software. You will receive an upgrade notification every time you connect until you have installed the upgrade software.
Figure 5-27 Notification of a Software Upgrade
Firewall Notifications
If the VPN Client and VPN Concentrator firewall configurations do not match, the VPN Concentrator notifies the VPN Client while negotiating the connection. The notification includes the policy that the VPN Concentrator requires. For example, the notification in Figure 5-28 shows an example firewall notification. The message states that the policy required is AYT and the firewall required is any Zone Labs product.
Figure 5-28 Firewall Notification
Upgrading the VPN Client Software (InstallShield)
Upgrading the VPN Client software using this method retains existing connection entries and their parameters.
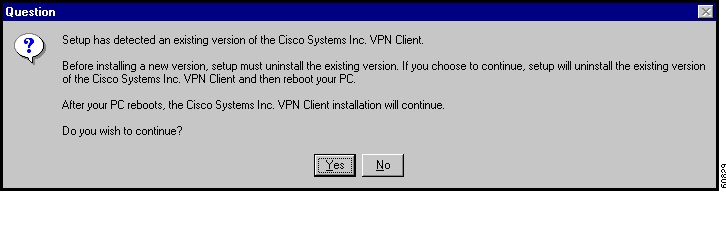
To install an upgrade of the VPN Client over an existing version on your system, use the following procedure, which first uninstalls the existing version, and then reboots your PC and installs the new version.
Step 1
When it starts, the installation wizard detects the existing version and asks you to confirm that you want to remove that version and reboot your PC. (See Figure 5-29.)
Figure 5-29 Uninstalling an Existing Version
Step 2
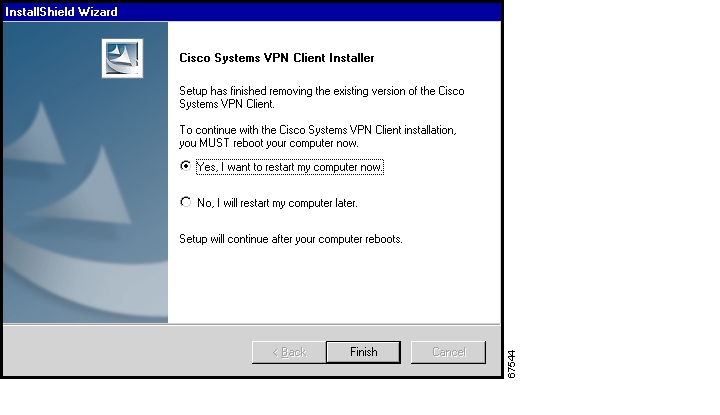
The installation program removes the old version and asks you to confirm the system restart. (See Figure 5-30.)
Figure 5-30 Confirming the System Restart
Be sure to remove any diskette from its drive before you restart your system.
If you are installing from diskettes, reinsert Disk 1 after your system restarts and displays the Windows logo screen, but before the desktop appears.
Step 3
The installation wizard restarts your system. Once your system has restarted, installation continues automatically.
Step 4
Upgrading the VPN Client Software (MSI)
Upgrading the VPN Client software using this MSI in this recommended way retains existing connection entries and their parameters.
To install an upgrade of the VPN Client over an existing version on your system, use the following procedure.
Step 1
Step 2
Uninstalling the VPN Client with the Uninstall Application
This option is available only if you have installed the VPN Client via InstallShield. Uninstalling the VPN Client means completely removing all VPN Client software from your computer. For example, if you are changing or upgrading your PC, you might want to uninstall the VPN Client. Also, if you are getting ready to install Cisco VPN Client 3.6 using Microsoft Windows Installer (MSI), you can run the Uninstall application to remove previous versions of the Cisco VPN Client.
Note
Before you run the uninstall program, make sure you have closed all of your remote access (Dial-Up Networking) connections and all VPN Client applications. Then use the following procedure. (See Figure 5-31.)
Note
Step 1
Figure 5-31 Running the Uninstall Program
The Uninstall Wizard runs and asks if you want to really want to remove the VPN Client applications. (See Figure 5-32.)
Figure 5-32 Confirming Uninstall
Step 2
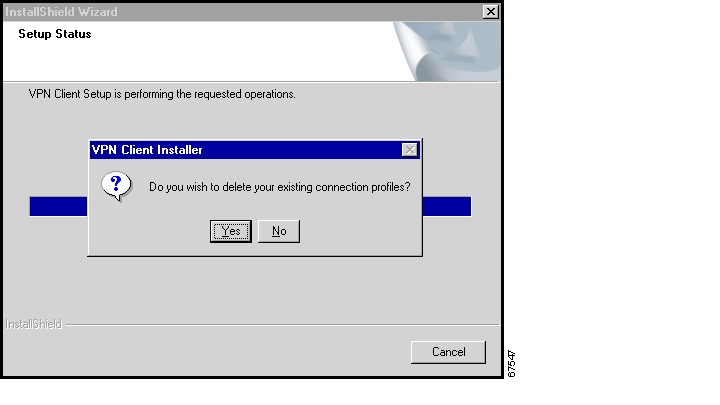
Next, the Uninstall Wizard asks if you want to delete your connection profiles. (See Figure 5-33.)
Figure 5-33 Confirming Your Connections
Step 3
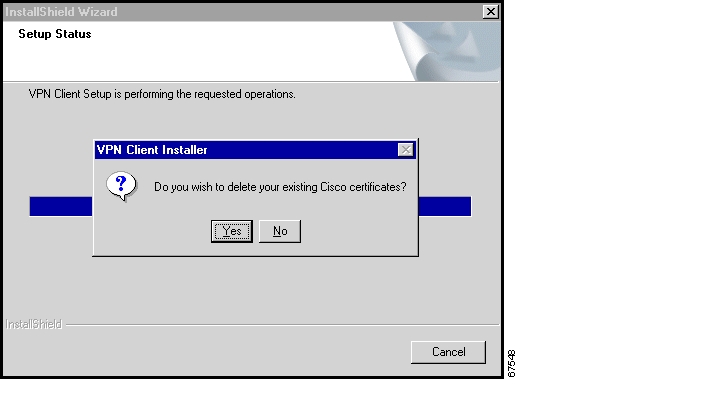
Then the Uninstall Wizard asks if you want to delete your certificates. (See Figure 5-34.)
Figure 5-34 Confirming Your Certificates
Step 4
Finally, the Uninstall Wizard prompts you to restart your system. To complete the uninstallation, you must restart your system.
Step 5
The installation program restarts your system.
Be sure to remove any diskette from its drive before you restart your system.
Note
Removing the VPN Client Software MSI Installation
To remove the VPN Client when it has been installed via MSI, use the Add/Remove utility available from the Control Panel. You must remove any version of the Cisco VPN Client or any other VPN Client before upgrading the Cisco VPN Client with MSI.
![]()
![]()
![]()
![]()
![]()
![]()
![]()
![]()
Posted: Mon Apr 18 08:05:18 PDT 2005
All contents are Copyright © 1992--2005 Cisco Systems, Inc. All rights reserved.
Important Notices and Privacy Statement.