|
|

Many tasks are required for fully configuring the Cisco Integrated Communications System 7750 (Cisco ICS 7750) for data and voice routing. This chapter lists common tasks required to configure the Cisco ICS 7750, gives pointers to Cisco IOS and Cisco CallManager documentation that tells how to perform these tasks, and describes any differences between configuring Cisco IOS or Cisco CallManager software on the Cisco ICS 7750 and configuring Cisco IOS or Cisco CallManager on other platforms.
This chapter contains these sections:
ICS System Manager is designed to communicate with and to monitor the status of all the components in the chassis. To enable ICS System Manager to perform these functions, a configuration program (ICSConfig) guides you through the configuration process. ICSConfig enables you to change key system parameters, such as the IP addresses of system cards, passwords, destination for syslog messages, and Simple Network Management Protocol (SNMP) community strings.
To enable ICS System Manager to properly function as a system management tool, it is important that you use ICSConfig or ICS System Manager, as appropriate, rather than the IOS command-line interface (CLI), when you enter key system parameters.
Except for the procedures listed in "ICSConfig Tasks," you can enter all IOS CLI commands that are available for use in any IOS software release that is intended for use on the Cisco ICS 7750.
You should always use ICSConfig for the following tasks:
The following list includes tasks that should never be configured on the Cisco ICS 7750 by using the IOS CLI under any circumstances:
To prevent loss of the ASI or MRP configuration, save the running-config file to the startup-config file by following these steps:
This section explains how to set the date and time on Cisco ICS 7750 cards. It contains the following tasks:
 |
Note For information about using NTP on the Cisco ICS 7750, see the "Running Network Time Protocol" section. |
Complete the following steps to set the date and time on Cisco System Processing Engine 310 (SPE310) cards:
Step 2 Use the Client Connection Manager to open a Terminal Services Client connection with the SPE310:
Step 3 Log in as an administrator (user ID administrator), and enter your password (the default is changeme).
Step 4 On the SPE310, choose Start > Settings > Control Panel > Date/Time.
The Date/Time Properties dialog opens.
Step 5 Fill in the necessary fields. Click OK to close the Date/Time Properties dialog box.
Step 6 Repeat Step 2 through Step 6 for any additional SPE310s, if present.
The system switch processor (SSP) card, multiservice route processor (MRP) cards, and analog station interface (ASI) cards each have a system clock that begins to run from the point at which the card starts up. The system clock keeps track of the date and time. The SSP stores its configuration data in Flash-simulated NVRAM. The MRP300, MRP3-8FXS, and MRP3-16FXS cards store their configuration data in NVRAM. The MRP200, ASI81, and ASI160 cards obtain their configuration data from the SPE310 running System Manager when they boot.
When you set the date and time, the setting remains accurate until the next card restart.
|
Note When changing the date and time settings on SSP, MRP, and ASI cards, open a Telnet session from the PC, not from the SPE310. If you open a Telnet session from the SPE, the changes you make to the card configuration are not saved. |
Complete the following steps to set the date and time on the SSP card and MRP cards:
Step 2 Enter the following command to open a Telnet session:
where IP address is the IP address of the card with which you wish to communicate.
Step 3 Enter your login password.
Step 4 Enter privileged EXEC mode by entering the following command:
Step 5 Enter your enable password.
Step 6 To enter global configuration mode, enter the following command:
Step 7 To set the time zone, enter the following command in global configuration mode:
For example, to set the time to PST, eight hours offset from UTC, enter the following command:
Table 6-1 lists the time zones in North America and their offsets from UTC.
Step 8 To set the clock for a card, enter one of the following IOS commands in privileged EXEC mode:
Step 9 To exit global configuration mode, enter the following command:
Step 10 To save your configuration, enter the following command:
Step 11 To verify your settings, enter the following command:
Step 12 Repeat Step 3 through Step 12 for additional cards, as necessary.
Step 13 Close the Telnet session by typing exit at the prompt.
The SSP is an eight-port switching module in the Cisco ICS 7750. It has two external ports for connecting to external network devices and has six internal ports for connecting to the other cards in the Cisco ICS 7750.
The SSP serves the following purposes:
|
Note The Cisco ICS 7750 supports only one SSP, which is always installed in slot 7 of the chassis. For a complete description of the SSP, refer to the Cisco ICS 7750 System Description. |
The SSP provides the following features:
|
Note Hot-swapping the SSP will result in system downtime since all the cards in the ICS 7750 chassis will lose connectivity during the swap. |
The SSP is, in the default configuration, network-ready. In most network configurations, the SSP will not require any additional configuration. However, many settings on the SSP are configurable. Table 6-2 lists tasks that you may need or want to perform in order to configure the SSP. In addition, Table 6-2 gives pointers to the locations in the Catalyst 2900 XL and Catalyst 3500 Software Configuration Guide that provide instructions for performing those tasks. The Catalyst 2900 XL and Catalyst 3500 Software Configuration Guide is available at the following URL:
http://www.cisco.com/univercd/cc/td/doc/product/lan/c2900xl/29_35wc/sc/index.htm
This section explains how to configure MRP and ASI cards and contains the following sections:
This section lists the key features of the MRP200, MRP300, ASI81, ASI160, MRP3-8FXS, and MRP3-16FXS system cards.
MRP200 and MRP300 cards have the following features:
The key features of the ASI81, ASI160, MRP3-8FXS, and MRP3-16FXS cards are delineated below:
|
Note The MRP300, MRP3-8FXS and MRP3-16FXS cards have additional functionality provided by 16 MB of onboard Flash memory, with 64 MB of add-on Flash memory available as an option. |
For a list of the WICs, VICs, and VWICs that are supported in MRP200, MRP300, MRP3-8FXS, and ASI81 cards, refer to the Cisco ICS 7750 System Description . For information about valid combinations of WICs, VICs, and VWICs on MRP and ASI cards, see "PVDM Requirements."
VICs and VWICs installed in MRP cards or ASI cards might require additional digital signal processors (DSPs) for processing heavier voice traffic. Each DSP can perform a maximum of 100 million instructions per second (MIPS).
You can install up to two packet voice/data modules (PVDMs) on each MRP or ASI card. PVDMs contain DSP chips that give MRP and ASI cards more processing power.
The Cisco ICS 7750 supports several options for voice-compression algorithms. These algorithms are commonly called codecs. The word codec is a combination of the words coder and decoder. Coding is the process of encoding a digitized signal into a more efficient form for transmission or storage. Decoding is the process of restoring the coded signal to the original form.
Codecs differ in terms of voice quality, compression rate and bandwidth, ability to carry dual-tone multifrequency (DTMF) and modem traffic, and number of channels (calls) that a single DSP can support. The more DSP channels, the greater the number of calls that an MRP or ASI card can support. The number of channels supported also depends on whether the DSP is running a digital image or it is running an analog image. (Digital T1 and E1 VWICs process digital signals, and analog VICs process analog signals.)
As Table 6-3 shows, some codec compression techniques require more processing power than others. Multiple DSP firmware images are available for use on MRP and ASI cards. High-complexity images support fewer calls than medium-complexity images.
| Channels per DSP— Digital Image1 |
Channels per DSP— Analog Image |
||||
|---|---|---|---|---|---|
| Codec | Bandwidth | Medium Complexity | High Complexity | Medium Complexity2 | High Complexity3 |
| 1VWICs (VWIC-1MFT-T1, VWIC-1MFT-E1, VWIC-2MFT-T1, and VWIC-2MFT-E1) require digital DSP software.
2Medium-complexity analog DSP software supports 8- and 16-port FXS modules (in the ASI 81 and the ASI 160, respectively). 3High-complexity analog DSP software supports all 2-port analog VICs (VIC-2DID, VIC-2BRI-NT/TE, VIC-2FXS, VIC-2FXO-M1, VIC-2FXO-M2, VIC-2FXO-M3, VIC-2FXO, and VIC-2E/M) and the 8- and 16-port FXS modules (in the ASI 81 and the ASI 160, respectively). 432 kbps = 2:1 compression, 24 kbps = 3:1 compression, and 16 kbps = 4:1 compression. |
G.711 performs pulse code modulation (PCM) and is the standard digital channel used in the public telephone network. PCM provides no compression and therefore no opportunity for bandwidth savings. Any services that operate over the public network should operate with similar performance over a Cisco ICS 7750 PCM channel (although the Cisco ICS 7750 connection might have more delay).
G.723.1 is a compression technique that uses multi-pulse, multi-level quantization (MP-MLQ) or code excited linear prediction (CELP) coding to compress speech or audio signal components at 5.3 or 6.3 kilobits per second (kbps), respectively. G.723.1, which is part of the H.324 family of standards, can be used for compressing speech or audio signal components at very low bit rates. G.723.1 Annex-A provides built-in voice activity detection (VAD) and Comfort Noise Generation (CNG).
G.726 performs adaptive differential pulse code modulation (ADPCM) coding. G.726 reduces network bandwidth requirements for transmitting voice by encoding 64 kbps voice channels as 32, 24, or 16 kbps ADPCM (that is, 32 kbps provides 2:1 compression, 24 kbps provides 3:1 compression, and 16 kbps provides 4:1 compression). Generally, there is a trade-off between the amount of compression and voice quality. ADPCM-encoded voice can be interchanged between packet voice, PSTN, and private branch exchange (PBX) networks if the PBX networks are configured to support ADPCM.
G.729 performs CELP coding, where voice is coded into 8-kbps streams. There are two variations of this standard (G.729 and G.729 Annex A [G.729a]) that differ mainly in terms of their computational complexity; both provide speech quality similar to 32-kbps ADPCM. G.729 is a high complexity algorithm, and G.729a is a medium complexity variant of G.729 with slightly lower voice quality. G.729a performs conjugate structure algebraic code excited linear predictive (CS-ACELP) coding, providing speech quality similar to 32-kbps ADPCM. G.729a offers the best compression rate (8:1), but it does not typically carry modem traffic, and it degrades DTMF and music signals somewhat. Depending on the type of traffic, using G.729a can produce cost savings of 40 percent, relative to using G.711. Other algorithms in the G.729 family include G.729 Annex-B, a high complexity algorithm, and G.729a Annex-B, a medium-complexity variant of G.729 Annex-B with slightly lower voice quality. The difference between the G.729 and G.729 Annex-B codecs is that G.729 Annex-B provides built-in VAD and CNG.
Codec interoperability is the ability of one codec to decode another codec. If a DSP is configured with a certain codec, the DSP should be able to decode the voice codec using any codec with which the DSP is interoperable.
The following G.729 codec combinations interoperate:
The following G.723.1 codec combinations interoperate:
Delay is the time it takes for packets to travel between two endpoints. In traditional data networking, delay can be tolerated with little or no impact on network users; however, in networks carrying voice traffic, delay is potentially quite significant because it can affect the ability of users to carry on a telephone conversation. For example, delay can introduce pauses or gaps in the conversation, increasing the likelihood that one person will start talking before the other person has finished.
Because of the speed of network links and the limited processing power of many devices, some delay is expected. Telephone users normally accept up to about 150 milliseconds (ms) of delay without noticing problems. You can measure delay by using ping tests at various times of the day with different network traffic loads. If network delay is excessive, reduce it before deploying a network that carries Voice over IP (VoIP) traffic.
The two types of delay most commonly found in today's telephony networks are propagation delay and handling delay. Propagation delay is caused by the characteristics of the speed of light traveling via a fiber-optic-based or copper-based medium. Handling delay (sometimes called serialization delay) is caused by the devices that handle voice information. Handling delays have a significant impact on voice quality in a packetized network. Codec-induced delays are considered a handling delay.
Table 6-4 shows the delay that is introduced by different codecs.
ASIs and MRPs handle calls based on the grouping of the DSPs. The DSPs are located on PVDMs. There can be up to five DSPs on a single PVDM. Each PVDM corresponds to one DSP group. MRP200 and MRP300 cards each have two PVDM slots and, therefore, can have a maximum of two DSP groups. Each DSP group serves either an analog port or a T1 port on the VIC. Therefore, one analog VIC and one T1 VWIC make up two groups, and two T1s with two different clock sources (regardless of whether they are on the same VWIC) also make up two groups.
Each DSP group that serves a T1 port can support as many DSPs as there are in the PVDM.
A DSP has a maximum capacity of 100 MIPS to handle a particular number of simultaneous calls. One G.729a call requires 25 MIPS, and one G.711 call requires 12.5 MIPS. The number of calls on a DSP is determined by the total MIPS used reaching 100 on that DSP. The DSP resource manager rejects a call if it cannot find a DSP with required unused MIPS for the selected codec.
Table 6-5 provides some examples of the number of calls that can be supported on a single DSP, depending on the codec used. Table 6-6 lists some of the combinations of calls that can be handled on a single DSP.
|
Note The examples provided in Table 6-5 and Table 6-6 are based on the assumption that you are using a medium-complexity digital image. |
| Scenarios | Calls per DSP | Codecs | MIPS per Session | MIPS Required | Call Status |
|---|---|---|---|---|---|
Each DSP group that serves analog ports requires the following:
This section provides information that can help you choose the DSP image that is best suited for a particular type of traffic. The following are some common scenarios:
When you choose DSP firmware, it is important to consider the following factors:
DSP firmware is included with each IOS release for the Cisco ICS 7750. Five DSP firmware images are available for use on ASI and MRP cards. Two of the DSP firmware images are intended for MRP200 and MRP300 cards (which contain analog VICs) and for MRP3-8FXS and ASI81 cards (which contain FXS ports); two images are intended for digital trunks (such as T1 CAS and T1/E1 PRI); and one image is intended for transcoding.
Each DSP firmware image supports a particular set of codecs. High-complexity DSP firmware supports more codecs than medium-complexity firmware supports. However, in order to support more codecs, the number of voice channels supported by the firmware has to be reduced.
Table 6-7 lists the number of channels supported by the DSP firmware images.
|
Note The abbreviations FIXHC, FIXMC, FLEX6, FLEX8, and XCODE represent the names of the firmware images. These abbreviations appear in the output from the show voice dsp command. |
| DSP Firmware Image | Codec | Number of Channels per DSP | Cards Supported |
|---|---|---|---|
| 1VIC-2DID, VIC-2E/M, VIC-2FXS, VIC-2FXO, VIC-2FXO-M1, VIC-2FXO-M2, VIC-2FXO-M3.
2VWIC-1MFT-T1, VWIC-2MFT-T1, VWIC-1MFT-E1, VWIC-2MFT-E1. |
The number of DSPs needed for each voice interface depends on the following two factors:
Table 6-8 shows how to calculate the number of DSPs needed for each channel. For example, with a medium-complexity analog image and a G.726 codec, 1 DSP is needed for 4 voice interfaces.
|
Note For additional information on PVDM selection, refer to the "PVDM Requirements" appendix in the Cisco ICS 7750 Hardware Installation Guide . |
| Type of Card | Suggested Number of DSPs | Suggested DSP Firmware | Total Voice Channels | Codecs Supported |
|---|---|---|---|---|
| 1VIC-2DID, VIC-2E/M, VIC-2FXS, VIC-2FXO, VIC-2FXO-M1, VIC-2FXO-M2, VIC-2FXO-M3.
2The codecs supported on the Cisco ICS 7750 are G.711, G.723.1, G.726, and the G.729 family. |
|
Note Table 6-8 does not address configuration rules for transcoding. See the "Determining How Many DSPs Are Needed for Transcoding" section. |
|
Note On MFT-T1 and MFT-E1 cards, medium-complexity firmware is not recommended, because this firmware restricts echo cancellation coverage to 16 ms. |
|
Note The codec complexity for ASI cards defaults to medium-complexity but can be changed to high-complexity with sufficient DSPs (see Table 6-8). |
Because some hardware and software currently support only G.711 (uncompressed) connections, transcoding is available on MRP and ASI cards. MRP and ASI cards are considered packet-to-packet gateways because they have DSPs that transcode between voice streams using different compression algorithms. For example, when a user on a Cisco IP Phone at a remote location calls a user at the central location, Cisco CallManager can be configured so that it causes the remote IP phone to use compressed voice (G.729a) for the WAN call. However, if the called party at the central site is unavailable, the call potentially could be routed to an application that supports only G.711. In this case, the MRP or ASI card transcodes the G.729a voice stream to G.711 so that a voice message is stored by the G.711-compliant voice-messaging server.
Transcoding is required when a compressed voice stream is used to save WAN bandwidth and when the local device does not support the codec. The transcoding service compresses and decompresses voice streams to match the capabilities of the endpoint device.
A transcoder is a device that takes the output stream of one codec and transcodes (converts) it from one compression type to another compression type. For example, a transcoder could take an output stream from a G.711 codec and transcode (convert) it in real time to a G.729 input stream accepted by a G.729 codec.
Transcoding is supported under the following conditions:
Transcoding is needed when the calling and called parties cannot use the same codec type. Codec incompatibility may result from of a lack of support for a particular codec. For example, some unified messaging systems support only G.711, while Cisco IP Phones support G.711 and G.729. (Note that Cisco Unity supports both G.729a and G.711.) Codec incompatibility could also be caused by a failure when negotiating a common codec. For example, in a lab, two Cisco voice gateways (such as an MRP or an ASI card) can be forced to use different codecs so that transcoding is required for them to communicate.
Suppose that an application is communicating with a G.711-only voice-mail system over a WAN link. To conserve bandwidth, the caller on one side of WAN link uses G.729, while the called party voice-mail system recognizes only G.711. This is a situation that would require transcoding.
Transcoding is not required if all the called parties (except those on a voice-mail system) are on the same LAN. You can configure the calling and called parties so that they must negotiate a common codec when possible.
Here are some additional transcoding guidelines:
When a DSP is reserved for transcoding, a special DSP firmware image is downloaded to the DSP. At present, the DSP firmware supports transcoding between G.723.1/G.729 and G.711 U/a-law, as well as between G.711 U-law and G.711 a-law. Transcoding between low-bit-rate codecs, such as between G.723.1 and G.729, is not supported.
Before an MRP or ASI can act as a transcoder, DSP resources must be reserved for transcoding. Unlike other Cisco gateways, the MRP or ASI provides the flexibility to choose the number of channels that should be reserved for transcoding. One DSP is required for every two transcoding channels (full duplex).
When the MRP or ASI boots, DSP resources are statically allocated first for analog VICs and the VIC-2BRI-NT/TE. These DSP resource allocations cannot be changed. In the show voice dsp command output, these DSPs are represented with a value of FIXMC or FIXHC in the Image field, depending on whether high- or medium-complexity DSP firmware is being used. The remaining DSP resources can be allocated to T1 VWICs, to E1 VWICs, or to transcoding, as needed.
For T1 VWICs or E1 VWICs, DSPs are reserved by defining a ds0-group or pri-group under the individual T1 or E1 controller. A DSP is reserved if it hosts a signaling channel for the T1/E1 VWIC. Such a reserved DSP has a non-zero value in the D-sig Allocate field, which can be seen in the show voice dsp command output.
ASI and MRP cards have Fast Ethernet interfaces that can be configured.Depending on your own requirements and the protocols you plan to route, you might need to enter additional configuration commands. For more information about basic configuration, including enabling the interface and specifying IP routing on Fast Ethernet interfaces, see the section "Configuring Ethernet, Fast Ethernet, or Gigabit Ethernet Interfaces" in the Cisco IOS Interface Configuration Guide, Release 12.2.
|
Note See the "Configuring Dial Plans" section for a sample configuration to configure a FastEthernet interface on an ASI or MRP card. |
|
Note Use ICSConfig to assign or modify the IP address of an ASI or MRP card, as necessary. Do not use the CLI. |
You can configure an MRP or ASI card with a WIC or VWIC installed for access to the WAN. For example, if you are using a serial interface, you can configure Frame Relay, Point-to-Point Protocol (PPP), and High-Level Data Link Control (HDLC) over that serial interface.
Information about the various types of connections is provided in the sections that follow:
Table 6-9 lists tasks you might need to perform in order to configure WAN interfaces on MRP or ASI cards and gives pointers to the location in Cisco IOS documentation set that provides additional instructions on performing those tasks. The various Cisco IOS configuration guides for version 12.2 are available at the following URL:
http://www.cisco.com/univercd/cc/td/doc/product/software/ios122/122cgcr/index.htm
| Tasks | Documentation Locations |
|---|---|
See "Configuring a Synchronous Serial Interface " and Configuring Low-Speed Serial Interfaces " in the Cisco IOS Interface Configuration Guide, Release 12.2. |
|
See "Configuring ISDN BRI " in the Cisco IOS Dial Technologies Configuration Guide, Release 12.2 |
|
See "Configuring Serial Interfaces for CSU/DSU Service Modules" in the Cisco IOS Interface Configuration Guide, Release 12.2. |
You can configure the serial interfaces on your asynchronous/synchronous serial WIC (WIC-1T, WIC-2T, or WIC-2A/S) by entering IOS commands at the ASI or MRP command prompt, in configuration mode.
|
Note See the "Configuring Synchronous Serial WICs" section for a sample configuration. |
Table 6-10 lists the half-duplex timer commands.
| Timer | Syntax | Default Setting (ms) |
|---|---|---|
| 1CTS = Clear To Send
2DCD = data carrier detect 3RTS = Request To Send |
Table 6-11 through Table 6-13 list clock rate settings in bits per second (bps) for specific interfaces.
You can use an Integrated Services Digital Network (ISDN) Basic Rate Interface (BRI) WIC to connect MRPs or ASIs with other ISDN routers. ISDN BRI is a dial-up connection. Adding an ISDN BRI connection to the MRP creates a logical dialer interface.
ISDN connections use one or both data channels for the connection to the ISDN service provider. Normally, the ISDN provider is your local telephone company.
This section tells how to configure ISDN BRI WICs.
|
Note For information on how to configure ISDN voice interfaces, see the "Configuring ISDN Interfaces for Voice" section. |
Before using an MRP with an ISDN BRI WIC, you must order a correctly configured ISDN BRI line from your local telecommunications service provider.
The ordering process varies from provider to provider and from country to country; however, here are some general guidelines:
|
Note See the "Configuring ISDN BRI WICs" section for a sample configuration. |
Table 6-14 lists the ISDN switch types for North America.
ISDN BRI provisioning refers to the types of services provided by the ISDN BRI line. Although provisioning is performed by your ISDN BRI service provider, you must tell the provider what you want. Table 6-15 lists the provisioning that you should order for switches used in North America.
| 1SPID = service profile identifier
2TEI = terminal endpoint identifier |
Some service providers use service profile identifiers (SPIDs) to define the services subscribed to by the ISDN device that is accessing the ISDN service provider. The service provider assigns the ISDN device one or more SPIDs when you first subscribe to the service. If you are using a service provider that requires SPIDs, your ISDN device cannot place or receive calls until it sends a valid, assigned SPID to the service provider when accessing the switch to initialize the connection.
At present, only the DMS-100 and NI switch types require SPIDs. The AT&T 5ESS switch type may support a SPID, but we recommend that you set up that ISDN service without SPIDs. In addition, SPIDs have significance only at the local access ISDN interface. Remote routers never receive the SPID.
A SPID is usually a seven-digit telephone number with some optional numbers. However, service providers may use different numbering schemes. For the DMS-100 switch type, two SPIDs are assigned, one for each B channel.
To define SPIDs and the local directory number (LDN) for both ISDN BRI B channels, use the following isdn spid commands in interface configuration mode:
|
Note Although the LDN is an optional parameter, you might need to enter it so that the MRP or ASI can answer calls made to the second directory number. |
For further information on configuring ISDN, refer to the "Configuring ISDN BRI" chapter in the
Cisco IOS Dial Technologies Configuration Guide .
The 1-port T1 WIC (WIC-1T) and fractional T1 WIC (WIC-1DSU-T1) include an integrated data service unit /channel service unit (DSU/CSU) and can be configured either for full T1 service (1.544 Mbps) or for fractional T1 service (less than 1.544 Mbps). You can configure the interfaces on your T1 WICs by entering IOS commands at the ASI or MRP command prompt, in configuration mode.
The IOS software provides a default configuration for CSU/DSU- and T1-specific parameters. To view the current configuration, enter the show service-module serial slot/port command.
|
Note See the "Configuring T1 and Fractional T1 WICs" section to see the default configuration and a sample configuration to configure a new T1 or fractional T1 interface or to change the configuration of an existing interface. |
For further information about these commands, refer to the "Configuring Serial Interfaces for CSU/DSU Service Modules" section in the "Configuring Serial Interfaces" chapter in the Cisco IOS Interface Configuration Guide .
You can configure the multiflex trunk (MFT) interface card as a WIC (for data-only transmission). In the WIC mode, an MRP treats the T1 or E1 as a single serial interface for data. You can specify the number of channels (up to 24 [T1] or up to 30 [E1]) for this connection. On a data T1 or E1, you can configure only one channelized group. The rest of the channels are not used.
In a data-only configuration, an MRP supports the following T1 or E1 configurations:
This section describes basic configuration, including enabling the interface and specifying IP routing. Depending on your own requirements and on the protocols you plan to route, you might need to enter other configuration commands as well.
|
Note See the "Configuring VWIC Interfaces for Data" section for a sample configuration to configure a new T1 or E1 VWIC interface or to change the configuration of an existing interface. |
Digital T1 and E1 interfaces require not only that you set timing, but also that you consider the source of the timers. You must configure the time-division multiplexing (TDM) clock to specify the clock source. You can specify up to two external clock sources for each MRP. This means that only two of the T1 or E1 ports can use line as the clock source. The clock source is selected via the tdm clock global configuration command.
For TDM clocking scenarios and topologies, see the "TDM Clocking Scenarios" section, which describes the basic timing scenarios that can occur when a digital T1 or E1 interface is connected to a PBX, to a central office (CO), or to both.
This section contains information on VoIP. VoIP is a Layer 3 network protocol that uses various Layer 2 point-to-point or link-layer protocols such as PPP, Frame Relay, or Asynchronous Transfer Mode (ATM) for its transport. VoIP enables Cisco routers, access servers, and multiservice access concentrators to carry and send voice and fax traffic over an IP network. DSPs segment the voice signal into frames and store them in voice packets. These voice packets are transported via IP in compliance with a voice communications protocol or standard such as H.323, MGCP, or SIP.
This section contains the following subsections:
|
Note See the "Sample H.323 Call Routing Configurations" section for sample configurations, |
Table 6-16 lists tasks that you might need to perform in order to configure VoIP on your MRP or ASI cards and gives pointers to the locations in the Cisco IOS Voice, Video, and Fax Configuration Guide, Release 12.2, that provide instructions on performing those tasks. The Cisco IOS Voice, Video, and Fax Configuration Guide, Release 12.2, is available at the following URL:
http://www.cisco.com/univercd/cc/td/doc/product/software/ios122/122cgcr/fvvfax_c/index.htm
| Tasks | Documentation Locations |
|---|---|
See "Voice Port Configuration Overview " in the Cisco IOS Voice, Video, and Fax Configuration Guide, Release 12.2. |
|
See "Configuring Basic Parameters on Analog FXO, FXS, or E&M Voice Ports" in the Cisco IOS Voice, Video, and Fax Configuration Guide, Release 12.2. |
|
See "Configuring Digital Voice Ports " in the Cisco IOS Voice, Video, and Fax Configuration Guide, Release 12.2. |
|
See "Configuring ISDN Interfaces for Voice " in the Cisco IOS Voice, Video, and Fax Configuration Guide, Release 12.2. |
|
See "Dial Plan Overview " in the Cisco IOS Voice, Video, and Fax Configuration Guide, Release 12.2. |
|
See "Configuring Voice over Frame Relay " in the Cisco IOS Voice, Video, and Fax Configuration Guide, Release 12.2. |
|
See "Configuring Quality of Service for Voice " in the Cisco IOS Voice, Video, and Fax Configuration Guide, Release 12.2. |
MRP and ASI cards can provide analog and digital voice ports for implementations of VoIP. Voice ports emulate physical telephony switch connections so that voice calls and their associated signaling can be transferred intact between a packet network and a circuit-switched network or device.
For a voice call to occur, certain information must be passed between the telephony devices at either end of the call, such as the devices' on-hook status, the line's availability, and whether an incoming call is trying to reach a device. This information is referred to as signaling, and to process it properly, the devices at both ends of the call segment (that is, those directly connected to each other) must use the same type of signaling.
The type of signaling associated with the analog voice ports on MRP or ASI cards depends on the VIC installed in the device.
You can install either a VIC or a VWIC in an MRP or an ASI to make voice-related calls through the network. A VIC connects the system directly to a regular analog phone, a fax, or a PBX. A VWIC enables 24 channels on a T1 or 30 channels on an E1 (where each channel represents a simultaneous incoming or outgoing call). A VWIC also provides the flexibility to combine channels to form channel groups.
Each VIC is specific to a particular signaling type; therefore, VICs determine the type of signaling for the voice ports. Voice-port commands define the characteristics associated with a particular voice-port signaling type.
The voice ports support the following voice signaling types:
VICs provide the connection to the telephone equipment or network, as follows:
Interfaces on FXS VICs are color-coded gray. Use a standard RJ11 modular telephone cable to connect this interface to a telephone or fax machine.
 |
Caution Do not connect an FXS interface directly to the PSTN. |
Interfaces on FXO VICs are color-coded pink. The following types of FXO interfaces are available:
In countries where the PSTN does not use RJ11 wall outlets, use a suitable adapter to convert the plug on an RJ11 modular cable to the connector used by the local wall outlet. These adapters are not sold by Cisco Systems, but they are available from other vendors, such as TeleAdapt. You can obtain additional information from TeleAdapt at http://www.teleadapt.com .
|
Caution Connect only an FXO interface approved for use in your country to the PSTN. Otherwise, connect the FXO interface only to a PBX. Connections from the PBX to the PSTN are permitted. |
Interfaces on E&M VICs are color-coded brown. The E&M voice interface card uses an RJ48S connector. The pinout depends on the PBX type and connection.
|
Caution Do not connect an E&M interface directly to the PSTN. |
|
Note If your MRP is configured with two VICs, a total of four telephones and fax machines can be connected to it. As the MRP has only two slots, you need to replace one VIC with a WIC to provide an interface for IP connectivity to the WAN and for data traffic. To accommodate more than four voice devices, you need to add an ASI, add MRPs, or use an E&M VIC and a local PBX, rather than connecting every telephone to its own FXS VIC. |
Use a dial plan to map the destination telephone numbers with the voice ports on the MRP. In North America, the North American Numbering Plan (NANP) is used, which consists of an area code, an office code, and a station code. Area codes are assigned geographically; office codes are assigned to specific switches; and station codes identify a specific port on that switch. The format in North America is 1Nxx-Nxx-xxxx, with N = digits 2 through 9, and x = digits 0 through 9. Internationally, each country is assigned a one- to three-digit country code; the country's dialing plan follows the country code.
In most corporate environments, the telephone network is configured so that users can reach a destination by dialing only a portion (an extension number) of the full E.164 telephone number. VoIP can be configured to recognize extension numbers and expand them into their full E.164 dialed numbers by using two commands in tandem: destination-pattern and num-exp. Before you configure these two commands, it is useful to map individual telephone extensions with their full E.164 dialed numbers. This can be done easily by creating a number expansion table.
For Cisco voice implementations, two types of dial peers are used to match a dialed number to either a local telephony port or a remote IP address:
|
Note See the "Configuring Dial Plans" section for sample configurations. |
Use the dial-peer voice command to define dial peers and to change to dial-peer configuration mode. See the "Configuring Analog Voice Ports" section for additional information.
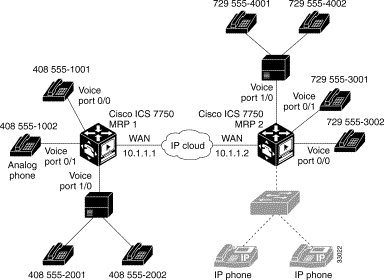
In Figure 6-1, a small company decides to use VoIP to integrate its telephony network with its existing IP network. The destination pattern (or expanded telephone number) associated with MRP 1 (at the left of the IP cloud) is (408) 555-xxxx, where xxxx identifies the individual dial peers by extension. The destination pattern (or expanded telephone number) associated with MRP 2 (at the right of the IP cloud) is (729) 555-xxxx.
Table 6-17 shows the number expansion table for this scenario.
|
Note You can use a period (.) to represent variables (such as extension numbers) in a telephone number. A period is similar to a wildcard, which matches any entered digit. |
The configuration shown in Table 6-17 needs to be made to both MRP 1 and MRP 2. Based on this configuration, MRP 1 can call any number string that begins with the digits 17295553 or 17295554 to connect to MRP 2. Similarly, MRP 2 can call any number string that begins with the digits 14085551 and 14085552 to connect to MRP 1.
|
Note See the "Configuring Number Expansion" section for a sample configuration that expands an extension number into a particular destination pattern. |
This section contains the following subsections:
This section explains how to configure ports on FXS VICs that connect directly to a standard telephone, fax machine, or similar device.
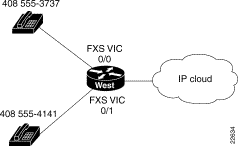
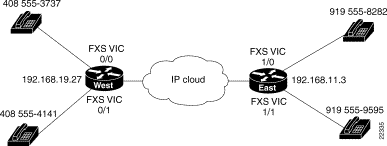
Figure 6-2 shows a basic voice network. A small business uses a MRP card (named West) to provide telephone and fax connections among employees in its office. Two of these telephones are connected to an FXS VIC port in the West MRP.
|
Note You can name your MRP by using the global configuration hostname command. |
Table 6-18 lists telephone numbers and voice ports for the West MRP.
|
Note If your MRP is configured with two VICs, a total of four telephones and fax machines can be connected to it. As the MRP has only two slots, you need to replace one VIC with a WIC to provide an interface for IP connectivity to the WAN and for data traffic. To accommodate more than four voice devices, you need to add an ASI, add MRPs, or use an E&M VIC and a local PBX, rather than connecting every telephone to its own FXS VIC. |
To route a received voice call to the proper destination, the MRP needs to have access to the telephone number that belongs to each voice port. For instance, if a call comes in for 408 555-3737, the MRP needs to correlate that phone number with a particular voice port (voice port 0/0, as shown in Figure 6-2.) In other words, the MRP needs to have access to the information in Table 6-18.
To hold this information, IOS software uses objects called dial peers. A telephone number, a voice port, and other call parameters are tied together by associating them all with the same dial peer. Configuring dial peers is similar to configuring static IP routes—you are telling the MRP what path to follow to route the call. All voice technologies use dial peers to define the characteristics associated with a call leg. A call leg is a segment of a call path; for example, segments occur between a telephone and an MRP, an MRP and a network, an MRP and a PBX, or an MRP and the PSTN. Each call leg corresponds to a dial peer.
Dial peers are identified by numbers, but they are usually referred to as tags to avoid confusion with telephone numbers. Dial-peer tags are arbitrary integers that can range from 1 to 231-1(2147483647). Within the allowed range, you can choose any dial-peer tag that is convenient or that makes sense to you. Dial peers on the same MRP must have unique tags, but you can reuse the tags on other MRPs.
Table 6-19 assigns a dial-peer tag to each telephone number and its associated voice port on the West MRP. This type of dial peer is called a POTS dial peer or a local dial peer. The term POTS (plain old telephone service) means that the dial peer associates a physical voice port with a local telephone device. (VoIP dial peers are explained in "Calling Between MRPs" section.)
You should construct a table similar to Table 6-19 for your own MRPs, assigning your own telephone numbers and dial-peer tags.
|
Note The telephone numbers used in this guide are only examples and are invalid for public use in the United States. When you configure your network, be sure to substitute your own telephone numbers. |
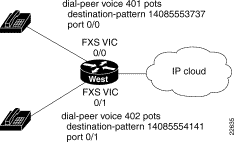
Figure 6-3 shows a configuration that uses dial-peer commands.
The dial-peer command always takes the argument voice. The number following it is the dial-peer tag, and pots is the type of dial peer.
IOS software refers to a telephone number as a destination pattern because it is the destination for an incoming or outgoing call. Enter these numbers with the destination-pattern command. A destination pattern can include asterisks (*) and pound signs (#) from the telephone keypad, as well as commas (,) and periods (.), which have special meanings. Parentheses ( () ), hyphens (-), slashes (/), and spaces ( ), which are often used to make telephone numbers easier for humans to read, are not allowed.
Notice that the commands in the examples put the prefix 1 (used in the United States to indicate a long-distance number) and an area code in front of the remaining numbers to complete the destination pattern. You need to include similar codes for your country if the VoIP equipment needs to establish a connection to the PSTN.
|
Note The IOS software does not check the validity of the telephone number. It accepts any string of permitted characters as a valid number. |
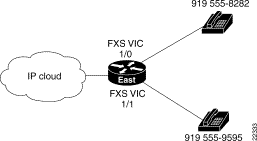
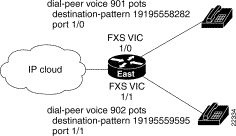
The business that owns the West MRP also has a branch office in the East. Figure 6-4 shows the East office network, and Table 6-20 lists the phone numbers, voice ports, and dial-peer tags for this office.
|
Note To configure the local ports on the East MRP, enter identical commands to those used in the previous example, substituting the dial-peer information in Table 6-20. See the "Configuring FXS Interfaces" section for a sample configuration. |
Figure 6-5 shows a configuration that uses dial-peer commands.
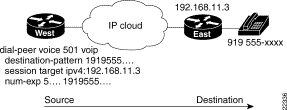
To enable the West and East offices to send voice traffic to each other over the same IP network that they use for data traffic, use a WIC on each MRP to provide a connection to the IP network, as shown in Figure 6-6.
Look at the connection between the West MRP and the IP network. This connection does not include a voice port or an attached telephone—it leads from a WAN interface to a remote destination somewhere on the IP network. IP MRPs can locate IP addresses on the network, but they cannot locate telephone numbers. To route an outgoing voice call over this connection, the West MRP has to associate a telephone number in the East office with the IP address of the East MRP.
Table 6-21 assigns a dial-peer tag to each telephone number and its associated IP address on the West MRP. This type of dial peer is called a remote dial peer or VoIP dial peer. (Remember, the dial-peer tags are arbitrary.) The term VoIP means that the dial peer associates a telephone number with an IP address.
| Remote Location | Telephone Number | Destination Pattern | IP Address | Dial-Peer Tag |
|---|---|---|---|---|
Create a VoIP dial peer on the West MRP for every telephone on the East MRP, all associated with the same IP address. But it is much easier to use periods as wildcards, as shown in Table 6-22.
| Remote Location | Telephone Number | Destination Pattern | IP Address | Dial-Peer Tag |
|---|---|---|---|---|
Construct a table similar to Table 6-22 for your own MRPs, assigning your own telephone numbers, IP addresses, and dial-peer tags.
|
Note The IP addresses shown in this guide are meant only as examples. When you configure your network, be sure to substitute your own IP addresses. |
IOS software describes the remote network as the session target. This command is followed by the IP address of the remote MRP. The prefix ipv4 means IP version 4. Alternatively, you can use the prefix dns followed by the Domain Name System (DNS) name as follows:
|
Note See the "Configuring FXS Interfaces" section for a sample configuration. |
|
Note Configure a dial peer on each MRP for each telephone number on every other MRP connected to it. |
To reduce the amount of data that you must enter, configure number expansion for East MRP telephone numbers on the West MRP. For details on the num-exp command, see "Configuring VoIP for Frame Relay" section.
Now users can dial a five-digit extension beginning with 5 from a telephone on the West MRP to reach a telephone on the East MRP.
Figure 6-7 shows a configuration that uses dial-peer commands.
The West MRP is now configured to send calls to the East MRP.
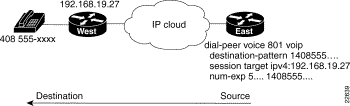
Table 6-23 shows how to configure the East MRP to send calls to the West MRP.
| Remote Location | Telephone Number | IP Address | Dial-Peer Tag |
|---|---|---|---|
|
Note See the "Configuring FXS Interfaces" section for a sample configuration of number expansion on the East MRP using the dial-peer configuration given in Table 6-23. |
Figure 6-8 shows a configuration that uses dial-peer commands.
If the path between endpoints of a voice call runs through intermediate MRPs, configure those MRPs for VoIP traffic, as described in the "Configuring FXS Interfaces" section.
You need to configure POTS or VoIP dial peers on an intermediate MRP only if that MRP also has voice devices attached to it.
The Direct Inward Dialing (DID) feature in dial peers enables the router to use the dialed number identification service (DNIS) to directly match an outbound dial peer when receiving an inbound call from a POTS interface. When DID is configured on the inbound POTS dial peer, the called number (DNIS) is automatically used to match the destination pattern for the outbound call leg.
Unless otherwise configured, when a voice call comes into the router, the router presents a dial tone to the caller and collects digits until it can identify an outbound dial peer. This process is called two-stage dialing. After the outbound dial peer is identified, the router forwards the call through to the destination as configured in the dial peer.
You may prefer that the router use the called number (DNIS) to find a dial peer for the outbound call leg—for example, if the switch connecting the call to the router has already collected all the dialed digits. DID enables the router to match the called number to a dial peer and then directly place the outbound call. With DID, the router does not present a dial tone to the caller and does not collect digits; it forwards the call directly to the configured destination. This is called one-stage dialing.
Figure 6-9 shows a call topology that uses DID.
In Figure 6-9, the POTS dial peer that matches the incoming called-number has DID configured:
The direct-inward-dial command in the POTS dial peer tells the gateway to look for a destination pattern in a dial peer that matches the DNIS. For example, if the dialed number is 5552020, the gateway matches the following VoIP dial peer for the outbound call leg:
The call is made across the IP network to 10.1.1.2, and a match is found in that terminating gateway:
This dial peer matches on the dialed number and changes that number to 52744200 with the prefix command. The result is that the user dials a number, connects, and never knows that the number reached is different from the number dialed.
|
Note DID for POTS dial peers is not the same as analog DID for Cisco routers, which enables DID trunk service from the PSTN. |
|
Note See the "Configuring ISDN Voice Interfaces" section for a sample configuration of a POTS dial peer for DID. |
|
Note DID is configured for inbound POTS dial peers only. |
FXO interfaces provide a way for a VoIP call to reach the analog PSTN or a PBX that does not support E&M signaling. In this way, FXO interfaces enable users to reach telephones and fax machines outside the VoIP network. Figure 6-10 shows a typical FXO gateway attached to the West MRP.
To create a POTS dial peer for an FXS interface as explained earlier, you enter the complete telephone number of the attached telephone as the destination pattern for incoming calls. However, to create a POTS dial peer for an FXO interface, the destination pattern refers to outgoing calls, and you can include wildcards in it because the PSTN performs the switching.
The VoIP feature can also remove digits that you do not want to send to the PSTN. For instance, to dial 9 to reach an outside line (that is, the analog PSTN), you would configure a destination-pattern for 9.
|
Note See the "Configuring FXO Interfaces" section for a sample configuration. |
When you dial 9, the MRP makes a connection to the PSTN through voice port 0/0. The PSTN then provides a dial tone, and any digits you enter on the telephone thereafter are interpreted on the PSTN.
|
Note See the "Configuring FXO Interfaces" section for a sample configuration to enable East MRP users to make calls over the West MRP local PSTN. |
In this example, when you dial 7 on the East MRP, the call is connected to the PSTN on the West MRP. The PSTN then provides a dial tone, and any digits you enter on the telephone thereafter are interpreted on the PSTN.
|
Note In this example, West MRP voice port 0/0 has two separate POTS dial peers associated with it. Dial peer 201 matches calls beginning with the digit 9 and handles PSTN calls originating from the West MRP. Dial peer 601 matches calls beginning with the digit 7 and handles calls to the PSTN originating from the East MRP. |
If you have more than a few voice users at each location, the cost of voice ports and MRPs and the effort needed to configure dial peers for all the combinations of origins and destinations increases rapidly. In this situation, it might be more efficient to use a PBX at each location to switch local traffic and direct incoming calls and to then use E&M VICs to connect the PBXs over an IP network.
|
Note E&M interfaces are supported with H.323 only. |
Figure 6-11 shows a company with two offices, West and East. Each office has a PBX to operate its internal telephone network, and the IP network carries voice traffic between the offices. Each PBX connects to an E&M VIC port in the MRP.
To configure E&M voice ports, you need to use the following privileged EXEC commands:
Both PBXs in Figure 6-11 use E&M interface Type 2, with four-wire operation and immediate-start signaling. The values for your configuration depend on your PBX and are available from your telecommunications department or the PBX manufacturer. For more information about E&M interface configuration commands, refer to the "Configuring Voice over IP" chapter in the Software Configuration Guide for Cisco 3600 Series and Cisco 2600 Series Routers.
In this example, West users can dial 5 and then a 4-digit extension to reach telephones in the East office. East users can dial 5 and then a 4-digit extension to reach telephones in the West office.
The West MRP connects to the PBX through an E&M VIC port 0/0. This port is associated with a POTS dial peer for incoming calls. But you no longer need to associate every telephone number with its own port. Instead, you can configure a local dial peer as if all the West telephones (represented by a wildcard destination pattern) are connected directly to this port.
|
Note See the "Configuring E&M Interfaces" section for a sample configuration. |
|
Note Configuration commands for E&M interfaces are identical to those used for FXS interfaces. |
|
Note To configure VoIP dial peers for outgoing calls and to associate destination phone numbers on the East MRP with that MRP IP address, as shown in Figure 6-12, see the "Configuring E&M Interfaces" section for a sample configuration. |
Now configure number expansion so that numbers beginning with 5 (belonging to the East office) and sent by the West PBX to the West MRP are expanded into the full destination pattern:
|
Note See the "Configuring FXS Interfaces" section for a sample configuration. |
|
Note You do not need to configure number expansion for calls from one West telephone to another West telephone because the PBX switches those calls. |
Configure the E&M port on the West MRP.
|
Note See the "Configuring E&M Interfaces" section for a sample configuration to configure the E&M port on the West MRP and on the East MRP. |
Configure the East MRP similar to the West MRP. The East MRP connects to the PBX through an E&M VIC port 0/1.
Configure number expansion to make it easy for East users to dial numbers on the West MRP:
|
Note See the "Configuring FXS Interfaces" section for a sample configuration to configure a POTS dial peer for all East telephones, and number expansion and a VoIP dial peer for telephones on the West MRP. |
VWICs support T1 or E1 applications, including fractional T1 or E1. The T1 version integrates a fully managed DSU/CSU. The E1 version includes a fully managed DSU.
The T1 or E1 lines that connect a telephony network to the digital voice ports on a router or MRP contain channels for voice calls. A T1 line contains 24 full-duplex channels or time slots, and an E1 line contains 30. The signal on each channel is transmitted at 64 kbps, a standard known as digital signal 0 (DS0); the channels are known as DS0 channels. For T1 lines, the ds0-group command creates a logical voice port (a DS0 group) from some or all of the DS0 channels, which enables you to address those channels easily, as a group, in voice-port configuration commands. (The ds0-group command is not supported on E1 lines.)
Digital voice ports are found at the intersection of a packet voice network and a digital, circuit-switched telephone network. The digital voice port interfaces that connect the router or MRP to T1 or E1 lines pass voice data and signaling between the packet network and the circuit-switched network.
Signaling is the exchange of information about calls and connections between two ends of a communication path. For instance, signaling communicates to the call's endpoints whether a line is idle or busy, whether a device is on-hook or off-hook, and whether a connection is being attempted. An endpoint can be a CO switch, a PBX, a telephony device such as a telephone or fax machine, or a voice-equipped router or MRP acting as a gateway. There are two aspects to consider with respect to signaling on digital lines: the information about line and device states that is transmitted, and the method used to transmit the information.
The information about line and device states is communicated over digital lines, using signaling methods that emulate the methods used in analog circuit-switched networks: FXS, FXO, and E&M.
Channel-associated signaling (CAS) is the transmission of signaling information within the voice channel. Various types of CAS signaling are available in the T1 world. The most common forms of CAS signaling are loop-start, ground-start, and E&M. The main disadvantage of CAS signaling is its use of user bandwidth to perform signaling functions. CAS signaling is often referred to as robbed-bit signaling because user bandwidth is being "robbed" by the network for other purposes. In addition to receiving and placing calls, CAS signaling processes the receipt of DNIS and ANI information, which is used to support authentication and other functions.
VoIP for the Cisco ICS 7750 supports the following T1 CAS signaling systems:
In the original wink start handshaking protocol, the terminating side responds to an off-hook from the originating side with a short wink (transition from on-hook to off-hook and back again). This wink tells the originating side that the terminating side is ready to receive addressing digits. After receiving addressing digits, the terminating side then goes off-hook for the duration of the call. The originating endpoint remains off-hook for the duration of the call.
In the Immediate Start protocol, the originating side does not wait for a wink before sending addressing information. After receiving addressing digits, the terminating side goes off-hook for the duration of the call. The originating endpoint remains off-hook for the duration of the call.
Ground Start / FXS / FXO—Ground Start signaling helps resolve glare, a condition that occurs when two sides of a connection try to go off-hook at the same time. Two sides of the connection simultaneously going off-hook creates a problem with loop start signaling because the only way an incoming call from the network can be recognized by the customer premises equipment (CPE) using loop start is to ring the phone. The 6-second ring cycle leaves a substantial amount of time for glare to occur. Ground Start signaling eliminates this problem and indicates an immediate seizure from the network to the CPE. This indication tells the CPE that a particular channel has an incoming call on it.
Internet service providers can provide switched 56-kbps access to their customers using the Cisco ICS 7750. The subset of T1 CAS (robbed-bit) supported signaling commands are as follows:
Digital T1 or E1 packet voice capability requires specific service, software, and hardware:
Gather the following information about the telephony network connection that the voice port will be making:
This section tells how to configure ISDN BRI and Primary Rate Interface (PRI) ports for voice support and contains the following sections:
For complete descriptions of the commands used to configure ISDN interfaces for voice, refer to the Cisco IOS Dial Technologies Command Reference and the Cisco IOS Voice, Video, and Fax Command Reference .
ISDN voice support makes it possible to
Cisco routing devices support both ISDN BRI and ISDN PRI. Both media types use bearer (B) channels and data (D) channels.
ISDN BRI provides two B channels, each capable of transferring voice or data at 64 kbps, and one 16-kbps D channel that carries signaling traffic. The D channel is used by the telephone network to carry instructions about how to handle each of the B channels. ISDN BRI (also referred to as 2 B + D) provides a maximum transmission speed of 128 kbps.
The ISDN BRI NT/TE voice interface card (VIC-2BRI-NT/TE) enables Cisco IOS software to replicate the PSTN interface to a PBX that is compatible with European Telecommunications Standards Institute (ETSI) NET3 and QSIG switch types.
|
Note For more information about QSIG, refer to the "Configuring ISDN Interfaces for Voice" chapter in the Cisco IOS Voice, Video, and Fax Software Configuration Guide. |
Customers with PBXs that implement only the BRI TE interface have had to make substantial hardware and software changes on the PBX in order to implement the NT interface. Implementation of an NT interface on MRP and ASI cards enables the customer to connect ISDN PBXs and key systems to a multiservice network with a minimum of configuration changes on the PBX. Use of an NT interface also allows bypassing of the PSTN by enterprise customers who have a large installed base of legacy telephony equipment.
ISDN PRI provides 23 B channels plus a D channel (in North America and Japan) or 30 B channels plus a D channel (in the rest of the world). Similar to the ISDN BRI D channel, the ISDN PRI D channel carries signaling traffic. ISDN PRI is often referred to as 23 B + D (in North America and Japan) or 30 B + D (in the rest of the world).
The D channel notifies the central office switch to send the incoming call to particular time slots on the Cisco access server or router. Each B channel carries data or voice. The D channel carries signaling for the B channels. The D channel identifies whether the call is a circuit-switched digital call or an analog modem call. Analog modem calls are decoded and then sent to the onboard modems. Circuit-switched digital calls are relayed directly to the ISDN processor in the router.
Before configuring an MRP or ASI with an ISDN interface, you must do the following:
|
Note See the "Configuring ISDN Voice Interfaces" section for sample configurations to configure DID for ISDN, ISDN BRI VICs, and ISDN PRI interfaces. |
Table 6-24 shows ISDN switch types. An ISDN switch type must be specified in your configuration.
| ISDN Switch Type | Description |
|---|---|
NET3 (TBR3) ISDN, Norway NET3, and New Zealand NET3 switches. (This switch type covers the Euro-ISDN E-DSS1 signaling system and is ETSI-compliant.) |
|
With ISDN PRI, signaling in VoIP is handled by ISDN PRI group configuration. After ISDN PRI has been configured, you must enter the isdn incoming-voice command on the serial interface (acting as the D channel) to ensure a dial tone.
|
Note See the "Configuring ISDN Voice Interfaces" section for sample configurations to configure DID for ISDN, ISDN BRI VICs and ISDN PRI Interfaces. |
Under most circumstances, the default voice port command values are adequate for configuring voice ports to transport voice data over your existing IP network. However, because of the inherent complexities of PBX networks, you might need to configure specific voice port values, depending on the specifications of the devices in your telephony network.
To configure specific voice port parameters, see the "Configuring Voice Ports" chapter in the Cisco IOS Voice, Video, and Fax Configuration Guide .
For more information on specific voice-port configuration commands and additional voice port commands, refer to the Cisco IOS Voice, Video, and Fax Command Reference.
You can check the validity of your voice port configuration by performing the following tasks:
If you are having trouble connecting a call and you suspect that the problem is associated with voice port configuration, you can try to resolve the problem by performing the following tasks:
You need to consider certain factors when you configure VoIP so that it runs smoothly over Frame Relay. A public Frame Relay cloud provides no guarantees for quality of service (QoS). For real-time traffic to be transmitted in a timely manner, the data rate must not exceed the committed information rate (CIR), or packets might be dropped. In addition, Frame Relay traffic shaping and Resource Reservation Protocol (RSVP) are mutually exclusive. This is particularly important to remember if multiple data-link connection identifiers (DLCIs) are carried on a single interface.
For Frame Relay links with slow output rates (less than or equal to 64 kbps), where data and voice are being transmitted over the same permanent virtual circuit (PVC), we recommend the following solutions:
|
Note When traffic bursts over the CIR, the output rate is held at the speed configured for the CIR (for example, traffic will not exceed a rate of 32 kbps if CIR is set to 32 kbps). |
In IOS Release 12.0, Frame Relay traffic shaping is not compatible with RSVP. We suggest one of the following workarounds:
For Frame Relay, it is customary to configure a main interface and several subinterfaces with one subinterface per PVC.
|
Note See the "Configuring VoIP for Frame Relay" section for sample configurations. |
For more information about configuring Frame Relay for VoIP, refer to the "Configuring Frame Relay" chapter in the Cisco IOS Wide-Area Networking Configuration Guide.
You need to have a well-engineered, end-to-end network for running delay-sensitive applications such as VoIP. Voice traffic is much more sensitive to timing variations than data traffic. For good voice performance, you need to configure the data network so that voice packets are not lost or delayed. Fine-tuning the network to adequately support VoIP involves selecting a series of protocols and features to improve QoS. It is beyond the scope of this document to explain the specific details relating to wide-scale QoS deployment. Cisco IOS software provides many tools for enabling QoS on the backbone, such as random early detection (RED), weighted random early detection (WRED), Fancy Queuing (that is, custom, priority, or weighted fair queuing), and IP precedence. To configure your IP network for real-time voice traffic, you must take into consideration the entire scope of your network and then select the appropriate QoS tool or tools.
|
Note QoS measures the level of network performance. It does not directly measure the quality of the voice signal. |
The important thing to remember is that QoS must be configured throughout your network—not just on the MRP running VoIP—in order to improve voice network performance.
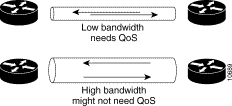
On a relatively low-bandwidth connection, such as a PPP or HDLC serial link, you should consider using methods to ensure QoS. If you have a high-bandwidth network, such as Ethernet or Fast Ethernet, and voice and data traffic together occupy only a small fraction of the available bandwidth, then you might not need to provide QoS. (See Figure 6-13.)
Although not mandatory, some QoS tools can be valuable in fine-tuning a network to support real-time voice traffic. To configure an IP network for QoS, perform one or more of the tasks in the following sections:
Some QoS features, such as IP RTP reserve and custom queuing, are based on the transport protocol and the associated port number. Real-time voice traffic is carried on UDP ports ranging from 16384 to 16624. This number is derived from the following formula:
Custom queuing and other methods for identifying high-priority streams should be configured for these port ranges. For more information about custom queuing, refer to the "Configuring Custom Queuing" chapter in the Cisco IOS Quality of Service Solutions Configuration Guide.
Weighted fair queuing ensures that queues are not starved for bandwidth and that traffic gets predictable service. Low-volume traffic streams receive preferential service; high-volume traffic streams share the remaining capacity, obtaining equal or proportional bandwidth.
In general, weighted fair queuing is used in conjunction with multilink PPP with interleaving and RSVP or IP precedence to ensure voice packet delivery. Use weighted fair queuing with multilink PPP to define how data is managed; use RSVP or IP precedence to give priority to voice packets. For more information about weighted fair queuing, refer to the "Configuring Weighted Fair Queuing" chapter in the
Cisco IOS Quality of Service Solutions Configuration Guide .
Use the ip precedence command to give voice packets a higher priority over other IP data traffic. Every IP packet is given a precedence level. In IP precedence, the numbers 1 through 5 identify classes for IP flows; the numbers 6 and 7 are used for network and backbone routing and updates. You can configure voice packets for higher priority by setting the IP precedence value to 5. Internal MRPs using weighted fair queuing give these packets priority. This command applies only to VoIP dial peers.
The ip precedence command should also be used if RSVP is not enabled and you want to give voice packets a higher priority over other IP data traffic.
|
Note See the "Configuring IP Precedence" section for a sample configuration of IP precedence. |
The ip precedence command should also be used if RSVP is not enabled and you want to give voice packets a higher priority over other IP data traffic.
RSVP enables MRPs to reserve enough bandwidth on an interface for reliability and quality performance. RSVP allows end systems to request a particular QoS from the network. Real-time voice traffic requires network consistency. Without consistent QoS, real-time traffic can experience jitter, insufficient bandwidth, delay variations, or information loss. RSVP works in conjunction with current queuing mechanisms. It is up to the interface queuing mechanism (such as weighted fair queuing or WRED) to implement the reservation.
RSVP works well on PPP, HDLC, and similar serial line interfaces. It does not work well on multi access LANs. RSVP can be equated to a dynamic access list for packet flows.
You should configure RSVP to ensure QoS if the following are characteristics of your network:
To minimally configure RSVP for voice traffic, you must enable RSVP on each interface where priority must be set.
By default, RSVP is disabled so that it is backward compatible with systems that do not implement RSVP. To enable RSVP for IP on an interface, use the following interface configuration command:
This command starts RSVP and sets the bandwidth and single-flow limits. The default maximum bandwidth is up to 75 percent of the bandwidth available on the interface. By default, the amount that can be reserved by a flow can be up to the entire available bandwidth.
On subinterfaces, RSVP applies to the more restrictive of the available bandwidths of the physical interface and the subinterface.
Reservations on individual circuits that do not exceed the single flow limit normally succeed. However, if reservations are made on other circuits adding up to the line speed, and if a reservation is made on a subinterface that has enough remaining bandwidth, then the reservation will still be refused because the physical interface lacks supporting bandwidth.
An MRP running VoIP and configured for RSVP requests allocations on the basis of the following formula:
For G.729, the allocation works out to be 24,000 bps. For G.711, the allocation is 80,000 bps.
For more information about configuring RSVP, refer to the "Configuring RSVP" chapter in the
Cisco IOS Quality of Service Solutions Configuration Guide .
|
Note See the "Configuring RSVP" section for a sample configuration. |
Multiclass multilink PPP with interleaving allows large packets to be multilink-encapsulated and fragmented into smaller packets to satisfy the delay requirements of real-time voice traffic; small real-time packets, which are not multilink-encapsulated, are transmitted between fragments of the large packets. The interleaving feature also provides a special transmit queue for the smaller, delay-sensitive packets, enabling them to be transmitted earlier than other flows. Interleaving provides the delay bounds for delay-sensitive voice packets on a slow link that is used for other best-effort traffic.
In general, multilink PPP with interleaving is used in conjunction with weighted fair queuing and RSVP or IP precedence to ensure voice packet delivery. Use multilink PPP with interleaving and weighted fair queuing to define how data is managed; use RSVP or IP precedence to give priority to voice packets.
You should configure multilink PPP if the following are characteristic of your network:
Multilink PPP support for interleaving can be configured on virtual templates, dialer interfaces, and ISDN BRI or PRI interfaces. To configure interleaving, you need to complete the following tasks:
|
Note See the "Configuring Multilink PPP with Interleaving" section for sample configurations of multilink PPP and interleaving on a configured and operational interface or virtual interface template. |
For more information about multilink PPP, refer to the "Configuring Media-Independent PPP and Multilink PPP" chapter in the Cisco IOS Dial Technologies Configuration Guide.
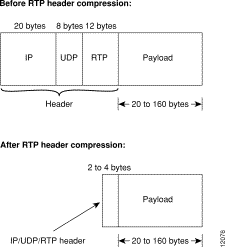
Real-Time Transport Protocol (RTP) is used for carrying audio traffic in packets over an IP network. RTP header compression compresses the IP/UDP/RTP header in a 40-byte RTP data packet to approximately 2 to 4 bytes (most of the time), as shown in Figure 6-14.
This compression feature is beneficial if you are running VoIP over slow links. Enabling compression on both ends of a low-bandwidth serial link can greatly reduce the network overhead if there is a lot of RTP traffic on that slow link.
Typically, an RTP packet has a payload of approximately 20 to 160 bytes for audio applications that use compressed payloads. RTP header compression is especially beneficial when the RTP payload size is small (for example, compressed audio payloads between 20 and 50 bytes).
You should configure RTP header compression if the following are characteristic of your network:
Perform the following tasks to configure RTP header compression for VoIP. The first task is required; the second task is optional.
You must enable compression on both ends of a serial connection. To enable RTP header compression, use the following interface configuration command:
If you include the passive keyword, the software compresses outgoing RTP packets only if incoming RTP packets on the same interface are compressed. If you use the command without the passive keyword, the software compresses all RTP traffic.
By default, the software supports a total of 16 RTP header compression connections on an interface. To specify a different number of RTP header compression connections, use the following interface configuration command:
|
Note See the "Configuring RTP Header Compression" section for sample configurations for enabling and configuring RTP header compression for a serial interface. |
For more information about RTP header compression, see the "Configuring IP Multicast Routing" chapter of the Cisco IOS Release 12.0 Network Protocols Configuration Guide, Part 1.
This section describes the timing scenarios that can occur when different combinations of WICs and VICs are used on the two slots of an MRP. All digital T1 interfaces are connected to a PBX, to a CO, or to both. In all the examples, the PSTN (or CO) and the PBX can both provide and receive clocking.
The MRP200 and MRP300 cards have two onboard phase locked loop (PLL) chips that can derive clock source from any T1 interface on the system. The clock source is selected by using the tdm clock global configuration command. Both PLL chips can either provide a clock source to both T1 interfaces or receive clocking that can drive the second T1 interface.
The T1 interface payload type can be defined as voice, as data, or as both. In the following scenarios, voice is the most commonly used payload type.
Configuration of TDM clocks affects the DSP groupings. (For information on DSP groups, see the "DSP Groups" section.) If only one clock source is used, the DSPs on both the PVDMs can be considered a single pool of DSP resources. If two clock sources are used, each PVDM constitutes a separate pool of DSP resources. If a port is used for an analog VIC, a single PVDM constitutes the DSP resource. Therefore, depending on whether one or two clock sources are defined, the bindings between the DSP resources and the set of ports that they can service can vary.
An MRP supports the following T1 configurations:
Table 6-25 describes the timing topologies that can result when slot 0 is a T1 interface and slot 1 is empty.
|
Note See the "T1 in Slot 0" section for sample configurations and explanations of the various topologies described in Table 6-25. |
Table 6-26 describes the timing topologies that can result when both slot 0 and slot 1 are T1 interfaces.
|
Note See the "T1 in Both Slot 0 and Slot 1" section for sample configurations and explanations of the various topologies described in Table 6-26. |
Table 6-27 describes the timing topologies that can result when slot 0 is a T1 interface and slot 1 is an analog VIC interface.
|
Note The MRP200 and MRP300 cards do not support the topology in which both T1 ports in slot 0 are receiving clocking from the line and in which a VIC is installed in slot 1. The VIC utilizes one clock source; the two T1 ports cannot receive two other clock sources because there is a limit of two clock sources in an MRP. |
|
Note See the "T1 in Slot 0 and an Analog VIC in Slot 1" section for sample configurations and explanations of the various topologies described in Table 6-27. |
Table 6-28 describes the timing topologies that can result when slot 0 is a T1 interface and slot 1 is a WIC interface.
|
Note T1 data should not be configured on port 1 of either slot when a WIC is present on the same MRP because the WIC takes the same data path as port 1 of the other slot. |
|
Note See the "T1 in Slot 0 and a WIC in Slot 1" section for sample configurations and explanations of the various topologies described in Table 6-28. |
The Cisco ICS 7750 MRP and ASI cards can be configured as H.323 or MGCP gateways.
H.323 is a standard from the International Telecommunication Union Telecommunication Standardization Sector (ITU-T) for sending voice, video, and data across a network. The H.323 specification includes several related standards, such as H.225 (call control), H.235 (security), H.245 (media path and parameter negotiation), and H.450 (supplementary services).
An H.323 gateway is an endpoint on the LAN that provides real-time communications between H.323 devices on the LAN and other ITU devices on a WAN or to other H.323 gateways. Gateways allow H.323 devices to communicate with non-H.323 devices by converting protocols. The gateway is the point at which a circuit-switched call is encoded and repackaged into IP packets. Because gateways function as H.323 endpoints, they provide admission control, address lookup and translation, and accounting services.
Gatekeepers are optional nodes that manage other nodes in an H.323 network. Gateways communicate with gatekeepers using the registration, admission, and status (RAS) protocol. The gatekeeper maintains resource computing information, which it uses to select the appropriate gateway during the admission of a call. In an environment in which both gatekeepers and gateways are used, only gateways are configured to send VoIP data.
Cisco software complies with the mandatory requirements and several of the optional features of the H.323 Version 2 specification. Cisco H.323 Version 2 software enables gatekeepers, gateways, and proxies to send and receive all the required fields in H.323 Version 2 messages. Cisco H.323 Version 2 features include the following:
H.323 is the most widely deployed VoIP call-control protocol because it has been in use the longest; no other protocol choices existed before H.323. H.323 specifies how multimedia traffic is carried over packet networks using existing standards—for example, Q.931—to accomplish its goals. Q.931 is an ITU standard that describes one type of ISDN signaling for Layer 3 (Network layer in the OSI reference model).
H.323, however, is not generally seen as a protocol that is robust enough for PSTN networks. For these networks, other protocols such as MGCP and SIP are preferable.
Additional information on the H.323 protocol is available in the Cisco IOS Voice, Video, and Fax Configuration Guide, Release 12.2 available at http://www.cisco.com/univercd/cc/td/doc/product/software/ios122/122cgcr/fvvfax_c/.
MGCP enables the remote control and management of voice and data communications devices at the edge of multiservice IP packet networks.
As a communication protocol, MGCP overcomes the distributed configuration and administration problems inherent in the use of protocols such as the H.323 standard. Using a centralized architecture, MGCP greatly simplifies the configuration and administration of voice gateways that operate in multiservice IP packet networks.
In addition, MGCP supports the presence of multiple (redundant) call agents in a Voice over IP (VoIP) network, thereby eliminating the potential for a single point of failure in controlling the MGCP gateways in the network.
In effect, MGCP functions as a master/slave protocol to ensure that the MGCP voice gateways in a VoIP network properly receive and execute the configuration, control, and management commands that are issued to the gateways by Cisco CallManager.
MGCP is an extension of the earlier version of the protocol Simple Gateway Control Protocol (SGCP). MGCP supports SGCP functionality and provides several enhancements. Systems using SGCP can easily migrate to MGCP, and MGCP commands are available to enable the SGCP capabilities.
An MGCP gateway handles the translation between audio signals and the packet network. The gateways interact with a call agent (CA), also called a Media Gateway Controller (MGC), that performs signal and call processing on gateway calls. In MGCP configurations on the Cisco ICS 7750, the Cisco ICS 7750 acts as the gateway, and the CA is a Cisco CallManager server (version 3.1.2c or above).
MGCP uses endpoints and connections to construct a call. Endpoints are sources of or destinations for data. Endpoints can be either physical or logical locations in a device. Connections can be point-to-point or multipoint.
Like SGCP, MGCP uses User Datagram Protocol (UDP) for establishing audio connections over IP networks. However, MGCP also uses hairpinning to return a call to the Public Switched Telephone Network (PSTN) when the IP network is not available.
Creating a call connection involves a series of signals and events that describe the connection process. This information might include such indicators as the off-hook status, a ringing signal, or a signal to play an announcement. These events and signals are specific to the type of endpoint involved in the call.
MGCP groups these events and signals into packages. A trunk package, for example, is a group of events and signals relevant to a trunking gateway, whereas an announcement package groups events and signals for an announcement server. MGCP supports seven package types, as follows:
The trunk package and line package are supported by default on certain types of gateways. Although configuring a gateway with additional endpoint package information is optional, you may want to specify the packages for your endpoints to add to or to override the defaults.
MGCP provides the following benefits:
MGCP on the Cisco ICS 7750 supports the following MGCP gateway types:
ISDN PRI backhaul provides a method for transporting complete IP telephony signaling information from an ISDN PRI interface of a multiservice route processor (MRP) or analog station interface (ASI) system card to Cisco CallManager through a highly reliable TCP connection.
This feature works by terminating all the ISDN PRI Layer 2 (Q.921) signaling functions in the Cisco IOS code on the MGCP voice gateway while, at the same time, packaging all the ISDN PRI Layer 3 (Q.931) signaling information into packets for transmission to the Cisco CallManager through an IP tunnel over a highly reliable TCP connection. This methodology ensures the integrity of the Q.931 signaling information being passed through the network for managing IP telephony devices.
A rich set of user-side and network-side ISDN PRI calling functions is supported by the ISDN PRI backhaul feature. The gateway uses a single TCP connection for backhauling all the ISDN D channels to Cisco CallManager. The "SAP/Channel ID" parameter in the header of each message identifies individual D channels. In addition to carrying the backhaul traffic, the inherent TCP keepalive mechanism is also used to determine MGCP voice gateway connectivity to an available call agent.
The MGCP voice gateway also establishes a TCP link to the backup (secondary) Cisco CallManager server. In the event of Cisco CallManager switchover, the ISDN PRI backhaul functions are assumed by the secondary Cisco CallManager server. During this switchover, all active ISDN PRI calls are preserved, and the affected MGCP gateway is registered with the new Cisco CallManager server through a Restart-in-Progress (RSIP) message to ensure continued gateway operation.
The multicast music-on-hold (MOH) feature enables you to subscribe to a music-streaming service when using an MRP or ASI system card as a Cisco IOS MGCP voice gateway. By means of a preconfigured multicast address on a gateway, the gateway can "listen for" Real-Time Transport Protocol (RTP) packets that are broadcast from a default router in the network; the gateway can relay the packets to designated voice interfaces in the network.
RTP is the Internet-standard protocol for transporting real-time data, including audio and video information, across a network. Thus, RTP is well suited for media on demand and for interactive services such as IP telephony.
The default router in the network for handling MOH functions must have the following enabled:
When you configure a multicast address on a voice interface of a gateway, the gateway sends an Internet Gateway Management Protocol (IGMP) "join" message to the default router, indicating to the default router that the gateway is to receive RTP multicast packets.
Thus, the MOH feature provides the functionality to stream music from an MOH server to the voice interfaces of on-net and off-net callers that have been placed on hold.
The integrated multicast capability of Cisco CallManager 3.1 is implemented through the H.323 signaling plane in Cisco CallManager.
In an MOH environment, whenever caller A places caller B on hold, Cisco CallManager requests the MOH server to stream RTP packets to the "on-hold" interface through the preconfigured multicast address. In this way, RTP packets can be relayed to appropriately configured voice interfaces in a VoIP network that have been placed on hold.
Multiple MOH servers can be present in the same network, but each server must have a different Class D IP address, and the address must be preconfigured in Cisco CallManager and the Cisco IOS MGCP voice gateways.
To configure MGCP on a Cisco ICS 7750 MRP or ASI, perform the tasks in the following sections.
|
Note Before configuring MGCP, you need to have previously run the ICSConfig initial configuration program on the Cisco ICS 7750, you need to have configured IP routing, and you need to have configured the voice ports on the MRP or ASI card. For information about ICSConfig, refer to the Cisco ICS 7750 Getting Started Guide. For information about configuring IP routing and voice ports on the MRP and ASI cards, refer to the Cisco ICS 7750 Software Configuration Guide . |
To configure a TGW, use the following commands, beginning in global configuration mode:
To configure an RGW, use the following commands, beginning in global configuration mode:
The Cisco ICS 7750 MRP and ASI cards have the capability of using MGCP with Cisco CallManager for administration and redundant call agent features. This capability requires additional configuration steps.
To configure a system card so that it can be controlled by Cisco CallManager using MGCP, use the following commands, beginning in global configuration mode:
To force the MRP to use the backup Cisco CallManager server, use the following command, beginning in privileged EXEC mode:
When using the Cisco ICS 7750 as a voice gateway in conjunction with MGCP and Cisco CallManager Version 3.1, you can complete the necessary configuration for a gateway on the Cisco CallManager server and download the configuration to that gateway through a TFTP server.
Before performing the steps in this section, you should complete the basic configuration of your MGCP voice gateway by using the initial configuration dialog and the command-line interface (CLI). Your gateway configuration, as well as that of other network devices, must provide connectivity between your target gateway and the TFTP server.
|
Note The IP host name should match the gateway name that is specified in the CallManager configuration. |
After the required basic configuration of your MGCP voice gateway is completed and the gateway is reset, the configuration file, formatted in XML, is downloaded automatically from the Cisco CallManager server to your local gateway through a TFTP server. On receipt, the local gateway parses this file, converts it to Cisco IOS CLI commands, and uses it to update its active configuration.
After the initial download is completed, the local gateway saves some of the configuration file. If the gateway is restarted or reset and the specified TFTP server is not available, the gateway keeps trying to download the file and does not alter the current configuration.
|
Note Downloading MGCP gateway configuration information does not override any existing local configuration information. For this reason, you should remove any existing MGCP settings before proceeding with the following steps. |
|
Note In this procedure, only "mgcp"- and "ccm-manager"-related configuration can be downloaded from the CallManager. |
To enable the MGCP configuration download feature, use the following commands in EXEC configuration mode:
To configure T1 CAS for MGCP support, use the following commands, beginning in global configuration mode:
To configure ISDN to backhaul Q.931 signaling, use the following commands, beginning in global configuration mode:
You can block all new MGCP calls to the router and gracefully terminate all existing active calls, which means that an active call is not terminated until the caller hangs up. To block all new calls, use the following commands in global configuration mode:
| Command | Purpose | |
|---|---|---|
| Step 1 | ||
| Step 2 |
The Cisco ICS 7750 supports fax over IP using the MGCP protocol. There are two supported modes of fax over IP. The Cisco ICS 7750 can be configured to use either or both modes:
|
Note In order to successfully transmit faxes between a Cisco ICS 7750 and another voice gateway, both the Cisco ICS 7750 and the other voice gateway must be configured to use the same mode. Configuring multiple modes on a single MRP or different modes on different MRPs or other routers in the network can cause fax calls to fail.If, for example, the Cisco ICS 7750 is configured to use both fax relay and fax pass-through modes, and the other voice gateway is configured to use fax relay only, the two gateways will be unable to transmit faxes to each other. |
In fax relay mode, the MRP terminates the T.30 fax signaling. Fax relay mode is the preferred method of transmitting fax traffic. Fax relay mode is enabled by default. The following command can be used to disable fax relay or to determine whether fax relay is enabled:
| Command | Purpose |
|---|---|
Cisco fax relay over MGCP is enabled by default. You can disable it by using this command. If fax relay is disabled, the MRP will use fax pass-through by default. |
To obtain information about the status of the configuration download feature, use the following privileged EXEC command on the MGCP voice gateway:
The system displays the current status of the download feature, as shown in the following example.
In fax pass-through mode, the MRP does not distinguish a fax call from a voice call. The fax communication between the two fax machines is carried in band over a "voice" call in its entirety. To use fax pass-through mode, use the following commands.
|
Note To use fax pass-through mode on the Cisco ICS 7750, you must have Cisco CallManager version 3.1.3a or later. Fax pass-through mode cannot be used with Cisco CallManager version 3.1.2c or any earlier version. |
For more information about configuring fax relay or fax pass-through over MGCP on the Cisco ICS 7750, see the document Implementing Fax Over IP on Cisco Voice Gateways at the following URL:
http://www.cisco.com/univercd/cc/td/doc/product/voice/c_access/fxmdmnt.htm
Cisco CallManager Version 3.1 supports putting callers on hold, with music supplied from a streaming multicast MOH server. This section describes how to enable the MOH feature on a Cisco ICS 7750 MGCP voice gateway so that it can support multicast streaming of music to callers who are on hold.
To configure multicast MOH on a Cisco ICS 7750 MGCP voice gateway, use the following command in global configuration mode:
Because connecting to the Internet presents security risks, use a set of overlapping security mechanisms, including authentication (verifying a person's identity), authorization (defining user access privileges), firewalls (hardware, software, or a combination of both that enforces security policies at the network boundary), and packet filters (software controls that prevent unauthorized packets from leaving or, in some cases, entering, the network).
You can use the ICS System Manager to configure authentication and authorization privileges. Therefore, this section describes only the following activities:
|
Note For additional information about how to use IOS commands related to security, refer to the Cisco ICS 7750 Software Configuration Guide. |
Typically, a network firewall consists of several different machines. Figure 6-15 shows an example of a possible firewall architecture.
In the architecture shown in Figure 6-15, the router that is connected to the Internet forces all incoming traffic to go to the application gateway. The router that is connected to the internal network accepts packets only from the application gateway.
The application gateway institutes per-application and per-user policies. In effect, the gateway controls the delivery of network-based services both to and from the internal network. For example, only certain users might be allowed to communicate with the Internet, or only certain applications might be permitted to establish connections between an interior host and an exterior host.
Set up the route and packet filters to reflect the same policies (see the "Setting Up Packet Filters" section). If mail is the only permitted application, only mail packets should be allowed through the router. This restriction keeps the application gateway from being overwhelmed by packets it would otherwise discard.
Suppose that your network is set up as shown in Figure 6-16. The firewall router allows incoming new connections to one or more communication servers or hosts. Having a designated router act as a firewall clearly identifies the router's purpose as the external gateway and avoids encumbering other routers with this task. If the internal network needs to be isolated, the firewall router provides the point of isolation so that the rest of the internal network structure is not affected.
Connections to the hosts are restricted to incoming File Transfer Protocol (FTP) requests and e-mail services, and incoming Telnet or modem connections are screened by the communication server.
You can set up packet filters on routers and servers to accept or deny packets from particular addresses or services. Packet filters augment authentication and authorization mechanisms.
Set up your security policy so that packet filters follow one of the following policies:
The first policy requires a thorough understanding of specific security threats and can be hard to implement.
The second policy is easier to implement and more secure because you do not have to predict future attacks for which packets should be denied. The second policy is also easier to test because there is a finite set of accepted uses of the network. Cisco devices that support Cisco IOS software implement this second type of policy in their packet filters, which Cisco calls access control lists (ACLs).
This section consists of the following topics concerning ACLs:
An ACL on an MRP, ASI, router, or switch running the Cisco IOS software always has an implicit deny-all statement at the end. Accept statements are processed before the implicit deny-all statement. (The statement is implicit because you do not actually have to enter it, although it is a good idea to enter it to make the behavior of the list more obvious.)
ACLs help you determine whether network traffic is forwarded or blocked at interfaces on an MRP, ASI, router, or switch. ACL definitions provide criteria that are applied to packets that enter or exit an interface. Typical criteria are the packet source address, the packet destination address, and the upper-layer protocol in the packet.
Because the Cisco IOS software tests a packet against each criterion in the list until a match is found, you should carefully design ACLs to provide good performance. By studying traffic flow, you can design the list so that most packets match the earliest conditions. Fewer conditions to check per packet means better throughput. It is best to order the list with the most general statements at the top and the most specific statements at the bottom, with the last statement being the general, implicit deny-all statement.
To provide security on the firewall router, as shown in Figure 6-16, you can use ACLs as described below.
Suppose that you decide to permit incoming e-mail and news access for a few hosts, but you want to limit FTP, Telnet, and rlogin services only to hosts on the firewall subnet. You could use IP extended ACLs (range 100 to 199) and Transmission Control Protocol (TCP) or User Datagram Protocol (UDP) port numbers to filter traffic. When a connection is to be established for services such as e-mail, Telnet, FTP, and so forth, the connection attempts to open a service on a specified port number. You can, therefore, filter out selected types of service connections by denying packets that are attempting to use that service.
An ACL is invoked after a routing decision has been made but before the packet is sent out on an interface. The best place to define an ACL is on a preferred host, using a text editor. You can create a file that contains the ACL commands, place the file (marked readable) in the default TFTP directory, and then load the file onto the MRP, ASI, or router.
|
Note The network server storing the file must be running a TFTP daemon and have TCP network access to the firewall router. |
Examples of ACL entries follow (see Figure 6-16):
After loading the ACL onto the ASI, MRP, or router, you can assign that ACL to a particular interface on that device. For example, if you want to filter traffic coming from outside your network (via the serial 0 interface) before allowing it to reach subnet 13 (via the ethernet 0 interface), you could use the following commands:
You can filter packets before they enter the ASI, MRP, or router (using input ACLs), instead of filtering them as they leave the device (using output ACLs). In most cases, input ACLs and output ACLs accomplish the same functionality. However, input ACLs can be used to prevent some types of IP address "spoofing" when output ACLs do not provide sufficient security.
Figure 6-17 shows a host that is spoofing (illegally claiming to be an address that it is not). Someone in the outside world is claiming to originate traffic from internal network 131.108.17.0. Although the address is spoofed, the router interface to the outside world assumes that the packet is coming from 131.108.17.0. If the input ACL on the router allows traffic coming from 131.108.17.0, it will accept the illegal packet. To prevent entry of spoofing traffic, an input ACL should be applied to the router interface to the outside world. This ACL would not allow any packets with addresses that are from the internal networks of which the router is aware (in this case, 17.0 and 18.0).
You can configure Cisco CallManager on the SPE310 by logging in to the CallManager application as the administrator and using the password configured in ICSConfig. See the "Accessing Cisco CallManager" section.
This section discusses the following topics:
Because the Cisco ICS 7750 is an integrated voice and data system, there are a few differences between the way that Cisco CallManager is configured on the Cisco ICS 7750 and the way that Cisco CallManager is configured on a a standalone Cisco CallManager configuration. This section describes those differences, which include the following:
The TFTP server configuration in ICSConfig takes precedence over the CallManager TFTP configuration. The IP address specified in the Phone TFTP IP field must be configured in ICSConfig because ICSConfig controls the value returned to the IP phones in the DHCP responses. This value must match the actual IP address of the SPE310 running the CallManager TFTP server. See the "Network ConfigurationIP Device Addresses Page Fields" section.
The Cisco CallManager name, found in the Cisco CallManager Configuration screen, is automatically assigned. This name matches the host name given to the SPE310 on which Cisco CallManager is installed using the naming convention CM_ICS7700-XXXXXXX. Do not change the Cisco CallManager name. Changing the name will require that the SPE310 host name be changed according to the instructions in the "Updating Microsoft SQL Server with the New Host Name" section.
The Cisco CallManager server is automatically configured when you install Cisco CallManager on the Cisco ICS 7750. The CallManager server defaults to the host name assigned to the SPE310 in the form of ICS7700-XXXXXXX. You can change this name in the Server Configuration screen. If your network uses Domain Name System (DNS) services, you can specify the DNS name of the server. If your network does not use DNS services, you must specify the IP address of the SPE310 on which Cisco CallManager is installed. Refer to the Cisco CallManager Administration Guide .
The Cisco ICS 7750 only supports internal music on hold (MOH) with .WAV files. If you want to use external music sources, such as a CD player, for recorded or live audio, such as Muzak, you will need to obtain an external Cisco CallManager hardware server to house a sound board that can be connected to an external source.
Table 6-29 lists common configuration tasks that you might need to perform to configure Cisco CallManager on your Cisco ICS 7750. If you are not using a particular feature or component, you can skip the related step. You have some flexibility in the order for performing these tasks, and in some cases you might have to alternate between steps or return to a particular step several times to complete the configuration. Table 6-29 providers pointers to locations in the Cisco CallManager Administration Guide that provide instructions for performing configuration tasks.
Additional documentation to help you configure Cisco CallManager includes the following:
| Task | Cisco CallManager Administration Guide | Done |
|---|---|---|
Configure the Cisco CallManager Server to specify the address of the SPE310 on which Cisco CallManager is installed. |
Refer to the "Server Configuration" section. |
|
Use Cisco CallManager Configuration to specify the ports and other properties for each Cisco CallManager installed in the same cluster. A cluster comprises a set of Cisco CallManagers that share the same database. |
Refer to the "Cisco CallManager Configuration" section. |
|
Configure system-level settings:
|
|
|
|
|
|
|
|
|
Refer to the "Location Configuration" section. |
||
Configure Gateways to enable communications with non-IP telecommunications devices. |
Refer to the "Gateway Configuration" section. |
|
Refer to the "Cisco IP Phone Configuration" and "Managing User Directory Information" sections. |
||
Configure system-wide features:
|
|
Cisco CallManager uses the Cisco IP Telephony Applications Backup Utility to back up Cisco CallManager data. You can back up your Cisco CallManager data to a configured network share device or to a local directory, using Backup Server or Backup Target.
Backup Server performs the backup operation by storing the backup data in the destination you specify. If an SPE310 is configured as a Backup Server, Cisco CallManager will automatically add it to the Backup Target list.
Since the Cisco Call Manager Publisher contains the data to be backed up, you should configure the SPE310 running the Cisco CallManager Publisher as the Backup Server.
To back up the Cisco CallManager data, refer to Backing Up and Restoring Cisco CallManager Release 3.1.
For additional guidelines for using backup and restore, refer to Cisco CallManager Backup and Restore Guidelines.
When you install Cisco CallManager on the SPE, NTP is installed as part of that installation.
NTP provides a common time base for networked routers, servers, and other devices. NTP is designed to synchronize the time on a network of machines. A synchronized time allows for correlating of syslog and Cisco IOS debug output to specific events. Call records for specific users can be found within one millisecond.
NTP runs by means of UDP, using port 123 as both the source and destination. UDP runs over IP. NTP Version 3 RFC 1305 is used to synchronize timekeeping among a set of distributed time servers and clients. A set of nodes on a network is identified and configured with NTP. The nodes form a synchronization subnet, sometimes referred to as an overlay network.
An NTP network usually obtains its time from an authoritative time source, such as a radio clock or an atomic clock attached to a time server. NTP then distributes this time across the network. NTP is extremely efficient; no more than one packet per minute is necessary to synchronize two machines to within a millisecond of one another.
XNTPD.exe is the executable for the NTP service. XNTP is provided as an alternative time synchronization service to Windows' native W32Time service. The XNTP client allows time synchronization with any reachable NTP time server.
You can run the NTP service on the Cisco ICS 7750 to ensure that the dates and times maintained by all the servers in a CallManager cluster are kept in sync. The XNTP client is a preferred method of timekeeping when CallManager servers are not members of a Windows NT/2000 domain structure. Refer to the Network Time Protocol: Best Practice White Paper for information on how to configure the XNTP client to keep time with multiple NTP servers for accuracy and redundancy.
It is highly recommended that the NTP and Service Time Stamp features of Cisco IOS be implemented on your network in order to facilitate coordination of syslog and SNMP events.
For an explanation of NTP, refer to the Time Synchronization Server website at http://www.eecis.udel.edu/~ntp/.
For Cisco IOS configuration examples that incorporate NTP, refer to Clock, Calendar, and NTP Configuration Examples available at http://www.cisco.com/univercd/cc/td/doc/product/software/ios11/cbook/csysmgmt.htm#31645.
Cisco Unity is a Windows 2000-based communications solution that integrates with Cisco CallManager and works with Microsoft Exchange 2000 to deliver and store messages.
The Cisco ICS 7750 provides all the IP telephony features available with Cisco CallManager. With an additional SPE310 card, the Cisco ICS 7750 can also support Cisco Unity Voice Messaging and automated attendant features.
Refer to the following documentation for Cisco Unity installation and configuration information:
http://www.cisco.com/univercd/cc/td/doc/product/voice/ics7750/icsapps/uvminst/index.htm
http://www.cisco.com/univercd/cc/td/doc/product/voice/ics7750/icsapps/uvmrelnt/uvmrelnt.htm
http://www.cisco.com/univercd/cc/td/doc/product/voice/ics/icsapps/icsunity/uvm312/upgrd312.htm
http://wwwin-itg.cisco.com/push_targets1/ucdit/cc/td/doc/product/voice/ics/icsapps/icsunity/uvm313/setupins/uvminst.htm
http://www.cisco.com/univercd/cc/td/doc/product/voice/c_unity/unity30/integuid/callma31/index.htm
http://www.cisco.com/univercd/cc/td/doc/product/voice/c_unity/unity30/sag/sag301/index.htm
You can configure the Cisco ICS 7750 to work with voice-mail solutions that support the Simplified Message Desk Interface (SMDI). These voice-mail solutions include Cisco Unity running on an external server and traditional legacy voice-mail solutions, such as the Octel 250.
This section tells how to configure the Cisco ICS 7750 and associated components for voice mail. Complete the procedures in the section appropriate section for your configuration:
This section tells how to configure the system to support a direct serial connection to an Octel 250 or to a voice-mail server. It includes the following tasks:
Follow these steps to connect and configure an external voice-mail server or Octel 250 for use with the Cisco ICS 7750:
Step 2 Configure the voice-mail server or Octel 250. (Refer to the documentation that came with your messaging software or Octel 250.)
Step 3 Continue with "Configuring Cisco CallManager" section.
This section tells how to configure Cisco CallManager on the Cisco ICS 7750 for a direct serial connection through the SAP to an external voice-mail server or an Octel 250. It includes the following tasks:
Follow these steps to configure a route group that contains the serial port of the external voice-mail server or Octel 250:
Step 2 Choose Route Plan > Route Group > Add a New Route Group.
The Route Group Configuration dialog box appears.
Step 3 In the Route Group Name field, enter a name for the route group, such as VoiceMail.
Step 4 Click Continue.
The screen refreshes and the route group name that you entered appears.
Step 5 Click the drop-down arrow to view a list of choices for the Device Name field. Choose the voice-mail port on the external server that is running your messaging software or the appropriate serial port on the CF card of the Octel 250.
Step 6 Click the drop-down arrow to view a list of choices for the Port field, and choose All.
Step 7 Click the drop-down arrow to view a list of choices for the Order field, and choose 1.
Step 8 Click Insert.
The screen refreshes and displays the configuration that you entered.
Step 9 Click Add Device to add the voice-mail port that you configured to your route group.
Continue with the "Creating a Route List in Cisco CallManager" section.
Follow these steps to associate the voice-mail route group containing the serial port on the external voice-mail server or Octel 250 with a route list:
The Route List Configuration dialog box appears.
Step 2 In the Route List Name field, enter a name for the route list, such as VoiceMail.
Step 3 Click Insert.
The screen refreshes and displays the name of the route list that you specified.
Step 4 Click Add Route Group.
The screen refreshes and displays the name of your voice-mail route group in the Select Route Groups (ordered by priority) field.
Step 5 Choose your voice-mail route group from the Select Route Groups (ordered by priority) field.
Step 6 Click Add.
The Route Details Configuration dialog box appears.
Step 7 Click Insert.
The screen refreshes and displays the default settings for your voice-mail route list.
Continue with the "Configuring a Route Pattern in Cisco CallManager" section.
Follow these steps to associate the voice-mail route list with a route pattern:
Step 2 Click Add a New Route Pattern.
The Route Pattern Configuration dialog box appears.
Step 3 Enter the appropriate route pattern in the Route Pattern field.
Step 4 Click the drop-down arrow to view a list of choices for the Gateway/Route List field. Choose the voice-mail route list that you created in the "Creating a Route List in Cisco CallManager" section.
Step 5 Click Insert.
The screen refreshes and displays the selections that you made.
Continue with the "Configuring the Cisco Messaging Interface in Cisco CallManager" section.
Follow these steps to configure Cisco CallManager to communicate with the SAP COM port that you are using for voice mail:
Step 2 Click the drop-down arrow to view a list of choices for the Select New Server field, and choose the IP address of the target SPE310.
Step 3 Click Insert.
The page refreshes. The IP address of the selected SPE310 is displayed in the left pane.
Step 4 Click the Command Line Parameters radio button.
Step 5 To make changes to an existing service parameter, highlight the parameter in the Configured Service Parameters list. Make the changes in the Type and Value fields. Then click Update.
|
Caution Do not change service parameters unless you fully understand the feature that you are changing or unless the change is specified in this document. |
Step 6 Repeat Step 5 for each service parameter you want to configure. You might need to change the following service parameters:
|
Note Many voice-mail systems can be configured to use different baud rates, but 9600 is usually correct. |
|
Note The Parity settings can be None, Even, Odd, Mark, or Space. Settings are usually Even or None—Mark and Space are rarely used. This field is not case sensitive. |
|
Note To restore the Cisco CallManager default service parameter settings, click Default. A message is displayed that states that you are about to permanently delete any previous settings and replace them with the default settings. Click OK to continue, or click Cancel to keep the current settings. |
Go to the "Using Network Management Solutions with the Cisco ICS 7750" section.
This section describes various Network Management Solutions (NMS) available for use with the Cisco ICS 7750.
The CiscoWorks2000 product line provides network management solutions focused on two key administrative areas: wide-area and local-area switched network management. Each of these areas integrates new and existing Cisco applications into an enhanced web-based management solution.
CiscoWorks2000 solutions assist in managing the enterprise network in the following areas:
Several advanced applications are also available:
For information on how you can use Internet technology to integrate management tools, refer to Building the Management Intranet: Using Internet Technology to Integrate Management Tools and Information.
To view detailed information about any of the CiscoWorks2000 product line, including solutions for VPN/security management, LAN management, resource management and service management, refer to the CiscoWorks2000 website.
LMS features web versions of the Layer 2/Layer 3 topology tool, user tracking, virtual LAN (VLAN) manager, path trace, and other functions from CWSI. Table 6-30 summarizes the applications included in LMS.
Routed WAN Management Solution provides wide-area network monitoring, troubleshooting, traffic management, access control, and applications for administering the routed infrastructure of multiservice and VPN routing platforms built with Cisco products. Table 6-31 summarizes the applications included in the Routed WAN Management Solution.
SMS provides capabilities for managing network service levels and monitoring quality of service (QoS) embedded within Cisco infrastructures. Table 6-32 summarizes the applications included in SMS.
Network management platforms discover network devices and poll them for information. Some common network management platforms include the following:
Each network device is represented by a graphical element on the management platform's console. Different colors on the graphical elements represent the current operational status of network devices. Network devices can be configured to send notifications called SNMP traps to network management platforms. SNMP, widely used for monitoring and configuring network elements, uses an authentication method based on a community string. This community string is essentially a password used for accessing the network element. Upon receiving the notifications, the graphical element representing the network device changes to a different color, depending on the severity of notification received. The notification, usually called an event, is placed in a log file.
It is important that the most current Cisco Management Information Base (MIB) files be loaded on the SNMP platform to ensure that the various alerts from Cisco devices are interpreted correctly. You can find published MIB files for managing various network devices on the Cisco MIBs website:
http://www.cisco.com/public/sw-center/netmgmt/cmtk/mibs.shtml
For information about important MIB objects to monitor to ensure that the CallManager, gateways, trunks, and phones are working, refer to the Cisco SNMP MIBs for Fault Management table at:
http://www.cisco.com/univercd/cc/td/doc/product/voice/ip_tele/solution/6_operat.htm#34645
![]()
![]()
![]()
![]()
![]()
![]()
![]()
![]()
Posted: Sun Jan 19 02:32:02 PST 2003
All contents are Copyright © 1992--2002 Cisco Systems, Inc. All rights reserved.
Important Notices and Privacy Statement.