|
|

Table Of Contents
Configuring Cisco CallManager Extension Mobility
Rules for Configuring Cisco CallManager Extension Mobility
Procedures for Configuring Cisco CallManager Extension Mobility
Creating a New Application User
Configuring the Cisco CRA Engine
Configuring Cisco CallManager for Cisco CallManager Extension Mobility
Preparing the User for Cisco CallManager
Extension Mobility
Logging in to Cisco CallManager Extension Mobility
Logging out of Cisco CallManager Extension Mobility
Configuring Cisco CallManager Extension Mobility
The following topics describe how to configure CiscoCallManager ExtensionMobility:
•
Rules for Configuring CiscoCallManager ExtensionMobility.
•
This chapter also includes information for you to give CiscoCallManager ExtensionMobility users. See the "Preparing the User for CiscoCallManager ExtensionMobility" section .
Rules for Configuring Cisco CallManager Extension Mobility
It is important to understand how device profiles work with CiscoCallManager ExtensionMobility in order to configure the service correctly.
This section discusses the following topics:
Managing Device Profiles
A device profile is made up of a set of attributes (services and/or features) associated with a particular device. Device profiles include name, description, phone template, add-on modules, directory numbers, subscribed services, and speed dial information.
You can think of the device profile as a device which is not yet physically embodied. It has all the properties of a device except those which are explicitly tied to a device, like MAC address or directory URL, for example.
When a device profile has been loaded onto a device, that device adopts the attributes of that device profile. A device can adopt a device profile when there is no user logged in (that is, when a device is first initialized and when a user logs out) or when a user logs in.
There are two types of device profiles: autogenerated device profiles and user device profiles.
Autogenerated Device Profile
An autogenerated device profile generates when you update the phone settings and choose a current setting to generate an autogenerated device profile. An autogenerated device profile represents a snapshot of an existing device's configuration.
The autogenerated device profile associates with a specific phone to be the logout device profile. That is, when a logout command for a device is received, this is the profile loaded onto a device.
An autogenerated device profile cannot be associated with a user. An autogenerated device profile can only be loaded onto a device when there is no user logged in. You can modify the autogenerated device profile, but not delete it.
User Device Profile
You can assign a user device profile to a user so that when a user logs in or out of a device, the corresponding user device profile is loaded onto that device. Devices can adopt user device profiles when a user logs into a device or when there is no user logged in.You can modify, or delete a user device profile in the Cisco CallManager administration pages.
Logging In and Logging Out
When a user logs in, the current configuration of a device is replaced by a particular user device profile.
When a user logs out, the current configuration of a device (the user default device profile) is replaced by the logout profile.
Cisco CallManager Extension Mobility supports only one login at a time on a device. Subsequent logins will fail.
You cannot log out of a device which does not have anyone logged in.
Configuration Examples
This section describes different scenarios using CiscoCallManager ExtensionMobility:
•
•
•
Scenario 1: All Users have Cisco CallManager Extension Mobility
In a typical CiscoCallManager ExtensionMobility scenario, all employees are users of CiscoCallManager ExtensionMobility. The users are configured to have a default device profile and they do not control their individual phones. They must log into a phone before they can use it as their extension.
Employees have access to common devices, such as lobby phones, conference room phones, and cubicle phones that are meant to be shared.
When users go to the Cisco Phone User Options web pages to change their services or speed dials, they can select only their default device profiles from the "Select a device to configure" drop-down menu. Any changes users make to their services follows them to any phone they log into.
Note
This is a recommended configuration.
Scenario 2: Mixed Configuration
In this configuration, each user has a phone assigned to him. Each user has a device profile too which follows him on every device he logs into. Each user has access to common devices, such as lobby phones, conference room phones, and cubicle phones that are meant to be shared.
Note
This is a recommended configuration.
Scenario 3: Mixed Configuration
In this scenario, some employees may have a regular desk phone and other users can log into this phone.
This is not a recommended configuration for CiscoCallManager ExtensionMobility for the following reasons.
When a device is configured for CiscoCallManager ExtensionMobility, a snapshot of that device is taken which is used as a profile after a user logs off that device.
With CiscoCallManager ExtensionMobility enabled on Tom's personal extension, Tom goes to his Cisco Phone User Options web pages to configure services. He has two options from the "Select device to configure" drop-down menu: the device (the office phone) he controls or the Default Device Profile.
•
•
Configuration Rules
To avoid problems deploying CiscoCallManager ExtensionMobility, be sure to follow these configuration rules:
•
•
Note
Note
Procedures for Configuring Cisco CallManager Extension Mobility
Perform the following procedures to configure Cisco CallManager Extension Mobility.
Caution
1.
2.
a.
b.
c.
d.
3.
c.
d.
e.
f.
4.
This section also includes information to give CiscoCallManager ExtensionMobility users. See the "Preparing the User for CiscoCallManager ExtensionMobility" section .
Creating a New Application User
To create a new application user for CiscoCallManagerExtensionMobility, perform the following steps:
Procedure
Step 1
You can also connect to the Cisco CallManager server by using the following URL:
http :// servername/ ccmAdmin
where servername is the DNS name or IP address of your Cisco CallManager server.
You will be prompted to enter the network password.
Step 2
Step 3
Step 4
Step 5
Step 6
Step 7
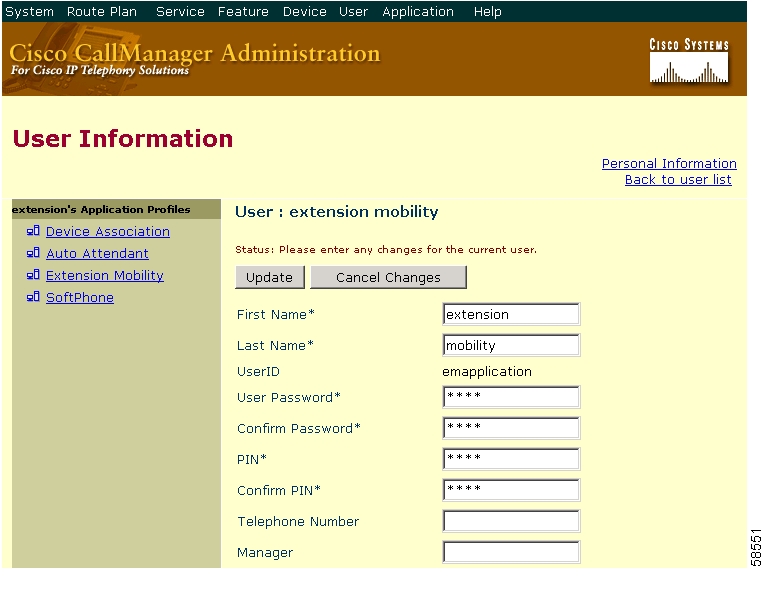
Figure 3-1 Adding Cisco CallManager Extension Mobility for the User
A new User Information page displays.
Step 8
Step 9
Figure 3-2 Enabling Authentication Proxy Rights
Related Topics:
•
•
Configuring the Cisco CRA Engine
To configure the Cisco Customer Response Application (CRA) Engine for CiscoCallManagerExtensionMobility, perform the following procedures:
1.
2.
3.
4.
Adding the Login Application
To add the Logi n Application for Cisco CallManager Extension Mobility, perform the following steps:
Procedure
Step 1
http :// servername/ AppAdmin
where servername is the DNS name or IP address of your Cisco Customer Response Application Engine (Cisco CRA Engine).
Step 2
The Application page displays.
Step 3
Step 4
Step 5
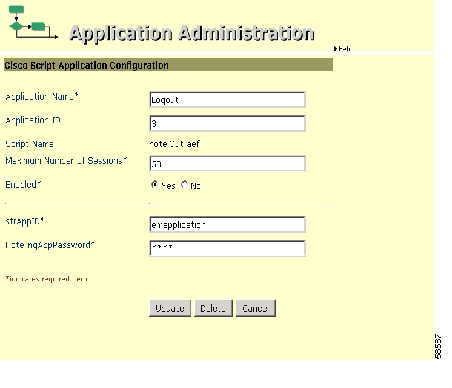
Figure 3-3 Selecting the Login Application
Step 6
Step 7
Step 8
Step 9
Step 10
See Figure 3-4 .
Step 11
Figure 3-4 Adding the Login Application
Related Topics:
•
•
Adding the Logout Application
To add the Logout Application for Cisco CallManger Extension Mobility, perform the following steps:
Procedure
Step 1
Step 2
Step 3
Step 4
Figure 3-5 Selecting the Logout Application
Step 5
Step 6
Step 7
Step 8
Step 9
Step 10
Figure 3-6 Adding the Logout Application
Related Topics:
•
Adding the Login Application Trigger
To add the Extension Mobility Login Application Trigger, perform the following steps:
Procedure
Step 1
Step 2
Step 3
Tips
Step 4
Step 5
Step 6
Figure 3-7 Adding the Login Application Trigger
Step 7
Step 8
Related Topics:
•
•
Adding the Logout Application Trigger
You add the Extension Mobility Logout Application Trigger the same way you added the Login Application Trigger. Perform the following steps:
Procedure
Step 1
Step 2
Step 3
Tips
Step 4
See Figure 3-8 .
Figure 3-8 Adding the Logout Application Trigger
Step 5
Step 6
Step 7
Step 8
Related Topics:
•
•
Configuring Cisco CallManager for Cisco CallManager Extension Mobility
To configure Cisco CallManager for ExtensionMobility, perform the following procedures:
3.
4.
5.
6.
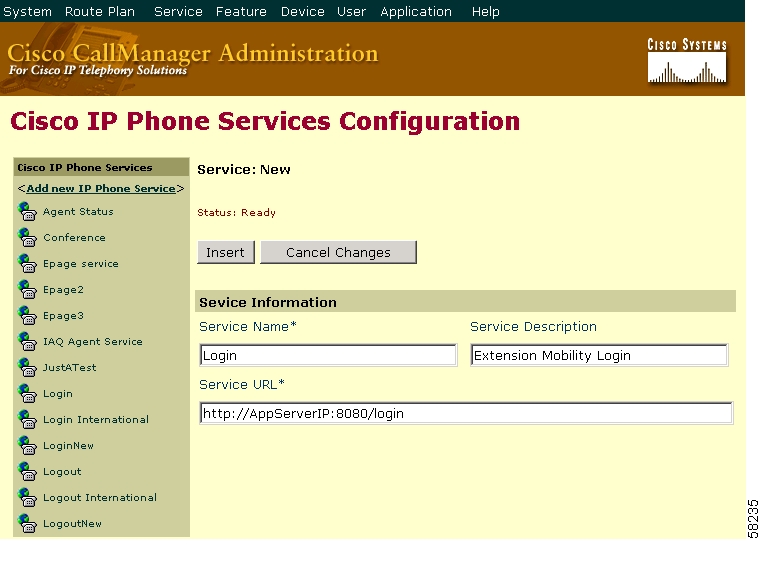
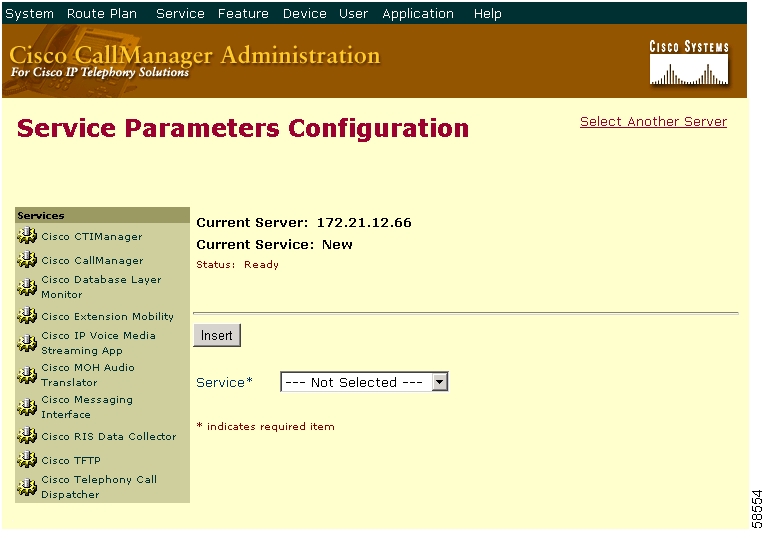
Adding the Login Service
To add the Login Service for Cisco CallManager Extension Mobility, perform the following steps:
Procedure
Step 1
Step 2
Step 3
Step 4
Step 5
Caution
Tips
See Figure3-9.
Figure 3-9 Adding the Login Service
Step 6
Related Topics:
•
•
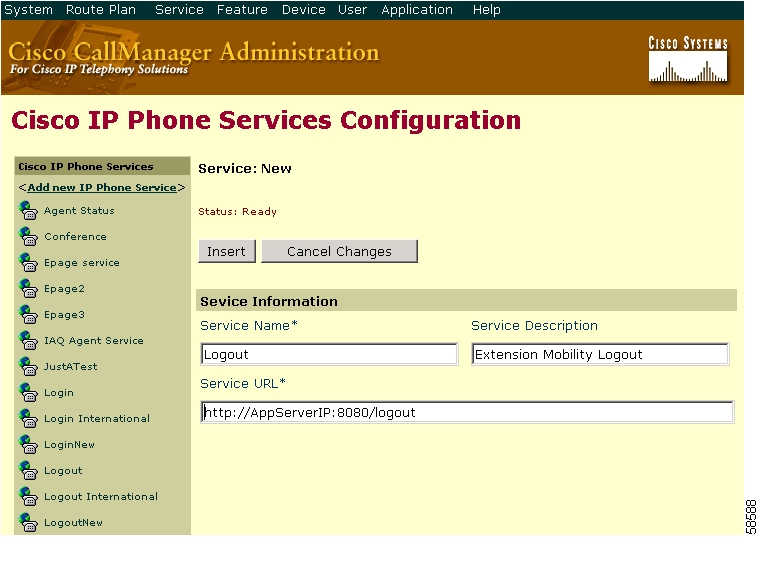
Adding the Logout Service
To add the Logout Service for Cisco CallManager Extension Mobility, perform the following steps:
Procedure
Step 1
Step 2
Step 3
Step 4
Caution
Tips
See Figure3-10.
Figure 3-10 Adding the Logout Service
Step 5
Related Topics:
•
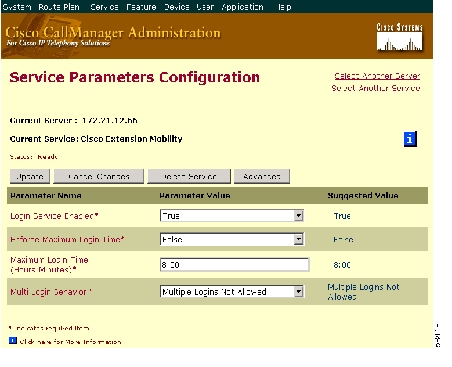
Setting the Service Parameters
Setting the Service Parameters in the CallManager Service Parameters Configuration page allows you to define the maximum login time and the multi login behavior for Cisco CallManager Extension Mobility.
Maximum Login Time
At the Enforce Maximum Login Time, set True or False. True indicates you wish to define a maximum login time.
At the Maximum Login Time field, enter the maximum login time. This is a system-wide maximum time specified for logins. After this time, the system automatically logs out the device.
Note
Multi Login Behavior
At the Multi Login Behavior field, select one of the following options:
•
•
•
•
To set the Service Parameters for Cisco CallManager Extension Mobility, perform the following steps:
Procedure
Step 1
The Service Parameters Configuration page displays
Step 2
A new Service Parameters Configuration page displays.
Step 3
Figure 3-11 Selecting the Logout Service
A new Service Parameters Configuration page displays.
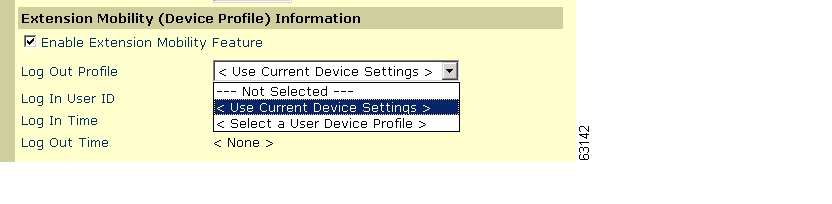
Figure 3-12 shows the Service Parameters screen, with the service parameter information entered.
Figure 3-12 Setting the Service Parameters
Step 4
The default value is True. Selecting false disables the user login service.Step 5
If you select True, the service logs a user out of a device automatically after a maximum login time.
The default value is False.Step 6
The default value is 8:00 (8 hours).Step 7
•
•
•
The default value is Multiple Logins Not Allowed.Step 8
Related Topics:
•
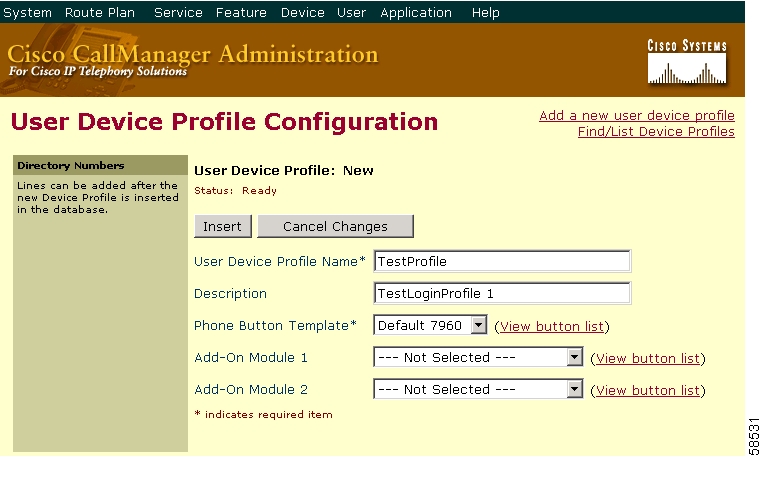
Creating the Default Device Profile for a User
The Default Device Profile contains attributes such as name, description, phone template, add-on modules, directory numbers, subscribed services, and speed dial information.
Note
To add a default device profile for a new user of Cisco CallManager Extension Mobility, follow these steps:
Procedure
Step 1
The page refreshes to the Find and List Device Profiles Page.Step 2
The User Device Profile Configuration page displays.Step 3
Step 4
Figure 3-13 Associating a User Device Profile to a User
Step 5
Note
Step 6
The Directory Number Configuration page appears.
Step 7
Step 8
Click OK.
Step 9
On the User Device Profile Configuration page, select Update service.
Step 10
Step 11
Step 12
Related Topics:
•
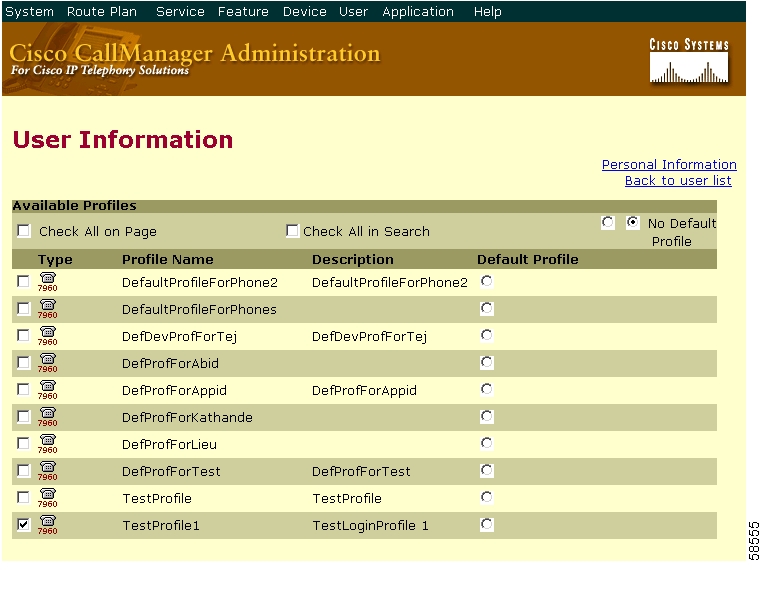
Associating a User Device Profile to a User for Cisco CallManager Extension Mobility
A User Device Profile is associated in the same way that physical devices are associated, starting with the User Global Directory. To associate a user device profile to a user for CiscoCallManagerExtensionMobility, follow these steps:
Procedure
Step 1
Step 2
Step 3
Step 4
Step 5
Step 6
Figure 3-14 Associating a User Device Profile to a User
Step 7
Step 8
Note
Step 9
Related Topics:
•
•
Configuring the Cisco IP Phones for Cisco CallManager Extension Mobility
To configure the Cisco IP phone for Cisco CallManager Extension Mobility, follow these procedures:
•
•
Configuring the Cisco IP Phone Models 7960 and 7940
To configure a new or an existing Cisco IP Phone Model 7960 or 7940 for Cisco CallManager Extension Mobility, follow these steps:
Procedure
Step 1
The Find and List Phones page displays.
Step 2
a.
Note
A list of devices matching the criteria appears.
b.
c.
Step 3
a.
The Add a New Phone page displays.
b.
c.
d.
Step 4
Figure 3-15 Configuring a Phone for Cisco CallManager Extension Mobility
At the Phone Configuration page, enter the Media Access Control (MAC) address of the phone.
Note
Step 5
Step 6
Step 7
Click OK.
The Directory Number Configuration page displays.
Step 8
Step 9
Step 10
Step 11
Click OK.Step 12
Subscribing to the Cisco CallManager Login Service
To subscribe to the Cisco CallManager Login Service, follow these procedures:
Procedure
Step 1
Step 2
Step 3
Step 4
Step 5
Figure 3-16 Enabling Extension Mobility
Step 6
This creates an Autogenerated Device Profile as the default device profile. When a logout is executed, the current configuration (the User Device Profile) is replaced by the Autogenerated Device Profile (the default device profile).
See the "Rules for Configuring Cisco CallManager Extension Mobility" section for information about configuring device profiles.
Step 7
Step 8
Related Topics:
•
•
Setting up Anonymous Access on IBM-340 platforms
If you are configuring CiscoCallManagerExtendedServices on an IBM-340 platform, make sure that the system is set to allow anonymous access to the Login Service web site. If your system is not set to allow anonymous access, you may encounter a Login Server Connection Error when attempting to log in to the phone.
To allow anonymous access, set the IIS to control the password. Perform the following steps:
Procedure
Step 1
Start >Programs>Administrative Tools >Internet Services Manager.Step 2
Step 3
Step 4
Step 5
Step 6
Step 7
Step 8
Step 9
Step 10
Preparing the User for Cisco CallManager
Extension MobilityOnce you have configured the system for Cisco CallManager Extension Mobility, provide the phone user with the following information:
•
•
•
•
•
You can provide the following procedures to the phone user to enable them to use the Cisco CallManager Extension Mobility feature:
•
•
Logging in to Cisco CallManager Extension Mobility
To log in to Cisco CallManager Extension Mobility, perform the following steps:
Procedure
Step 1
Step 2
Step 3
Step 4
The phone adopts your user device profile information such as directory number(s), speed dials and services.
Note
Step 5
Logging out of Cisco CallManager Extension Mobility
To log out of Cisco CallManager Extension Mobility, perform the following steps:
Procedure
Step 1
Step 2
Step 3
![]()
![]()
![]()
![]()
![]()
![]()
![]()
![]()
Posted: Tue Mar 16 17:12:56 PST 2004
All contents are Copyright © 1992--2004 Cisco Systems, Inc. All rights reserved.
Important Notices and Privacy Statement.