|
|

This chapter provides instructions for administering Cisco Conference Connection.
Refer to the appropriate topics in this chapter to understand how to administer Cisco Conference Connection.
This section provides instructions for starting and stopping the Cisco Conference Connection Server. You must first start the Cisco Conference Connection Server before users can log in.
To start the Cisco Conference Connection Server, perform these steps.
To stop the Cisco Conference Connection Server, perform these steps.
To log in to Cisco Conference Connection, perform these steps:
http:// servername
where servername is the name or IP address of the Cisco Conference Connection server.
Step 2 In the Username field, enter your administrator user name (the default is Administrator).
Step 3 In the Password field, enter your password (the default is no password).
Step 4 Click Login.
The Cisco Conference Connection Web Interface appears.
To log out of the Cisco Conference Connection:
After the Cisco Conference Connection is installed, you need to set up the number of ports for which you purchased a license.
To set up the ports, perform these steps.
Step 2 In the left navigation pane, click Administraton Tasks and Reports.
The Administration Tasks and Reports page appears.
Step 3 In the right pane, under Administration Tasks, select Administer Licenses.
The Licensing Settings for Cisco Conference Connection page appears.
Step 4 In the Enter License Key field, enter the license key specified in your license certificate.
Step 5 Click Update.
The License Settings Updated page appears confirming the license update. If you are entering additional license keys in sequence, click Enter additional License Keys.
Step 6 Click Logout to log out of the Cisco Conference Connection Web Interface.
You need to stop and then restart the Cisco Conference Connection Server.
Step 7 From the Windows 2000 desktop, select Start > Programs > Cisco Conference Connection > Stop Cisco Conference Connection.
Wait for the Cisco Conference Connection to completely stop before you perform Step 8.
Step 8 From the Windows 2000 desktop, select Start > Programs > Cisco Conference Connection > Start Cisco Conference Connection.
If you purchased a license upgrade for additional conference ports, you need to update the license in Cisco Conference Connection.
Perform steps 1 - 8 in the "Licensing Setup" section.
All Cisco Conference Connection user accounts are managed through Cisco CallManager, except the Cisco Conference Connection system administrator account. You can add and delete Cisco Conference Connection users through the Cisco CallManager administration application.
The Cisco Conference Connection system administrator account has a separate user ID and password than the Cisco CallManager system administrator account. The Cisco Conference Connection system administrator account is created during the installation of the Cisco Conference Connection software. The default administrator user name is Administrator and there is no default password. The system administrator account password can be changed through the Administer users - User list page. The administrator account can also be deleted through the Administer users - User list page.
For increased security, you can create another user account as the "system administrator" account, for example, the system administrator's Full name account. Once the new system administrator account is created, you can delete the Administrator account created during the installation of the Cisco Conference Connection software.
The Cisco Conference Connection system administrator account lets you manage all conferences, and change the permissions (Type) of any user. All user accounts are created with "regular" permissions (Type), meaning that these users can add and view conferences. You can change the permission of a user as needed. See the "Administering Users in Cisco Conference Connection" section.
To modify the Administrator account, perform these steps.
Step 2 In the left navigation pane, click List Users.
The Administer users - User list page appears.
Step 3 Select the Cisco Conference Connection Administrator user (named "Administrator").
Step 4 You can change any of the following:
Step 5 Make the changes you want and then click Modify.
To delete the Administrator account, perform these steps.
 |
Caution You should only delete the Administrator account if you have already assigned another user account with the "Administrator" User Type. |
Step 2 In the left navigation pane, click List Users.
The Administer users - User list page appears.
Step 3 Select the Cisco Conference Connection Administrator user.
Step 4 To delete the account, click Delete Account.
All Cisco Conference Connection user accounts are created from the Cisco CallManager directory (see the "Setting Up Cisco Conference Connection Users" section). Cisco Conference Connection user accounts allow individual users to access the Cisco Conference Connection application to add, join, modify, and view scheduled conferences. You add and delete user accounts, and change user passwords, for Cisco Conference Connection users only through the Cisco CallManager administration applicaton. Refer to the Cisco CallManager administration documentation for more information.
All user accounts are created with "regular" permissions (Type), meaning that these users can add and view conferences. You can change the permission of a user as needed. See the "Administering Users in Cisco Conference Connection" section
 |
Note Make sure that you tell each user his or her user name and password. |
An administrator can view a list of all users and change any user's permissions Type) through the Cisco Conference Connection administration pages.
To view a list of all Cisco Conference Connection users, perform these steps.
Step 2 In the left navigation pane, click List Users.
The Administer users - User list page appears. The list provides the following information:
|
Note Clicking on a user's Full name brings up the Modify User page. See "Changing the User Type" section. |
Within the Administer users - User list, you can search for a particular user.
To search for a user, follow these steps.
The Search - Users page appears.
Step 2 Enter any or all of the fields (Full name, Username, Email address).
Step 3 Click Search.
The Administer users - User list page reappears with a list according to the search criteria you specifed.
The User Type identifies the permissions that a user has when using Cisco Conference Connection. When the user accounts are created, all users are assigned the User Type "Regular".
The following table describes the User Types.
| User Type | Description |
|---|---|
A regular user can add ,modify, and view conferences, and delete conferences that he or she has scheduled. |
|
To change the User Type for a user, perform these steps:
Step 2 In the left navigation pane, click List Users.
The Administer users - User list page appears.
Step 3 Select a user from the user list.
Step 4 From the Type drop-down list box, select the Type you want to assign to the user.
Step 5 Click Modify.
As a system administrator, you can manage conferences through the Cisco Conference Connection Web Interface. This includes adding, modifying, stopping, and deleting conferences, including conferences with the "hidden" attribute.
Refer to the appropriate topics in this section to manage conferences.
To schedule a conference, follow these steps.
The Add a conference page appears.
Step 2 Enter all of the information for your conference:
Note that the start time is in the time zone indicated.
|
Note To set up a daily conference, select Weekly, and then choose the day(s) on which you want to schedule the conference. |
Step 3 After you have entered all of the conference information, click Add Conference.
The Conference Confirmation page appears to confirm your conference, and your conference appears in the list of scheduled conferences. Note that hidden conferences are marked with a special icon.
You can modify a conference in progress, or modify a conference scheduled at a future date.
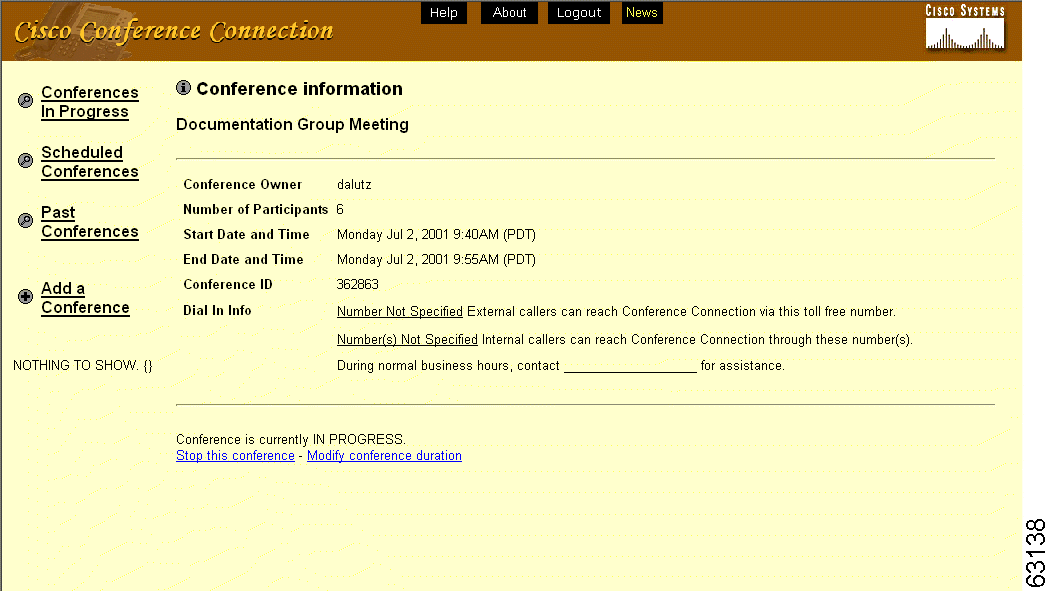
When a conference is in progress, you can stop the conference or modify its duration.
To stop a conference in progress, follow these steps.
The Conferences in Progress page appears.
Step 2 On the Conferences in Progress page, click the conference that you want to stop.
The Conference Information page appears.
Step 3 To stop the conference, click Stop this conference.
Step 4 Click OK to confirm that you want to stop the conference.
|
Note When you do this, conference participants are not warned and they will simply be dropped from the conference. |
The Conferences in Progress page redisplays, with a message indicating that your conference has been successfully stopped.
|
Note You may need to select the click here link so that the list of conferences in progress no longer shows the conference you stopped. |
To modify the duration of a conference in progress, follow these steps.
|
Note If participants remain in a conference past the scheduled end time, Cisco Conference Connection auto-extends the conference if there are conference ports available. |
The Conferences in Progress page appears.
Step 2 On the Conferences in Progress page, click the conference whose duration you want to change.
The Conference Information page appears.
Step 3 To change the conference duration, click Modify conference duration.
The Modify conference page appears.
Since the conference is in progress, you can only change the conference duration.
Step 4 To change the conference duration, click Modify Conference.
The Modify conference page appears.
Step 5 In the Duration field, change the conference duration.
|
Note You cannot shorten the duration of a conference in progress by less than 10 minutes. If you need to shorten a conference by less than 10 minutes, stop the conference at the appropriate time. |
Step 6 Click Modify Conference to save your changes.
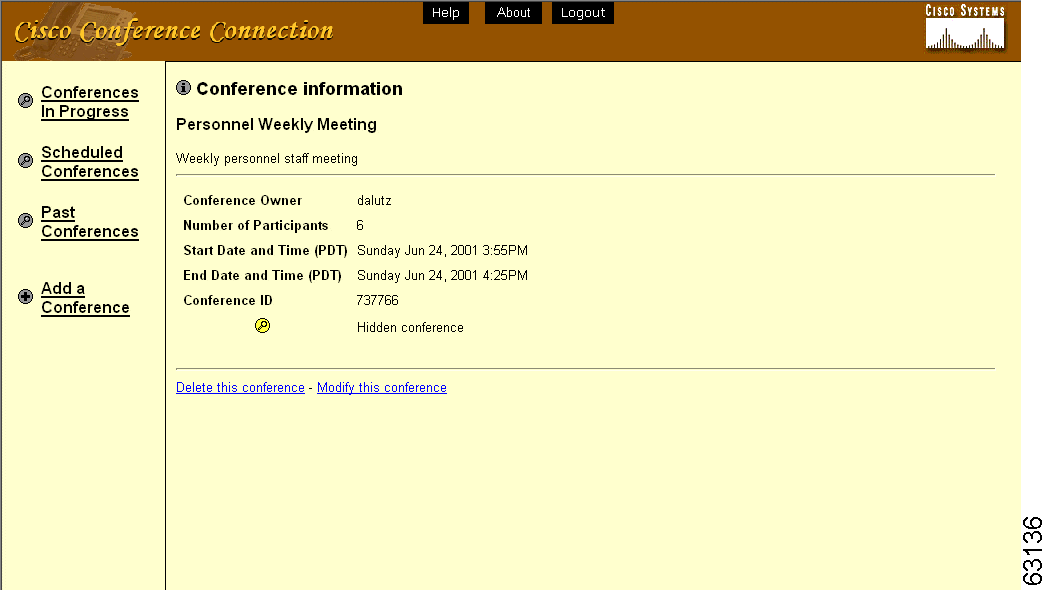
To change a conference, follow these steps.
Step 2 On the Schedule Conferences page, scroll to the Conferences You Scheduled section.
Step 3 Click the conference that you want to change.
The Conference Information page appears.
Step 4 To change the conference information, click Modify this conference.
|
Note If the conference is a recurring conference and you want to make a change for all occurrences of the conference, you should click To modify the entire series click here to change all instances of the conference. |
The Modify Conference page appears.
Step 5 Make any changes to the conference information that you want and then click Modify Conference to save your changes.
You can delete individual conferences or delete a group of past conferences based on a date range.
To delete a conference, follow these steps.
Step 2 On the Schedule Conferences page, scroll to the Conferences You Scheduled section.
Step 3 Click the conference that you want to delete.
The Conference Information page appears.
Step 4 To delete the conference, click Delete Conference.
|
Note If the conference is a recurring conference and you want to delete all occurrences of the conference, you should click To delete the entire series click here to delete all instances of the conference. |
Click OK to confirm the deletion and the conference is deleted from the list of scheduled conferences.
Yu may want to perform some periodic deletions of past conferences to free space in your database. Deletions of past conferences that are more than 30 days old is a suggested guideline. You can do this using the Bulk Delete Past Conferences function. You could also copy the mdb file (database) periodically and/or use SQL management tools at your site to back up your data.
To delete a group of past conferences, follow these steps.
Step 2 Under Administration Tasks, click Bulk Delete Past Conferences.
The Bulk Delete Past Conferences for Cisco Conference Connection page appears.
Step 3 In the From fields, choose the starting date for the deletion of past conferences. (Click Calendar for easy date selection.)
Step 4 In the To fields, choose the ending date for the deletion of past conferences. (Click Calendar for easy date selection.)
Step 5 Click Submit.
The conferences within the date range that you specified are deleted.
You can join a conference in Cisco Conference Connection using your telephone.
For instructions, refer to one of the following sections:
To dial a conference in Cisco Conference Connection, follow these steps.
You will hear the Welcome prompt.
Step 2 At the Welcome prompt, dial the conference ID, followed by the # key.
To start over, press the * key.
Step 3 If your conference ID is correct, press the # key.
When you are connected to a conference, you will hear an ascending tone or a prompt.
|
Note Use of the Hold feature, or otherwise answering or placing a call while connected to a conference, will result in your conference call being dropped. This eliminates the possibility of getting music on hold from the local Cisco CallManager. |
If you are not able to join a conference, you may hear one of the following:
In this case, the conference is full.
In this case, the conference ID that you entered was not correct. You have to hang up and call the conference phone number again.
In this case, it is likely that your conference ID is not recognized. Hang up and verify the conference ID, and then call the conference phone number again.
If you time out while trying to join a conference, you will hear one of the following prompts:
In this case, verify the conference time and either re-enter the conference ID, or call back at the correct conference time.
In this case, verify the conference ID with your conference organizer.
In this case, you will be connected to an operator.
Step 4 To leave the conference, hang up.
The other remaining participants in the conference will hear a descending tone or a prompt.
To join a conference in Cisco Conference Connection via your Cisco IP Phone 7960/7940, you must be subscribed to the Cisco Conference Connection Service. Once you are subscribed, you can join conferences via the services button on your Cisco IP Phone 7960/40.
To subscribe to the Cisco Conference Connection Service, follow these steps.
Step 2 Enter the URL of your IP Phone User Options Web page.
The Cisco IP Phone User Options logon page appears.
Step 3 In the User Identification field, enter your user name.
Step 4 In the Password field, enter your password.
Step 5 Click Log On.
The User Options Menu page appears.
Step 6 From the Select a device or device profile to configure list box, select your Cisco IP Phone 7960/7940.
The User Options Menu page redisplays with a list of configuration options.
Step 7 Click Configure your Cisco IP Phone Services.
The Service Subscription: New page appears.
Step 8 From the Select a Service list box, select the Conference Connection service and click Continue.
The Service Subscription page appears.
Step 9 In the Service Name field, leave the default name of the service.
Step 10 In the User Password field, enter your password (the same one you entered when logging on to the Cisco IP Phone User Options Web page).
Step 11 In the UserID field, enter your user name (the same one you entered when logging on to the Cisco IP Phone User Options Web page).
Step 12 Click Subscribe.
The page redisplays and the service appears in the Your Subscribed Services list.
Step 13 Click Log off.
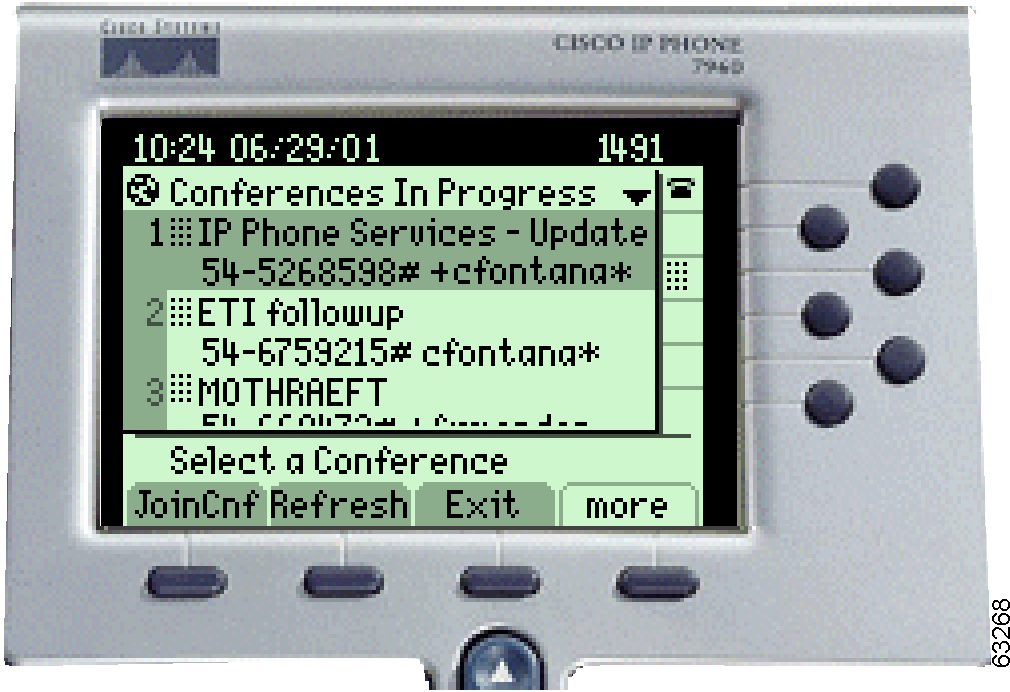
To join a conference from your Cisco IP Phone 7960/7940, follow these steps.
Step 2 Use the Navigation buttons to scroll to the Cisco Conference Connection service that you configured in the "Subscribing to the Cisco Conference Connection Service" section. Press the Select soft key to select the service.
The Conferences in Progress screen is displayed.
|
Note If the Cisco Conference Connection Login screen appears, enter your user ID and password, and the Conferences in Progress will be displayed. You will need to go back and re-subscribe to the Conference Connection Service using the correct user ID and password. |
Step 3 Using the Navigation buttons, select the conference you want to join, and press the JoinCnf soft key.
Step 4 Follow the prompts to join a conference.
|
Note Use of the Hold feature, or otherwise answering or placing a call while connected to a conference, will result in your conference call being dropped. This eliminates the possibility of getting music on hold from the local Cisco CallManager. |
Step 5 To leave a conference, hang up.
Here are some tips for managing conferences and achieving good performance with Cisco Conference Connection.
 |
Tip |
You can view and search for all conferences.
To view a list of conferences in progress:
A list of conferences in progress is displayed, as well as a list of conferences that you scheduled yourself.
The Conference Information page appears with the following conference information:
To find a specific conference:
A list of conferences is displayed.
To view a list of scheduled conferences:
A list of next scheduled conferences is displayed, as well as a list of conferences that you scheduled yourself.
The Conference Information page appears showing more detailed conference information, as described in the "Viewing Conferences in Progress" section.
To find a specific conference:
A list of conferences is displayed.
To view a list of past conferences:
A list of past conferences is displayed, as well as a list of past conferences that you scheduled yourself.
The Conference Information page appears showing more detailed conference information, as described in the "Viewing Conferences in Progress" section.
In addition, the Participant Information table is shown, which includes the following information:
|
Note If no participants joined the conference, then the table reads "No participants joined this conference." |
To find a specific conference:
A list of conferences is displayed.
A list of conferences matching your search criteria is displayed.
The Cisco Conference Connection Web Interface for the system administrator lets you generate a Port Usage report and add System Information.
This report shows you the utilization of ports (used vs. scheduled) for past conferences for a specified timeframe.
To run a Port Usage report, follow these steps.
The Administration Tasks and Reports page appears.
Step 2 Under Administration Reports, click Port Usage.
The Port Usage Report for Cisco Conference Connection page appears
Step 3 In the From fields, enter the starting date for your report. (Use the Calendar for easy date selection.)
Step 4 In the To fields, enter the ending date for your report. (Use the Calendar for easy date selection.)
Step 5 Click Submit.
The Port Usage Report is displayed. It includes a list of all conferences in the date range that you specified, up to a maximum of 100 conferences per page. The ports used vs. scheduled is displayed for each conference. The total port utilization is indicated at the bottom of the report.
A template can be used to display urgent information, news, dial-in information, support information, and alternate dial-in information for Cisco Conference Connection.
Specific instructions for using the template are provided in the template and in the online help for the Information Configuration page. Carefully follow the steps in the template when you want to initially set up or change system information.
To view the system information, follow these steps.
The Administration Tasks and Reports page appears.
Step 2 Under Administration Tasks, click Edit Information Page.
The Cisco Conference Connection Information Configuration page appears.
Follow the instructions in the information page template to change the information that appears on this page.
Step 3 To save the new information, click Modify.
You may want to upgrade the Cisco Conference Connection software or install a maintenance release.
To download and install a Cisco Conference Connection upgrade or maintenance package from the Internet, perform the following steps.
Step 2 Use a Web browser to access the following URL:
http://www.cisco.com/cgi-bin/tablebuild.pl/ccc
Step 3 Locate the Cisco Conference Connection file and download it.
Step 4 Double-click on the downloaded file to launch the installer, and follow the instructions in the Readme file that accompanied the update.
This section provides instructions for a re-installation of the Cisco Conference Connection Server. When re-installing the Cisco Conference Connection Server, you need to:
To back up the Cisco Conference Connection database, follow these steps.
Step 2 Stop Cisco Conference Connection.
Step 3 Stop MSDE services.
a. From the Windows 2000 desktop, select Start > Programs MSDE Service Manager
b. From the Service Manager, stop all SQL services on the Cisco Conference Connection Server.
c. After all the SQL services have stopped, close Service Manager.
d. On the Windows taskbar, find and right-click the Service Manager icon. Select Exit.
Step 4 Copy c:\MSSQL7\Data\DCMS_DATA.mdf and c:\MSSQL7\Data\DCMS_log.ldf to a secure backup location. You will need to retrieve these files when you restore the Cisco Conference Connection database.
To re-install the Cisco Conference Connection Server, follow these steps.
|
Note During the re-installation of the Cisco Conference Connection software, use the database password that you noted and saved in the "Backing Up the Database" section. |
Step 2 After the installation is complete, start the Cisco Conference Connection Server.
Step 3 Ensure that the new database is working.
To restore the Cisco Conference Connection database after a re-installation of the Cisco Conference Connection software, follow these steps.
|
Caution No configuration changes can be made while restoring the database. |
Step 2 Stop MSDE services.
a. From the Windows 2000 desktop, select Start > Programs MSDE Service Manager
b. From the Service Manager, stop all SQL services on the Cisco Conference Connection Server.
c. After all the SQL services have stopped, close Service Manager.
d. On the Windows taskbar, find and right-click the Service Manager icon. Select Exit.
Step 3 Copy the DCMS_DATA.mdf and DCMS_log.ldf backup files as follows:
Step 4 Restart SQL services.
Step 5 Restart Cisco Conference Connection.
Step 6 Verify that the new database is working.
![]()
![]()
![]()
![]()
![]()
![]()
![]()
![]()
Posted: Mon May 5 18:36:21 PDT 2003
All contents are Copyright © 1992--2003 Cisco Systems, Inc. All rights reserved.
Important Notices and Privacy Statement.