|
|

You must install the DPA 7630/7610 into your network, connecting it to the IP network, to Octel voice mail system, and (if you are using the hybrid integration) to the PBX system. These sections provide instructions for safely installing the DPA 7630/7610:
After completing the installation, review the information in "Preparing the Cisco CallManager and Octel Systems."
Before installing the DPA 7630/7610, review these sections:
For the Cisco DPA 7630/7610 to successfully operate in your network, your network must meet the following requirements:
 |
Warning Read the installation instructions before you connect the system to its power source. |
|
Warning Only trained and qualified personnel should be allowed to install, replace, or service this equipment. |
|
Warning Ultimate disposal of this product should be handled according to all national laws and regulations. |
|
Warning This unit is intended for installation in restricted access areas. A restricted access area is where access can only be gained by service personnel through the use of a special tool, lock and key, or other means of security, and is controlled by the authority responsible for the location. |
|
Warning Unplug the power cord before you work on a system that does not have an on/off switch. |
|
Warning The plug-socket combination must be accessible at all times because it serves as the main disconnecting device. |
|
Warning This product relies on the building's installation for short-circuit (overcurrent) protection. Ensure that a fuse or circuit breaker no larger than 120 VAC, 15A U.S. (240 VAC, 10A international) is used on the phase conductors (all current-carrying conductors). |
|
Warning Never defeat the ground conductor or operate the equipment in the absence of a suitably installed ground conductor. Contact the appropriate electrical inspection authority or an electrician if you are uncertain that suitable grounding is available. |
|
Warning The safety cover is an integral part of the product. Do not operate the unit without the safety cover installed. Operating the unit without the cover in place will invalidate the safety approvals and pose a risk of fire and electrical hazards. |
|
Warning Before working on equipment that is connected to power lines, remove jewelry (including rings, necklaces, and watches). Metal objects will heat up when connected to power and ground and can cause serious burns or weld the metal object to the terminals. |
|
Warning Do not work on the system or connect or disconnect cables during periods of lightning activity. |
|
Warning To avoid electric shock, do not connect safety extra-low voltage (SELV) circuits to telephone-network voltage (TNV) circuits. LAN ports contain SELV circuits, and WAN ports contain TNV circuits. Some LAN and WAN ports both use RJ-45 connectors. Use caution when connecting cables. |
|
Warning The device is designed to work with TN power systems. |
To install the DPA 7630/7610, you must have the following equipment:
To connect the DPA 7630/7610 to the different systems, you also need the following items:
You have the option of installing the DPA 7630/7610 in a 19-inch rack or setting it on a shelf or other flat surface. Refer to these sections for detailed instructions:
The DPA 7630/7610 includes the brackets and screws required to install it in a 19-inch rack. Follow these instructions to install it safely and securely.
|
Warning To prevent bodily injury when mounting or servicing this unit in a rack, you must take special precautions to ensure that the system remains stable. The following guidelines are provided to ensure your safety: |
The chassis comes with brackets for use with a 19-inch rack. To install the chassis in a rack, attach the brackets in one of the following ways:
These figures (Figure 3-1 and Figure 3-2) show how to connect the bracket to one side of the chassis. The second bracket connects to the opposite side of the chassis.
 |
Note These graphics show the DPA 7630 with its three telco connectors. The DPA 7610 is similar, but it has only one telco connector. |
 |
Caution Only use the screws provided when attaching the brackets. |


After the brackets are secured to the chassis, you can rack-mount it (Figure 3-3).
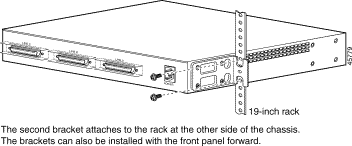
Step 1 Lift the DPA 7630/7610 and align the mounting holes in the L brackets with the mounting holes in the rack.
Step 2 Secure the chassis by inserting the mounting screws through the holes in the L brackets and into the threaded holes in the mounting posts.
Before setting the DPA 7630/7610 on a desktop, shelf, or other flat, secure surface, adhere the rubber feet included with the DPA 7630/7610. To attach them to the chassis, peel the rubber feet from the adhesive strip and place them adhesive-side down onto the round, recessed areas on the bottom of the chassis. Place the DPA 7630/7610 right-side up on a flat, smooth, secure surface.
You must connect the DPA 7630/7610 to the other IP telephony systems in the network, including Cisco CallManager, Octel, and Definity or Meridian 1 systems.
Review these sections before connecting the DPA 7630/7610:
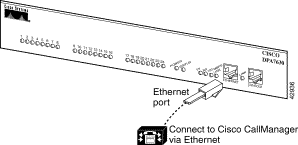
Use the Ethernet port to connect the DPA 7630/7610 to the IP network to access Cisco CallManager (see Figure 3-4). The DPA 7630/7610 fully supports 10/100 Mbps half- and full-duplex Ethernet. See the "Configuring Ethernet" section for details.
|
Warning To avoid electric shock, do not connect safety extra-low voltage (SELV) circuits to telephone-network voltage (TNV) circuits. LAN ports contain SELV circuits, and WAN ports contain TNV circuits. Some LAN and WAN ports both use RJ-45 connectors. Use caution when connecting cables. |
Use the console port to connect the DPA 7630/7610 to a console terminal for configuration and management tasks (see Figure 3-5).
To connect the DPA 7630/7610 to a terminal, perform these steps:
Step 1 Connect the terminal using an RJ-45-to-RJ-45 rollover cable and an RJ-45-to-DB-9 adapter, included with the DPA 7630/7610.
Step 2 Configure your terminal or PC terminal emulation software for the following settings:
| Setting | Value |
Baud | 9600 |
Data bits | 8 |
Parity | No |
Stop bits | 1 |
Because of the wiring differences between the DPA 7630 and the DPA 7610, you connect to the Octel and PBX systems slightly differently. Refer to the instructions for the specific model you are using in one of the following sections:
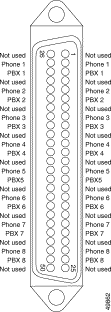
Use the three telco connectors to connect the DPA 7630 to the Octel and Definity systems. Each telco connector connects to eight ports on the DPA 7630 (see Figure 3-6).
The pinouts on the telco connectors match those on a Definity four-wire line card (see Figure 3-7 for details) with the following characteristics:
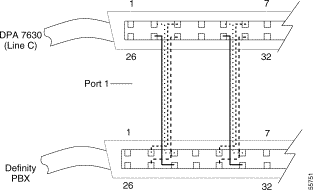
Because the wiring matches the Definity PBX, you can easily connect the DPA 7630 to the Definity PBX via a punch panel. Figure 3-8 illustrates in detail how to connect the wires from the DPA 7630 to the Definity PBX system. Starting with port 1, you skip a port, cross the next two ports, skip a port, cross the next two ports, and so on. For example:
The wiring to the Octel system is more complicated because there are no unused pairs (see Figure 3-9 for details.)

In the simple integration mode, you are integrating Cisco CallManager and Octel voice messaging systems. There are 24 ports, but if you have fewer than 24 Octel ports, you can leave the remaining ports empty.
If you want to connect Cisco CallManager, Octel voice messaging system, and Definity PBX system, you must use the hybrid integration mode. To use this configuration, all MWI lines for the Definity and Cisco CallManager phones must pass through the DPA 7630, following the guidelines described in the "Implementing the Hybrid Integration" section.
Use the single telco connector to connect the DPA 7610 to the Octel and Meridian 1 systems. The telco connector connects to 24 ports on the DPA 7610 (see Figure 3-10).

The pinouts on the telco connectors match those on a Meridian 1 two-wire line card (see Figure 3-11 for details) with each port consisting of 1 telco pair.
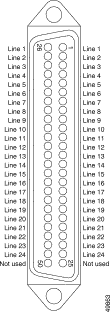
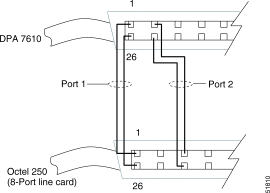
Because the wiring matches the Meridian 1 PBX, you can easily connect the DPA 7610 to the Meridian 1 PBX via a punch panel. However, the wiring to the Octel system is more complicated and varies depending on the type of Octel system you are using. For an Octel 200/300 system, the wiring is identical to the DPA 7610 and Meridian 1 system. See Figure 3-12 for an example of wiring to an Octel 250/350 system.
In the simple integration mode, you are integrating Cisco CallManager and Octel voice messaging systems. There are 24 ports, but if you have fewer than 24 Octel ports, you can leave the remaining ports empty.
If you want to connect Cisco CallManager, Octel voice messaging system and Meridian 1 PBX system, you must use the hybrid integration mode. To use this configuration, all MWI lines for the Cisco CallManager and Meridian 1 phones must pass through the DPA 7610, following the guidelines described in the "Implementing the Hybrid Integration" section.
After you complete installation of the DPA 7630/7610 and have connected power to it, connect a console terminal to observe its initial startup procedure. You can only observe these initial startup messages when connected to the console port. Initially, the device uses DHCP by default, but you can reconfigure this after startup.
The startup process proceeds as follows:
1. Loads boot loader software image and starts up the DPA 7630/7610.
2. Performs self tests on the hardware, indicating whether the component passed; for example:
Testing RAM......passed
Testing FLASH....passed3. Pauses for 10 seconds, allowing you to access the boot loader by pressing the Esc key on the console terminal. The boot loader allows you to do the following:
4. Loads the main software image and displays the main menu (see Figure 3-13).
If the main software menu displays successfully, you can begin configuring the device as described in "Configuring Octel/Definity Integration Settings". If the menu does not display properly, verify your connections and follow suggestions in "Troubleshooting the DPA 7630/7610."
![]()
![]()
![]()
![]()
![]()
![]()
![]()
![]()
Posted: Wed Aug 14 10:12:47 PDT 2002
All contents are Copyright © 1992--2002 Cisco Systems, Inc. All rights reserved.
Important Notices and Privacy Statement.


