|
|

The following topics help you install and configure Cisco IP Phone Productivity Services:
1. Before You Begin Installing
2. Installing Cisco IP Phone Productivity Services
4. Configuring MailView for Cisco Unity E-mail
5. Preparing the Phone User for Cisco IP Phone Productivity Services
Before you begin to install Cisco IP Phone Productivity Services, check that you have met the system requirements and that you have information needed for installation at hand. See the following sections:
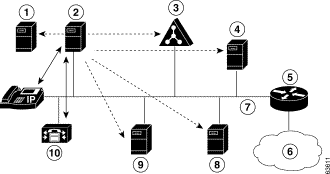
Cisco IP Phone Productivity Services interact with many elements in your IP telephony network. Some network elements need to be informed of Cisco IP Phone Productivity Services presence; other elements only interact indirectly with Cisco IP Phone Productivity Services and do not require such information. Have a fully-functional voice-over-IP network in place before installing Cisco IP Phone Productivity Services in your telephony network.
Figure 2-1 shows Cisco IP Phone Productivity Services connection to the IP telephony network. Solid lines show that both Cisco IP Phone Productivity Services and the target system require configuration. Dotted lines indicate that only Cisco IP Phone Productivity Services require configuration. The arrows indicate whether communication is one way or two way.

See Table 2-1 for the components of Cisco IP Phone Productivity Services and see Table 2-2 for server requirements for Cisco IP Phone Productivity Services.
| Components | Required | Notes |
|---|---|---|
Cisco CallManager Release 3.1 or later | Required |
|
Cisco IP Phones Models 7960 or 7940 | Required |
|
Microsoft Exchange 5.5 or later | Required | Used for CalendarView |
Microsoft Outlook 2000 installed and configured Collaborative Data Objects (CDO) installed | Required | Microsoft Outlook 2000 must be installed and configured before you install Cisco IP Phone Productivity Services. By default, when you install Outlook, the CDO is not installed. If CDO is not installed, install it using the Outlook CD. |
Cisco Unity Release 2.4.6 or later | Optional | Required for MailView with Cisco Unity |
IMAP 4-compliant message store | Optional | Required for MailView without Cisco Unity or in addition to Cisco Unity |
| Components | Required | Components |
a dedicated server separate from the Cisco CallManager server | Required | Due to memory consumption and processing requirements, Cisco IP Phone services applications can affect performance if installed on the same server as Cisco CallManager. |
a dedicated server separate from the Microsoft Exchange server (for CalendarView) | Recommended | Due to memory consumption and processing requirements, Cisco IP Phone services applications can affect performance if installed on the same server as Microsoft Exchange. |
the dedicated server must be a member of the Microsoft Exchange server NT/2000 domain (for CalendarView) | Required |
|
a dedicated server separate from the Cisco Personal Assistant server | Required if used with Cisco Personal Assistant | Due to memory consumption and processing requirements, Cisco IP Phone services applications can affect performance if installed on the same server as Cisco Personal Assistant. |
Microsoft Internet Information Server (IIS) 5.0 or later | Required |
|
Use Table 2-3 to gather information that you need to install Cisco IP Phone Productivity Services. Be sure to have this information on hand when you start the installation.
 |
Note Do not include the domain suffix in the domain name for Domain Administrator User ID for Microsoft Exchange for CalendarView. For example, use unity\administrator, not unity.cisco.com\administrator. |
To install Cisco IP Phone Productivity Services, perform the following steps:
Procedure
Step 2 Use a web browser to access the following URL:
http://www.cisco.com/cgi-bin/tablebuild.pl/ip-prod-svcs
Step 3 Locate the Cisco IP Phone Productivity Services 1.1 application and download the file:
cipps-ffr.1-1-1.exe
Step 4 Double-click on the downloaded file to launch the installer.
Step 5 Click Next at the Welcome to the Cisco IP Phone Productivity Services Installation Wizard window
The License screen displays.
Step 6 CalendarView and Contacts Synchronization are installed by default. MailView is optional.
To install MailView. check the box next to MailView.
Step 7 Click Next.
Step 8 Enter Cisco CallManager information:
Step 9 Click Next.
At this point, the installation checks for the presence of Cisco CallManager Release 3.1. The Cisco IP Phone Productivity Services installation will not continue until Cisco CallManager Release 3.1 is installed.
Step 10 You are prompted to enter the following information.
For the Cisco Unity server, enter:
Click Next.
For the Microsoft Exchange 2000 server, enter:
 |
Note Do not include the domain suffix in the domain name for Domain Administrator User ID. For example, use unity\administrator, not unity.cisco.com\administrator. |
Click Next.
Step 11 The screen displays the settings of the servers you have entered:
Step 12 In the Ready to Install Cisco IP Phone Productivity Services window, click Next.
Step 13 Enter the network password for the Cisco Call Manager server. This is necessary to configure Cisco IP Phone Productivity Services.
Step 14 Click OK.
Step 15 Reboot the system.
The installation of Cisco IP Phone Productivity Services is complete.
To configure CalendarView, perform the following procedures:
If you are using a non-Cisco Unity Microsoft Exchange 2000 server for CalendarView, you require privileges to access all the user's accounts. You do not have to perform this procedure for Exchange 5.5 servers.
 |
Note The Cisco CallManager User ID must match the user mailbox name in the Exchange Server. |
To set privileges to access all the user's accounts, perform the following steps:
Procedure
Step 2 On the Exchange System Manager form, under the <your organization>, select Servers.
<Your Exchange Server> displays.
Step 3 Right click on <Your Exchange Server> to bring up the Properties form for <your Exchange Server>.
The Properties form displays.
Step 4 On the Properties form, select the Security tab.
The Form displays Name and Permissions boxes.
Step 5 In the Name box, select
Administrator user [<domain-name>\Administrator].
Step 6 In the Permissions box, enable the Allow field for Receive As and Send As fields.
Step 7 Click OK on the form.
Now you are set up to access all the user accounts.
If you have Outlook installed on a server with Cisco IP Phone Productivity Services, perform the following steps to add a user profile to your computer. Make sure that Outlook is installed in the corporate or work group mode before you perform this procedure.
Procedure
Step 2 Double click pm the Mail icon.
Step 3 Click Show Profiles.
Step 4 Click on Add. Select the Microsoft Exchange Server.
Step 5 Enter the Microsoft Exchange Server name and Mailbox as:
administrator.
Step 6 Click on Finish.
Perform the following two procedures to enable MailView for Cisco Unity e-mail:
 |
Note Make sure that, as Microsoft Exchange Domain administrator, you have access to all users' mailboxes. |
To set up the Message Format on the Microsoft Exchange server used for Cisco Unity to enable users to view their e-mails, perform the following steps:
Procedure
Step 2 On the Exchange Server Manager form, under <your-organization>, select Servers.
<Your Exchange Server> displays.
Step 3 Select <Your Exchange Server / Protocols / IMAP4 > Default IMAP4 Virtual Server Properties>.
Step 4 Right click on Default IMAP4 Virtual Server.
The Default IMAP4 Virtual Server Properties form displays.
Step 5 In the MIME encoding section, select Both and click OK to close the form.
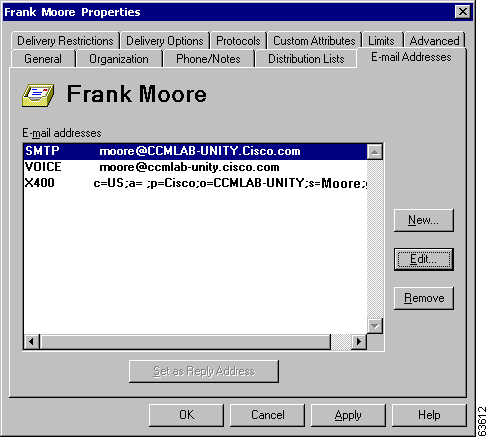
You must set e-mail IDs for each Cisco Unity user to match the Microsoft Exchange server e-mail IDs.You must add an e-mail alias for each mail recipient of the form userid@domain name of type "voice." See Figure 2-2.
This enables the Cisco Unity server to recognize that MailView replies and forwards are voice mail. It also allows users to receive MailView replies and forwards of "voice" type.

Once you have installed Cisco IP Phone Productivity Services, provide your phone users with the following information:
![]()
![]()
![]()
![]()
![]()
![]()
![]()
![]()
Posted: Thu Oct 25 08:41:23 PDT 2001
All contents are Copyright © 1992--2001 Cisco Systems, Inc. All rights reserved.
Important Notices and Privacy Statement.